Many inexperienced drivers begin to panic and talk about a breakdown of the gearbox, although in fact the culprit of the problem is the rocker. Practice shows that replacement and repair are rare and not very common measures. Much more often, the current situation forces you to simply adjust the scenes. But today we will talk not only about adjustment, but also talk about the features of modification, repair and replacement of this element.
Element location
Why do you need a gearbox slide?
In fact, most often the gearbox is in good condition, but the rocker may fail.
The drawstring is assembled.
You can replace the unit with a new one, or you can get by with proper adjustment of the rocker. Adjusting this element will help troubleshoot problems and make sure that the problem is related specifically to the gearbox linkage. It happens that a car owner simply begins to change one component after another without understanding the problem, wasting money and time to no avail.
The gearbox itself is designed to prevent gears from switching spontaneously . It happens that due to incorrect or erroneous adjustments, the entire transmission system begins to work incorrectly and may even fail. Therefore, you need to be able to adjust the gearbox rocker with your own hands, especially since this procedure is not complicated.
When does the rocker need adjustment?
Gear shift mechanism.
The procedure for adjusting the gearbox linkage is recommended in the following cases:
- After the transmission on the car has been replaced or removed.
- When loosening the fixing clamps.
- If the cardan was changed.
- If the link starts to rotate on its hinge.
Although visually it may seem that the rocker is in place, even the slightest movement of the rocker can lead to incorrect operation of the gearbox. It happens that it is enough to tighten the link to the cardan by 1 mm, after which all functions of the gearbox will be restored.
What is a rocker in a car?
Every motorist should know the basic structure of his car. Driving courses provide condensed information, but many points are missed. For example, the gearbox yoke is not considered. In view of this, many motorists have an erroneous opinion regarding this important detail in the design of the car. This situation needs to be corrected immediately.
What is a rocker in a car gearbox?
Do you think that the rocker in a car is an ordinary lever with which you can conveniently change gears? This should upset you, but it doesn't. We have a lot to talk about, the information below will be very useful for you.
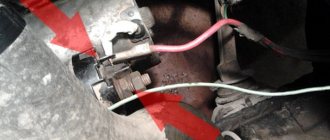
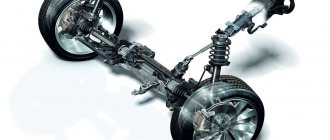
We call the linkage of the gearbox control drive a rocker. This part in the car is composite, complex and multi-component. It provides communication between the gearshift lever and the rod. The connecting mechanism in the gearbox is difficult to see or touch, since it is located between the lever and the gearbox, in fact, under the bottom of the car body. In some cases, a place is allocated for this mechanism near the driveshaft, and it may also be located under the speed control lever.
We hope everyone understands what a car slide is. And no one else will confuse it with a lever for changing car speeds. And we continue to delve into this topic and move on to the next question.
Mechanism design
The mechanical linkage is often modified, becoming more reliable, innovative and modern. However, the general fundamentals of its structure remain unchanged. The mechanism of the backstage in the gearbox looks like this:
- lever for switching car speed modes;
- traction, which provides the ability to select gears;
- selector fork pin;
- finger locking device;
- fork and seal.
The part we are studying has a complex device that is hidden from the driver’s eyes. That is why so little attention is paid to it, and often inexperienced drivers ignore irregularities in the operation of the mechanism.
Signs of malfunctions of the scenes
Every day it is exposed to loads that require high strength, endurance and durability to withstand. Still, problems with this part are not uncommon. On average, the gearbox covers are enough for 100 thousand km. In rare cases, the mechanism can last 200 thousand km; there are cases of proper operation for 300 thousand. You should not rely on your luck; it is better to listen to the operation of the device inside the gearbox and react to every change.
Problems most often arise due to the low content of lubricants inside the mechanism, the ingress of water, dust and debris. Be that as it may, it is necessary to promptly identify the presence of faults in the gearbox linkage and carry out repairs without delay. You can recognize the presence of problems in the operation of the mechanism by a number of signs:
- Increased play in the gear knob is especially noticeable in the neutral position.
- Problematic gear shifting, which may be accompanied by a crunching sound, tight lever movement and other difficulties.
- Incorrect inclusion of speeds, which does not correspond to the selected position.
None of these issues should be ignored. If there is even the slightest suspicion of a malfunctioning condition of the scenes, it is necessary to immediately carry out diagnostics. During the diagnostics, the motorist’s further actions will become clear: adjusting the mechanism or replacing it. If the problems are ignored, the device may break while the vehicle is moving, which will cause an accident.
Self-adjustment of the scenes
If problems arise with the gearbox mechanism, there is no need to rush to replace it. Often simple regulation can save the situation. This procedure is simple and can be performed without the involvement of specialists. There are two ways to perform rocker adjustment:
- When selecting reverse gear, you need to loosen the clamp and set the lever to the ideal position that will correspond to the selected speed. In this position, the clamp is tightened and the operation of the device can be checked.
- The first speed for adjusting the mechanism is often selected when it is impossible to engage reverse gear. We activate the first speed, loosen the clamp, rotate the drive counterclockwise until the lever rests against the reverse gear lock. In this position, tighten the clamp.
These are the general rules for adjusting the backstage. Depending on the type of mechanism, the regulation process may differ. Therefore, before starting work, you need to study the instructions for your car and act in accordance with the manufacturer’s recommendations.
Today it was explained what a rocker is in a manual transmission, its structure and signs by which malfunctions can be identified were studied. The condition of this vehicle part cannot be neglected, since many human lives may be in danger.
The best prices and conditions for the purchase of new cars
Credit 9.9% / Installments / Trade-in / 98% approval / Gifts in the Mas Motors showroom
Symptoms indicating a malfunction
In fact, it is not at all difficult to identify that the cause of troubles is precisely the backstage. Meanwhile, there are a number of distinctive points indicating this:
- 1st gear does not turn on/off in any way or moves to another position;
- when engaging 1st gear, initially the gearshift knob behaves as usual, but a little later the gearbox spontaneously begins to jump to reverse;
- It is not possible to turn on/off 1st and/or 5th gear, while no issues arise when switching other speeds.
As soon as the first signs of trouble appear, you can visit a service station or set aside time in the garage to troubleshoot problems.
| Signs of a malfunction | Explanation and solution |
| There is play on the gearshift lever. | The linkage is probably worn out. The problem can be resolved by replacing the worn part. |
| There was a ringing sound in the wings. | This problem occurs most often in checkpoints. In addition, defects in factory production can cause ringing. It is possible that poor quality repairs preceded it. |
| With tension, the speeds on the box are turned on, and they are also knocked out. | It makes sense to try 2 methods: · adjustment; · replacement. When the setting does not help, the element should be replaced. |
| Instead of 1st gear, it shifts to reverse. | There are no problems with the lever, but the rocker failed. It is worth making a replacement, but repairs can also be helped by using a repair kit. |
| The lever vibrates excessively. | It is necessary to examine the position of the gearshift knob hinges. There is probably significant play in them. |
Preparing to adjust the rocker
On an old car, it is better to lubricate the linkage mounting assembly with a penetrating compound in advance.
Before starting adjustment work, you need to prepare the place and carry out the following preparatory measures:
- The car needs to be parked in a pit.
- The handbrake must be tightened all the way.
- It is mandatory to install wheel chocks.
For a faster and better adjustment process, it is better to perform all work with an assistant. The process itself can occur in several ways.
First adjustment method
To adjust, you need to loosen the clamp connecting the rocker drive to the cardan.
This method is the simplest. In this case, the gearbox linkage is adjusted according to the reverse speed . First of all, you need to loosen the clamp, after which the reverse gear is engaged. Then you need to position the lever in the position you need. After this, the clamp is tightened and the operation of the entire mechanism is checked.
If you don't succeed the first time, you need to listen for knocks and crackles when switching . They must either decrease or increase. In accordance with this, you need to position the lever in the desired direction. If all manipulations do not lead to the desired effect, you need to resort to another adjustment method.
Second adjustment method
The gear shift lever should rest against the locking plate (in the photo it is made of light plastic).
This method is used if the first one did not lead to the desired results. When using it, you can more clearly position the gearshift lever. This method is as follows:
- The gearshift lever switches to first speed.
- The backstage clamp is completely loosened.
- Next, you need to turn the drive of the rocker itself counterclockwise until the lever rests against the reverse speed stop.
- The backstage clamp is tightened.
Tighten the clamp fastening nut, eliminating the shift of the rod during operation. - The operation of the gearbox is checked.
It happens that some VAZ-2110 cars do not have a plastic limiter retainer, so the adjustment in this case is carried out not in first gear, but in neutral.
Third adjustment method
This method is quite complicated , as it involves calculating the depth of the gearbox linkage to the cardan. Due to this, the position of the lever in the neutral position can be accurately calculated and adjusted. It happens that if the calculation is not accurate enough, all manipulations only lead to the appearance of rattling when changing gears.
If adjustment by any of the above methods does not lead to the desired results, several options are possible to solve the problem:
- Carry out diagnostics at a service station to make sure that the problem is in the gearbox linkage.
- You can replace the gearbox linkage.
- You can contact specialists who will adjust the slide themselves.
Installation of the backstage from "Kalina"
Replacing the VAZ 2110 gearbox
On a VAZ 2110 you can successfully install a slide from Kalina:
- To do this, it needs to be modified a little.
- The cardan from the new model is 20 mm longer than the original “tenth”.
- Therefore, it needs to be cut, to do this, use a lathe.
Note: when cutting manually, you can ruin the part, since when the temperature of the metal increases, it loses its strength.
- The replacement of the slide must be carried out in the garage from the inspection hole.
- Remove the plastic tunnel from the car interior.
- Also remove the boot.
- Remove the old rocker, unscrew all the fasteners from under the bottom of the car.
- Install a new link and adjust it.
Note: adjustment must be carried out in order to later avoid troubles that arise during operation of the vehicle.
Why is it recommended to install a cardan from the new Kalina? On VAZ-2110 models, universal joints made of less resistant material are installed, so they quickly fail. This causes premature play in the rocker, which usually affects the quality of gear shifting while the vehicle is moving. After purchasing a new link, a visual comparison should be made of the old cardan and the purchased one. The comparison will be entirely in favor of the new acquisition. The Kalina cardan is made of better quality material, it is much more wear-resistant.
Gearbox slides for VAZ 2110
After installing a new link, the lever may rattle. Since this link completely eliminates play, that is, the vibration is transmitted completely to the lever.
Fixing lever rattling
- To do this, install a new ball joint for the lever and install a repair kit.
- The ball joint must be replaced from the inspection hole, since it is easier to change it from under the bottom of the car.
- Install the retaining spring to the gear lever.
It will dampen vibration by holding the lever in the desired position. This will not affect the application of additional forces when turning on the speeds. To get rid of the rattling of the lever, you can install additional plastic washers on the gearbox axle. To do this you will need:
- material - plastic (regular lid for jars);
- open-end wrench No. 10, No. 13;
- scissors;
- Phillips screwdriver;
- flat file, you can use a small flat file.
Stages of work:
- remove the plastic tunnel;
- unscrew the nut with an open-end wrench No. 13;
- Unscrew the screw using a Phillips screwdriver;
- unscrew the two nuts with a No. 10 wrench;
- remove the bolt;
- carefully pull out the bushing;
- remove the washers.
Using scissors, according to the size of the sleeve, cut two washers from the prepared plastic materials:
- Lubricate all parts with graphite lubricant.
- Place an additional washer on the bushing.
- Put it in place.
- Insert another washer on the right.
- Place oil-resistant rubber rings on both sides of the bushing.
- Reinsert the bolt.
- Treat the threads with graphite lubricant.
- Tighten the nuts.
Note: when tightening the nut to 13, you must take into account the following: if it is tightened too tightly, the lever will be difficult to move.
After such painstaking work, the car enthusiast will get rid of the rattling gear lever for a long time. The lever begins to work easier, and the gears are switched on more efficiently. You need to do the work yourself after watching the video and photos. Painstaking work must be carried out after a detailed study of each stage of work, since the gearbox gate ensures good operation of the gear lever. Therefore, how professionally the repair is carried out will completely affect the provision of comfort during operation of the VAZ-2110. It is also recommended to read the manufacturer's instructions. Price of spare parts for replacing the rocker:
- gearbox driveshaft from VAZ-2114/2115 from 300 rub.,
- boot from 65 rub.,
- drawstring from "Kalina" within 500 rubles.
Do-it-yourself installation and adjustment will give the car enthusiast the opportunity to fully feel the difference in the operation of the car.
https://carfrance.ru/regulirovka-kulisi-vaz-2110/https://vaz-remont.ru/samostoyatelnaya-regulirovka-kulisy-na-vaz-2110-regulirovka-kulisy-kpp-svoimi-rukami/https: //ladaprofi.ru/vaz-2110/kak-sdelat-regulirovku-kulisy-na-vaz-2110.htmlhttps://vaz-2110.ru/podveska/regulirovka-kulisy-na-vaz-2110.htmlhttps:// ladafakt.ru/kak-otregulirovat-kulisu-na-vaz-2110.htmlhttps://avto-zhelezo.ru/1742-kulisa-korobki-peredach-vaz-2110-menyaem-svoimi-rukami.html
Self-adjustment of the rocker on a VAZ 2110. Adjustment of the gearbox rocker with your own hands
The gearbox linkage, like everything else in a car, requires care and timely adjustment. misadjusted gearbox linkage can cause discomfort while driving. For example, the gear knob may rattle, the gear shift may become inaccurate, the speeds may “knock out” from time to time, and the lever itself may begin to “play.”
To get rid of all this, you need to carry out a simple procedure for adjusting the gearbox rocker, especially since adjusting the rocker will take you no more than half an hour.
The gearbox slide is necessary to prevent random switching of gears due to the simultaneous movement of the sliders. Often, the entire transmission suffers from an incorrectly adjusted rocker, and as a result, you are at risk of malfunctioning the entire gearbox. In our previous articles, we have already talked about this detail several times, for example, in the article: About how to install a short-throw rocker on a Lada Priora. and also in the article: Installing a short-throw rocker on a VAZ 2109. In addition, the issue of engaging gears and gearboxes is addressed in this article.
Adjusting the gearbox slide requires the presence of an assistant, in which case the result, and the work itself, will be of better quality. It is fashionable to adjust the slide in several ways; below we will talk about each of them in more detail.
Finalization of the scenes of the VAZ 2110
Owners of domestically produced cars often wonder about the possibility of improving the operation of the gearbox by installing a short-throw shifter instead of the standard one installed during assembly.
The short-throw rocker is the result of a VAZ garage tuning. Replacement allows you to improve the efficiency of the box, gear shifting is carried out in a more precise mode, and whether to make this replacement or not is the choice of the car owner.
Changing the type of rocker does not require dismantling the standard part. Replacement is carried out in the sequence described below:
- From the outside, disassemble the ball joint;
- The metal ring of the support gently opens, the plastic legs move apart;
- The support ball rolls out;
- Disconnect the rod from the support, then weld a fragment of a tube, a strong piece of metal, to it, to the rod;
- When making adjustments, it is necessary to raise the hinge with the hook, this will prevent the switching on the wrong speed that was selected.
You can watch the process in more detail in the video:
Changing the type of gearbox link will result in a harder gear shift, but it will also become clearer.
Technological features of long-stroke and short-stroke scenes, as well as their advantages and disadvantages:
| Short stroke | Long-stroke | ||
| Advantages | Flaws | Advantages | Flaws |
| Lever path for gear shifting is shortened | Force required to shift higher gear | The effort to change gears is minimal | The lever path to change gear is significantly longer |
| Gears are engaged more accurately and predictably, especially when paired with a driveshaft from Kalina | Faster synchronizer failure time | Gearbox resource is higher | Switching time is higher |
| Used in motorsports | Requires manufacture or purchase | Installed on the vehicle from the factory | |
| Reduced gear shift times |
Fighting the ringing
Typically, a ringing sound appears after adjusting the gear shift lever. To correct this drawback, you need to install a spring to hold the lever. The development of mechanical engineering makes it possible to replace the parts of the VAZ 2110 backstage with similar, but more advanced ones. For a VAZ car, the Kalina rocker is ideal.
In this case, the cardan from the new model is modified to be 20 mm longer than on the ten. This sound is directly related to the part itself; the Kalina rocker has no play, and all the vibration is transmitted into the car interior, to the gear shift lever itself. The easiest way to get rid of rattling is to install a spring.
By holding the lever, it will prevent vibration from occurring. When performing such repairs, it is not necessary to disassemble parts of the car. A more reliable way would be to install a rubber or plastic washer. It will take a little longer, but the effect will be more effective. To make a repair, the following is required:
- soft plastic, you can use a regular glass jar lid;
- file;
- scissors;
- screwdriver;
- keys for “10” and “13”.
This repair involves removing the casing from the gearshift lever and lifting it up; the lever itself does not need to be removed. Afterwards, you need to unscrew the nut, using the Phillips bit to unscrew the screw. You can use a screwdriver and push it through the side of the tunnel. Then unscrew two more nuts with a “10” wrench. Cut out a washer from plastic. The most important thing remains, you need to insert these washers into the mechanism.
The process itself will not be easy, since the hole is very small. The washers are inserted along the left and right sides of the bushing. It will have to be sharpened; the thickness of the washer is only 1.5 mm. Place oil-resistant rubber rings onto the bushing axle on both sides. The parts need to be slightly compressed. This repair will allow you not to hear the ringing noise for a long time, and the speeds will switch much smoother.
Remember: the tighter the nut on the gear shift knob is tightened, the harder it moves. All these types of manipulations can more likely be attributed to masking defects rather than repairs. The main thing is to find the cause of the vibration. You may have to replace the entire repair kit for the rocker or modify the linkage joint.
How to repair a rocker: video
So, regardless of what you plan to subject the rocker to - repair, replacement or adjustment - in any case you will need to disassemble this unit. The procedure is carried out as follows:
- remove the cover from the gearshift knob;
- drive the vehicle into a pit or jack up the front part;
- remove the front console (fixed with mounting bolts);
- remove the rocker (the manufacturer used 6 bolts for fastening);
- study the condition of each component during dismantling;
- By bending the boot, you will be able to approach the oil seal, support, and propeller shaft.
As for the actual repair: here are some tips based on the current position of the unit, as well as its parts.
- At best, repairs require the use of a repair kit for the rocker.
- If the bushing is deformed, it must be replaced.
- It is necessary to check whether the play of the lever axis is worn out.
- It is worth making sure that there is no hole in the cardan. Otherwise, you won’t be able to get by with a repair kit, and you’ll have to change the entire link.
- Sometimes the source of extraneous noise, clanging, and rattling when switching gearbox speed is considered to be the rocker pad. It is quite easy to change, and even a beginner can master this process.
If you have any questions about replacing or repairing the slide in the VAZ-2110, we recommend watching the video. Experts will tell you in detail and show all the nuances of these actions. Let your car never let you down and always be on the move!
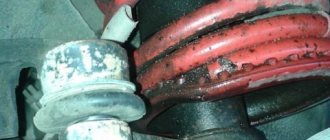
Replacing the rocker rod oil seal
The normal condition of the oil seal determines whether the oil “disappears” from the gearbox, so if you notice oil stains on the asphalt after parking, you should think about whether it is the oil seal or the oil filter.
Therefore, after checking the filter, it’s the seal’s turn. A malfunction of the VAZ 2110 oil seal can also be suspected if a crunching sound is heard when changing gears.
The oil seal can only be replaced in a hole, overpass or other device that allows you to get under the car:
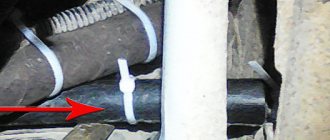
- First of all, we pay attention to the rubber boot. If oil escapes from the VAZ 2110 gearbox through the oil seal, then the entire boot will be in its drops;
- We bend the boot and disconnect the cardan, gaining access to the cuff;
- We remove the cardan from the lever, and then from the rocker;
- Having removed the cardan, we get to the oil seal;
- Using an awl and a hook, remove the cuff on the gearbox;
- Now you need to press in the new oil seal. Traditional craftsmen usually install it using a plastic bottle cap;
- If the replacement was successful, we return everything to its place, install the boot, and we can consider this minor repair complete.
Remember that any rocker repair will not be successful if it is not adjusted correctly. It is best if the setup is done with an assistant, since it is problematic to do this on a VAZ 2110 yourself.
Features and purpose of the scenes on the VAZ-2110
The easiest way to get acquainted with the principle of operation of the backstage is to study the photo drawing of the product. This functional unit is directly connected to the operation of the gearbox and, through a lever transmission, allows you to switch the gears of the driven shaft. Thus, the driver can change the gear ratio of the drive and driven shafts of the gearbox. It's no secret that thanks to this you can change the speed of the car and accordingly adjust the torque that creates traction force on the drive shaft of the wheels. Thanks to the rocker, reverse gear is also engaged and the movement of the vehicle can be completely blocked.
VAZ 2110 backdrop
Naturally, the rocker plays one of the key roles in the car control system. If the gearshift lever is faulty, full-fledged driving in real road conditions becomes difficult, and sometimes even becomes impossible. Unfortunately, this functional unit can break down quite often. Surely, you will be interested to know why this happens and how to prevent the malfunction of the link in time. The next section of our article is devoted to these issues.
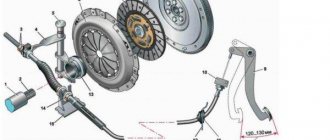
Adjusting the position of the gear shift lever
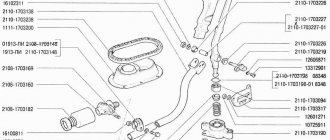
Read how to adjust the gear shift control drive on a VAZ 2110. A diagram of the device is presented.
If during operation of the car you have problems with gear shifting (there is no clear shift), then it’s time to adjust the drive that controls this mechanism. Also, this work must be carried out immediately after you have removed the gearbox, repaired it and reinstalled it, since after such actions the entire gear shift mechanism “diverges”.
We did the setup on a VAZ 2110 car.
Adjusting the gear shift control drive
| 1 — reverse locking bracket; | 8 — spherical pin of the gear shift mechanism; |
| 2 — axis stop; | 9 — body floor; |
| 3 — gear shift lever axis; | 10 — ball joint; |
| 4 — axle bushings; | 11 - buffer; |
| 5 — VAZ 210 gear shift lever; | 12 - spring; |
| 6 — spacer sleeve; | 13 - template 67.7834.9527; |
| 7 — spherical washer of the ball joint; | 14 — bracket cover. |
1. On the transmission control rod, it is necessary to loosen the nut of the clamp bolt; just unscrew the bolt 4–5 turns (you will need a 13 key). You can only get to it from below the car.
2. In order to ensure free movement of the rod relative to the gear selection rod, the grooves at the end of the rod and the clamp should be widened using a screwdriver. Then place the rod in the neutral position.
3. Next, we go into the car interior and remove the gearbox cover from the handle. You can simply lower it to the very bottom, and install the lever so that its lower (non-bent) end is approximately vertical.
If you have template 67.7834.9527, then set the gear shift knob as follows: with the lever cover removed, install the template in the trim window (number 14 in the diagram above) of the reverse locking bracket.
Next, insert the stop of the axis (2) of the lever (5) into the groove of the template (13) and press it against the template in the transverse direction without causing elastic deformation of the bracket (number 1). Lock the lever (5) in this position.
4. Under the bottom of the car, you need to carefully, without sudden movements of the hand, select the axial play of the rod in the rearward direction and its angular play in the counterclockwise direction (the task is not to move the gear shift lever).