The VAZ 2110 car has long been known to Russian drivers. And this is not surprising, since its manufacturer is the Volzhsky Automobile Plant. It first appeared on the market in 1995, and production ended more than ten years ago. Despite this, the car is still often found on Russian roads today.
The VAZ 2110 is a reliable, comfortable, inexpensive to maintain and quite beautiful looking front-wheel drive sedan. If you compare the cost of consumables with foreign cars, you will notice a significant difference. The price of spare parts, fluids and other things for the VAZ 2110 is several times lower. It is also worth noting the efficiency in fuel consumption. A car with a 1.6 liter unit spends 8-10 liters of gasoline per 100 km. Quite playful and fast, acceleration takes 11 seconds.
Having become the owner of such a car, you need to know the type and power of light bulbs that the manufacturer has provided for it. Since periodically they burn out and require replacement.
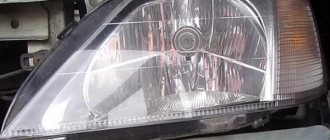
Replacing turn signal lights
Replacing turn signals on a VAZ 2110
But if you need to replace the turn signal for some other reason, then you need to read these instructions:
- First, you should disconnect the block with wires from the turn signal, and then from the headlight (see Repairing a VAZ 2110 headlight with your own hands);
- Next, press the latch, then turn the hydraulic corrector and remove it from the headlight housing;
- Then you need to unscrew the nuts that secure the headlight and turn signal;
- After this they can be easily removed;
- You need to unscrew the two fastening screws, which will allow you to disconnect the turn signal from the headlight;
- Install the headlights and turn signal in the reverse order. Make sure they are properly secured.
Replacing the turn on a VAZ 2110
So, let's look at the algorithm for how to replace the turn signal on a VAZ 2110:
- Unscrew the decorative panel, which is secured with 2 bolts. Take the 8 key and start turning it counterclockwise to quickly and easily complete the task;
- When the decorative panel is dismantled, it is necessary to begin dismantling the trim. A 10mm wrench will help with this. If the fasteners are completely unscrewed, you can remove the bar;
Replacing the front turn signal of a VAZ 2110
- When the headlight is removed, you need to unscrew the 2 mounting screws, which will allow you to remove the turn signal;
- Everything is put together in reverse order.
Replacing the front turn signals of a VAZ 2110
The most inconvenient part about replacing headlights is screwing in the bolt located under the bumper. The easiest way to do this is with a socket wrench.
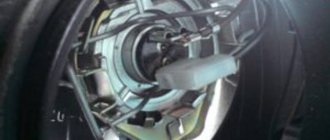
Replacing the turn signal handle
Turn signal handle
If the turn signal handle is broken, then the following problem appears: when the steering wheel is turned to the left, the turn signal lights up and indicates that the driver wants to turn. But during the turn itself it does not snap off. After that, it continues to burn and does not turn off. This leads to the driver feeling awkward: he is driving in a straight line, but the turn signal indicates that the car wants to turn.
Note: This problem is quite rare, but if not corrected, it can lead to accidents on the road.
So, replacing the turn signal handle is accompanied by the following manipulations:
- First you need to remove the cover under the steering wheel, which is held on by 2 bolts.
- Now you have access to the turn signal knob. It comes off quite easily.
- You can install it in place without difficulty. After this the lid is screwed on.
How to Change the Dimensions Light Bulb on a VAZ 2110
Installation, repair and replacement of front and rear dimensions of the VAZ 2110
The SDA clearly states that it is not possible to drive in the dark or in poor visibility conditions without the dimensions included on both the front and rear of the vehicle. Today we will look at how the dimensions are placed on the VAZ 2110, what could be the cause of the breakdown, and how to fix them.
Vas 2110 with markers and DRLs
Content
Business date, meeting
The front dimensions are called headlights and are found in the headlights in front of the car on either side of it. They are extreme on the sides of the lighting system and their name comes from the fact that they show the size of the car and the width of oncoming cars.
Various options for side and daytime lights
The rear dimensions are designed for the same mission. for you to move on. This is especially true when overtaking if you don't want someone who didn't make the real size hit your Swallow.
Adjustable position of rear lights
READ Replacing the VAZ 2110 Threshold Do-It-Yourself Video
This is an important tip: if you suddenly have to go at any cost and you get burned, the flask cannot be replaced with a new one in the left dimension, due to its absence, do not be lazy and move it to the right. And we will tell you how to do this.
device
Headlights (front dimensions) are part of the headlight. The rear dimensions are part of the rear light of the VAZ 2110, this is one of its sections. Nearby are the rear fog lights, tail lights, turn signal, reflector, brake light and .
Causes of breakdowns
There can be many reasons for malfunctions. The most common is that the lamps are on, which naturally prevents the side lights from turning on. Particularly unreliable in this regard are the lamps brought to us from the Middle Kingdom.
Replacing all headlight bulbs on a VAZ 2110-2112: low and high beam, dimensions and turns
Detailed description of the submersible lamp High beam, rotation and dimensions
Do it yourself.
REPLACING HEADLIGHT BLANKS BASED ON VAZ 2110, 2111, 2112
REPLACING TUBERS
Front side lights
VAZ 2110
, 2111, 2112. REPLACEMENT OF LAMP
DIMENSIONS
OF LADA.
Although they attract more than the “democratic” price, and at any wholesale outlet, you cannot encounter them. Therefore, it may be worth mentioning the saying that we are not such rich people that we buy cheap things twice.
READ How to connect fog lights VAZ 2110
Good branded light bulbs will last several times longer, and you won't have to change them forever.
Bulb Dimensions
Sometimes the dimensions “blink” or the instrument panel lights flash when they turn on the parking lights . Many blame this size on the relay but can't find it. The VAZ 2110 carburetor does not have a side relay, there is only a relay for high and low beams.
For a vehicle with an injection relay, locate all fuses in the mounting block. Moreover, if the relays light up one after the other, you should immediately contact an electrician as this indicates a short circuit somewhere in the circuit and therefore a burnt out vehicle.
Mounting block and relays and fuses
Never, under any circumstances, replace a blown fuse with a larger one, or one that is not a “fault” at all.
Repair
As already mentioned, it is prohibited to move the car in the evening or at night unless it is on fire. parking lights , so we will look for the cause and then fix it.
If you are sure the electrical paths are working, first make sure the bulbs haven't burned out. And if they need replacement, do it.
READ Low beam bulb VAZ 2110
For the headlight, the replacement procedure is as follows:
- Open the lid;
- Disconnect the battery, or better yet, remove it. We're talking about electricity, which is dangerous;
- From the engine compartment, take the lamp with your hand, disconnect the wires going directly to the lamp from the unit;
- Remove the rubber cover;
- Move the lock to the side by unhooking the spring using the hook;
- Take this flask ;
- We replace it with a new one and put everything back together.
When replacing, make sure the main lights are on.
Rear marker lamps on the VAZ 2110 are installed as follows:
- Turn off the car;
- Remove the contact part from the body side (open) the epiphany with the lamps. To do this, press the latches;
- Take this flask , replace it with a new one.
Remember that bare hands cannot touch the halogen lamp. Replace gloves. The fact is that when you touch the light bulb there will be dark spots. Moreover, this has been proven. This bulb burns out much faster.
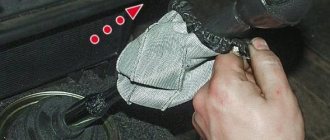
Replacing the rear turn signal bulb
Rear turn signal lamp
There is a pocket in the trunk that opens easily. This is where the plug for the rear turn signal bulbs is located. Replacing the bulbs is as follows:
- Pull the plug out;
- There is a special latch under it. You need to click on it.
- This will allow you to remove the bulbs.
Note: there will be three lights here - for the brake light, the parking lights and the turn signal.
- You need to turn the bulb counterclockwise to remove it. Now the new light bulb is inserted.
- Everything returns to its place in reverse order.
Note: sometimes not only the light bulb burns out, but also the board itself. It can also be replaced. It is inexpensive - only 200 rubles.
Table of light bulbs used in LADA VAZ 2110
| Installation location | Designation according to GOST | EEC designation | Power, W | Appearance |
| Headlight block: | ||||
| high beam lamp | AKG12-55-2 | H1 | 55 | |
| low beam lamp | AKG12-55-2 | H1 | 55 | |
| front turn signal lamp | A12-21-4 | PY21W | 21 | |
| side light lamp | A12-5-2 | W5W | 5 | |
| Fog lamp | AKG-12-55-1 | H3 | 55 | |
| Side turn signal lamp | A12-5-2 | W5W | 5 | |
| Rear Exterior Light: | ||||
| turn signal lamp | A12-21-3 | Р21W | 21 | |
| side light lamp | A12-4-1 | T4W | 4 | |
| side light lamp | A12-10 | T10W | 10 | |
| fog lamp | A12-21-3 | Р21W | 21 | |
| Rear interior light: | ||||
| brake light | A12-21-3 | Р21W | 21 | |
| reverse lamp | A12-21-3 | Р21W | 21 | |
| License plate lamp | AS12-5-1 | C5W | 5 | |
| Luggage compartment lamp | AS12-5-1 | C5W | 5 | |
| Interior lamp | AS12-5-1 | C5W | 5 | |
| Glove box light bulb | AS12-5-1 | C5W | 5 | |
| Instrument cluster illumination lamp | A12-1.2 | W1,2W | 1,2 | |
| Instrument cluster indicator lamp | A12-1.2 | W1,2W | 1,2 | |
| Individual lighting lamp | A12-4-1 | T4W | 4 | |
| Cigarette lighter lamp | AMN12-3-1 | T3W | 3 | |
| Heater control unit illumination lamp | A12-1.2 | W1,2W | 1,2 | |
| Illumination lamp for the damper control lever of the ventilation and heating system | A12-1.2 | W1,2W | 1,2 | |
| Clock light | A12-1.2 | W1,2W | 1,2 | |
| Switch symbol illumination lamp | A12-1.2 | W1,2W | 1,2 | |
Video of replacing lamps in headlights of a VAZ 2110
The video below details the process and tools needed to replace the low beam bulb.
We change all the light bulbs in the headlights of VAZ 2110, VAZ 2112, VAZ 2111 cars (low and high beam, dimensions, turn signals). Before starting work, be sure to remove the terminal from the battery. The work is carried out using an 8-valve engine as an example; it is much more convenient to work with it, since there is more space.
The headlight unit is on the inside, under the cap where your finger is pointing there is a high beam lamp, under the second black cap there is a low beam lamp and dimensions, in the far right corner there is a turn lamp:
The headlight units differed depending on the year of manufacture of the car; there were few fundamental differences in them. There are no particular difficulties in replacing, the first thing you need to do is remove the cap, to do this, press the plastic lock up with your finger, take it out and see the entire structure of the low beam light bulb fastening. It is secured using a metal spring bracket. Before disconnecting it, you need to pull out the plug with the wires. Now we get rid of the latch, or rather move it down, to do this we press on it a little and move it down:
Now we carefully take out our light bulb. On the tenth family, the low and high beam bulbs are the same, base H1. As for installing new light bulbs, all work should be done with clean gloves; it is better not to grab the new lamp by the glass. Reassemble in reverse order.
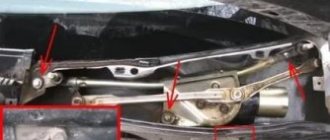
Replacing the turn signal relay
Turn signal relay
So, you need to:
- Unscrew the 5 screws of the steering column switch housing. This will allow you to easily remove the casing elements;
- To get to the turn signal and hazard warning relays, you need to remove the instrument panel. From the factory it is attached with clips.
Note: it is better to replace the clips with screws, otherwise the panel will not hold well.
- The instrument panel moves forward as much as possible to reach the relay. To remove it you need to unscrew just one 10mm nut.
Note: this is difficult to do with a regular standard key. Therefore, you need to use either a long 10mm socket wrench or a long flat head screwdriver and a 10mm socket head (they can be connected to allow you to get to the nut). The nut will remain in the socket wrench.
- You need to remove the wires from the plug and remove the relay. To replace it, you need to unfasten it from the plug and install a new relay in place of the old one.
- Screw all nuts into place.
Add a commentAdd a comment We advise you to read Xenon in the fog lights of the VAZ 2109 with your own handsXenon on the VAZ 2109: installation on your ownWe do the lens headlights on the VAZ 2109 ourselvesHydraulic corrector for the VAZ 2110 and its installationHome / Catalog / Lada / Lada / VAZ 2113 / VAZ 2114 / VAZ 2115 with 1.5i liter engines and 1.6i liter, repair book in color photos in electronic form / ...Show book contents
Content
Introduction
Emergency procedures
- Wheel replacement
- Actions in case of engine overheating
- Starting the engine from an additional power source
- Circuit breakers
- Emergency pressure drop in the engine lubrication system
- Turning on the low battery indicator
- Turning on the engine system malfunction indicator
- Turn on the brake warning light/parking brake warning light
Daily checks and troubleshooting
Operating a car in winter
A trip to the service station
Operation and Maintenance Instructions
- Technical information
- Controls, instrument panel and interior equipment
- Car care
- Vehicle maintenance
- Fuels and lubricants
Warnings and safety rules when working on a vehicle
Basic tools, measuring instruments and methods of working with them
- Basic set of necessary tools
- Methods of working with measuring instruments
Engine and its systems
- General information
- Servicing the engine without removing it from the car
- Engine disassembly and assembly
- Ignition and engine control system
- Supply system
- Lubrication system
- Cooling system
- Intake and exhaust system
- Chapter Appendix
Transmission
- General information
- Clutch
- Transmission
- Drive shafts
- Chapter Appendix
Chassis
- General information
- Front suspension
- Rear suspension
Steering
- General information
- Steering wheel
- Steering gear
- Steering rods
Brake system
- General information
- Car service
- Front wheel brakes
- Rear wheel brakes
- Parking brake
Body
- General information
- Front bumper
- Rear bumper
- Hood
- Front door
- Rear door (VAZ 2114/2115)
- Body dimensions
Gas equipment
Car electrical equipment
- General information
- Generator
- Starter
- Egnition lock
- Replacing steering column switches
- Replacing the power window switch
- Outdoor lighting devices
Fault codes
- Controller JANUARY-4
- GM Controller (IFSI-2S, ITMS-6F)
- OBDII protocol controllers
Electrical circuits
Dictionary
Useful tips for car owners
How to pay and download
Steering column switches
Note
: The following describes how to replace the left side steering column switch. Replacing the switch on the right side is done in the same way.
1. Turn off the ignition, all electrical consumers and remove the key from the ignition switch.
2. Lower the steering column adjustment lever to the lowest position, and then lower the steering column all the way down.
3. Using a Phillips screwdriver, unscrew the three screws securing the lower steering column casing.
4. After unscrewing the fastening screws, remove the lower steering column casing.
5. Then disconnect...
... and remove to the side the upper steering column casing with the hazard warning light switch wiring harness connected to it.
6. Grasping the block and pulling to the side...
Attention
: When disconnecting the electrical connector, do not pull on the wire harness, otherwise the wires may be damaged.
... disconnect the electrical connector of the steering column switch.
7. Press the locking latches from above and below...
... and then remove the steering column switch from the steering column. We discard the faulty steering column switch.
8. Take a new steering column switch...
... and insert it all the way into the steering column. The switch should lock into place with a characteristic click.
9. Then, carefully and fully connect the electrical connector of the steering column switch.
10. Turn on the ignition and check the functionality of the switch in all positions.
11. First we install the upper...
... and then the lower steering column housings. Next, we secure the casings from below with three screws.
12. Raise the steering column adjustment lever to the upper position, having first adjusted the position of the steering wheel.
Typical faults and their elimination
So, why might the dimensions not work on the VAZ 2110? There are several reasons, we will list them all:
- The fuse responsible for powering the parking lamps has blown.
- The power cable has broken.
- There was a short circuit in the supply wire to the car body.
- The control relay K1 has failed.
- The light bulbs have burned out.
- The exterior lighting switch is faulty.
Let's try to independently find the problem with the rear lights on the VAZ 2110 and fix it. First of all, let's analyze the situation. As mentioned above, fuse F11 is responsible for the starboard side, and F1 is responsible for the left side.
If only the rear lights do not light up, but the front ones work, then it is logical to assume that the fuses are in order. Otherwise (the side does not light up both front and rear), it makes sense to check the serviceability of the fuses in the mounting block. Where to find it will be described at the end of the article.
Now we need the so-called “control”, which is easy to assemble yourself. You need to take any indicator LED and a resistor with a resistance of 800 Ohms.
Schematic diagram of the “control”
Let's start with the rear lights. We open the trunk and find two pockets in the upholstery at the level of the rear lighting fixtures that cover the lights. We bend them and get access to the power connector.
We bend the upholstery and see the back of the lights with the power connector
On the top and bottom of the lantern we find two latches, squeeze them and remove the board with the lamps from the lantern.
Removing the rear light board of a VAZ 2110
Carefully remove the power connector from the board. We connect one “control” probe to the body of the VAZ 2110 car in a place that can provide good electrical contact with the metal. We turn on the dimensions and measure the voltage at the connector socket to which the red (right side) or red-yellow wire (left side) goes.
If there is voltage, then the problem is in the flashlight. We remove the flexible board and carefully inspect the tracks - they often break due to vibration.
Vibration can cause flex board conductors to break.
If everything is in order, then the reason is poor contact of the light bulb with the socket or its failure. We considered the case when there is voltage on the flashlight block. If it is not there, we continue the search.
We find the common power supply for the rear light devices (see diagram) and measure the voltage on it. The wires are still the same - red and yellow-red. If there is voltage, then the cause of the malfunction is a break in the wire going from this connector to the corresponding size. We inspect the harness, find a break, and fix it.
There is no tension - we move on. Now we need a mounting block. Where to find it will be described below. On the back of this block we find connector Ш2 and measure the voltage at the contacts to which the red and yellow-red wires go.
Numbering of pads and colors of wires connected to them
If it is, then the reason is a break in the wire running from the mounting block to the power supply block for the rear light devices. We inspect the harness, find it, eliminate it. No voltage? We measure the voltage at the same connector, the wire is black and white.
If it is there, then there are problems with the mounting block - fuses F1 and F11, control relay K1, broken tracks. We check the fuses, inspect the tracks, change the relay or install jumpers instead (see diagram).
Location of jumpers instead of control relay K1
If there is no voltage, the cause of the malfunction is a break in the black and white wire coming from the outdoor lighting switch to the mounting block, or the switch itself.
Important! Often the cause of a malfunction can be poor contact in the pads. When searching for a breakdown, it makes sense to disconnect them and make sure that the contacts are not oxidized and that the connectors are not filled with water or clogged with dirt.
Well, let’s talk separately about fuses that can burn out for two reasons:
- Voltage surge in the on-board network.
- Short circuit in power supply circuits.
In the first case, it is enough to replace the blown fuse with a device of the same rating (5A). In the second, the task becomes somewhat more complicated - after replacing the fuse, it burns out again. You will have to find a short circuit of the supply wires to the body, which is the negative power bus. We inspect the harnesses, find them, and remove them. Most often, insulation damage occurs where wires pass over and through the ribs of the body.
Video review of the procedure for replacing steering column switches on VAZ 2113 / 2114 / 2115
—>
At a teammate alonchik
'The turn signal in the right mirror stopped working normally, so it was decided to open and inspect the mirror for contact oxides and other things. Sanya, thank you for your courage in trusting me to break your car. So, let's go! First, use the joystick to lower the mirror to the lowest position and try to carefully disconnect the mirror element from the latches.[/URL] Next, disconnect the mirror heating terminals[/URL] Unscrew the coin with the mirror adjustment motor[/URL] Remove the chip from it and put it aside. [/URL] Next, we unscrew the two screws[/URL] and[/URL] After which we unfasten a couple of latches[/URL] We have something like this picture[/URL] We meet two more latches on our way (very nasty and fragile in the cold) [ /URL] and[/URL] Next, we try to lower everything that we have freed up a little, prying the turn signal with the blade of a knife[/URL] If we succeed, then we begin to disassemble even further and unscrew two more screws[/URL] and (photo were made during the assembly process, so there are slight differences, which I will write about later)[/URL] During the photographing process, a frozen alonchik[/URL] and Student at work were caught in the frame[/URL] Well, okay, let's continue... After unscrewing screws, we remove the ill-fated turn signal, for the sake of which everything was started [/URL] Afterwards we have this look [/URL] Well, we begin to study the turn signal, twirling it in our hands, cleaning and lubricating the contacts, we understand that it has given up a long life and no longer shines full brightness, and somehow it works every other time[/URL][/URL][/URL] During the disassembly process, they tried to rip the chip, because when connected to it, nothing stopped working at all. As a result, we removed the plastic, cleaned the contacts and heated the terminals with heat shrink (yes, this is the very difference that was mentioned earlier) these are terminals from chips, we tried to squeeze them and clean them from the inside[/URL] this is a plastic case, strictly speaking[/URL] and the same terminals, but in a shrink tube[/URL] After all the manipulations, we assemble the mirror in the reverse order[/URL] Thanks to everyone who read. If something is unclear, write to us and we will answer. Sanka even seemed to recognize the turn signal number, so here’s the info from him on this issue.
Sources used:
- https://masteravaza.ru/vneshnee-osveshhenie-avtomobilya/fary-elektroprovodka-i-elektrooborudovanie/zamena-povorotnika-vaz-2110-664
- https://krutilvertel.com/zamena-podrulevyh-perekljuchatelej-vaz-2113
- https://passatworld.ru/showthread.php/179206-zamena-povorotnika-v-zerkale-(ostorozhno-fotootchet)