Payment via PayPal
After selecting payment via PayPal, the PayPal payment system will launch, where you need to select the payment method: bank card or PayPal account.
If you already have a PayPal account, then you need to log into it and make a payment.
If you do not have a PayPal account and you want to pay using a bank card via PayPal, you need to click on the “Create an Account” button - shown with an arrow in the picture.
PayPal will then prompt you to select your country and provide your credit card information.
After specifying the information required to make the payment, you must click on the “Pay Now” button.
Transmission
Do-it-yourself spray booth, design features and stages of work
Removal and installation
Place the vehicle on a lift or inspection ditch. Raise the engine hood and secure it in this position.
Removal work carried out from inside the engine compartment:
- disconnect the wires from the battery, from the starter traction relay and from the speed sensor;
- disconnect the ground wire from the clutch housing;
- disconnect the lower part of the clutch cable as described in the “Clutch” section;
- unscrew the two upper bolts securing the clutch housing to the engine block and the upper nut securing the starter, attach a bracket (if there is none) to the left stud of the engine exhaust manifold to lift the power unit;
- install cross member 67.7820,9514 on the gutters to support the engine and hook it to the bracket installed on the exhaust manifold stud. If there is no cross member, hang the power unit with a hoist.
Removal work carried out from below the vehicle:
- remove the engine splash guard and the lower clutch housing cover;
- Unscrew the drain plug and drain the oil from the gearbox;
- disconnect the wires from the reverse light switch;
- loosen the clamp and disconnect the rod from the gear selector rod hinge;
- disconnect the jet rod from the gearbox;
- disconnect the ball joints of the suspension arms from the steering knuckles;
- using a puller 67.7801.9524 or sharply hitting the inner joint body with a hammer through a drift, knock out one hinge from the side gear, then fix the side gear with a technological mandrel or plug used when transporting the differential (otherwise the unfixed side gear may fall into the gearbox housing), after why knock out the second hinge;
- move the wheel drive shafts to the sides;
Note
:
If it is difficult to separate the wheel drive from the side gear on the car, remove the gearbox assembly with the wheel drive and on a workbench, using the same puller, press the hinge out of the side gear.
- Unscrew the bolt of the rear suspension support cushion of the power unit;
- Unscrew the nut securing the left suspension support cushion of the power unit;
- Unscrew the lower nut securing the starter and remove it;
- install a special stand with a hydraulic lift under the gearbox;
- slightly lower the engine by extending the support rod of the cross member or lowering the hoist, unscrew the lower bolt and nut of the stud securing the gearbox to the engine block and move the gearbox assembly with the clutch housing away from the engine to separate the gearbox shaft and the driven clutch disc;
- remove the gearbox;
Attention:
When removing or installing the gearbox, do not rest the input shaft of the gearbox on the petals of the pressure spring, so as not to damage them.
The gearbox is installed in the reverse order of removal, tightening the bolts and nuts to the torques specified in the “Service Data” section, taking into account the following:
Before connecting the wheel drive shafts with the semi-axial gears, make sure that the retaining rings on the internal joints have been replaced with new ones
This is very important, since when installing old rings, spontaneous separation of the wheel drives and side gears is possible when the car is moving; Before installing the gearbox, wash the splined end of the input shaft with white spirit and apply a thin layer of CV joint grease to it and the outer surface of the clutch release bearing clutch guide sleeve. If necessary, center the clutch driven disc using mandrel A.70O81
After installing the gearbox, adjust the full travel of the clutch pedal and the gearshift control drive in the following order:
working from below the car, with the clamp bolt 12 loosened, Figure 1, set rod 5 to the neutral position; check the ease of longitudinal movement and rotation of rod 14 relative to the tip of the hinge 11. if necessary, widen the groove at the end of rod 14;
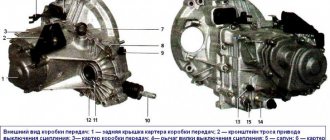
Figure 1 – Transmission control drive:
1 – gear selection rod lever; 2 – gear selection lever; 3 – gearbox housing; 4 – clutch housing; 5 – gear selection rod; 6 – rod bushing; 7 — rod seal; 8 – protective cover; 9 – hinge body; 10 – hinge bushing; 11 – hinge tip; 12 – clamp; 13 – protective cover of traction; 14 – gearbox control drive rod; 15 – gear shift lever; 16 – ball joint cage; 17 – ball joint of the gear shift lever; 18 – jet thrust.
Transmission VAZ 2170 Priora
- Repair manuals
- Repair manual for VAZ 2170 (Priora) 2004+.
- Transmission
Repairing a car yourself remains a rather difficult task, especially if you consider the VAZ 2170 Priora transmission. Today you can find a large number of various recommendations that tell you how to solve some problems during the operation of a particular car unit, but the bulk of such resources are based only on generalized information, without delving into the subtleties and details, on which not only the duration of operation, but also its effectiveness often depends.
Our information portal offers you full support in this matter. The presented repair manuals and detailed descriptions of the units are available online 24 hours a day. If necessary, you can get a more convenient, handy version by simply downloading it from the page. A detailed description of the parameters and what the VAZ 2170 Priora transmission consists of, important aspects for correct and reliable installation will help to significantly reduce the risk of unexpected car breakdowns. Information provided about all components online allows you to quickly and effectively monitor any defects and defects, even before they appear during operation.
Most of the data presented on the site is taken from the instructions, but at the same time, it is much better structured and disclosed in detail to the user. Using them as an application database, you can always install and repair cars with your own hands, no less efficiently than in a car service center. But to do this you need to have a certain amount of knowledge, which can be replenished on our website.
Having studied all the necessary features of the unit, the car owner will gain invaluable experience in handling not only original, but also contract options. It's no secret that the original will in 100% of cases meet the assigned tasks as part of the car, but there is always a risk of manufacturing defects, which can be easily determined using our recommendations.
A good contract spare part is almost as good in quality and reliability as the original models. However, in most cases, important nuances remain during installation and operation, knowledge of which will help maintain the performance of the analogue at the proper level. Most sections of the site are devoted to these and many other important points.
6.0 Transmission Clutch Design features Possible malfunctions of the clutch, their causes and solutions Removing and installing the clutch Replacing the clutch release bearing Replacing the clutch release fork Replacing the clutch release cable Gearbox Special…
6.1. Clutch (Category). See the list of materials inside...
6.2. Gearbox (Category). See the list of materials inside...
6.3. Front wheel drives (Category). See the list of materials inside...
↓ Comments ↓
1. Car structure
1.0 Car structure 1.1 General information about the car 1.2 Passport data 1.3 Car keys 1.4. Controls 1.5. Heating and ventilation of the cabin 1.6 Ensuring a comfortable air temperature in the cabin 1.7. Doors 1.8. Passive safety equipment on the car 1.9. Seats
2. Recommendations for use
2.0 Recommendations for use 2.1. Safety rules and recommendations 2.2 Running in the car 2.3 Operating the car during the warranty period 2.4. Preparing the car for departure
3. Problems along the way
3.0 Malfunctions along the way 3.1. The engine does not start 3.2 Malfunctions of the fuel injection system 3.3 Idle speed has disappeared 3.4. Interruptions in the operation of the 3.5 engine. The car moves jerkily 3.6 The car accelerates poorly 3.7 The engine stalled while driving 3.8. Oil pressure dropped to 3.9. Engine overheating 3.10. The battery does not recharge 3.13. Knocks in the engine 3.16. Wheel puncture
4. Maintenance
4.0 Maintenance 4.1. General provisions 4.2. Inspection work 4.3. Lubrication and filling works 4.4. Diagnostic work 4.5. Repair and adjustment work
5. Engine
5.0 Engine 5.1 Design features 5.2 Possible engine malfunctions, their causes and solutions 5.3 Useful tips 5.4 Checking compression in the cylinders 5.5 Removing and installing the decorative engine casing 5.6 Removing and installing the engine splash guard 5.7 Installing the piston of the first cylinder to the TDC position of the compression stroke 5.8 Replacing the drive belt gas distribution mechanism and tension roller 5.9 Replacing the power unit supports 5.11. Replacing engine seals 5.13. Engine cylinder head 5.15. Engine repair 5.16. Lubrication system 5.17. Cooling system 5.18. Power supply system 5.19. Design Features
6. Transmission
6.0 Transmission 6.1. Clutch 6.2. Gearbox 6.3. Front wheel drives
7. Chassis
7.0 Chassis 7.1. Front suspension 7.2. Rear suspension
8. Steering
8.0 Steering 8.1 Design features 8.2 Possible steering malfunctions, their causes and solutions 8.3. Steering column 8.4. Steering linkage 8.5. Steering gear
9. Brake system
9.0 Brake system 9.1 Design features 9.2 Possible malfunctions of the brake system, their causes and solutions 9.3 Bleeding the brake system hydraulic drive 9.4 Removing and installing the vacuum brake booster 9.5 Replacing the brake pedal axle bushings 9.6. Main brake cylinder 9.7. Front wheel brakes 9.8. Braking mechanisms of the rear wheels 9.9. Pressure regulator 9.10. Brake hoses and tubes 9.11. Parking brake
10. Electrical equipment
10.0 Electrical equipment 10.1 Design features 10.2. Battery 10.3. Mounting block (relays and fuses) 10.4. Generator 10.5. Starter 10.6. Ignition switch (lock) 10.7. Electronic engine control system (ECM) 10.8. Ignition system 10.9. Lighting, light and sound signaling 10.10. Windshield cleaner 10.11. Washer reservoir 10.12. Electric fan of the engine cooling system 10.13. Electric motor of the heating and ventilation system fan 10.15. Cigarette lighter 10.16. Instrument cluster 10.18. Electronic anti-theft remote control system 10.19. Immobilizer 10.21. Replacing sensors and switches
11. Body
11.0 Body 11.1 Design features 11.2 Possible body malfunctions, their causes and solutions 11.3 Removing and installing windshield frame lining 11.4 Removing and installing soundproofing upholstery in the engine compartment 11.5. Removing and installing bumpers 11.6 Removing and installing the fender liner and protective wing cover 11.7 Removing and installing the front fender 11.8 Removing and installing decorative sill trims 11.9. Hood 11.10. Trunk lid 11.11. Doors 11.12. Seats 11.13. Seat belts 11.14. Rear view mirrors 11.15. Interior fittings 11.16. Instrument panel 11.17. Heater 11.20. Body care
12. Applications
12.0 Appendix 12.1 Appendix 1. Tightening torques of threaded connections, Nm 12.2 Appendix 2. Fuels, lubricants and operating fluids 12.3 Appendix 3. Nominal filling volumes 12.4 Appendix 4. Basic data for adjustments and monitoring 12.5 Appendix 5. Spark plugs used on vehicles 12.6 Appendix 6. Lamps used on a car 12.7 Appendix 7. What you need to have in a car 12.8 Appendix 8. Tools used when repairing a car
13. Electrical diagrams
13.0 Electrical Diagrams 13.1 Diagram 1. Instrument Panel Harness Connections 13.2 Diagram 2. Vehicle Front Wire Harness Connections 13.3 Diagram 3. Engine Electronic Control System (ECM) Harness Connections 13.4 Diagram 4. Vehicle Rear Wire Harness Connections 13.5 Diagram 5. Light Harness Connections license plate light 13.6 Diagram 6. Left front door wiring harness connections 13.7 Diagram 7. Right front door wiring harness connections 13.8 Diagram 8. Rear door wiring harness connections
Priora mechanics gear shift diagram
What is included in the Lada Priora Lux package. Lada Priora equipment
Cleaning the box parts is also a chance to test the properties of the magnet. If it has cracks and has poor performance, it should be replaced to improve the operation of the gearbox. Selling a gearbox with a worn magnet will force the motorist to replace this element in the future.
Professional repair of manual gearboxes of cars of mark LADA PRIORA Moscow Russian Federation
You can even rock the car from side to side, shake the acetone and let it penetrate into all the corners and soften the dirt. If with the first everything is clear, it is installed in the most inaccessible place under the front panel, then with the second it is not so.
Carefully and accurately align all the marks that were placed when removing. The guides on this bushing tend to wear out.
Due to the fact that the filament is thinner, its temperature is higher when driving on our Kyiv roads, peak overloads occur, for which such lamps are simply not designed, reducing the service life to a couple of months.
Lada Priora gear shift diagram
The gearbox can be filled with TM 412 fuel
You should pay attention to the 75-80W version, which belongs to the GL-4 group. Its advantage is that it has excellent viscosity-temperature characteristics
If you use low-quality fluid, noise and crunching noise may soon occur from the gearbox. The replacement procedure can be done with your own hands.
Installation and repair of a gearbox on a Lada Granta with a cable drive: adjusting the cables
- First of all, you should remove the box from the car;
- We clean it from dirt;
- Remove the oil level indicator;
- Detach the front and back covers;
- Disconnect the synchronizer;
- Disconnect the drive gears;
- Disconnect the input and output shafts at the same time;
- If necessary, further disassembly of the primary and secondary shaft is carried out.
Lada Priora - how to disassemble the gearbox
Any car with an internal combustion engine has a gearbox in its design. There are many varieties of this unit, but the most common type is a manual transmission (MT). Both domestic and foreign cars are equipped with it.
The structure of a manual transmission and how it works
Every motorist who has ever encountered driving a ZIL 130 or 131 car will say with confidence that there are practically no obstacles for this “iron horse”.
However, if this is your first time driving such a unit, then you will probably be interested in the ZIL 130 gear shift diagram.
Moreover, it is quite original and unusual for the average motorist.
Gearbox of a ZIL-130 car: shift diagram
Automakers around the world do not stand still in terms of technological progress. Every year, cars appear that surprise with their innovations in equipment and characteristics.
AvtoVAZ does not produce high-tech cars, but from time to time the manufacturer pleases with updates to certain components. For example, the VAZ 2170, better known as the Lada Priora, is now equipped with an updated manual transmission.
Its main feature is the main gear and synchronization with the differential.
Troubleshooting the Priora gearbox and the algorithm for dismantling the unit
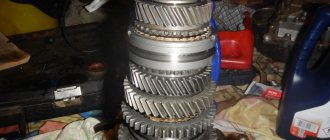
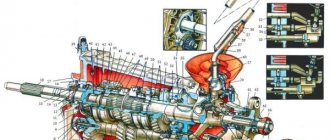
The primary shaft 5 () is made in the form of a block with drive gears. They are constantly in engagement with the driven gears of all five forward gears. The secondary shaft 9 is hollow, the main gear drive gear 31 is removable.
Driven gears 11, 13, 15, 16, 18 and synchronizers 10, 14, 17 forward gears are located on the secondary shaft. Rear bearings 6, 12 shafts are ball, front bearings 3, 30 shafts are roller.
Under the front bearing of the secondary shaft there is an oil sump 29, which directs the flow of oil into the secondary shaft and under the driven gears.
Gearbox Lada Priora (Lada Priora)
The ease of driving with an automatic transmission is achieved at the expense of the loss of other qualities of the car: efficiency, dynamics, and precise fulfillment of all the driver’s desires. Therefore, the manual transmission is still rated higher by experienced drivers and is in great demand.
What kind of gearbox is on lada granta, kalina, priora
06 April 2021 Lada.Online 5 175
Production of Lada Kalina began in 2004, Lada Priora in 2007, Lada Granta in 2021. Throughout the entire period of production of these cars, AvtoVAZ refined their design, introduced new configurations, and added new engines and transmissions. Do you know what gearboxes are installed on Granta, Kalina and Priora?
Decoding of some gearbox models:
- Manual transmission 2180 - gear shift drive with rods
- Manual transmission 2181 - cable gear shift drive (cable)
- AMT 2182 - automated manual transmission
- Automatic transmission (Jatco) Nissan - classic “automatic” (not in the tables)
See comparison of manual transmissions 2180 and 2181.
The gearbox article is formed from the model, part and index.
| Model | Detail | Index | Marking | Gear ratio of the main pair | Secondary shaft |
| 21800 | 1700012 | 00 | 01200 | 3,7 | 21120-1701105-30 |
| 10 | 80010 | 3,9 | 21120-1701105-20 | ||
| 21806 | 1700014 | 00 | Impact point method | 3,7 | 21120-1701105-30 |
| 21826 | |||||
| 21827 | 3,9 | 21120-1701105-20 |
Applicability: This box is used on vehicles of the LADA Kalina, LADA Priora, LADA Granta families. Total volume of oil to be filled V=2.25 ±0.05l.
| Model | Detail | Index | Marking | Gear ratio of the main pair | Secondary shaft |
| 21810 | 1700012 | 00 | 11200 Impact point method | 3,7 | 2110-1701105 |
| 77 | 4,3 | 21905-1701105-77 | |||
| 1700014 | 00 | Impact point method | 3,7 | 2110-1701105 |
Applicability: This box is used on vehicles of the LADA Kalina, LADA Granta, LADA Granta LB family. Total volume of oil to be filled V=2.2 ±0.1l.
| Model | Detail | Index | Marking | Gear ratio of the main pair | Secondary shaft |
| 21900 | 1700012 | 00 | 2190 | 3,7 | 21120-1701105-30 |
| 01 | 2190-01 |
Applicability: This box is used on vehicles of the LADA Granta family.
| Model | Detail | Index | Marking | Gear ratio of the main pair | Secondary shaft |
| 11180 | 1700011* | 00 | 18-00 | 3,7 | 21100-1701105 |
| 1700012 | 21100-1701105 | ||||
| 01 | 18-01 | ||||
| 20 | 18-10 | 21100-1701105 | |||
| 21 | 18-21 | 21100-1701105 | |||
| 11190 | 1700011* | 00 | 19-03 | ||
| 03 | 3,9 | ||||
| 1700012 | 00 | 19-00 | 3,7 | 21120-1701105 | |
| 01 | 19-01 | 3,9 | |||
| 03 | 19-03 | ||||
| 11190** | 12 | 19-12 | 3,7 | 21120-1701105-30 | |
| 13 | 19-13 | 3,9 | 21120-1701105-20 | ||
| 23 | 19-23 | 21120-1701105-20 |
* (1118-1700011) - supplied as spare parts without part 11180-1414050 for blocking the reverse selection line
* (1119-1700012) - for LADA Kalina Sport
** Clutch housing 21120-1601010
Note: The total volume of oil to be filled is V=3.1±0.1l.
Note: The 11190 transmission has 3 starter mounting points.
Applicability: This gearbox is used on cars of the LADA Kalina family
| Model | Detail | Index | Marking | Gear ratio of the main pair | Secondary shaft |
| 21083 | 1700012 | 13 | 13 | 3,7 | 21083-1701105-31 |
| 21100 | 00 | 2110 | 21100-1701105 | ||
| 20 | 12-20 | 21120-1701105-30 | |||
| 21120 | 00 | 12-00 | 21120-1701105-30 | ||
| 01 | 12-01 | 21120-1701105-30 | |||
| 10 | 12-10 | 21120-170105-30 | |||
| 11 | 12-11 | 21120-1701105-30 | |||
| 20 | 12-20 | 21120-1701105-30 | |||
| 21 | 12-21 | 21120-1701105 |
Applicability: This box is used on vehicles of the LADA 2110, LADA Priora, LADA Priora Coupe family. The total volume of oil to be filled is V=3.1±0.1l.
Let us remind you that we previously told you which oil is best to pour into the gearbox of LADA cars.
Keywords: Lada Granta gearbox | gearbox Lada Kalina | Lada Priora gearbox
3
Found an error? Select it and press Ctrl Enter..
Which one should I fill?
Comparison of Lada Priora and Lada Granta
It is important what you put in the box. AvtoVAZ initially uses Lukoil TM 412 in the gearbox
In this case, the lubricant has already been “run in”, which means that its consumption will not depend on this parameter. And yet, the first technical inspection also requires the first replacement of the transmission fluid.
You can use the lubricant not only recommended by AvtoVAZ, but also imported
It is important to pay attention to viscosity here. A lubricant that is too viscous increases the friction temperature. Resistance increases
Blood pressure rises. The unit is working hard
Resistance increases. Blood pressure rises. The unit works "for wear and tear".
The ideal viscosity limit is 75-80W. Among the domestic manufacturers of lubricants that are suitable in all respects: Lukoil TM4, Novoil Trans KP, Rosneft KINETIC, Trans KP. Among the imported ones - SHELL TRANSAXLE OIL (Great Britain). Regardless of the choice, the rule must apply: no savings!
It is best to use synthetic lubricants. Their lubricating index is higher. They are all seasonal, the operating temperature range ranges from -50 to +50 degrees Celsius. This suggests that the properties of the lubricant will not change due to temperature changes.
According to the API classification system, gear oil intended for Priora belongs to group GL-4.
Quality of transmission lubricants
Dynamic viscosity - at low temperatures, in winter, the thickened oil resists shearing, which is a bad indicator in the operation of transmission units. Pour point is an indicator of the hardness of the oil in cold weather. But even when the lubricant hardens, there is a possibility that the gears can turn without applying torque to them. Viscosity index is a parameter characterizing the change in viscosity of transmission oil relative to temperature. If a car enthusiast wants his car to feel good on the road, he must constantly monitor the gearbox. Its regular inspection and maintenance of technical condition plays a big role in the operation of machine components.
To properly maintain the level, the oil in the gearbox is periodically topped up using a funnel and a hose attached to it.
https://youtube.com/watch?v=gouyRn4tfTw
Subsequence:
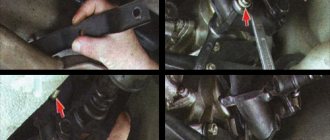
- Using a size 8 wrench, unscrew the nut of the drive housing. Disconnect the cable from the clutch pedal retainer.
- Remove the compensation system box and ring from the pedal. To avoid damage, carefully pick out the box with a knife.
- Remove the plastic sleeve from the pin. If there are signs of damage, replace with a new one. Lithol treatment is required before installation.
- Remove the drive seal from the hole in the front of the shield.
- Remove the tip, first dragging it in the direction of movement of the car.
- Unscrew the cable end fixing nut. It is screwed onto a bracket, which is attached to the transmission with a 17-point head.
- After removing the tip, pull out the cable.
- Unfasten the latch and remove the speed sensor chip.
- Unscrew the fixing screws of the pallet flap and remove it.
- Secure the engine with a reliable support.
- Unscrew the fixing bolt of the rear engine mount to the bracket.
- Remove the limiter on the rear surface of the motor.
- Unscrew the bolts that secure the motor to the body surface.
- Remove the support from the rear side.
- Remove the limit rollers from below.
- Unscrew the motor bracket clamps on the rear surface of the transmission housing.
- Using a size 8 wrench, unscrew the top screw and remove the bracket.
- Unscrew the screw and remove the speed sensor chip.
- We unscrew the bolt securing the gearbox hinge box.
- Remove the click rod from the hinge base.
- Loosen the torque clamps.
- Remove the designer hubcaps from the front wheelbase.
- Using a knife to pick up the edge, remove the hub protective lining.
- Align the hub nuts.
- Loosen the screws securing the wheelbase. Using a 30mm socket, unscrew the hub bolt.
- When you unscrew the screws that secure the wheelbase, the car is positioned on the platform with all wheels.
- To prevent the vehicle from moving, tighten the handbrake and install supports under the rear wheels.
- Unscrew the ball joint clamps and remove the maneuvering knuckles.
- Remove the shank from the hub.
- After removing the left drive, put a plug in its place.
- Press out the drive on the right side. Remove it.
- Place a support under the transmission.
- Remove the screws securing the transmission to the engine.
- Move the gearbox as far back as possible, remove the support, holding it.
The transmission of AvtoVAZ models has the advantage of simplicity of design and the ability to install it yourself if you have the necessary skills.
“Madame Priora, what should I pour you?”
What oils to use. For Lada cars, it is recommended to use synthetic Lukoil brand fluids; the same lubricants are poured into the gearbox and by the manufacturer as flushing and break-in lubricants. They are used until the first maintenance. For the Lada Priora car to operate properly, it must contain a lubricant that meets the parameters specified in the instructions.
The first thing you need to pay attention to is viscosity. A highly viscous or liquid substance does not adequately protect against wear, and the result is short-lived performance.
Also, you should not use mineral-based fluid, since this is not provided by the AvtoVAZ plant. When pouring mineral water, it is very difficult to determine the replacement period, since these lubricants become unusable much more often than synthetic ones. Mineral water consumption is higher.
Under no circumstances should you add your own additives or other additives to new oil; this may affect the viscosity and other technical characteristics of the lubricant. Lubricants should be purchased from official representatives, they are obliged to guarantee the quality of the product; if you buy “from hand”, there is a possibility of getting a surrogate.
Repair of Lada Priora gearbox - price, terms of work
The price of repair work is calculated after inspection and troubleshooting. It depends on the type of damage, cost of spare parts, complexity and number of operations. After selective repairs, you can pick up your car the next day. If the damage is serious, it may take longer to fix it.
Lada Priora manual transmission repair at Remont-MKPP.ru – your benefits
- Inexpensive car parts and manual transmission assembly.
- Affordable prices for the company's services.
- 4 month warranty.
- Carrying out free diagnostics.
- Company discounts – from 10%.
- Carrying out work in 1 day.
- High quality result.
We have been working for more than 20 years. We have extensive experience in the restoration of manual transmissions and related components. We guarantee complete restoration of all transmission functions, comfort and safety of vehicle operation. We work from 9 to 21 hours. We accept cars throughout the working day.
Phone in Moscow: +7 (909) 624-64-64.
Downloading a book
After successfully completing the payment (by any method) and returning to the KrutilVertel store from the payment system website, you will be taken to the successful payment page:
The book you purchased will be in your personal account, from where you can always download it.
Please note that after making the payment, you need to return back from the payment system website to the KrutilVertel website. If for some reason you did not return back to the site and closed the payment system tab with a message about the successful completion of the payment, please let us know - we will send you a letter indicating access to download the book
If for some reason you did not return back to the site and closed the payment system tab with a message about the successful completion of the payment, please let us know - we will send you a letter indicating access to download the book.
Control Features
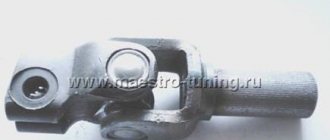
Control is carried out through a lever and a knob for switching between speeds - a rocker with a cover. To prevent accidental engagement and disengagement of gears while driving, a reaction-type traction rod is integrated into the mechanism. At one end it is connected to the engine, and at the other to the base of the switch lever. Some drivers install a short-throw rocker as an upgrade for greater sensitivity. On one side of the rod, a switch is fixed inside, which affects the mechanism; it is a separate unit and is attached to the pallet. There are three axes fixed in the device casing:
- The first is used to secure the speed selection and switching switch, as well as two locking brackets.
- The second goes through the slots in the brackets and prevents them from turning.
- The third secures the reverse gear fork.
The gearbox has a special solenoid that blocks spontaneous engagement of reverse speed. Its middle part has a protrusion and does not allow the locking brackets to move along the axes to the reverse gear position. The solenoid switch is located on the gear shift handle. When the ring rises, the electrical circuit is closed and the solenoid receives supply voltage. The protruding middle part slides inward, allowing you to engage reverse gear. If the ring is damaged or the electrical circuit is broken, reverse gear cannot be engaged.
To be able to get to the nearest car service center, you need to remove the solenoid from the gearbox housing and install a plug in its place that secures the gearshift fork
In this case, there is a risk of engaging reverse gear instead of first and vice versa, so you should be careful
After troubleshooting, it is necessary to add oil to the crankcase, as some of it will leak out when the solenoid is removed.
Design Features
Manual transmissions are installed on cars with both front and rear wheel drive.
Despite the development of engineering and the appearance of automatic transmissions, mechanics continue to be used and improved. The reason for this popularity is no secret. Compared to analogues, this mechanism remains the simplest to manufacture and most reliable to operate. The only drawback of manual transmissions is that in city traffic jams, the variator turned out to be more practical. In recent years, the mechanics began to be equipped with a cable drive, and this made it more convenient.
What changed
Previous designs used a rocker to engage the gear. To put it very briefly, the rocker is a metal lever. When used, vibration from the engine is transmitted to the gear shift lever. Turning on and off was rough. All of the above and other shortcomings disappeared as soon as the cable structure was used in the box. Shifts became clear. The travel of the gear shift lever has been significantly reduced.
Malfunctions of the Lada Priora gearbox and their elimination
The manual transmission of the Lada Priora is far from ideal and has a number of characteristic faults. Problems common to all manual transmissions also arise. Conventionally, they can be divided into breakdowns in the gearbox and in the gear shift mechanism. The first include:
- damage to synchronizer couplings and their splined connections;
- gear wear;
- oil leakage and low level in the crankcase;
- development of the service life of bearings on shafts (primary, intermediate and secondary);
- deformation and damage to oil seals;
- weak connections.
Failures in the switch mechanism:
- defective drive rod - damaged, weakened, loose, soured and worn out;
- the rod is worn out, there is play in the mechanisms;
- deformation or wear of the locking mechanism;
- The fork is worn out.
The reasons why certain malfunctions of the gearbox and switching mechanism most often occur:
- operating rules were violated - insufficient oil level, poor-quality lubricant, driving with a faulty clutch;
- low quality spare parts;
- the service life of the parts has been exhausted (natural wear);
- improper maintenance and repairs performed by unqualified personnel.
A malfunction in the gearbox can be determined by a number of external factors:
the gearbox is noisy;
- gears are difficult to engage;
- Spontaneous gear shifting (gears are thrown out)
- gears do not engage or are engaged with great difficulty and extraneous sounds, the car jerks while driving;
- The gearbox is noisy, when you press the clutch pedal the noise disappears;
- extraneous sounds when shifting gears - grinding, crunching, squealing, rattling, creaking, vibration;
- oil leak.
When carrying out diagnostics, it should be taken into account that the same symptom may indicate several malfunctions at the same time. Determining the exact cause is carried out only after removing and disassembling the gearbox. Carrying out repair work and identifying worn or damaged parts requires qualifications and experience.
Many malfunctions can occur due to clutch problems, since these two devices are inextricably linked in the gear shift mechanism. For this reason, diagnosing breakdowns requires appropriate qualifications, as well as repairing, troubleshooting and installing new parts.
There is only one way to troubleshoot: disassemble the unit and replace damaged parts, as well as adjust the gaps.
Signs of malfunction, repair of the Priora gearbox
Transmission system failures occur for a number of reasons. For VAZ, this is primarily due to factory defects. Other sources of breakdowns include wear and tear of parts, mechanical damage, participation in an accident, untimely maintenance and systemic driving errors.
The Priora gearbox does not like sudden acceleration, extreme braking, or incorrect shifting. It is not so reliable that errors go unnoticed. The aggressive nature of driving will very quickly respond with noise and knocking out of gears. And this is a direct route to the workshop for repair of the Lada Priora manual transmission with associated costs. Forgetfulness of drivers in terms of maintenance also leads to unpleasant consequences. Thickened grease loses its effectiveness. Overheating and increased friction cause manual transmission mechanisms to fail even faster. After which a major restoration may be required, and possibly a replacement of the box.
Symptoms of a manual transmission malfunction
- Noise, hum, or grinding noise in the gearbox may indicate wear on the gear teeth, bearings, or lack of fluid.
- Difficulties in shifting may arise due to incomplete disengagement of the clutch, loosening of the hinge or lever. Deformation of the drive rod and jet thrust also leads to difficult transition to other gears. In addition, incorrect adjustment of the drive and deformation of the plastic elements of the gearbox control drive can lead to failures.
- Knockout of gears occurs due to the wear of synchronizer teeth and increased engine vibrations on the supports. Due to incomplete gear engagement, incorrect drive adjustment.
- Noise when shifting gears can occur as a result of incomplete engagement of the clutch and wear of the synchronizer locking ring.
- An oil leak may occur due to the destruction of oil seals or the gear selector rod, loosening of the crankcase, damage to the gearbox cover, sealant, or drain plug.
To eliminate symptoms, the first step is to determine the root causes of the breakdown. It is impossible to do this in a garage. That is why self-repair is based on the assumptions and intuition of the “masters”. Such repairs of the Lada Priora gearbox always end in the same way. One repair is followed by the next, until the indirect or main cause is determined at random. At the same time, a complete solution to the problems of manual transmission may not be expected. This is due to the fact that one malfunction gives rise to another. And they can be eliminated comprehensively only in a professional car service. And the more you do self-repair, the more likely it is that you will have to look for a new gearbox on your Lada Priora. And this will be more expensive than high-quality repairs.
How to change gears on a Priora
In this article, I want to give a basic understanding of the essence of the gear shifting process, which will allow you to automatically select the right gear to drive each time in order to ensure the desired driving mode in a specific situation and get:
If we switch to second at this moment, the wheels will also move at a speed of 25 km/h, but the engine will spin at lower speeds, approximately 1800 rpm.
The engine will be under heavy load at this moment.
This is similar to a long and short lever - the long one is easier to move, but you need to cover a greater distance, while the short one will require more force, but you won't need to deflect it much.
Problems when paying with bank cards
Sometimes difficulties may arise when paying with Visa/MasterCard bank cards. The most common of them:
- There is a restriction on the card for paying for online purchases
- A plastic card is not intended for making payments online.
- The plastic card is not activated for making payments online.
- There are not enough funds on the plastic card.
In order to solve these problems, you need to call or write to the technical support of the bank where you are served. Bank specialists will help you resolve them and make payments.
That's basically it. The entire process of paying for a book in PDF format on car repair on our website takes 1-2 minutes.
If you still have any questions, you can ask them using the feedback form, or write us an email at [email protected]
Disadvantages, breakdowns and problems of the Lada Priora box
Most often, owners complain about howling transmissions and rattling manual transmission knobs.
Drivers are also annoyed by unclear shifting and poor lever locking
Many oil seals begin to leak oil even at low mileage of the car.
The gearbox control drive and clutch require periodic adjustment
Synchronizers, bearings and gears wear out quite quickly here
You can contact the site administrator by email: [email protected]
All texts were written by me, are authored by Google, included in the original Yandex texts and notarized. For any borrowing, we immediately write an official letter on company letterhead in support of search networks, your hosting and domain registrar.
Next we go to court. Don’t try your luck, we have more than thirty successful Internet projects and have already won a dozen lawsuits.
The Lada Priora car attracts many potential buyers with its sophisticated appearance. The car can be equipped with a 16-valve power unit (1.6 liters). Initially, a 5-speed manual transmission was installed; since 2014, automatic transmission has become available. This car has front-wheel drive. In basic configurations there is an 8-valve 1.6-liter power unit (VAZ 21114). The car produces 87 horsepower. Fuel consumption is optimal in all cycles.
The process of changing the oil in a Priora box
Since the gearbox is located near the engine, when the engine is running, both units heat up, including the oil. It is better to change the oil when the engine is warm, since in this case the liquid becomes more fluid and drains better from the most secluded corners, and all contaminants come out with it. Thus, if your car is cold, take the time to start it and take a short drive for 10-15 minutes. Idling does not count, since in this case the gears of the gearbox do not work, and the gearbox will remain cold even after the engine warms up to operating temperature.
Drain the oil
When starting work on replacing the fluid, you need to find out the required volume of oil in the Priora gearbox and buy lubricant in the store. Next, crawl under the bottom of the car and unscrew the drain plug, first replacing the prepared container. The used liquid will begin to drain. If necessary, you can dismantle the protection if you have one.
When unscrewing the plug, tear it with a key, and then continue to unscrew it by hand and carefully remove it without staining anything around it.
The oil will pour out quickly at first, and then the process will slow down. To speed up the process, pull the dipstick out of the upper hole, which will create a vacuum and the oil will completely drain.
Filling with new fluid
Before pouring new oil into the gearbox, do not tighten the drain plug and pour literally 50-100 g of lubricant into the filler neck so that it pours out from below, washing out the remaining old oil. Screw the drain bolt into place and thoroughly wipe everything with a rag, removing any smudges. Clamp it with a key and start pouring lubricant, but do not overdo it, otherwise you will have to drain it again or suck out the excess with a syringe. Pour out the lubricant gradually, checking the level with a dipstick.
What is the danger of overfilling the gearbox?
You need to figure out what the consequences of overfilling the oil in the Priora gearbox can be? First of all, the lubricant will begin to foam, the pressure in the system will increase and the oil seals and rubber seals will be damaged. Oil may also begin to escape through the dipstick hole.
To avoid oil overflow, do not rush to fill the box with the entire volume of lubricant recommended by the manufacturer. Fill most of it and leave the car for 10 minutes until the oil drains completely down, and then check the level again. If necessary, add fluid to the maximum mark.
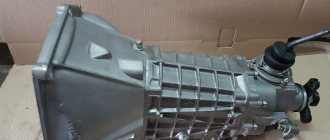
All the details of the box - what's inside
The five-speed gearbox of the Lada Priora is connected to the central gear and differential. The Priora gearbox consists of shafts: the input shaft is made as a block of central gears. The gears of the forward speed modes have oblique teeth, the reverse gears have straight teeth. They contact the gears of the secondary shaft. There is an oil sump at the bottom of the secondary shaft in the bearing area. It is responsible for distributing the oil emulsion and supplying it to the secondary shaft, and then to the driven gears of all gears. The design of the gearbox includes a gear synchronizer. Synchronizers for 3rd, 4th, 5th gears have a similar design. The only difference is the blocking circles. The parts of 1st and 2nd gears have a different design. They have two cone-shaped friction areas installed, which relieve the load, distributing it evenly among themselves.