Date of publication: September 29, 2021. Category: Automotive equipment.
Not so long ago, our authorities passed a law stating that, regardless of the time of day, fog lights or DRLs must work on cars. This decision was based on the experience of European specialists, who proved that thanks to working light elements on the vehicle, the percentage of road accidents can be significantly reduced. In this regard, since 2010, changes have been made to GOST and traffic rules, according to which non-working fog lights or missing DRLs can cause a rather “unpleasant” fine (1,500 rubles).
But, despite the fact that the installation of daytime running lights has now become mandatory, some car owners are convinced that they have found a way out of the situation. Particularly enterprising drivers decide to simply connect the lights in the low beam headlights so that they turn on along with the engine, naively believing that this will be enough. Unfortunately, side lights will not help you in any way when meeting with a traffic police officer, since they cannot be used instead of DRLs. Therefore, if you are not the owner of a modern car that already has “hybrid” fog lights with DRLs installed, then there is no escape from installing new light elements.
You can install running lights in a specialized workshop or yourself. If you are confident in your abilities, then before you start work, carefully study the rules for installing running lights on a passenger car.
What are daytime running lights
Daytime running lights (DRLs) are a light source that is directed forward and improves the visibility of the vehicle (vehicle) when driving during daylight hours. In 2010, a decree was issued in Russia stating that all vehicle owners must drive in the daytime with low beam headlights on. If we look at the statistics, the number of road accidents has noticeably decreased since the decree came into force. This results in the high efficiency of using DRL. In addition, such lighting allows you to give the car some individuality.
DRL appointment
So, we found out that LED lights allow you to identify a car on the road during daylight hours, and this is especially important in bright sunny weather or in summer rain. If you turn on the side lights, the vehicle will remain unnoticed, which is due to the lower intensity of the emitted light. The light from the dimensions is suitable for night time. Some motorists may have a question: what is the difference between DRLs and low beam headlights? Yes, you can drive with low beams, it is not prohibited by law, but there are some nuances that you need to know about:
- The service life of lamps and optics in general is reduced. When using expensive lighting equipment, replacing it will require considerable financial costs.
- When you turn on the low beam, the side lights turn on at the same time, and the instrument panel is also illuminated. This leads to increased energy consumption and correspondingly increased fuel consumption.
From the above we can conclude: purchasing and installing DRLs will be the right decision. There is an opinion that this type of lighting can be replaced by fog lights (FTL), but in reality this is not the case. Fog lights have a power consumption similar to that of low beam headlights.
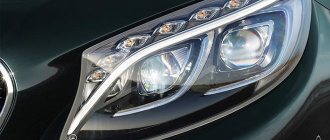
Daytime running lights allow you to identify your vehicle on the road during daylight hours and make driving safer
Advantages
The design in question consists of LED elements. DRLs are equipped with a special operating mode when they are connected when the engine starts. This can be done by choosing one of the lamp connection diagrams below or by installing equipment with a control unit. When the low beam headlights are turned on, the power of the DRLs is reduced by 50%, as a result of which this light source acts as additional dimensions. Equipping a car with running lights simultaneously solves several problems:
- You don't have to constantly remember to turn on your headlights.
- LEDs are characterized by much lower energy consumption compared to conventional lamps used in headlights.
- Compared to high beams, DRLs do not blind oncoming drivers.
- The light beam of daytime running lights has an increased light spot size.
One of the important advantages of DRLs is their special design to indicate vehicles on the road. Compared to low beam headlights, they produce more light, which is noticeable to other drivers.
Installing DRLs has a number of advantages, one of which is the high brightness of the light, in contrast to low beam
What light sources are used as DRLs?
The traffic rules provide for the use of the following as daytime running lights:
- low beam headlights , which are usually used to illuminate the area directly in front of the car;
- driving lights , which are used at night to illuminate the road over a long distance;
- fog lightsused as additional lighting during rain, fog or snowfall;
- independent headlights , which are low-power devices, most often LED spots or strips, which are used exclusively as DRLs.
How to choose
Many car owners are wondering about choosing DRLs. There are many options for this lighting system, and making a choice is sometimes not very easy. To make the right decision, you need to consider the size, shape, and location where the equipment will be installed. In addition, attention is paid to the brightness of the glow and the manufacturer. Let's look at each point in more detail.
In shape, as well as in size, DRLs can be very diverse. The housing shape of LED equipment can be round, oblong, triangular or square. Designs of individual parts connected to each other by wire are also possible. Before purchasing and installing one or another option, you need to find out whether it will fit in size and how it will look on your car. It is important to determine the installation location in accordance with GOST and taking into account the car bumper. Today, the most popular are rectangular-shaped DRLs in a cast housing. They can be installed on almost any car, which will make it more attractive.
Now regarding the brightness of the glow. Basically, the system under consideration consists of two blocks, which are mounted on the left and right on the front of the car. Each block includes a certain number of LEDs (1–12 pcs.). Depending on the number of elements, the brightness of the glow will be different. The standard block of daytime running lights consists of 5 LEDs, but this option is not suitable for every car. The arrangement of elements can be done at the bottom, top or in the middle. An important point: the glow color of the diodes must be white, i.e., the temperature is 5–6 thousand K (kelvin) and the luminous intensity is 400 cd (candelas).
The service life, characteristics and overall performance of LED equipment will depend on the choice of the manufacturer. The most popular companies in the field of optics are Hella, Osram, Philips. The equipment of these companies is of high quality and reliability. There are a number of other manufacturers, but they are inferior in terms of lighting characteristics to the brands superior to them.
DRLs have different shapes, characteristics, design features, and can be installed in different places on the front of the car
How to choose the right DRL? The basic rule to follow should be high brightness of the LED elements. It is advisable to choose those devices that have a current consumption of 0.5–1 A. At the same time, power is not always an indicator of the efficiency of daytime running lights. Some experts are of the opinion that the light beam of LED flashlights should be in the range of 550–700 cd. It is this light intensity that makes a vehicle visible from a distance of more than 1 km. In addition to the rectangular shape, the round one is no less popular, since such running lights are characterized by the effective operation of reflectors.
Preference should also be given to those devices whose body is made of aluminum. This allows them to be equipped with more powerful LED elements, since the metal is endowed with high heat transfer, which contributes to better cooling when installing light sources with high efficiency. If we consider the best option from an installation point of view, then you should pay attention to those devices that have a direct connection to the battery, bypassing the ignition system. The operating principle of such equipment involves switching on when a certain voltage of the vehicle’s on-board network is reached.
Legal regulations for installing DRLs
It is important to know and take into account the requirements for the selection and installation of LED lights:
- the number of LED blocks should be no more than 2 pcs.;
- installation of DRLs on trailers is prohibited;
- The running lights should turn on automatically;
- the lighting block should be round or rectangular;
- depending on the location of the DRLs, the size may vary: smaller devices are installed on the air intake, larger ones on the bumper;
- LED blocks should have a brightness of 150–330 lumens, with the number of elements and their size selected independently.
During the installation process it is important to consider:
- instead of running lights, you can use high beam headlights or fog lights;
- there are no special requirements for the connection diagram;
- daytime lights should be located at a distance of no more than 40 cm from the edge of the car body;
- the distance between the DRLs must be at least 60 cm, and if the vehicle width is less than 130 cm, it can be reduced to 40 cm;
- when installed, the running lights are directed forward, and the horizontal angle should be 20 ˚, vertical 10 ˚;
- The use of navigation lights with a stroboscopic effect is prohibited;
- The LEDs should light up when the engine starts and go out after turning on the head optics.
It is worth noting that self-installation of DRLs is permitted and legal in accordance with RF Decree No. 720, which dates back to September 2009. In this case, it is important not to fall under the restrictions of GOST, which requires certification of compliance of any changes in the design of the vehicle.
Installation of DRLs on a vehicle must be carried out taking into account the current regulations
How to install on a car with your own hands
First of all, it is worth saying that for the installation of the system in question you will need the following list of materials and tools:
- pliers;
- wire cutters;
- soldering iron;
- insulated two-core wire;
- LED blocks;
- 12V relay;
- reed switch;
- single-core wire;
- plastic clamps.
Depending on the layout and installation location, the list may be different. If you are using Chinese-made DRLs, it is recommended to treat the housing with a sealant before installation to prevent water from getting inside. Let's consider several options for circuits with which you can connect DRLs.
Connection diagrams for daytime running lights
One of the simplest options is to automatically turn on the running lights when you turn on the ignition and start the engine. The circuit does not have any additional elements: the LED equipment is connected to the on-board power supply: plus to the ignition switch, minus to ground (body). This installation does not require any special skills or knowledge in electrical engineering.
A circuit that turns on daytime running lights automatically when the ignition is turned on
There is another scheme that is similar to the first, but the difference is that the running lights turn off when the low beam headlights are turned on. The differences are that the positive wire is connected, as in the previous circuit, and the negative wire is connected to the “+” of the low beam lamps. The operation of this circuit is due to the fact that conventional lamps are characterized by higher current consumption than LEDs and lower resistance. As a result, the lamp will not work even at full intensity, and this will not affect the operation of the running lights in any way. When the low beams are turned on, a “+” will appear on the negative wire of the DRLs, which will lead to them being turned off. But at the same time, turning on the high beam will lead to the start of the running lights. In this case, the DRLs can be connected to the headlights.
The scheme in which the DRLs are launched when the side lights are turned on
For the next circuit you will need an element such as a reed switch. In it, the DRLs operate when the engine is started and running. We connect the negative wire from the LED equipment to ground, and the positive wire to the 30th contact of the relay, 87th contact to the “+” of the battery or any wire with a large cross-sectional diameter, 85th contact of the relay is connected to the total ground, 86 to one of the contacts of the reed switch. The second terminal of the reed switch is connected to any “+”, for example, from the battery or generator. Next, we start the engine and by moving the reed switch we find the position at which the relay will operate and the LEDs will work. We attach the reed switch, which is previously placed in a heat-shrinkable tube, using a plastic tie to the generator in the appropriate position. If there is no reed switch, then you can slightly alter the circuit by connecting contact 86 to the oil pressure lamp, which is located on the instrument panel. As a result, the running lights will light up when the engine is started.
The inclusion of DRL can be achieved when starting the engine by using a reed switch
Installation locations
Many car owners install LED lighting far from following the rules. Therefore, you need to figure out in what places this type of lighting equipment can be installed:
- One of the installation methods is on the radiator grille from below. The car owner chooses running lights based on his preferences.
- Installing DRLs from below or above the radiator grille, using LED strips. This is one of the options that is not considered by law as DRL, since the LED strip is more of a tuning element than a lighting element.
- Installation of LEDs around the perimeter of the radiator grille. The option does not comply with vehicle safety regulations.
- Installation of LED strip in head optics. Widely used on tenth generation VAZ cars. This installation method meets the operating requirements and is approved for use.
- Installation of daytime running lights in the places provided for PTF (fog lights). This option is permitted for use and meets safety requirements. In most cases, round lanterns are used for this method. But since you can use fog lights instead of running lights, this option is not particularly popular.
Installation and connection process
We begin the work by selecting a location. At this stage, it is important to take into account not only the dimensions of the car and the mounting method, but also installation recommendations. Running lights must be located at a height of 350 mm to 1500 mm from the road surface. The minimum height is considered to be 250 mm, but if the car is operated with a load, the body will lower. This point must be taken into account. Depending on what type of vehicle the DRLs are installed on, the optimal height parameter can range from 400 mm to 800 mm.
The DRL kit, depending on the specific model of the device, consists of LEDs, wires, mounting brackets, instructions and a control unit
The next stage is the installation of running lights. When purchasing equipment, the kit must include everything you need: LEDs, wires, instructions and other materials. When installing the DRL into the radiator grille, it will need to be removed. The place where the bracket will be mounted must be washed and degreased. Then double-sided tape is glued, the shape of which corresponds to the shape of the staple. After removing the protective layer, a bracket is attached to the tape. Before the clamp is fixed, stretch the wire that comes from the body. Experts recommend making the fastening more reliable and not relying only on tape. In this case, holes are drilled and fastening is done using self-tapping screws. Even when mounted with tape, they are fixed with self-tapping screws.
One of the popular places for installing DRLs is the radiator grille
The next step is to install the control unit. It is best to place the unit near the battery, but away from the engine to avoid overheating. Since the case is sealed and waterproof, there is no need to take additional protective measures. The unit is connected according to the standard scheme:
- The red wire is connected to the “+”, the black wire to the “-” battery.
- The orange wire should be connected to the low beam headlights or headlights. The purpose of the orange wire is to turn off the DRLs when the headlights are turned on. If you do not connect this wire, the LEDs will shine too brightly and blind oncoming drivers.
- When the head optics are turned off, the LEDs should glow brightly.
- The lights are connected to the unit using an appropriate cable using a detachable connection.
Standard connection of DRLs to the battery terminals, which is the most reliable power supply option
After the work has been done, it is necessary to check whether everything was done correctly. When the engine starts, the DRLs should light up, when the headlights are turned on, they should dim, and when the engine is turned off, they should go out completely. If the LEDs glow for about 20 seconds after turning off the engine, then this is considered normal. After you have checked and ensured that the system is working correctly, attach the central module and fix the LED units. To do this, they are inserted and snapped into the mounting bracket.
It is recommended to fasten the mounting brackets for lamps using self-tapping screws, having previously drilled holes for the wiring and screws
Next, the wiring is carefully laid under the hood and secured with plastic ties. Important: Do not attach wires to the fuel line, pressure hoses and radiator pipe. Upon completion of all operations, the grille is installed in place. The option with a control unit was discussed above. If there is none, then you will need to install a relay along the low beam circuit in accordance with the diagrams above.
The DRL control unit is located near the battery, but away from the engine to avoid overheating
DIY control unit
If you are good at electrical engineering, then why not assemble the DRL unit yourself. The principle of operation of such a unit is that it receives voltage when the ignition is turned on, and it determines the operation of the engine by the pulse frequency on the ignition coil. If the pulse presence time is more than 5 s, the DRL is automatically turned on. If there are no pulses within the specified time, the lighting will not turn on. In addition, the unit turns off the LEDs when the headlights are turned on.
It is connected as follows:
- power is taken from any point where it is present when the ignition is turned on;
- to count pulses, the connection is made to the ignition coil;
- the signal to turn on the main lighting is taken from the point at which 12 V appears when the head light is turned on;
- the output of the device uses an automotive relay with a current consumption of no more than 200 mA at a voltage of 12 V, while the switched current should be 30–40 A;
- We connect the negative wire to ground.
With sufficient knowledge in the field of electronics, you can assemble the DRL control unit circuit with your own hands
Connecting DRL via generator
Let's look at how you can power daytime running lights from a generator using a standard automotive relay (5 contacts). The connection process is as follows:
- The 30th relay contact is connected to terminal D of the generator;
- The 80th is connected to the “+” of the dimensions;
- 87th - connects to “+” LED blocks;
- 86th - body weight.
In addition to the relay, the circuit involves the use of a button, which must be connected to the circuit between the 30th contact of the relay and the generator. As a result, the device will work as follows:
- When the engine starts, “+” goes from the generator through the button to the 30th relay contact. Next, current flows to the “+” contacts of the daytime running lights, which causes the LEDs to light up.
- When the side lights are turned on, voltage occurs between the relay contacts (85 and 86), the coil is activated and the contacts (30 and 87) are closed. There is no voltage at pin 87 and the DRLs turn off.
Connecting DRL to the generator using a standard automotive relay
Installation and connection to standard headlights
Daytime running lights can be built into standard optics, for example, in PTF. To do this, you only need to modify the fog lights so that they turn on properly, while the fog lights themselves will still work. To implement the plan, you will need two relays with 4 and 5 contacts. The connection is made as follows:
- 85 contact of the first relay is connected to ground;
- Contact 86 goes to the “+” side lights or low beam;
- Contact 30 is connected to 87 of the second relay;
- from pin 87 there is a connection to the “+” output of the headlights, while the PTF connection remains intact;
- Contact 86 of the second relay is connected to the “+” of the generator;
- Contact 30 of the second relay is connected with a wire to the “+” battery through a fuse;
- Contact 85 of the second relay is connected to ground.
It is worth noting that when connecting pin 86 of the second relay to the generator, the DRL will work as soon as the engine starts. If the connection is made through the ignition switch, the LEDs will light up after the ignition is turned on. Both options will be correct, and the choice is yours.
As you can understand, connecting DRLs is possible in different ways. In this case, either a relay or a special lighting system control unit can be used. Which option to give preference to, everyone chooses independently. The above described not only what daytime running lights are intended for, but also possible installation methods and connection diagrams. As a result, equipping your car with such lighting will not be difficult.
Lada 2106 Funny › Logbook › Correct Angel Eyes on a VAZ 2106 or DRL.
The correct ones are the headlights located inside, waterproof, turned on via a relay, via a separate button and, most importantly, PERFECT ROUND SHAPE
What will you need for this?
Materials:
— round 13-centimeter board with LEDs 700 RUR per pair — two new glasses for low beam 100 RUR per pair — wire with a cross-section of 0.2-0.4 mm 2 meters — power button 50 RUR — terminals mother 2 pcs 4 RUR — round terminal “minus” 3 pcs 6р - universal four-pin relay 50р - isolating tape 50р - universal silicone KIM TEC 101E 120р
Procedure:
- removes the decorative element of the grille “glasses” covering the space around the headlights - unscrew the screws securing the headlights - disconnect the wire chips - take out the lamps - wrap the headlight in rags and carefully knock out the old glass with a hammer - use gloves or pliers to remove glass fragments stuck to the silicone,
be careful
— we use a knife to clean off the remnants of the factory silicone, degrease the surface — we make a technological hole almost close to the future new glass with a 2 or 3 drill — we try on the LED rings in place — we thread the wires from the rings into the hole made — we apply silicone in a thick stripe to the intended place inside the reflector (3 -4 mm) in a circle - we apply the rings of LEDs on top, without pressing too hard - to be sure, we draw a thin strip of silicone on top of the rings along their outer edge, so that the strip touches both the reflector and the ring -
do not poke your fingers there
and do not smear anything!
It fits as it should, the main thing is to place the rings exactly inside the reflector. — these two rings, when dry and provided they are in contact with the surface of the reflector, ultimately form the mount of Angel Eyes, the AG turns out to be, as it were, clamped inside them and, due to their low weight, are attached in this way reliably and effectively — let them dry for about 20-30 minutes so that the silicone “ got up". — let’s start gluing the glass and general sealing of the headlight: — draw a thin strip along the seat of the reflector — glue in the glass of the diffuser — to be sure, apply a thin strip on top of the glass at the point of contact with the reflector, here we actively use a finger
and a rag — coat all technological holes on the outside of the reflector , including the llama seat and our hole, which we drilled ourselves, pay special attention to the light bulb seat, there are many gaps there - we move on to laying the wires, draw plus and minus through the headlight housing and connect them to the Angel Eyes wires - install the headlight in place, also with second - we find a place in the engine compartment for a 4-pin relay, screw it on, connect the wires, I can’t tell you here, I’m not an electrician. I just already had a relay with wires and a free button. - we drill a hole for the button, I installed it between the emergency lights and the adjustment of the instrument lighting, we connect the wires, having previously inserted them either into the existing holes in the motor shield, or we drill ourselves - we check the operation of the relay and AG - you can connect the whole thing to the size wire, it's easier - that's it