Often, owners of VAZ products have to remind their passengers that the door can only be closed if they slam it quite hard. And, unfortunately, both the front door and the back door close this way. It is difficult to imagine a VAZ-2107 car owner, or any other model, who would not want to correct such a defect. In this article we will show you how to find a way out of such a predicament, using silent car locks that are installed on more modern models, for example, on the VAZ-2114 or VAZ-2115. And since installing silent locks on a VAZ-2107 does not require special skills, every car owner can easily cope with this task if he performs the work step by step.
Design disadvantages of VAZ door locks
Over the 40 years of operation of the VAZ 2101-2106 and 2105-2107 door locks, no significant deficiencies in its design have been identified, and with appropriate care, which consists of periodic lubrication and cleaning of the mechanism, the locks fully meet even the most stringent requirements for reliability and safety, as has been stated repeatedly Tested for burglary and strength in critical situations.
A rattle when closing the door indicates incorrect adjustments of the VAZ door lock and insufficiently thorough maintenance of their mechanism. Noise when closing can occur primarily when the latch and locking bolt wear out, when wear leads to distortion of the geometry of the mechanism, which is fully compensated by proper adjustment followed by washing and lubricating the entire locking mechanism. Once again, we emphasize that the locks are designed to last a lifetime, subject to timely maintenance.
Preparing to install locks
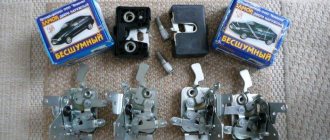
First, we purchase the treasured set of locks. You will need two sets, each with two locks. When choosing a manufacturer, pay attention to the fact that GAZ locks are the quietest option, but in this case you will have to file off the tongue. If we consider DAAZ, this is, of course, the noisiest option, but they can be improved. At the same time, the quality of construction and durability is one of the best. Well, the best option is silent locks for the VAZ 2110 Ptimash. In terms of silence, they are the most acceptable, and in terms of reliability, everything is fine with them.
Important! Before purchasing, be sure to carefully inspect the locks for defects. It is not recommended to purchase a set of locks with unclear manufacturer's name.
Set of silent locks
We prepare the necessary tools. For installation we will need:
- Hammer;
- Phillips and hex screwdriver;
- Drill;
- The castles themselves.
Lock installation
We start by carefully removing the old locks from all the doors. To do this, completely unscrew the top bolt. We do not remove the lower bolt completely, loosen it a little.
Dismantling the old castle
Now we slightly move the upper part of the lock and again install the bolt in this hole. Why are we doing this? In this case, we are considering the option of installation without removing the casing. If you follow the instructions exactly, you will save time on removing and re-stretching the trim. Thus, by reinserting the bolt, you prevent the lock located inside the door from falling down.
Everything else is logical. We remove the remaining bolt, dismantle the lock, and install a new one using the same scheme.
Final point. All we have to do is remove the old bolt holding the lock on the door and install a new one.
Replacing the old bolt with a new one
Now you can check the result of your work. The same must be done with the remaining doors.
In principle, we can stop there. If you are satisfied with everything and the result is what you expected, then congratulations. However, if something doesn’t suit you, or you want a greater effect, adjusting the VAZ 2110 door lock will help you.
central locking
I decided to install a central locking system and connect it to the signaling system, I will describe everything in stages.
Installation of actuators in the front doors.
First you need to purchase:
Tools:
To begin, we remove the door, remove the trim, the handle, the window lifter handle and the plug from the door handle.
Next, you can begin installing the actuator.
Personally, I attached the actuators to the included strips:
Why is this so? Because it was just enough to secure the length of the rod included in the kit and there was no need to add anything - shamanism. Some do this:
but then you will need to select and place a washer, nut or something else under the lower mount so that the actuator does not warp, it seemed to me that it would be easier and more reliable to use the bar.
In the open position of the door (pulled out) we pull out the acuator to the maximum and, using the included fastener, we hook the rods and screw in the bolts.
Now it is advisable to check the actuator so that it opens and closes the door freely. Just connect the wires to positive and ground, change the polarity and check the opening and closing. If everything is ok. We put it in the second door in the same way.
For convenience, unscrew the door stops
We drill a hole in the place we like, I drilled with a 10m drill. It's better to drill a hole in the door first.
We select a place so that it does not touch the seal and so on.
We close the door and draw or scratch a post from the inside of the door through this hole so that the second hole is coaxial and there is no bending of the wires when the door is closed.
Next, we drill the holes to the required size so that the rubber tube fits freely into it, the hole in the rack should not be much larger, so you will also need to insert the tube seal. We check whether the holes were made correctly, whether the wires will bend when closing the door.
We pull the wires, it’s easier in the passenger door, there is a hole in the glove compartment on the right, there is a wire going there to the door limit switch. We throw wires into it, lower them along the stand and catch them in the hole. For convenience, the end switch itself can be unscrewed so that the wires do not get caught once again and you can see whether the wires are running or not.
In the driver's room it is not much more complicated, you need to pull out the speedometer and run the wires through its hole into the same hole on the left, in principle it is not difficult to do by touch.
It is better to tie the wires with electrical tape to make it more convenient and avoid pulling them one by one.
We put rubber tubes on the wires.
We put it in the door hole.
We check how the tube moves in the door, whether it is loose or bent. open the door to the maximum and you can cut off the excess.
We lay the wires in the doors as you please, I secured them with zip ties to the holes for fastening the door cards, because... I have them homemade and I don’t need these holes.
We attach the round terminals and connect them to the actuators. I left a few wires in reserve, just in case. You never know it will have to be remade or removed or something else.
The last time we check the bend of the wire when closing the door, it turned out like this for me
All elements of the door are far enough away and will not touch anything.
Disadvantages of silent locks VAZ 2107
Special “silent” locks, unlike standard locks on VAZ 2108 or foreign cars that can be installed on “classics”, include plastic parts instead of metal ones. Plastic does not knock when the mechanism operates, but its strength and wear resistance are much lower than that of metal.
Some silent VAZ 2107 locks, made in a homemade way, have design flaws, for example, reduced thickness of the latch or other elements of the locking mechanism.
Using low-quality locks is dangerous - a weakened mechanism may not hold the door under load, for example, if a passenger leans on it during a sharp turn. Therefore, when choosing locks, you need to realistically evaluate their quality and, in the absence of special skills, install standard “eight” locks, which make little noise but have a fair margin of safety.
If you decide to install silent locks with plastic elements, you should understand the consequences of a possible malfunction.
Cleaning and lubricating standard locks gives an acceptable result, making the operation of the doors not completely silent, but quite comfortable.
Features of installing silent on VAZ 2105, 2106, 2107
One important feature should be taken into account when installing silent locks on “classic” locks. After installing the lock, the lever that is responsible for opening the lock is directed in the other direction, i.e. it must be lowered to open the lock, unlike the factory lock, where the lever had to be raised. This entails modifying the standard door opening handles or installing the euro handle upside down. An additional metal flag must be installed on the internal mechanism of the handle of the VAZ 2105 and 2106, to which the rod will be attached, so that when the handle is opened, the flag presses down.
Additionally, a flag is made that will push the rod down
The flag is installed on the handle on the side that is closest to the lock.
The flag is bolted into a pre-drilled, tapped hole
We recommend: Several simple ways to check the oil level in an automatic transmission
When starting work, you should be guided by the principle “Measure twice, cut once”; here it will come in handy more than ever. Having done everything efficiently, you will get a good result. Now you don’t have to loudly slam the door, sometimes several times. New locks will ensure quiet and easy closing of the door, which will be especially noted by owners of foreign cars who enter the interior of your car. Despite the fact that the process of installing silent locks on a car is very painstaking, requiring both time and material costs, the result will please you for a very long time.
A car door lock is a part that usually requires almost no repairs, since it rarely fails. But, like other components of the car, it wears out, especially on the driver's door, since every time a person gets in or out of the car, the lock is activated. Over time, this leads to the fact that the door begins to close worse, in particular, you need to slam it harder for the lock to work, and sometimes it completely loses its functionality. This is especially evident on cars of outdated designs, such as classic VAZs. Therefore, in today’s article we will talk about replacing the front left door lock on a VAZ-2107.
Tools and materials:
- 2 screwdrivers – regular and Phillips;
- 10mm wrench;
- Felt pen;
- Lock lubricant;
- New castle.
A new part is sold in almost any auto store and costs about 300 rubles. The latch, internal handle and cylinder cost around 100 rubles. for 1 piece or even less. External handles will cost the most - about 400 rubles. for 1 piece However, everything together rarely changes; usually, we are talking about one of these details.
It is better to replace the lock in a spacious and bright room, like any other repair. Also keep in mind that the door trim clips are not very strong and must be removed with care.
Installation of alarm system on VAZ 2107, 2106, 2105
If a few years ago a car alarm was considered a luxury, now its presence is one of the best ways to protect your car and other property from thieves.
A car alarm can be installed on any make of car, including the VAZ 2107, 2106, 2105, with your own hands, without the involvement of experienced specialists.
For the installation to be successful, you should follow the instructions and also have a high-quality anti-theft system.
Types of car alarms
One-way signaling is considered the simplest and most accessible. Despite the minimum number of functions, or rather, engine blocking and control of locks on the doors and trunk, it copes with the main function. A minimum distance of about 100 meters is required between the car and the system key fob for good functioning.
In addition to standard functions, the two-way anti-theft system has additional ones that slightly expand the functionality. This system notifies the owner with sound signals about a break-in or attempted access, and information is also sent to the key fob display. A car alarm with auto engine start is essentially two-way. The difference is the engine control at a certain distance, about 200-300 meters.
The interactive anti-theft system recognizes the owner through dialogue. Newer models have Internet access and allow you to track the location of the car. Alarms with auto start and other functions are quite expensive, so the most functional models are installed on the corresponding cars.
Preparing for installation
Installing an alarm system on a VAZ 2107, 2106, 2105 does not require special knowledge or extensive experience. To install the anti-theft system you will need the following tools:
- screwdrivers
- electric drill
- spanners
- pliers
- tester
To begin installing a car alarm, you need to partially disassemble the interior, or rather, remove the front panel and door trim, including the handles for opening and closing the glass. To gain access to the ignition switch, you must remove the cover from the steering column.
Before installing the alarm system on a VAZ 2107, 2106, 2105 with your own hands, you need to assemble all its components in advance and test them for functionality by connecting them to the battery. The anti-theft system kit includes a main unit, a contact relay, limit switches, an alarm button, wires with lugs and a central lock. The main unit must be installed as secretly as possible to make it difficult to access. The wiring should also be hidden from prying eyes or simulate the network of another mechanism using colored insulating tape.
To make the electrical circuit under the hood difficult to access, you should hide it behind large parts, but away from hot and moving parts. The sound system must be installed so that it can only be accessed after opening the car.
Installation of anti-theft system and components
Installing an anti-theft system takes a lot of time, but it's worth it. The anti-theft system for VAZ 2107, 2106, 2105 is installed under the front panel or under the sound insulation of the engine compartment. In the first case, the front panel must be removed, but despite this, this method is considered more deliberate, since the alarm units are located more reliably.
First of all, you can install the LED by fixing it on the front panel near the windshield. If you are installing an alarm system on a VAZ 2107, 2106, 2105, the block can be located on the left, right or center, respectively. Using a tester, find the wiring of the central locking, door opening buttons, and ignition. If there is no central locking, it is necessary to install an electric drive under the door trim, which is connected to the main alarm unit.
You can install an electric drive on all doors using turn signals and wires with limit switches. We mount the siren under the hood so that it is invisible and difficult to access. It must be secured with a screwdriver so that dirt, water and dust do not get into the horn. To avoid breakdowns, all parts of the car alarm should be well secured and the connections should be insulated. To reduce the likelihood of your car being stolen, you need to block the engine, fuel pump, starter and ignition.
Installing the Valet button
The Valet button is included with every anti-theft system. It completely disables the alarm and allows you to reprogram it.
If you install an alarm system on a VAZ 2107, 2106, 2105 with your own hands, you can install the Valet button in the most convenient place for you. The main thing is that it is invisible and difficult to access. It is rarely used, since you need to turn off the alarm in case of breakdown or failure, and also if you want to reprogram it. Each other alarm model connects the Valet button differently, so it is better to use the installation instructions for a specific model.
Completing the installation of the anti-theft system
After securing all parts and components of the alarm, you need to check the wiring insulation and the functionality of the alarm. If the system is working properly, the panels and trim can be secured.
What tools and components need to be prepared
Of course, you can install such locks in a car service center, but you will have to pay a lot for the service, and independent work will require a minimum of cash investments and very few tools and additional components:
- A set with external euro handles, it is best to give preference to a well-known manufacturer.
- Locking mechanism with latch.
- The part of the lock that is inserted inside the device is often called the “chocolate bar”.
- Two fixing bolts that fit VAZ-2114 or VAZ-2115 car locks. It is worth noting that such clamps can have both short and long sizes. Experts recommend choosing the longest fasteners.
- A connecting bolt for the rack and a tap with which you can cut the thread.
- A small cable, the diameter of which will be approximately 1.5-1.6 mm and drills measuring 8.5, as well as 9 and 10.
In addition, a drill and a hammer, as well as a set of screwdrivers and medium-sized sandpaper can be useful in the work.
Required Tools
In order to install silent locks on a VAZ-2106, we will need the following tools:
lock with latch (mechanism and its outer part);
- two bolts from the lock of a VAZ-2106 car, with the help of which the parts from the previous paragraph can be connected into one. Please note that these bolts come in short and long versions. For this work we need long bolts;
- bolt to the rack;
- a cable whose diameter is approximately 1.5 mm;
- tap for cutting threads;
- drill;
- drills 10, 9, and 8.5;
- screwdrivers;
- hammer;
- round file;
- grinder with a nozzle designed for grinding, or emery.
Design and device of the VAZ 2107 door lock
The standard Fiat door mechanism was developed almost 50 years ago, and since then it has not undergone any special modifications. Maybe that's a good thing. Nevertheless, we have to put up with some relics of the past, and although there are much fewer complaints about the locking mechanism than about some other parts and components, it can be brought to a state of combat condition without making any special design changes.
The door lock of the classic VAZ 2107 serves to securely lock the door in two positions: closed, latched with one click, and closed, latched completely. Stock DAAZ locks are designed taking into account the emergency loads that the locking mechanism must withstand, keeping the door closed. To do this, the thickness, material and geometry of the latch, as well as the method of its fixation on the lock body, were calculated in a production laboratory.
Another equally important structural element of the VAZ door lock is the fixing bolt, which is screwed into the center pillar reinforcement and into the rear door opening reinforcement. The fixing bolts are made of durable steel and are also designed to securely fix the door when closed. The locks are controlled using metal rods, some of them have adjustable plastic tips. Despite the fact that the lock design is primitive, it is quite reliable and cannot be replaced for the entire service life of the car.
We adjust the locks on a VAZ
There are several options for modifying and adjusting silent locks; let’s look at the most popular ones.
The first method is a sealant
In order to proceed to the adjustment stage, it is necessary to prepare the material needed for the work: a screwdriver, glue, lithol, seals and a knife.
Required material for adjustment
We take our silent lock and unscrew the spring from it. Next we glue the seal. We select the smallest spring and glue the seal again. Don't forget to remove any excess sealant. And finally, we lubricate everything with lithol.
The second method is a heat insulator
In the second option, we add alcohol, cotton swabs, and a piece of heat insulator to our previous set of tools. Using alcohol, degrease the entire surface. Next, cut off the required amount of heat insulation, insert it inside, glue it and cut off the excess.
Adjusting the silent lock
This method will help you soften the first click of the latch as it hits the lock.
After such an adjustment, the sound from closing your doors will not be any different from the sound that we hear when closing the doors in a foreign car.
Types of installed silent locks
Adjusting and lubricating standard VAZ 2107 door locks does not completely eliminate the problem, making the locks quiet and silent, “like on a foreign car.” Here it is necessary to replace the locks with fundamentally different ones. There are two options to get out of the situation:
- installation of locks from VAZ 2108 or foreign cars;
- installation of silent locks VAZ 2107.
In the first case, you have to do a lot of work to fit the “non-original” locks to the doors of the “Seven”. The second option is simpler in terms of installation, but such locks are more expensive and slightly less reliable due to the use of plastic parts in the locks. The advantage of this solution is the almost silent operation of the new lock.
We recommend: Rules for adjusting the headlights of a VAZ 2114 car
Installation and connection of central locks
Installing the central locking activator in the front door
Installation of the central lock should begin by removing the door trims and other elements that may interfere with installation. Then holes are drilled in each door to install a metal strip on which the door lock activator will be attached.
Having secured and adjusted the plastic activator, we move on to connecting and laying the wires. The task is to bring the wires into the car interior and connect them to the alarm unit.
In order to avoid moisture getting on the wires and further failure of activators and other devices (power windows, door lights), consider laying the wires along the door in advance.
Avoid placing wires at the bottom of the door, as this is where water tends to accumulate.
Central locking activator wire routing
When laying the wire, also pay attention to the most “problem” area, namely the place where the wires bend in the opening between the door and the body.
Door wiring protection tube
The best option is to use a rubber tube through the pipe. This corrugation will protect the wiring from chafing and kinks.
For a competent approach to the matter, as well as in order to be able to easily identify and find the necessary wires (+12 Volts, ground, control outputs from the alarm unit), it is better to remove the instrument panel (dashboard) completely. Thus, you will not only simplify your work on laying wires, but you will also be able to connect, solder and insulate them without much difficulty.
On a VAZ 2106 car, the instrument panel can be removed quite simply (four self-tapping screws and four nuts).
Twist or solder wires?
We recommend purchasing female and male terminals, as well as a special tool for crimping wires. If the activator fails, you can easily replace it with a new one. To do this, you just need to disconnect the terminals, dismantle the old one and connect a working activator.
Twisting the wires and wrapping them with electrical tape is not a reliable option; in this case, it is better to “twist” + “soldering” + “heat-shrink tube”.
How to connect the central locking to the alarm system?
Since the VAZ 2101-2107 car is not initially equipped with a central locking or electric door lock drives, you can install additional electric drives and connect them to the system as follows.
Central locking connection diagram
The blue-white and orange wires of the 6-pin connector of the main unit of the alarm system are connected through 15A fuses to +12 V DC. Green and blue wires to the vehicle ground or, in other words, “ground”.
The white wire is to the blue door lock activator unlock wire, and the yellow wire is to the green power lock wire.
Most Chinese car alarms, especially inexpensive models (APS 2600 SHERIFF, Pantera CLK 355), have blocks similar in structure. Sometimes it seems that Chinese manufacturers only change the label, but the “filling” remains the same. At least, the 6-pin connector itself with power outputs for locks, as well as the colors of the wires, differ quite rarely.
Having familiarized yourself with the central locking connection diagram, feel free to start connecting the wires and checking the operation of the activators. After successful tests, all that remains is to assemble all the removed parts in place and then carry out a “control” check.
How to adjust the door of a VAZ 2107
The front door of the VAZ 2107 is adjusted more often. This is especially true for the driver's side door. Door adjustment involves two stages:
- adjusting door hinges;
- adjusting door locks.
Before making adjustments, it is advisable to lubricate the locks and hinges with silicone grease. This will improve their operation and eliminate possible problems when the lock operates. To adjust the position of the hinges, you must perform the following steps:
- set the impact screwdriver to the unscrewing mode;
- loosen the hinge fastening screws with a sharp blow of a hammer;
- slightly lower or raise the door to even out the gap between it and the car body;
- tighten the fastening screws;
- check the door position;
- repeat the adjustment if necessary.
When the position of the door in the opening is adjusted, you can proceed to adjusting the lock, or rather, to adjusting the position of the latch. This is done like this:
- draw a line around the perimeter of the latch with a marker (this way you can find out its initial position;
- Using a 10mm wrench, loosen the three bolts securing the lock retainer;
- move the latch down or up so that the lock fits freely into it without hitting the top or bottom;
- if the door closes “with one click,” the latch must be moved slightly outward, but if it closes easily but dangles, move it deeper;
- tighten the fastening bolts;
- check the operation of the door lock;
- repeat the adjustment if the door does not close well enough.
This completes the adjustment of the VAZ 2107 door. You can hit the road.
Having bought my VAZ-21074, I almost immediately appreciated the inconvenience of the lack of central locking. I don't think you need to tell anyone. Therefore, the first step was to install a central lock on the car. Internet searches made it clear what exactly I needed. A central locking kit for 4 doors was purchased at the car market.
It contained: two 5-pin actuators for the front doors, two 2-pin actuators for the rear doors, a controller, a set of necessary wires, rods and mounting accessories.
I’ll immediately make a reservation that the wires were of sufficient length and thickness, the power of the actuators was enough for VAZ locks (about possible problems - below), so there was practically nothing to add. I wanted more, namely an electric trunk lock and remote control of the central locking from a key fob, so in addition I bought a simple alarm system and a solenoid for the trunk lock. What do we need for work? A certain amount of wires, 15-20 mm self-tapping screws with a press washer (such a wide flat head, you can use a drill, or better without, because the body iron is quite thin). I also needed rubber tubes (“corrugations”) to pass the wiring into the doors and other little things like wire lugs, electrical tape, heat shrink, etc. Tools: screwdriver with bits and drills, screwdrivers, standard set of power tools, marker. Some wrenches may be needed. Let me remind you that when working with the on-board wiring of a car, you must remove the negative terminal from the battery. It doesn't matter if you're cutting into wires or just moving bundles. Troubles in the form of melted wiring are much sadder than lost car radio settings. So, let's begin. Wiring You need to start by determining the location of the controller. I identified a place for myself on the body partition between the glove compartment and the shelf. Then you need to spread out and lay the wiring. After unwinding the wires from the kit, we determine by the length of the bundles which one to connect to which door. It is convenient to lay the wires to the rear doors under the plastic door sills, then along the middle pillar through the holes to be drilled into the door. We lay the wires on the left side of the car under the dashboard, then follow the same route to the doors. We draw a +12V wire from the battery to power the entire circuit. The same wire will be used to power the alarm. At first I wanted to do the smart thing and get the power somewhere in the wiring block (fuse and relay box) terminals, but after seeing how difficult it was to crawl to them, I decided to run the wire directly to the battery terminal. Again, in the event of any alarm breakdowns, this wire will be easier to disconnect. There must be a fuse on the power cord. Usually it comes already installed in the harness out of the box. There is no need to connect the central locking controller to the wires yet. Rear doors It is better to start installing actuators from the rear doors, so that later it will be more convenient to check the operation of the central locking system when unlocking/locking the door with the key. Remove the door trim and top plastic trim from the door. First, we determine where the wires will go from the stud to the door. We drill a 5 mm hole in the door with a drill, close the door, and use a marker to place a point on the counter through the hole.
Then we drill a hole in the rack. We check the alignment of the holes and drill them to a sufficient diameter. We push the wires through the holes, do not forget to thread the corrugation between the stand and the door. I had corrugations of a fairly large diameter, but I didn’t have such a drill, so in the back door I limited myself to heat-shrink tubing (which I later regretted and ended up converting to corrugation anyway).
The hardest part was finding a place to mount the actuator. At first I wanted to attach it to the horizontal rod, but experiments showed the futility of this idea, so a place was found in the lower front part of the door, under the vertical rod of the lock lock button.
Although I found a description of the option with horizontal mounting on the Internet:
We put the rod from the kit on the actuator, insert the actuator together with the rod through the technological holes into the installation site (exactly in this sequence, otherwise it will not be possible to insert the rod later). We fix the actuator using a mounting strip, screw the actuator itself to the strip with the screws included in the kit, and screw the strip to the door with the self-tapping screws that I wrote about at the beginning of the article. We check that the actuator does not interfere with lowering the window. We fasten the actuator rod to the lock button rod using the fasteners included in the central locking kit. We are not fixing one of the rods yet. We lift the rod up, and put a mark on the actuator rod with a marker near the fastener. Then we lower both rods down and put another mark. We place the fasteners in the middle between the marks and fix the second rod.
We check the operation of the actuator. To do this, we pull a wire with +12 V from the battery. We connect one end of the actuator to this wire, and the other to the ground, and check the operation of the actuator. Then we change the polarity and check the operation in the other direction. We do this several times. If everything works as it should, then you're in luck. If the lock does not open/close completely the first time, this means that the lock is too tight and the actuator cannot cope with it. There are several possible solutions: a) lubricate the places where the rods are attached to other parts (it helps a lot!); b) adjust the position of the rods relative to each other; c) install a more powerful actuator; d) finish the lock by removing the unnecessary part. More about the latter. We remove the rocker connecting the lock lock button rod with the horizontal rod going to the lock itself. We remove the spring from this rocker. This spring is responsible for blocking the lock when the door is closed with the lock button pressed. After removing the spring, the door will not lock itself. If you have a central lock, especially one associated with an alarm, this function does not make much sense, so I easily parted with it. But you should keep this in mind.
We put the rocking chair in place and attach the rods. We check the operation of the actuator. If everything works well, cut off the excess traction. We check that the rubber corrugated boot on the actuator is in place; if not, we correct it. We connect the ends of the actuator to the wires laid in the door, wrap the connecting terminals with electrical tape for reliability, and put the door back together. We check the operation of the actuator again by applying voltage to the wires running from the door to the controller. If the door no longer locks/unlocks properly, check to see if anything is blocking it after reassembling it. It is possible that if the wires are used too thin, the actuator simply does not have enough voltage. Thicker wires will have to be re-routed. We do the same with the second door, but in a mirror image. Front doors With the front doors, regarding the actuators, everything is much simpler. To be honest, I thought it would be the other way around. Remove the trim from the door. You can leave the plastic cover on. We try on the location for installing the actuator so that the actuator's thrust axis coincides with the thrust axis of the locking button (see photo). We make marks for the holes with a marker, then drill holes with a diameter of 3.5-4 mm according to the marks.
We push the actuator with the rod into place, insert the screws from the kit into the holes, and screw the actuator without any mounting strips. We check how the glass goes down. We install the rod fasteners, make exactly the same marks with a marker as on the back door, and fix the rods.
Let's check. The check must be done behind closed doors, sitting inside. First, let's check for opening and closing. We connect the +12 V wire and ground to the ends of the same color as the two-pin actuators (for me these are blue and green wires). We change the polarity and check again. If everything is fine, connect all ends to the wires from the controller. We also connect the controller itself to the harness connector and supply +12 V to it (through a fuse). Now we check the operation of the key locks. We close the door and use the key to open/close the lock from the outside. In this case, the actuators of all doors should operate. You can also check the operation of the lock button. If the central locking does not work in any direction, you need to try to move the rods relative to each other. Once everything is checked, you can lay the wires. Just in case, we do not cut off the excess rod, but wrap its end to another rod with electrical tape so that it does not rattle. At the same time, this will increase rigidity. If you already have acoustics installed, then you probably already have the necessary holes and a tube for connecting the wires from the body to the door. If not, you will have to make them, just like at the back door. If the tube is thin, you may have to replace it if all the wires do not fit through it. I got a decent bundle: 5 actuator wires, 2 acoustic wires, 1 heated mirror wire, 1 ground wire (there is no reliable ground in the doors). I used a rubber tube with an outer diameter of 14 mm. In such a tube there was a reserve for the wires of the future electric window. On one side the tube is thinner, this side should be on the outside of the bend (sorry for the taftology) so that there are no kinks.
By the way, laying wires into the left door will be a little difficult - the steering wheel gets in the way. After installation, we connect everything, wrap the connections with electrical tape, and assemble the door. We check the operation of the central locking system with the door assembled. We do the same with the second door. Final steps We connect the controller to the block with wires. We connect the battery. Locks at this moment may work in either direction, so keep the door keys with you, or do not close the doors. We check the operation of the locks by unlocking and locking both front doors both from the outside with the key and from the inside using the lock buttons. If any of the locks works “out of phase,” it means that the polarity of its connection is reversed. The wires need to be swapped. The door lock buttons can be removed, or better yet left on. There is only one argument for “remove”: it is supposedly safer, the door cannot be opened with a hook through the slightly open glass. This argument disappears if you install safe buttons (without caps). There are three arguments for “leave”: 1) aesthetics are not violated; 2) you can see from the buttons whether the doors are locked or not (if the front door is not tightly closed, the central locking system may bounce back to unlock); 3) it is possible to lock and unlock the doors from the inside without installing any additional buttons in the cabin.
Lada 2107 Murena › Logbook › Installation of central locking VAZ 2107
Hi all!
So it happened, I received the central locking system that I ordered online.
I was very pleased with the quality of this central locker; I have no comments whatsoever. The kit includes: - 2 control panels with a folding key; — one 5-pin actuator for the driver’s door, three 2-pin actuators; — control unit (controller); — a set of necessary wires, rods and fastening accessories.; — Another 2-pin actuator, I bought separately for the trunk
To install the central locking system I needed:
— Drill, Screwdriver (attachments and drills); — Screwdrivers, pliers, wire cutters; — A pair of wrenches, a set of sockets; — 15-20mm self-tapping screws with a wide flat washer, rubber corrugations (to hide and protect the wires between the door)
I did it this way:
1) I removed the trim, loaves, oars and speakers from all the doors. 2) Installation of actuators, first of all 2 rear, 2 front. 3) I spread out the wiring and connected all 4 actuators to the control unit to check. More details in point 3. 4) Drilling between the door spaces for wires. 5) Laying wiring.
Paragraph 1.
I won’t describe in detail how to undress the door, because everyone knows how to do it. Not all of my pockets had clips - I bought them. But I couldn’t buy plastic linings (loaves) - I couldn’t find them.
Point 2.
I decided to install it on a vertical rod; of course, it was possible to install it on a horizontal one. We bend the profile to fit the curves of the door, try it on and make marks with a marker for future holes. We drill holes and screw the profile onto self-tapping screws. We screw the solenoid to this profile. Put the rod on in advance, then you simply can’t put it on an already screwed actuator. Same with the second door.
On the front doors everything is much easier to bend; there’s nothing necessary. We apply the actuator to the door and mark the holes (I marked it with a nail). We drill, put the rod on the solenoid, push it inside the door and screw it on. This is what we get