Device
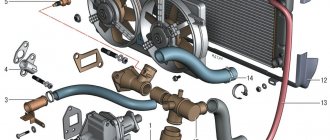
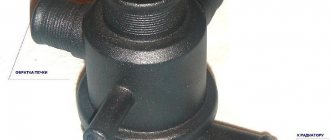
The part has a classic design, typical of modern passenger cars: two tanks connected by tubes with cooling plates. The manufacturer took the path of reducing the cost, which was reflected in the materials used. The tanks are made of plastic, the tubes are made of aluminum. the parts are connected through a rubber gasket that prevents coolant leakage.
Chevrolet Niva with and without air conditioning is equipped with one radiator model. The only difference is that in the first case, the condenser of the air conditioning system is fixed in front of the honeycombs, and in the second - a guide casing.
Let's get started
If you are replacing the radiator of a Niva-Chevrolet heater without air conditioning, you need to remove the glove compartment on the passenger side. It is attached with self-tapping screws. We put the latter in a separate box so as not to experience difficulties with installation.
If you are replacing the radiator of a Niva-Chevrolet stove with air conditioning, you will have to disassemble the front panel and part of the engine compartment.
So, let's start replacing. First, unscrew the glove compartment and remove it from the cabin. Next, you need to remove the lower air duct, which blocks access to the radiator. To be on the safe side, we place cardboard or polyethylene on the mats.
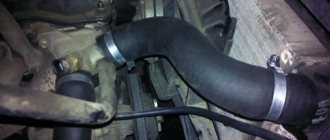
Next, using a Phillips screwdriver, loosen the clamp securing the lower radiator pipe. Be careful - antifreeze may splash out when disconnected. Try to remove it carefully so that the coolant does not get on your skin or eyes. If the pipe fits tightly in the groove, twist it clockwise and counterclockwise. At the next stage, unscrew the second pipe. It is also attached to clamps. Next, unscrew a couple of screws that secure the radiator itself to the stove body.
We take the heat exchanger out. Be prepared for difficulties. The radiator may hit the air duct. To remove it, you will need to bite off the plastic corner of the heat exchanger. It may also rest against the relay block cover. In this case, you will have to take a key number 8 and unscrew the block cover. This is the only way to make room for dismantling the Chevrolet Niva heater radiator.
Comparison of manufacturers
In stores you can find spare parts produced by several companies. Products differ in two parameters: price and workmanship. Let's look at a few of the most popular brands.
Hola is a trademark of the Dutch company H&H Group. 15 European factories produce radiators, belts, shock absorbers and other auto parts. Inexpensive products of this brand are of good quality. According to customer reviews, spare parts of this brand at a comparable price are superior in quality to Chinese products. Price - 2000 rubles.
DAAZ - Dmitrov Automotive Assembly Plant, part of the United Automotive Technologies concern, was founded back in 1967. In addition to radiators, the company produces filters, brake pads and other spare parts for Russian and foreign cars. The products of this brand are used in cars that come off the AvtoVAZ assembly line. Price - 2500 rubles.
Luzar is a Russian company that was founded in 2003 on the basis of the Lugansk Radiator Plant. Products of this brand comply with GOST-R and the manufacturer gives them a 2-year warranty. Price - from 2100 rubles.
Bautler is a British company that produces, among other things, spare parts for the Chevrolet Niva. Price - from 2200 rubles.
Reviews from car owners vary. Some consider DAAZ radiators to be the most reliable, others consider Bautler, Hola or Luzar.
Taking into account the fact that replacing a part takes a lot of time and effort, it is worth taking the sports version of Luzar. It is designed to withstand heavy loads and is therefore more reliable.
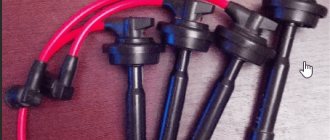
Hola products are distinguished by the fact that each tube has its own rubber seal, rather than being fixed with a single seal. In Luzar-Sport, the honeycomb is soldered to a base that is attached to the tanks.
When to change
Aluminum and plastic are materials that are difficult to repair if cracks or holes appear. Therefore, the main reason for replacing a radiator is a coolant leak.
There are two reasons for replacement:
- coolant leak;
- clogged tubes.
If you notice drops and smudges, you should immediately replace the product with a new one, and not try to eliminate leaks with dubious means for eliminating antifreeze leaks.
Despite advertising claims, various powders added to the coolant do little to eliminate leaks, but they perfectly clog radiator pipes. This reduces its efficiency. In this case, you need to replace the part with a new one. If this is not done, then systematic overheating of the engine will lead to the need for rapid overhaul.
Fan malfunctions
Installing a tow bar on a Chevrolet Niva
Let's look at what malfunctions of the Niva cooling fan may occur and how to identify them. The most common malfunction is blown fuses.
The fuse blows.
A single occurrence of such a malfunction does not indicate a faulty wiring or the fans themselves. During operation, fuses heat up and eventually fail. They are easy enough to replace. They are located on a carburetor car in the lower fuse block, and on an injection car in an additional block near the driver's door pillar.
If the fuses blow immediately when the fans are turned on, then it is necessary to find a short circuit or replace the fan. To determine the location of the malfunction, it is enough to disconnect the connector on the fan motor and connect the wires on the radiator sensor with each other with the ignition on.
On an injection engine, to check it is necessary to remove the chip from the temperature sensor, which is located on the thermostat. In this case, the engine control unit will go into emergency mode and activate a program for working with a faulty temperature sensor and turn on the fan relay. If the fuse burns out, then it is necessary to find and eliminate the short circuit. If the fuse remains intact, then the problem is most likely in the fan motor. Faulty fans are stuck or difficult to rotate. This may be caused by the stator magnet falling off or the armature bushings wearing out. A faulty fan should be replaced.
The fan does not turn on
Another common malfunction is when the fan does not turn on when the operating temperature is reached. The reason may be a malfunction of the fan sensor on a carburetor car or the engine control unit on an injection car, a relay malfunction, broken wires, or a malfunction of the fan motor.
It is better to start troubleshooting by checking the temperature sensor or control unit. This is done as described earlier by bridging the wires on the carburetor engine sensor or removing the chip from the temperature sensor on the injection engine. If the fans do not work, then you need to check the power relay.
The relays are located under the instrument panel on the front wall. To check, remove the chip from the relay and check for the presence of power at pins 30 and 85. If there is no power, check the condition of the fuse and wires. If there is power, connect terminals 84 and 85 of the relay with a test lamp. If the warning lamp does not light up, then the wire from the ECU connector to the relay socket is broken or the ECU itself is faulty. A lit lamp indicates a relay malfunction.
To test the relay, connect pins 87 and 30 with a piece of copper wire, which should trigger the fans. If this does not happen, then connect a test lamp to the connector without removing the jumper from the relay connector. If the lamp does not light up, then connect one end of the test lamp to the housing, and with the other, check for the presence of a plus on the connector. If the control lamp does not light up, then there is a break in the wire from the relay to the fan connector. Accordingly, the glow of the lamp indicates poor contact of the negative wire with the body or a wire break. The presence of power and minus indicates a malfunction of the electric motor.
The lifespan of a Niva SUV engine largely depends on how efficiently the VAZ-2121 cooling works. After all, overheating is the first enemy of the power unit, leading to expensive repairs.
This is why the serviceability of the components and elements of the cooling circuit is so important. In order to be able to service them and identify malfunctions, you need to understand what the circuit consists of and how the Niva’s cooling functions.
Replacement on a car without air conditioning
The work is carried out in an inspection ditch. Before starting repairs, you need to prepare a new air conditioner, 10 liters of antifreeze and the following tools:
- Container for draining coolant.
- Spanners.
- Crosshead screwdriver.
- Jack.
- Wheel chocks.
- Balloon wrench.
The radiator is dismantled after the car is installed on the inspection ditch and the antifreeze has been drained from the cooling system. The work is carried out as follows:
- Remove the bumper and radiator grill (you will need to unscrew the screws and bolts).
- Jack up and remove the front wheels.
- Remove the air filter pipe.
- Remove the casing that guides the air.
- Unscrew the power steering oil cooling mount.
- Remove the headlights so that they do not interfere with the oil cooling pipes.
- Remove the crossbar that partially blocks access to the bolts holding the cooling fans in place.
- Disconnect the terminal from the electric fan unit.
- Unscrew the nuts and bolts holding the fan mount and carefully remove it down.
- Unscrew the screws securing the condenser tubes to the car body.
- Move the pipes and power steering oil cooling system forward.
- Loosen the clamps and remove the pipes.
- Remove the radiator.
Sensor for turning on electric fans. — Lada 4×4 3D, 1.8 l., 2000 on DRIVE2
There are many opinions on the Internet about where to install a coolant temperature sensor to turn on electric fans. Basically, people are divided into two camps before the radiator and after the radiator, although there are ways to install a thermostat and in the radiator. For both, everything seems to work. After analyzing the whole situation, I came to the conclusion that it doesn’t matter where you put it, it’s not so much the large cooling system in our engines, and the main job of regulating the temperature in the engine is done by the thermostat, and the liquid circulates in a small circle. When the engine heats up, the hot liquid will flow through the opened thermostat into the radiator, and From the radiator, cooler fluid will flow into the engine, and as soon as cold fluid enters the engine, the thermostat will close
The fans will turn on in any case as soon as the liquid in the radiator becomes hot, and it doesn’t matter before or after the sensor is installed, the difference in turning on will be seconds. If the sensor is positioned before, then the fans will turn on earlier and begin to cool the temperature of the liquid already in the radiator to an even lower temperature. immediately goes to cooling the engine, the thermostat slammed shut, the fans still worked a little, cooled the liquid entering the radiator a little and turned off. If the sensor is located after the radiator, then the fans turn on later than with the sensor before the radiator option, but the liquid will not go into the engine with such a big difference temperature and cooling of the engine turns out to be longer. The liquid will be cooled all at once both in the block and in the radiator to the same temperature, the thermostat slams shut, and the fans turn off at the same moment. However, in terms of cooling time and energy consumption, the result is the same well. Maybe, of course, I’m wrong
Here is a video of how the fans work by time, the heat outside is over 30 degrees, I stood in the sun, there is no wind.
www.drive2.ru
Which Chevrolet Niva engine cooling radiator is better, repair instructions, video
It is designed to withstand heavy loads and is therefore more reliable. Hola products are distinguished by the fact that each tube has its own rubber seal, rather than being fixed with a single seal.
In Luzar-Sport, the honeycomb is soldered to a base that is attached to the tanks. When to replace Aluminum and plastic are materials that are difficult to repair if cracks and holes appear.
Chevrolet Niva radiator which one to choose
Niva - Club / Niva - Club
Therefore, the main reason for replacing a radiator is a coolant leak. There are two reasons for replacement: If you notice drops and smudges, you must immediately replace the product with a new one, and not try to eliminate leaks with dubious means for eliminating antifreeze leaks.
Despite advertising claims, various powders added to the coolant do little to eliminate leaks, but they perfectly clog radiator pipes. This reduces its efficiency.
The resulting flat area will not interfere with dismantling the radiator.
Disconnect the lower pipe. We take out the cooling unit. Before installing a new product, remove the corner rubber feet from the old one and put them on the new one. We mount the new radiator on the seat.
Further assembly is carried out in reverse disassembly sequence. At the final stage, fill in coolant and power steering fluid to the required level.
labavto.com
We start the engine and wait for the fans to start. We check connections for leaks and fluid levels. We eliminate leaks and add fluid if necessary.
The peculiarity of performing work on a Chevrolet Niva with an air conditioning system is that during dismantling it is necessary to move the air conditioning system condenser to the side without removing it. In this case, the gas pipeline greatly interferes. When the condenser is moved, loosen the fastenings on the clamps, remove the hoses and other necessary elements of the assembly. Next, we replace the radiator with a new one and put everything back together.
The complexity of the procedure with air conditioning only lies in the greater number of elements.
Replacing the Chevrolet Niva radiator. Do you have any questions? I think the problem was in the weak bypass valve spring - excess pressure simply tore all the seals. I installed power clamps on the radiator pipes, although it’s a bit of a hassle, but they hold up just fine.
How to choose a heating radiator for a Chevrolet Niva
Many people ask the question: which stove radiator is better - copper or aluminum? There can be no definite answer here; each has its own disadvantages and advantages.
To make the right choice, you need to know the principle of operation of the heating system in a car.
Heat enters the car interior from the engine, this is a side effect of its operation. Heat is generated as a result of fuel combustion and from rubbing surfaces. To remove heat from very hot parts, the engine is equipped with a cooling system, an integral part of which is interior heating. Therefore, the hotter the engine gets, the better the heating. Hot coolant is supplied to the heater core, and the fan, passing air through it, dissipates heat throughout the cabin.
The temperature of the air leaving the deflectors is regulated by a tap located on the line between the motor and the stove. This is a regular shut-off valve with a mechanical or electrical drive; it regulates the amount of coolant that passes through the heater (by increasing the temperature on the control unit, the valve opens more; by decreasing the temperature, it closes). How the stove will work greatly depends on its operation. If it does not work correctly (does not fully open the passage for liquid), then it will be cold in the cabin.
Also an important factor is the temperature “overboard”; even a well-functioning heater in cold weather will heat a little worse, since the liquid does not heat up enough, because of this the heating becomes insufficient. The thermostat has a big influence: if it doesn’t work correctly, then don’t install any radiator, and cold air will blow from the deflectors. First you need to check the proper functioning of the entire system as a whole, and then think about replacement.
The radiator of the heating system is similar to its older brother from the cooling system. And their functions are similar, only the large one releases heat into the atmosphere, and the small one into the cabin. Both have two tanks in their design, which are connected to each other by tubes. Plates are attached to the tubes by soldering, increasing the cooling area (the more plates, the greater the heat transfer). Therefore, when choosing, you need to pay special attention to the number of plates. This can be done by placing both copies together and visually inspecting the density of the plates. Which radiator has a higher density, the heat transfer is higher. Liquid inlet and outlet pipes are attached to one of the tanks. Some models are equipped with places for attaching to a car.
- Copper has greater thermal conductivity than aluminum. And with an increase in thermal conductivity, heating improves.
- Maintainability. Copper is soft and will not be damaged by minor dents. Even if cracks appear, burst tubes can be soldered, leaving thermal conductivity unchanged.
- The copper radiator is equipped with a tank made of the same material, which significantly improves its performance characteristics.
This type has only one drawback - its price.
- The first and most important advantage will be its price. It is almost two times smaller than that of its copper counterpart.
- With an increased number of plates (increased cooling area), the heat transfer will be less than that of copper, but not so significantly.
- Prevalence in the new car market. Cars of recent years produced in our country are equipped with aluminum radiators.
- The low thermal conductivity of the material is the biggest disadvantage.
- Non-repairability: if the tubes are damaged, they cannot be soldered, and the entire assembly has to be replaced. A plastic tank can be damaged by the slightest blow. Some copies may have a crack in the tank out of the box. There are “craftsmen” who change tanks, but this is unreliable, and there is a high probability of failure of the entire stove.
- Susceptibility to corrosion. Aluminum is more susceptible to corrosion, which leads to poor heat transfer and the formation of smudges and failure of the entire interior heating system.
Summarizing all of the above, we can say that both types are clogged with dirt equally, both from the inside and the outside. And while it is possible to wash the outside of the device, doing it properly inside is problematic. And if the cooling system of your engine is clean (the engine has been overhauled or a new car has been done), then it is better to choose a copper option, if this is possible for your model. Well, if the condition of the water jacket is unknown, it is better to take an aluminum one and replace it after a few seasons with the same cheap option.
The best prices and conditions for the purchase of new cars
The quality of heater radiators on VAZ SUVs is a fairly relevant topic and worries many car owners; the interior of these cars with a standard heating system is not always warm. In addition, the “native” heater radiator of Niva cars may leak over time, and then it has to be replaced.
It doesn’t immediately become colder in the Niva’s cabin – the stove stops working normally for several reasons:
- the heating tap does not switch (stays sour in the closed or half-closed position);
- The motor rotates at low speed;
- the heater radiator is clogged;
- an air lock is created in the cooling system;
- parts turn out to be defective;
- the valve in the thermostat opens prematurely;
- poor circulation is created in the cooling system due to the water pump.
It may still be cold inside the car due to a blown cylinder head gasket in the engine. To make the interior warmer, car owners often install on Niva 21213 cars:
- three-row copper radiators of the stove, they have better heat transfer;
- The heater motor is 2108, they are more efficient than the standard ones on the Niva.
RP for the VAZ 21213 is produced by various companies, and the quality of stove radiators may vary. On the auto parts market you mainly find parts from manufacturers:
- "Orenburg radiator";
- luzar;
- DAAZ;
- SHAAZ;
- "Likhoslavl Radiator Plant";
- Iran;
Based on the material used, RPs can be made of copper or aluminum, each of them has its own advantages and disadvantages. Aluminum radiator:
- heats up quickly;
- cheaper than copper;
- has high rigidity and low weight.
But aluminum RP is not repairable, it is practically impossible to solder it. Other disadvantages of aluminum include:
- rapid cooling, this metal does not retain heat well;
- susceptibility to corrosion, which is why aluminum RPs fail more often than copper ones.
The main disadvantage of copper RP is that it takes a long time to heat up the interior, but even after stopping the engine, it retains heat for quite a long time. Copper heater radiators are approximately 30-50% more expensive than aluminum ones, but this is not so important - in general, the parts are still relatively inexpensive. The problem with copper RPs is different - the quality of the products is low, and it is not so easy to buy parts of acceptable quality.
Chevy Niva car owners often have problems with heating the interior; the car can be cold even in frosty temperatures of -15ºC - the aluminum radiator of the stove does not heat very well. Another problem on VAZ 2123 cars is that stove radiators often leak.
Aluminum heater radiators on a Niva car are inexpensive:
Copper RPs are sold more expensive, their prices range from 1,500 to 2,500 rubles, the cost depends on the brand of the product, the region of sales and the sellers themselves.
The heater radiator on the Niva 2121/21213/21214 is quite easy to change, but it is inconvenient to get to. We remove the RP as follows:
- drain the antifreeze from the radiator and cylinder block;
- we spread rags on the floor on the front passenger side, a little antifreeze will still spill;
- remove the shelf under the glove compartment;
- from under the hood, unscrew the clamps and remove the heater pipes;
- remove the draft from the stove faucet;
- dismantle the heating system fan;
- then we take out the RP itself.
VAZ 21213 models are standardly equipped with model 2105 heater radiators, but many owners of VAZ 4x4 cars install RP from Kopeika - 2101-8101060, with such a radiator heater the car becomes warmer. In order for the stove radiator to sit more tightly in the housing, it is covered with foam rubber around the perimeter to ensure a tight seal.
The main complaints that Chevy Niva car owners have about their stove heating system is a coolant leak from the stove radiator. Determining the malfunction is quite simple - the carpet on the floor in the front passenger area becomes wet, and the cabin smells of antifreeze. The cause of the leak could also be a stove faucet or a heating pipe, for example, a poorly tightened clamp, but the radiator itself also leaks quite often. Chevrolet Niva RPs are installed from the factory with aluminum, the parts are not distinguished by high quality.
We carry out the work of replacing the stove radiator as follows:
- drain the antifreeze from the cooling system (including from the cylinder block);
- unscrew the screws (3 pcs.), dismantle the right side of the glove compartment;
- remove the glove compartment by disconnecting all the wires from it; it can be dismantled quite easily;
- You should place some rags or a plastic bag under the heater radiator, because antifreeze will leak in any case;
- unscrew the two clamps securing the stove pipes, unscrew the self-tapping screws securing the RP in the housing;
- we pull off the hoses and move them as far as possible to the side of the body - this way they will not interfere;
- then we take out the heater radiator itself;
- we install a new RP in place, in some cases it is necessary to file or break the edge of the stove radiator body so that the part falls into place;
- we install the pipes in place, tighten the clamps;
- put the glove compartment and the side right plastic panel in place;
- fill in antifreeze, start the engine, check for leaks through the RP or stove pipes;
- If everything is in order, the replacement of the Chevy Niva heater radiator can be considered complete.
As you can see, on a Chevrolet Niva car without an air conditioner, replacing the air conditioner is not particularly difficult, but it is not possible to do the work that needs to be done on a car with an air conditioning system.
There are two ways to replace the RP on a Chevrolet Niva with air conditioning, each of them has its own pros and cons:
- the first method will take a lot of time, and you will have to disassemble almost the entire instrument panel;
- the second method is relatively fast, but it is necessary to cut and adjust some parts, as the common people say - this is the “collective farm” method.
In order to replace the stove radiator according to the instructions, we perform the following work:
- First of all, we drain the antifreeze - so that it all flows out, we blow into the expansion tank;
- remove the ground terminal from the battery;
- dismantle the glove compartment, it can be easily removed;
- remove the center console, including the radio;
- unclip the front body panels from both A-pillars;
- remove the decorative panel on the side of the center console (driver's side);
- disconnect the instrument cluster;
- loosen the fastenings of the gearshift lever panel, completely unscrew the two screws closest to the panel;
- dismantle the steering column covers and steering column switches;
- unscrew the bolts securing the panel itself (4 fasteners near the windshield);
- remove the air conditioner control knobs;
- dismantle the heater control unit;
- unscrew the four steering column fasteners (two on each side), lower the steering column onto the driver’s seat;
- remove the air duct located behind the torpedo;
- disconnect all the cables;
- remove the instrument panel frame;
- unscrew the bolts securing the iron frame of the panel, remove the “piece of hardware”;
- we separate the housings of the evaporator and the radiator of the stove from each other, dismantle the air ducts (central, as well as on the left side);
- we approach the clamps of the stove pipes, loosen them, and remove the hoses;
- We remove the stove, change the radiator, then put everything back in place.
The heater radiator on a car with a Chevrolet Niva air conditioner can be changed in another way, but here you will have to heat the plastic and cut out its pieces. The easiest way to use this method is to install a “original” radiator or a copper radiator from a Volga car - it will fall into place more easily. It’s not worth experimenting with copper RP from a “penny” - it won’t fit in size. You will also need long L-shaped stove pipes, they will fit from the VAZ Nine, but you will need adapter tubes and additional clamps - the 2109 pipes are thinner than the Nivsky ones.
- remove the glove compartment, dismantle the air duct on the passenger side;
- after removing the steering column casing and the heater protection in the heater radiator housing (on the driver’s side), we cut out or burn with a soldering iron a rectangular hole for removing the RP; by the contour of the plastic you can understand where exactly the heater radiator is installed;
- We unscrew the clamps of the stove pipes not at the radiator, but under the hood;
- we pull off the stove pipes, drain the antifreeze from them (tilt the hoses down), all the coolant does not need to be drained;
- so that the remaining antifreeze does not interfere with further work, we drill a hole in the old RP;
- Using a soldering iron on an old radiator, we anneal the furnace fittings for the pipes, pull out the control panel to the left (towards the driver);
- on the new stove radiator we install pipes 2109, adjust them to size, assemble the structure with adapter tubes, install the entire assembly in place, secure the RP using a homemade clamp.
To make it easier to carry out all this work, it is better to remove the front seats.
There are many disputes about which replacement is better for a Chevy Niva with air conditioning, but the second method has one serious advantage - the quality of Russian parts often turns out to be unimportant, and if the new heater radiator leaks, you will have to disassemble everything again. In the “collective farm” version, it will be possible to replace the RP a second time very quickly, but disassembling and reassembling the entire instrument panel may take a whole working day.
Which engine radiator is best for a Chevrolet Niva
- Registration
- Entrance
- To the beginning of the forum
- Forum Rules
- Old design
- FAQ
- Search
- Users
WHICH IS BETTER.
- Aluminum [21] 70%
- Copper [9] 30%
Total votes: 30
_________________
VAZ 2111, 2002, 16kl, 1.5l
My native worked for 10 years.
I searched through many sites and forums and decided to ask HERE. Which one is better? Aluminum or Medyakha? Does anyone have any experience with this? Thank you!
Which one is better? Aluminum or Medyakha?
Does anyone have any experience with this?
but now I would choose aluminum, although Cu is repairable, but it is more expensive than Al.
Native worked 10 years
zorbazord
DAAZ price-quality. Still on the field since 1999. And he worked on Dvinakh for 7 years.
Copper is heavy and expensive. I bought DAAZ for 900 rubles. Copper seems to be under 4t.
what can we say about stores?
The field is still factory equipped 1999
G
DAAZ bought for 900r
Copper seems to be under 4t.
Added after 1 minute 11 seconds:
Last winter I exchanged it for a store-bought DAAZ from Pasker. I didn’t notice anything running somewhere.
Dranik
Not 100kg. 6.6 copper. versus 2.7 DAAZ. It's twice as heavy, which means the price is three times higher.
I wrote the same above. Last winter, I didn’t buy it in bulk. in Paskara in the Vladimir region. 15t.km. already left.
Considering that some people here are asking about all sorts of additives to the cooling system against leaks. Saying that there is no money for a new radiator. The difference between RUB 3,450.00 and 1,470.00 rub. I think not so much.
Source
Features of the Niva cooling system.
Auto boiling point: how to choose a car radiator
The VAZ-21214 engine cooling system is designed for off-road driving, that is, to operate for a long time at low speed and high revs. This causes the engine to become very hot. Therefore, the Nivas are equipped with a cooling radiator slightly larger than on the classics and two cooling fans.
In fact, the machines are operated mainly in urban environments, where the engine operates without overload and the operation of two fans to cool the radiator is practically not needed. In addition, when operating, the Niva cooling fan makes quite a bit of noise, which affects comfort.
How to remove and replace the cooling radiator Niva Chevrolet - video
Reading the article will take: 1 minute
Replacing the Chevrolet Niva radiator is provided in case of leakage. This will certainly be evidenced by puddles of coolant under the car and its constantly decreasing level. By following the traces of the drying and crystallizing substance contained in the antifreeze, you can even detect the location of the leak.
Unit design and malfunctions
The cooling system is one of the most important for a car. If it is faulty, it threatens overheating and boiling, and subsequently costly repairs. The cooling radiator is the central unit. Its purpose is to prevent the engine from overheating. The cooling system operates under difficult conditions at elevated temperatures and pressures. Therefore, its components are subject to rapid wear. This is the reason for frequent radiator failures.
The radiator design is simple. It consists of a core of a large number of tubes and two cans, which are located above and below the core. The refrigerant circulating in the system removes excess heat from the cylinders of the power unit, flowing through the tubes, where it is cooled by the air flow blowing towards it. When the machine is stationary, cooling air is forced through the fan blades.
Work on removing the cooling radiator on a car with air conditioning
Work on cars to remove the cooling radiator equipped with air conditioning is generally similar, but has its own characteristics.
When replacing a radiator on a car equipped with an air conditioner, at first glance everything may seem complicated, due to the large number of pipes and other parts, but as the work progresses, it is important to take your time and do everything carefully.
It often happens that after 7-10 years of operation, the aluminum radiator of the Chevy Niva heater becomes unusable and begins to leak. Repairing this part is practically impossible; it is only possible to temporarily seal the leaks by cold welding. The only correct solution is to replace the stove radiator; if you have the time and desire, you can do it yourself, but you will have to work a little.
Device
The part has a classic design, typical of modern passenger cars: two tanks connected by tubes with cooling plates. The manufacturer took the path of reducing the cost, which was reflected in the materials used. The tanks are made of plastic, the tubes are made of aluminum. the parts are connected through a rubber gasket that prevents coolant leakage.
Chevrolet Niva with and without air conditioning is equipped with one radiator model. The only difference is that in the first case, the condenser of the air conditioning system is fixed in front of the honeycombs, and in the second - a guide casing.
Heater radiator, “stove”
- Go to page:
Re: Heater radiator, “stove”
Post by maxim53 » Nov 10, 2015, 11:16 pm
Re: Heater radiator, “stove”
Post by YARych » 11 Nov 2015, 19:25
Thank you guys! Thanks to you and the topic, I think I got it together. The SHAAZ three-row copper radiator is indeed quite rare here in Krasnoyarsk and the price tag for it is more than 2 thousand rubles, but I still found it in storage, taken off sale for 1.5 thousand. Well, I screwed on a new original faucet, instead of the “Chance”. SHAAZ - how does it fit in size? Is wrapping around the diameter with foam rubber (or something else) required? On Saturday, while it is light and not too cold, I will assemble the stove.
Re: Heater radiator, “stove”
Post by Captain » 12 Nov 2015, 01:27
Re: Heater radiator, “stove”
Post by alfa jt » 31 Dec 2015, 03:18
Why is it necessary to cover it with foam rubber?
PS: today I installed a new radiator - aluminum.
To seal the joints I used ordinary transparent silicone rings, which I picked up in the plumbing department of the store.
The rings became like family, I tightened them until I saw that the ring was starting to squeeze out a little!
I drove around all day, I even put a sheet of paper under the stove to see the drops of antifreeze (how they were already there!)
In general - everything is dry! – and it seems to me = this is so far the best option for sealing joints!
Re: Heater radiator, “stove”
Post by Captain » 31 Dec 2015, 08:15
Re: Heater radiator, “stove”
Post by alfa jt » Dec 31, 2015, 10:47 am
Thanks for the answer, otherwise I was already thinking about taking it apart and pasting it over again. By the way, instead of foam rubber, you can buy a sheet of self-adhesive noiseless foam - exactly the sheet of foam that is in the door. Very comfortably ! - can be cut into pieces and glued wherever needed, if there is not enough thickness - in two layers! The self-adhesive base holds very well. In general, my opinion is that a copper radiator is almost the same in terms of heat transfer as aluminum. , in aluminum, due to the design, the efficiency is higher, I installed a copper one - I didn’t notice much of a difference. My aluminum cooks so bad it’s like Tashkent in the car!
The Chevrolet Niva cooling system contains a thermostat, a pump, a heat exchanger, and a cabin heater. Today we will determine how to replace the radiator of a Chevrolet Niva stove. This radiator is located in the center of the dashboard. Therefore, if the smell of antifreeze appears, then it’s time to check the condition of the stove radiator.
Works
We drive the car into the pit and set the handbrake, speed or wheel chocks. Next, if there is any, remove the engine protection. Most likely, you will need 17 and 13 sockets along with ratchets, as well as WD40 fluid and a hammer and chisel. The problem lies in the souring of some bolts. We disconnect the negative terminal from the battery, since later we will work with the fan unit and the sound signal. For this operation we will need a 10mm open end wrench. Then we will need to remove the radiator grill using a Phillips screwdriver and a 8mm socket with a ratchet.
After removing the protection, we have a view of the factory mudguard for the engine. It consists of two parts and here we will need extensions for the small ratchet, an 8 socket, a small ratchet and a large or small Phillips screwdriver. Each of the two halves is connected to each other by a pair of self-tapping screws with a head for a Phillips screwdriver and one bolt with a head for a 8 nut. Also, each of the halves is attached to the supporting structures of the body with self-tapping bolts with heads for 8. Next, using a carrier with a light bulb, we inspect the places from below, where there is a possible leak. Unfortunately, it is impossible to see the leak that has formed at the bottom of the radiator, since it is covered by the supporting structure of the body and the fan unit. Having made sure that the radiator is still leaking (the indicator is dry pipes), we begin to remove it. However, before that.
Relay for starting the fan
The spare block may contain not only the fuses themselves, but also electromagnetic relays. They control the operation of the engine cooling system, the circuits of which are powered by the ignition switch of the on-board computer. The current comes from the battery through the fuses themselves.
The relay operates as follows: at the very beginning, voltage is applied to the output, as a result an electromagnetic field is formed by passing current through the inductive coil. Subsequently, the current passing through the relay starts the engine. If the voltage is removed, the contacts will open due to the spring that is present in the mechanism, and the fan itself will stop.
There are several ways to check the operation of the relay. The simplest method is to replace the relay with the same working one and check the condition of the system. Turn off the engine, then disconnect the temperature sensor connector, after which you will hear a characteristic click of the relay. Then you need to remove and test the output contacts using multimeters, constantly applying voltage to the output. From the temperature sensor, information is supplied to the unit switching device.
The temperature sensor itself is a resistor, the values of which vary in a variable temperature range: from 1.3-1.8 Ohms at 30°C to 155-196 Ohms at 90°C. To give an accurate assessment of its performance, use a thermometer and an ohmmeter, calculating the resistance at different temperatures. To check, the part is removed and then immersed in an aqueous environment. The sensor can be found near the main exhaust system. It is dismantled using a spanner.
Comparison of manufacturers
In stores you can find spare parts produced by several companies. Products differ in two parameters: price and workmanship. Let's look at a few of the most popular brands.
Hola is a trademark of the Dutch company H&H Group. 15 European factories produce radiators, belts, shock absorbers and other auto parts. Inexpensive products of this brand are of good quality. According to customer reviews, spare parts of this brand at a comparable price are superior in quality to Chinese products. Price - 2000 rubles.
DAAZ - Dmitrov Automotive Assembly Plant, part of the United Automotive Technologies concern, was founded back in 1967. In addition to radiators, the company produces filters, brake pads and other spare parts for Russian and foreign cars. The products of this brand are used in cars that come off the AvtoVAZ assembly line. Price - 2500 rubles.
Luzar is a Russian company that was founded in 2003 on the basis of the Lugansk Radiator Plant. Products of this brand comply with GOST-R and the manufacturer gives them a 2-year warranty. Price - from 2100 rubles.
Bautler is a British company that produces, among other things, spare parts for the Chevrolet Niva. Price - from 2200 rubles.
Reviews from car owners vary. Some consider DAAZ radiators to be the most reliable, others consider Bautler, Hola or Luzar.
Taking into account the fact that replacing a part takes a lot of time and effort, it is worth taking the sports version of Luzar. It is designed to withstand heavy loads and is therefore more reliable.
Hola products are distinguished by the fact that each tube has its own rubber seal, rather than being fixed with a single seal. In Luzar-Sport, the honeycomb is soldered to a base that is attached to the tanks.
Replacement on a car without air conditioning
The work is carried out in an inspection ditch. Before starting repairs, you need to prepare a new air conditioner, 10 liters of antifreeze and the following tools:
- Container for draining coolant.
- Spanners.
- Crosshead screwdriver.
- Jack.
- Wheel chocks.
- Balloon wrench.
The radiator is dismantled after the car is installed on the inspection ditch and the antifreeze has been drained from the cooling system. The work is carried out as follows:
Replacing the stove fan
Replacing a heater motor is quite simple.
Required Tools
To work you will need:
- set of hex keys;
- Phillips screwdriver;
- new electric heater motor.
Removing the stove fan
The stove fan is removed as follows.
- The negative terminal of the battery is disconnected.
- On the right (in the direction of travel) under the windshield there is a cabin filter protected by a snap-on lid. After removing the cover and removing the filter, access to the heater fan is available. To access the heater fan, the cabin filter is removed
- The impeller is removed. To do this, use a Phillips screwdriver to unscrew the bolt holding the mounting bracket. The impeller moves to the side and is removed. To remove the impeller, you need to unscrew the bolt and remove the mounting bracket
- In the cabin, in front of the passenger seat, the fastening of the glove compartment panel is unscrewed. To access the electric motor, the glove box panel is removed
- The connector with the power wires is disconnected. To remove the electric motor, you must disconnect the connector with the power wires
- Use a short 10mm hex to unscrew the mounting bolts and remove the electric motor. The heater motor is secured with three bolts
- After removing the engine, the impeller is carefully removed through the cabin filter niche. The impeller can be pulled out freely from the cabin filter side
Installing a stove fan
The faulty electric motor is repaired or replaced with a new one. A damaged impeller should also be replaced. A thin wire is threaded through the holes in its body and the cavity of the cabin filter is secured. The impeller must be installed in such a way that the groove located inside it fits into the pin of the electric motor shaft.
Before installing a new engine, the axle is lubricated with a special lubricant.
Assembly is performed in reverse order. If the impeller does not fit into place, it should be moved several times in different directions until it is completely seated on the motor shaft. Then, under the hood, the wire is cut with wire cutters, the mounting bracket is installed and the bolt is tightened. New heater fan installed.
Thus, diagnosing faults, repairing and replacing the heater fan on a Chevrolet Niva is not very difficult. This will require a minimum set of standard tools. Keep an eye on the stove, and the inside of your car will always be warm.
The radiator itself
After removing both hoses from the power steering radiator, it is necessary to remove the radiator itself. To do this you will need a 10mm socket, a small ratchet and an extension. There are five bolts, and the fifth holds the end of the radiator through a specially curved bracket. Please note that there is also liquid in the radiator - about 200 ml. If the radiator cannot be removed without disassembling the bracket, then use a 8-mm socket and disassemble the bracket. Now disconnect the electrical terminals from the fan unit - there are two of them and the terminal from the horn. Remove the horn using a 13mm socket with a ratchet.
Disconnect the pipe coming from the thermostat to the radiator, first loosening the clamp by 7 with the head.
Remove the upper half of the air trap in front of the radiator, which is held on by 4 bolts. You need a small ratchet, extension, 8mm socket. All 4 bolts.
Then unscrew the upper fastenings of the engine cooling radiator using a ratchet with the head on. Remove these fastenings and move the upper part of the radiator along with the fan unit slightly forward. This will allow you to remove two hoses, having first loosened both clamps going to the upper corner of the radiator on the passenger side using a ratchet with a size 7 head.
Now we separate the fan block and radiator. There are six connection points. Five of which are more or less accessible, but the sixth is well hidden. You need a small ratchet with a 10 mm socket and an extension. Unscrew the four nuts. The fifth is visible but not immediately accessible. It is necessary to bend the hose going to the bottom of the radiator down under the spar. Then we will calmly unscrew the fifth nut. The sixth nut is located at the bottom of the fan block exactly in the middle. It is hidden (tear off the hands of the designers) behind a special plate resembling two letters Y, connected by legs to each other. Before we get the sixth nut, we need a ratchet with a 13-mm head to unscrew the two bolts holding the bar from below. By unscrewing the sixth nut, we separate the fan block and the radiator.
Unfortunately, it is not yet possible to remove the radiator. It is held by a hose going to the bottom of the radiator and the lower half of the water trap. For both things, the designers’ hands need to be torn off again, because it’s inconvenient and it’s not clear why exactly this is happening?
It is not difficult to unscrew the lower part of the air trap. A small ratchet with an extension and a 10mm socket, and only two bolts and two nuts at the bottom inside the bumper. However, this part still needs to be removed, and the bumper interferes with the action. Fortunately, you won't have to remove it. The air trap is made of thin metal and bends well. We simply fold its sides into the center and get a flat part that does not interfere with removing the radiator.
In order to remove the lower pipe, you need manual dexterity, a small ratchet, an extension and a 7-point socket. Once we unscrew everything, we remove the radiator.
The main thing is that when you install a new radiator, you need to remove the 4 rubber feet in the corners from the old one and put them on the new radiator.
We carry out further actions in the reverse order of removal.
Add all liquids to the level. And we start the car.
We are waiting for the fans to start working. We check the fluid levels, if necessary we bring them up to level and EVERYTHING.
Heater radiator with air conditioning Niva Chevrolet (replacement)
There are two ways to replace the RP on a Chevrolet Niva with air conditioning, each of them has its own pros and cons:
- the first method will take a lot of time, and you will have to disassemble almost the entire instrument panel;
- the second method is relatively fast, but it is necessary to cut and adjust some parts, as the common people say - this is the “collective farm” method.
In order to replace the stove radiator according to the instructions, we perform the following work:
- First of all, we drain the antifreeze - so that it all flows out, we blow into the expansion tank;
- remove the ground terminal from the battery;
- dismantle the glove compartment, it can be easily removed;
- remove the center console, including the radio;
- unclip the front body panels from both A-pillars;
- remove the decorative panel on the side of the center console (driver's side);
- disconnect the instrument cluster;
- loosen the fastenings of the gearshift lever panel, completely unscrew the two screws closest to the panel;
- dismantle the steering column covers and steering column switches;
- unscrew the bolts securing the panel itself (4 fasteners near the windshield);
- remove the air conditioner control knobs;
- dismantle the heater control unit;
- unscrew the four steering column fasteners (two on each side), lower the steering column onto the driver’s seat;
- remove the air duct located behind the torpedo;
- disconnect all the cables;
- remove the instrument panel frame;
- unscrew the bolts securing the iron frame of the panel, remove the “piece of hardware”;
- we separate the housings of the evaporator and the radiator of the stove from each other, dismantle the air ducts (central, as well as on the left side);
- we approach the clamps of the stove pipes, loosen them, and remove the hoses;
- We remove the stove, change the radiator, then put everything back in place.
Read also: Opel Antara test drive
The heater radiator on a car with a Chevrolet Niva air conditioner can be changed in another way, but here you will have to heat the plastic and cut out its pieces. The easiest way to use this method is to install a “original” radiator or a copper radiator from a Volga car - it will fall into place more easily. It’s not worth experimenting with copper RP from a “penny” - it won’t fit in size. You will also need long L-shaped stove pipes, they will fit from the VAZ Nine, but you will need adapter tubes and additional clamps - the 2109 pipes are thinner than the Nivsky ones.
The principle of this installation:
- remove the glove compartment, dismantle the air duct on the passenger side;
- after removing the steering column casing and the heater protection in the heater radiator housing (on the driver’s side), we cut out or burn with a soldering iron a rectangular hole for removing the RP; by the contour of the plastic you can understand where exactly the heater radiator is installed;
- We unscrew the clamps of the stove pipes not at the radiator, but under the hood;
- we pull off the stove pipes, drain the antifreeze from them (tilt the hoses down), all the coolant does not need to be drained;
- so that the remaining antifreeze does not interfere with further work, we drill a hole in the old RP;
- Using a soldering iron on an old radiator, we anneal the furnace fittings for the pipes, pull out the control panel to the left (towards the driver);
- on the new stove radiator we install pipes 2109, adjust them to size, assemble the structure with adapter tubes, install the entire assembly in place, secure the RP using a homemade clamp.
To make it easier to carry out all this work, it is better to remove the front seats.
There are many disputes about which replacement is better for a Chevy Niva with air conditioning, but the second method has one serious advantage - the quality of Russian parts often turns out to be unimportant, and if the new heater radiator leaks, you will have to disassemble everything again. In the “collective farm” version, it will be possible to replace the RP a second time very quickly, but disassembling and reassembling the entire instrument panel may take a whole working day.
A good Chevrolet Niva heater radiator cannot be cheap. The smaller the distance between the honeycombs of the stove radiator, the better. The Chevrolet Niva heater radiator is available with or without turbulators. The presence of turbulators in the radiator increases the efficiency of the stove radiator by up to 27%. Their availability depends on the manufacturer. You can shake the radiator and hear something rattling inside, or simply shine a flashlight inside the heater radiator.
Read also: How to disassemble a magnetic lock
It is better to buy a Chevrolet Niva heater radiator made of copper or aluminum. It is quite difficult to find a copper stove radiator, but it is possible. The copper radiator of the Chevrolet Niva heater can be repaired if it leaks, but the aluminum one will have to be replaced. Soldering and repairing an aluminum stove radiator is more expensive than buying a new one. On cheap stove radiators, the plates can bend even from a light touch. With a good radiator, they can only be bent with a certain force, for example, by sticking your finger into the hole between the honeycombs.
Stove radiator cost:
| Options | Price |
| Chevrolet Niva heater radiator, aluminum | from 2500 rub. |
| Chevrolet Niva heater radiator, copper | from 3500 rub. |
Check the cost and availability of the stove radiator:
Whatsapp/Viber
Free delivery throughout St. Petersburg. Delivery to regions from 2 days.
The cost of a stove radiator depends on its condition (used, degree of wear, damage to honeycombs, etc.), the manufacturer, as well as availability in our warehouse or delivery time to our store.
Which stove radiator to buy:
1. Valeo (France) 2. AVA (Netherlands) 3. Nissens (Denmark) 4. Denso (Japan) 5. Termal (European Union)
Signs of a malfunctioning heater radiator:
— the heater radiator is leaking; — the heater radiator is clogged; — the smell of antifreeze in the cabin; — glass fogging.
Address in St. Petersburg: Store on Energetikov Ave.: Energetikov Ave., building 59, from 9.30 to 21.00, no days off. t. 8 (812)
Radiator 21236Х2.1301.012-10 ( 2123-1301012 ) Applicability: VAZ-2123 Chevrolet Niva engine: VAZ-2123 (1,690 cm³) Technical characteristics: Version: copper-brass, 3-row Core dimensions: width - 62 .5 height - 32.5 Overall dimensions: width - 71.5, height - 35 depth - 84 Dimensions of the base of the tank platform, cm: width - 5.4, length - 50 Heat transfer, kW: - 75 Working fluid: - water, antifreeze, antifreeze Coolant consumption, lit/min: - 90 Diameter of pipes, mm: - 32 . located on the RIGHT SIDE - Package dimensions, cm: height - 40, length - 73.5, thickness - 10 ( V = 0.03 m³) Weight, kg: - 8 Manufacturer: Orenburg radiator Analogue 2123: aluminum 2123-1301012 (Wonderful)
We will ship your luggage by transport company: [email protected]
* Price and technical specifications are for informational purposes only and are not a public offer. Opinions and recommendations reflect only our point of view and are not of an official nature.
21236Х2.1301.012-10 radiator NIVA-CHEVROLE "Orenburg radiator" copper-brass, tubular-tape type, made using traditional soft soldering technology using a flat-oval tube. It is characterized by high maintainability and low operating costs. Analogue using SOFICO prefabricated technology: 2123-1301012 When choosing, take into account the conditions and nature of the vehicle’s operation. - radiator drawing: ( . pipes are located on the right side)
When to change
Aluminum and plastic are materials that are difficult to repair if cracks or holes appear. Therefore, the main reason for replacing a radiator is a coolant leak.
There are two reasons for replacement:
- coolant leak;
- clogged tubes.
If you notice drops and smudges, you should immediately replace the product with a new one, and not try to eliminate leaks with dubious means for eliminating antifreeze leaks.
Despite advertising claims, various powders added to the coolant do little to eliminate leaks, but they perfectly clog radiator pipes. This reduces its efficiency. In this case, you need to replace the part with a new one. If this is not done, then systematic overheating of the engine will lead to the need for rapid overhaul.
Identified problems and ways to eliminate them
If controlling the stove on your Chevrolet Niva has suddenly become impossible for you, do not put aside the question of finding the cause. It may happen that you really need to redirect the flow of warm air in a certain direction, and you cannot count on a positive result.
We would like to point out that the problem may be a failure of the switches themselves, as well as a simple break in the cable that allows the valves to turn.
Algorithm for troubleshooting
Do not try to succumb to the “tempting” ideas of some “masters” who suggest doing nothing but changing the position of the damper manually. Indeed, this can be considered as one of the options for solving the problem, but only short-term. If even the slightest amount of time arises, we recommend not to be lazy, but to arm yourself with the necessary information and successfully carry out repair work aimed at restoring the functionality of the switches.
In order to get a positive result, we recommend that you prepare pliers, a screwdriver, high-quality glue, and three pieces of steel wire, the length of which is at least ten centimeters.
Under the driver's steering wheel there is a panel secured with four self-tapping screws. Unscrew them and remove the panel. Under it there will be cables that go to the switch. If you notice a clear break in such a cable, you can rush to the auto store and purchase the appropriate analogue. You can do it differently and use the material that you have prepared in advance.
The cable itself can be safely glued together. You can also disconnect the broken latch, then remove the broken cable. Make a double clamp from the prepared wire and secure it to the plastic part, tightening it with pliers, twisting it into a tight braid. This completes your repair work related to a broken cable.
If you still need to replace the switch itself, then after you remove the panel located under the steering wheel, you will have access to these round switches. All that remains is to simply remove them, then visit a car store and purchase an appropriate replacement. Just do not forget to show the removed regulator to the store salesperson so that he can study the markings and successfully select the right part for you. It will be easy to put the new switch in place, acting in the same way as before, but only in the opposite direction.
Sometimes drivers complain that it is difficult for them to still get to the broken cable, then we suggest you expand the space, and this will make access easier. Of course, in this case you will need to remove the control unit of your stove. There is nothing complicated in these steps, you just have to unscrew a few extra bolts and be extra careful.
Initially, after removing the panel cover, unscrew and carefully remove the plastic frame, then unscrew the two bolts and remove the cup holder. Now unscrew the bolts again and remove the glove box and tape recorder. All that remains is to unscrew two more bolts and carefully pull the climate panel towards you by about five centimeters. Now you will be much more comfortable checking the integrity of cables and fasteners, and if necessary, replacing or repairing them.
So, if you want to personally solve all the problems that may arise during the everyday operation of your favorite vehicle, it is enough for you to familiarize yourself with the recommendations provided, and then carry out all the proposed manipulations in practice. Your beloved “iron horse” will definitely thank you for showing such concern for him; he will be very pleased to please you with his excellent work.
Radiator installation
In the process of dismantling the radiator, you have to go through all the stages that are provided for its installation. It is important not to forget to change the rubber feet (switch to the new radiator from the old one), since the new unit is not equipped with them. When connecting the pipes, you need to remember that it may be necessary to repeat this procedure again, so the clamps should be positioned so that they can be easily unscrewed with a long screwdriver.
If you removed the heat exchanger of the hydraulic booster, then air did not enter the power steering compressor, therefore, there is no need to remove it from the system. The air contained in the power steering radiator will escape through the tank.
Having installed the radiator, proceed to piping the thermostat and installing the air filter housing. Since the coolant was drained, the system will have to be refilled. Filling is done through the expansion tank. Since the thermostat is closed, the large circle will be practically empty. The liquid has the opportunity to get into it, but it happens quite slowly. It is easier to warm up the car to operating temperature, and then add fluid to the desired level.
Installation
So, the replacement of the Niva-Chevrolet heater radiator is almost complete. Now you need to install the new element in the reverse order. First you need to cover it with a thin strip of foam rubber. It is better to use “Moment” or “Liquid Nails” glue for this. Next, using a file, we bite off the plastic corner (the same as when dismantling). Installation may also be difficult. Often the foam would catch on interior parts.
Therefore, you need to apply dexterity and dexterity in order to place the element in the seat without damage. Then we install pipes on the heat exchanger on both sides. We fasten the glove compartment and other interior parts. This completes the replacement of the Niva-Chevrolet heater radiator. All that remains is to add antifreeze to the required level in the expansion tank.
As a rule, the stove pipes fit quite tightly onto the radiator. Experienced motorists recommend using Litol-24 lubricant. We coat the inside of the pipe with it and install everything in place. The rubber band should slide in without effort. Additionally, lithol will provide us with a tight seal and prevent antifreeze leaks at the joints.
So, we found out how to replace the radiator of a Niva-Chevrolet stove with your own hands.
Dismantling the cooling system radiator may be necessary if it loses its seal or if there is major damage. In this article we will take a detailed look at the progress of such work both on a regular car and one equipped with an air conditioning system. Let’s immediately say that to carry out such work we will not need any additional auxiliary devices; a regular set of tools will suffice.
How to remove the cooling radiator on a Chevrolet Niva is described in detail in the video below: