Adjusting the clearances in the valve drive mechanism
The gap A (see Fig. 6) between the camshaft cams and the adjusting washers on a cold engine should be (0.2 ± 0.05) mm for the intake valves and (0.35 ± 0.05) mm for the exhaust valves.
The gap is adjusted by selecting the thickness of the adjusting washers 6. Spare parts are supplied with adjusting washers 3-4.5 mm thick at intervals of every 0.05 mm. The thickness of the washer is marked on its surface. The gap is adjusted in the following order. Remove the spare wheel, air filter and cylinder head cover, disconnecting the crankcase ventilation hoses from the crankcase ventilation hoses. Remove the front protective cover of the toothed belt, check and, if necessary, adjust the tension of the camshaft drive belt.
Remove the spark plugs and remove oil from the oil baths in the cylinder head. Inspect the surface of the camshaft cams: there should be no burrs, holes, wear or deep marks on them. Install fixture 67.7800.9510 on the cylinder head cover mounting studs (Fig. 64).
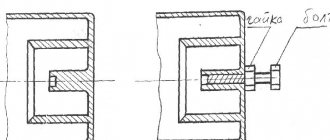
Turn the crankshaft until the installation marks on the pulley and the rear cover of the toothed belt align (see Fig. 7), and then turn it 40-50° (2.5-3 teeth on the camshaft pulley). In this case, there will be a combustion phase in the first cylinder. The crankshaft should only be turned clockwise either by the bolt securing the generator drive pulley, or by using tool 67.7811.9513 by the camshaft pulley. It is not allowed to turn the crankshaft by the bolt securing the camshaft pulley, as the bolt may be damaged.
Use a set of feeler gauges to check the gaps at the first camshaft cam. If the gap differs from the norm, then use device 67.7800. 9510 (see Fig. 64) recess the valve pusher and fix it in the lower position by installing clamp 2 (Fig. 65) 67.7800.9504 between the edge of the pusher and the camshaft.
Using device 67.7800.9505 (steel plate with a flat magnet) or pliers with narrow jaws, remove adjusting washer 1 and measure its thickness with a micrometer. Then determine the thickness of the new washer using the formula:
where H is the thickness of the new washer; B is the thickness of the removed washer; A - measured gap; C is the nominal gap.
Example
. Let's say A = 0.44 mm; B = 3.75 mm; C = 0.35 mm (for exhaust valve). Then W = 3.75 + (0.44-0.35) = 3.84 mm. Within the clearance tolerance of ±0.05 mm, we take the thickness of the new washer equal to 3.85 mm.
Install a new adjusting washer into the valve pusher, with the marking towards the pusher, remove the clamp 67.7800.9504 and check the clearance again. If it is adjusted correctly, the 0.35 mm thick feeler gauge (for 0.2 mm thick intake valves) should enter with slight pinching. Consistently turning the crankshaft half a turn, which corresponds to turning the mark on the camshaft pulley by 90°, adjust the clearances of the remaining valves, observing the order indicated in the table. 6.
Note. Count the cam numbers in order from the camshaft pulley.
After adjustment, pour oil into the oil baths of the cylinder heads and the front toothed belt cover. Wrap the spark plugs, install the air filter, crankcase ventilation system hoses and a spare tire.
Source
Features of the timing device
The same applies to the gas distribution mechanism. The essence of the work is identical, as well as the design, but the VAZ Oka has 11113 distributors. the shaft has only 4 cams. Therefore, the maintenance of the power plant of a small car is no different from the VAZ-2108.
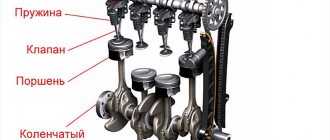
The Oka uses a gas distribution mechanism with an overhead camshaft, which is installed in the engine cylinder head. This made it possible to abandon a number of components (bars, rocker arms). In this design, the camshafts. shafts act on the valves through pushers. In this case, it is necessary to have a thermal gap between the component elements (cam-pushrod-valve heel), which compensates for the change in geometric parameters occurring due to expansion of the metal as a result of heating.
But during engine operation, wear occurs on the surfaces of the cams, pushers and heels as a result of friction, which causes the thermal gap to change. Moreover, it is not necessary that it will increase; it also happens that the gap decreases. This often happens due to low-quality oil, which leads to the appearance of deposits on the working surfaces of the timing belt.
As a result of a change in the thermal gap, a violation of the valve timing occurs, which is why the power plant loses power (which the Oka already has “sparsely”), fuel consumption increases, and dynamics decrease. And all because the valves either open insufficiently (increased clearance) or do not fit tightly to the seats (reduced clearance).
To compensate for changes in the thermal gap, the VAZ-1111 uses special adjusting washers, which are placed in a special seat in the pusher. That is, the contact of the camshaft cam occurs not with the pusher, but with the installed washer.
In order for the thermal gap to meet the standard, periodic adjustment of the valves on the Oka is required. Due to the design features of the timing belt, the entire process boils down to installing washers of the required thickness.
Adjusting valves oka 1111
Your request on the topic of adjusting the valves of the VAZ 11113 Oka with your own hands video has been processed. The best repair video and instructions on how to repair can only be found on our website. The presented videos are published with photos. Enjoy watching.
Owner reviews: after-sales service - competitors will die from shock
Category: Video instructions
Published by admin: at the request of Moses
When should adjustment be made?
The valve clearance on the Oka, according to the manufacturer’s recommendations, should be adjusted every 30 thousand km. But this is far from an accurate indicator, since much depends on operating conditions. Thus, lubricants, fuel, climatic conditions, features and intensity of use of the car can significantly affect the operation of the timing belt, and work on adjusting the thermal gap will have to be carried out earlier.
There are a number of signs indicating a change in the thermal gap:
- Increased engine noise (the sound of the unit is similar to a diesel unit);
- Power drop;
- Poor launch;
Main video: adjusting the valves of the VAZ 11113 Oka with your own hands video
More video: adjusting oka valves
Currently reading about French cars
© Repair of foreign cars and our cars
2014 – 2021 Copying materials from a web resource without consent from the site administration is strictly prohibited.
February 21, 2011, 09:23 #1 123
February 21, 2011, 09:35 #2 123
February 21, 2011, 10:53 #3 123
and are you sure that the problem is not in the marks on the timing belt, according to the description you missed the mark.
February 21, 2011, 14:40 #4 123
Eugene! Good afternoon. I couldn't fly by a tooth. The marks looked the same, the only thing is that before the engine was overhauled, the distributor was completely unscrewed to +. By the way, after I overhauled it, detonation appeared, if I put small gaps, the detonation disappears. But there is a possibility of valve burnout.
February 21, 2011, 15:26 #5 123
180xot, 21 February 2011, 14:40
Eugene! Good afternoon. I couldn't fly by a tooth. The marks looked the same, the only thing is that before the engine was overhauled, the distributor was completely unscrewed to +. By the way, after I overhauled it, detonation appeared, if I put small gaps, the detonation disappears. But there is a possibility of valve burnout.
completely plus is bad, it should be 2/3 or a little less, but as for the marks, there may be a mistake, try transferring it to a tooth, it’s not a tricky thing and doesn’t last long, it helped me on the 9, also after replacing the timing belt I couldn’t get it right Direct the engine channel.
Oka carburetor design
Cars under the Oka brand were produced from 1987 until 2008, at first the VAZ-1111 was modified (with a 0.65-liter two-cylinder engine). The updated VAZ-11113 model was launched into production in 1995, and it received a 749 cm³ engine. Initially, for 0.65-liter engines, the Dimitrovgrad Automobile Unit Plant developed the DAAZ carburetor series 1111, which combined elements of the Ozone and Solex type HRVs. Later, the DAAZ-11113 model began to be produced for the 0.75-liter internal combustion engine (ICE), which later underwent a slight modernization.
Carburetor 11113 is a device for creating an air-fuel mixture in a certain proportion, which sets the stable operation of a car engine in all modes. The body of this unit consists of 3 parts: the top cover, the middle (main) part where the float chamber is located, and the bottom part with throttles (flaps), the carburetor device itself is a 2-chamber one, with sequential opening of the throttles.
The carburetor assembly includes:
- the main dosing system (abbreviated as GDS), operating in all modes, which includes diffusers, fuel/air supply jets for both chambers;
- idle speed system (abbreviated as XX), which allows the engine to operate stably at minimum speed and consume fuel economically;
- economizer, which enriches the fuel mixture at high speeds and heavy loads;
- accelerator pump, its main function is to ensure uniform operation without failures with any, even the most sharp, pressing of the accelerator (gas) pedal;
- a starting device that allows you to smoothly start a cold engine at low air temperatures;
- float chamber, due to which a constant level of gasoline in the carburetor is maintained, required for stable operation of the internal combustion engine.
- a transition system that makes it possible to achieve a smooth increase in speed, without jerking, during the opening of the secondary chamber.
Do-it-yourself valve adjustment for VAZ 11113 Oka
Your request on the topic of adjusting the valves of the VAZ 11113 Oka with your own hands video has been processed. The best repair video and instructions on how to repair can only be found on our website. The presented videos are published with photos. Enjoy watching.
Owner reviews: after-sales service - competitors will die from shock
Category: Video instructions
Published by admin: at the request of Moses
Installation of Solex on Oka
It is often possible to achieve fuel economy and more stable engine operation by repairing the carburetor, replacing the repair kit, and making proper adjustments. But not all owners of small cars are satisfied with the dynamics of the engine and its throttle response, so some drivers perform tuning - install a Solex control unit from cars 2108-09. The price of this unit is relatively low, and many can afford this installation, but it will require some additional parts and minor modifications. Spare parts needed:
- thick spacer for the carburetor;
- 2 thin gaskets;
- clamps;
- fuel pipes (if necessary).
In any case, you will need to do something with the air filter housing: either upgrade an existing part, or purchase it from the VAZ-2108 (09) model. It's all about price, and if you want to save money, then it is better, of course, to modernize. Replacing a standard carburetor unit with a Solex is done as follows:
- remove the old HRSG (dismantle the air filter assembly, disconnect the fuel hoses, gas draft, choke cable, unscrew the four fastening nuts);
- We install thin gaskets on the collector platform, and a spacer between them;
- fasten the Solex with four nuts;
- we attach the gas rod, there should be no problems, adjustments are usually not required here;
- connect the EMG wire;
- we secure the fuel pipes with clamps; if there is no return line on the machine, we install a plug on the corresponding fitting;
- the choke cable will need to be “thrown over”, otherwise it will not be long enough;
- Having connected and installed everything except the “air”, we pump fuel into the float chamber with a gas pump, and try to start the engine.
Idle speed adjustment should be carried out only after the internal combustion engine has completely warmed up; idle speed is adjusted by tightening and unscrewing the quality and quantity screws. First, by using “quantity,” we raise the speed a little (to about 1000), then we tighten the quality screw until the engine runs quieter and small interruptions appear. We “add quality” a little, turning the screw a little, and using “quantity” we achieve speed within the standard range of 850-900 rpm.
Finally, we install the “air” in place and conduct tests on the road. If fuel consumption seems high, or the idle speed is not satisfactory, idle speed can always be adjusted on site, without removing the air filter housing.
Overfills the carburetor
Often on the Oka a situation arises when the carburetor floods; with such a malfunction it is usually very difficult to start the car, and in other cases the engine does not start at all. There may be several reasons for the problem:
- does not hold the needle valve;
- the fuel pump creates too much fuel pressure (if a return line is not installed);
- the level in the PC is set incorrectly (more than normal);
- The float is not sealed.
Finding the cause of the defect usually begins with inspecting the parts of the float chamber, and if there is significant overflow and smells of gasoline, first of all you should pay attention to the locking mechanism.
Cleaning the carburetor from carbon deposits and dirt
Most carburetor problems occur due to poor quality fuel. This is what causes plaque and soot to appear. It also causes blockages in the fuel channels. To eliminate all this, you will have to use a special cleaning fluid for carburetors. It is a spray can. The cylinder is usually accompanied by a set of nozzles for flushing the carburetor channels. There are many manufacturers of fluid, but HG3177 fluid is especially popular among car enthusiasts, allowing you to perfectly flush the carburetor in a few minutes.
Carburetor flushing fluid HG3177 is very popular among car enthusiasts
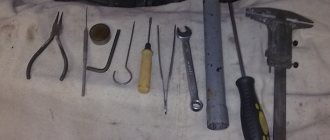
Tools and Supplies
- rags;
- several toothpicks;
- a piece of thin steel wire 30 cm long;
- compressed air cylinder;
- protective rubber gloves and glasses;
- set of open-end wrenches;
- flat screwdriver;
- carburetor cleaning fluid.
Sequencing
- Once removed from the vehicle, the carburetor is completely disassembled.
Completely disassembled and prepared for cleaning, the DAAZ 1111 carburetor for the OKA car
The thinnest nozzle for a can of carburetor cleaning fluid