Publication date: September 29, 2021. Category: Automotive equipment.
Not so long ago, our authorities passed a law stating that, regardless of the time of day, fog lights or DRLs must work on cars. This decision was based on the experience of European specialists, who proved that thanks to working light elements on the vehicle, the percentage of road accidents can be significantly reduced. In this regard, since 2010, changes have been made to GOST and traffic rules, according to which non-working fog lights or missing DRLs can cause a rather “unpleasant” fine (1,500 rubles).
But, despite the fact that the installation of daytime running lights has now become mandatory, some car owners are convinced that they have found a way out of the situation. Particularly enterprising drivers decide to simply connect the lights in the low beam headlights so that they turn on along with the engine, naively believing that this will be enough. Unfortunately, side lights will not help you in any way when meeting with a traffic police officer, since they cannot be used instead of DRLs. Therefore, if you are not the owner of a modern car that already has “hybrid” fog lights with DRLs installed, then there is no escape from installing new light elements.
You can install running lights in a specialized workshop or yourself. If you are confident in your abilities, then before you start work, carefully study the rules for installing running lights on a passenger car.
GOST requirements for installing DRLs
According to GOST R 41.48-2004, do-it-yourself installation and connection of navigation lights must be carried out strictly in accordance with the following requirements:
- A distance of 600 mm must be maintained from the edge of the car body to the DRLs. It is allowed to reduce this indicator to 400 mm, but only if the overall width of the machine is less than 1.3 m (clause 6.19.4.1).
- The distance from the ground level to the light elements should be in the range from 250 mm to 1500 mm (clause 6.19.4.2).
- DRLs must be forward-facing and installed on the front of the vehicle (clause 6.19.4.3).
- A certain geometric appearance is maintained. According to paragraph 6.19.5, the horizontal angle beta should be 20 degrees inward and outward, and alpha should be 10 degrees downward from the horizontal and upward.
At the same time, a specific connection diagram for running lights is not reflected in GOST in any way, so here you are free to make a decision yourself. However, there is a small nuance. Installing running lights in accordance with GOST also implies automatically turning on the DRLs together with the car engine and turning them off when the headlights are working. The only exception is turning on the high beam headlights for a few seconds to signal other drivers.
Based on these requirements, the choice of navigation lights must be approached carefully.
Important details you need to know
As with any standard, all the parameters that must be observed when connecting daytime running lights can be found in GOST - in our particular case we will need GOST R 41.48-2004, specifically paragraph 6, subparagraph 19. From what you need to know and take into account : The electrical function circuit which is required to control the voltage depending on the position of the terminals must be assembled in a special way. In the case of daytime running lights, the criterion for correct installation is the fact that the lights should turn on automatically when the engine is started. But at the same time, they should also automatically turn off if the driver manually turned on the main headlights.
You can also highlight paragraph 5, subparagraph 12, which says that the main headlights (the so-called headlights) themselves should be turned on only after the side lights have been turned on. An exception can be considered those moments when the side lights turn on briefly as signals (flashing).
Despite the fact that this does not seem particularly important at first glance, when connecting daytime running lights yourself, you will have to take into account all these nuances and delve into them.
While it may seem that the “science” of proper DRL wiring is all about striking a balance between the various warning lights on the car, this is actually not the case. The connection diagram for running lights should also take into account the fact that the stabilization unit for LED modules is very desirable when operating running lights. Without this block, the voltage inside the DRL will constantly jump. Such voltage fluctuations lead to rapid failure of the device and the need to replace it.
How to choose running lights
The stores offer a wide selection of DRLs from a variety of manufacturers, in various configurations and colors. However, not every lamp is suitable for use as navigation lights. For example, halogen and xenon lights will not withstand constant operation; they will “eat” a lot of energy and discharge the battery. Incandescent bulbs are also not the best choice, but LEDs are considered the best when installing DRLs.
There are also many LED running lights. The best products are those in glass housings and lensed LED DRLs for foglights. The rest (on rubber bands, “eagle” and “dragon” eyes, in the form of SOV platinums) do not meet the requirements stated by GOST.
Before connecting the daytime running lights yourself, make sure that:
- DRLs match the shape, type and design of your car's bumper.
- The size of the DRL unit, which is selected based on where the running lights will be installed (in the air intake or on the bumper), allows you to mount them in your car.
- The number of LEDs in the block does not exceed 5 pieces for each. If the light is too bright, the daytime lights will shine like “dimensions”, which is unacceptable.
- The luminous intensity of the DRL should be no less than 400 cd and no more than 800 cd, and the temperature range of the lamps should be from 4,300 to 7,000 K.
- Running lights emit pure white light (yellow and blue products are prohibited).
If we talk about manufacturers, then the most reasonable thing would be to purchase a ready-made DRL kit from Hella or Philips. Such units are equipped with everything you need (including a controller) and fully meet the technical requirements. regulations.
Having purchased DRLs for a car, or made them yourself, all that remains is to prepare everything necessary so that the installation of daytime running lights with your own hands goes without “surprises”.
What you need to install DRLs yourself
For work you will need the following materials and tools:
- Any crimping device, such as pliers.
- Wire cutters.
- Blowtorch and lighter. The latter will be required to tighten the heat-shrinkable tubes.
- 3-4 meters of insulated two-core wire, for example, PVA 2x1.5 or 2x0.75 (required when connecting two DRL units in parallel).
- Any sealed contact (reed switch).
- A single-core wire with a diameter of about 1.5-2.5 mm and a length of about 3 meters.
- Plastic clamps.
- A regular four-pin 12V relay.
- LED DRLs.
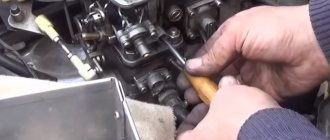
You should also make sure there is a clean, dry place where you will be working. After this, you can begin to install additional lighting elements.
First of all, decide where exactly the daytime running lights will be mounted. Some cars already have ready-made holes for additional fog light modules, while other cars use the radiator grille for DRLs. The last option is the best, since in this case you will be able to maintain all the necessary distances and boundaries.
Simply remove the radiator grille and cut out the holes for future lights yourself. It is important to remember that the light must be supplied at a certain angle. You may need to make an additional hole for this.
DRL connection diagrams
Since DRL can be mounted at your discretion, there are many connection schemes that allow you to configure the optics in the most convenient way for the driver. Let's look at the most popular of them.
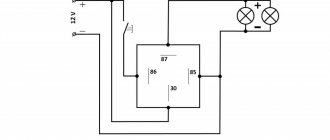
Option 1 (to speed sensors)
This connection of running lights through a relay, the diagram of which is shown below, is considered one of the simplest. In this case, the DRLs will turn on depending on the operation of the speed sensor. In order to implement this scheme, it is necessary to connect contacts K1.1 to the circuit section (into the wiring break) from the low beam switch button to contact 85. In this case, you can use any relay with an opening pair, but experts recommend using a product with a TC code.
4 pin relay, generator and oil sensor
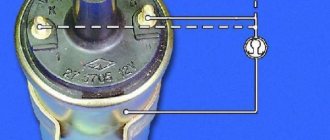
These are two more methods worth considering. A 4-pin relay, a generator and an oil pressure sensor will be used here. But not in a single chain.
Both schemes assume that the DRLs will turn on only when the engine starts. The system is powered by a generator and is based on switching a 4-pin switch and a reed switch.
The connection of the relay contacts looks like this:
- Pin 30 goes to the plus of the LED module;
- Contact 85 goes to the plus of the wire to the dimensions;
- Contact 86 is required for any output from the reed switch;
- 87 contact to the positive terminal from the battery;
- Also, the second terminal from the reed switch goes to the battery plus.
After connection, configuration must be carried out. Here you need to start the engine and start moving the reed switch near the generator in order to get the movement and stable operation of the movers. Then the reed switch should be removed into a special thermal tube and fixed.
If there is no reed switch, then power for the DRL can be supplied through the oil pressure sensor. Then contact 86 goes to the pressure lamp, but otherwise the circuit remains in its original form.
The schemes are excellent in many ways. But they cannot be used in situations where the dimensions are based on LEDs. This is the only significant drawback.
Types of connection
DRL Eagle eye, eagle eye
The connection diagram for running lights depends on the configuration and your budget. There are 3 types of configuration:
- the most inexpensive, only DRL;
- average in price, stabilizer included;
- expensive, with a control controller.
If you have the cheapest and worst ones, then the kit does not include a controller or control unit. Such a unit performs the function of a voltage stabilizer and on/off control.
The average configuration includes a 12V voltage stabilizer. There are voltage surges in the car network, and LEDs really don’t like this and fail. The stabilizer will significantly extend the life of the LEDs. But in this option, you will have to choose a place for connection so that they turn on only when the engine is running. There are many places for this, for example an oil pressure sensor or a generator.
Domestic model
The expensive version is equipped with a control unit that connects directly to the battery in the car. According to the principle of operation, they are of two types:
- determine the difference between the number of volts when the engine is off and on;
- cheaper, it turns on when the voltage rises above 13V.
The best option is the first one, regardless of the voltage on your battery, always turn it on and off correctly. The second option is budgetary and does not always work. With the engine off, the number of volts must drop below 13V for the controller to turn off the DRL. However, if your battery is new or well charged, then even after stopping the engine, it will have a voltage above 13V for up to several hours. That is, the daytime running lights will not turn off on their own until there is less than 13V. The only drawback will be its own power consumption when the controller is waiting for the engine to start. It will drain the battery along with the security alarm.
Recommendations
Hello.
Are they still working? didn't burn out? how long did you work?
And where are they at night?
Almost like low beam!
accepted thx saw them still on wish lists
Does your hazard warning light work? I installed the same DRLs + turn signals and ran into the problem that the ice does not work when the emergency lights are turned on!
Everything is working! Did you connect correctly?
Connected correctly, already changed - + result 0. After manipulating the rear turn signals, I discovered that if I turn off two bulbs, the emergency lights buzz, that is: in front of the turn signals, ice + side halogen repeaters = works, + I connect the rear 1 halogen light, = it works, but the ice turns on later and the resistance heats up, then + I connect back 2 light bulbs and the ice does not work, and the resistance gets hotter and hotter! The hike cannot be done without an electrician.
What about the fuse? Where to attach it?
No, but it’s a must! They won’t work for long without stabilization!
DRL with turn signal function. The connection principle is simple: a standard chip is connected to the turn signal connector and the third wire is connected to “+” (for example, dimensions). But here's how I started dancing with a tambourine: In the evening, I just decided to check how it works in the yard. So far without any stabilizers. So: I plug the turn signals into the standard connector, turn on the turn signal - it doesn’t blink. OK. I throw the third wire to the “+” of the battery and voila - the white one lights up. Without touching anything, I turn on the turn signal - and the white one begins to blink as it should, as if opposite the turn signals, but the yellow one does not blink (does not turn on). OK. I think the yellow LEDs are faulty. I open the trunk, connect the rear lights to the turn signals and voila - the yellow one blinks. Now the dilemma is - what is it? The design itself is in good order, because The driver works as it should, all LEDs are also working properly, because everything is on fire (in the rear light). The car chain is working properly, because Both minus and both plus are supplied to the DRL driver. What's the catch? Why doesn't the yellow one blink when installed from the front?
PS I still have one assumption in my head: due to the fact that the side repeaters are powered with the front turn signal, the LED does not have enough voltage to turn on. But on the other hand, this is unlikely, because I tried both the emergency lights and when they were on - the effect was the same.
Can you give me any advice?
If you did everything as written, then it can’t help but work! Connection is very simple! white should not blink, it goes out when the collar is turned on, and turns on after turning off, with a delay of 2-3 seconds!
3 hours of dancing with a tambourine in the garage - and this is the result. The Chinese confused “+” and “-“. I realized this when I noticed (during various manipulations) that the resistance was getting very hot. I swapped the wires and, like magic, everything works as normal)))
So that's great! You can open a dispute about this and get your money back!
Modern car owners are increasingly thinking about the possibility of using energy-saving technologies to modernize their car. In particular, many of our compatriots install DRLs in turn signals to turn them on instead of low beam headlights in the morning and afternoon. But how does the traffic police feel about such innovations? After all, it has long been known that making changes to the design of a vehicle is punishable by a fine or even deprivation of a license. And, based on this, one might think that it is unacceptable to install them without permission on cars that do not come equipped with factory daytime running lights. However, in reality everything is not so simple.
Operating mode
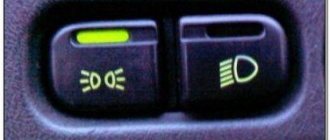
According to technical regulations for cars, DRL should automatically turn on when the engine starts. When you turn on the low beams, they should turn off automatically so as not to dazzle at night.
There are also combined models with installed turn signals on sale. The turn signal duplication section is connected separately in parallel to the standard turn signals. Having a stable diet is also a must.
DRL with turn signal
For models with additional control, there is a follow-up backlight function that operates for 10 minutes after the engine is turned off. It illuminates your path to your home or dugout, depending on where you live. Osram DRL has a mode in which they do not turn off, but dim by 50%. I just don’t know how legal it is and whether it will cause blindness.
Is it legal to install DRLs in turn signals?
In general, the inspector may have complaints about interference in the design of the car. If DRL is provided by the manufacturer, as on many modern cars, then there are no questions. But self-installation is just such an intervention, and failure to comply with the rules can result in a fine.
There is a GOST that regulates the location of daytime lighting. For example, the distance between the right and left must be at least 60 cm, and their height from the ground must be at least 25 cm and no more than 150 cm. You must also use exclusively white light and observe the angles of inclination and rotation. The light should automatically turn on when the engine starts and turn off with it.
After installation, you need to obtain permission to operate, even if everything was done strictly in accordance with GOST. Otherwise, problems may arise during the first technical inspection. This especially applies to flexible running lights with a running turn signal function, since they are usually installed at your own discretion, as a tuning not provided for by the design. They may not meet the requirements.
Therefore, it is always safer to contact specialists who will select and install running lights suitable for the car, and then formalize them.
The best prices and conditions for the purchase of new cars
DRL controller
I prefer the DRL connection diagram using a control unit, the most reliable method, suitable for any car and does not require any knowledge. Many car enthusiasts buy a DRL control unit from AliExpress - it is inexpensive, and the reviews seem to be good. However, most reviews are left either upon receipt of the product or after several days of use. In fact, absolutely all DRL controllers from AliExpress are short-lived and have the following disadvantages:
- the operating principle does not comply with GOST;
- there is no stabilization (for the majority);
- low quality of materials and workmanship;
- the features of the vehicle’s on-board network are not taken into account;
- no guarantee;
- some do not have moisture protection.
Choosing a stabilizer
In this form, the first and second methods will be combined. Even if your daytime running lights do not have a stabilizer, I recommend purchasing one or making it yourself.
You can buy Chinese modules at prices ranging from 50 to 120 rubles, so as not to order on Aliexpress, take a look at Avito, you can find very reasonable prices. The most common modules are pulse LM2596 and linear LM317. They are of course outdated, but they will draw a current of 1 ampere, which will be a power of 12 watts.
The XL6009, XL4015 chips are considered modern for 2021. They have higher efficiency and heat up much less. They can withstand a current of 2 Amps without a chip cooling system, this is equivalent to a load of 24 watts.
Connection via relay
Specialized relay Forget-me-not 3, price 450 rub.
On forums and websites you will find different ways to connect daytime running lights with your own hands; it will be different for each brand. Specialized relays are also sold, for example Forget-me-not, designed for any car.
The operating principle is simple. Power to the daytime running lights is supplied from the ignition switch wire. The positive wire from the far and near breaks the circuit when voltage appears on it. A 5-pin relay is sufficient for this. First, look for a solution on forums that specialize only in the make of your car. Perhaps you will find a simpler solution.
Connection diagram for running lights via relay
For example, in Duster you can connect the DRL to the cigarette lighter; voltage is supplied to it only when the ignition is turned on. This is better than looking for the ignition wire in the wiring. In any case, I recommend installing a fuse in case of a short circuit.
Many circuits use a gauge wire to disable the DRL. This is incorrect DRL should not go out when the headlights are turned on, only when low beam is on.
Another type of connection diagram for daytime running lights is the installation of a relay in the standard relay block of a car without any upgrades. It includes 30% or 50% distant, which will be enough to identify vehicles on the road. If the far one consumes 120W, then 30% equals approximately 36W, 50% equals 60W.
How to obtain permission for reconstruction
Regarding the issuance of permission to install running lights, you will most likely be refused. The man spent 2 years and 8 thousand rubles, and never achieved any results. although he collected all the documents and installed the DRL in a specialized service. And in the end they answered him:
We cannot issue you a permit. You are the first who decided to officially install DRLs. We have never issued such conclusions. This is a pilot project. We are not sure that if we give you permission, then they will not do anything to us for it. Today we will allow you - and tomorrow the crowds will come here with the same thing. Drive like this - you don’t get stopped for them, do you? Well, that’s wonderful! Maybe someday the time will come and you will become a pioneer!…
As a result, it turns out that you can install running lights without permission from the authorities and drive safely. But it is unknown how long this will last. And won’t they issue a decree on the design of DRLs, as was the case with towbars, because we so love to “shod” the already poor Russians.
The figure below shows a diagram of high beam lamps as daytime lights.
When switch SA1 is turned on, voltage is supplied to the lamps and to the relay winding, which in turn switches the lamps from parallel to serial mode. In this mode, the lamps glow at half incandescence.
When SA1 is turned off, the lamps switch to parallel mode.
Other less popular methods
Many people are interested in how to connect DRLs without a relay on their own, but it depends on the electrical system of your car; look for a solution in online clubs dedicated to your car. The most important thing is that power is supplied to this place after the engine starts.
The basic diagram for connecting the DRLs is through a 4 or 5 contact relay, which turns off when the low one is turned on. Those who are not too lazy to rummage through the car’s wiring can connect it from the oil pressure sensor or generator. On any vehicle, when the engine starts, the oil pressure light on the dashboard lights up, the signal from this wire is used to supply power. The second way to connect running lights yourself is to connect to a generator. They will turn on automatically when voltage appears on the generator.
It couldn't be simpler
This is the simplest scheme, which involves connecting to a battery or generator as a power source.
The scheme provides that the DRLs will be activated simultaneously with the engine starting. The point is to connect the plus to the positive terminal from the ignition switch of your Renault Logan or the same Lada Largus, and fix the minus on the car body in any convenient place. Everything looks simple and extremely logical. But you should not rush to conclusions, nor should you make such a connection. After all, it has an obvious drawback.