Causes
Below are the main reasons why reverse lights may malfunction and not light up when driving in reverse gear.
- Lamp burnouts
- Fuse
- Reverse sensor
- Open circuit
- Oxidation of contacts
Lamp burnout
This is the simplest option, but it still cannot be ruled out. It is unlikely that both bulbs could fail at once, but it is possible that you may not have noticed that one of the reverse lights is not on. Therefore, first of all, it is worth checking the lamps. To do this, you need to dismantle the lamp; it is removed from the luggage compartment and is held on by three wings.
Fuse
Both reversing lamps are powered by the same circuit, protected by the same fuse. Therefore, when the fuse-link melts, the power supply circuit for the lights disappears and both lamps stop turning on. This can easily be checked by looking at the dashboard, since on the Priora the fuse responsible for powering the rear running lights is also responsible for the dashboard lighting. If the car's lights and instrument panel lights stop lighting at the same time, the fuse link has most likely failed.
This fuse is numbered F12 with a rated current of 20A or 10A, depending on the vehicle configuration. In the “luxury” configuration 20A, “standard” 10A.
You can only replace a fuse with the same rating as it was previously installed in order to avoid a fire in the vehicle's electrical wiring.
Designations for other fuses can be found here.
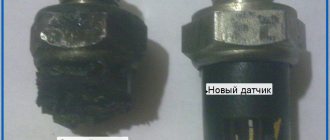
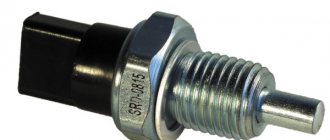
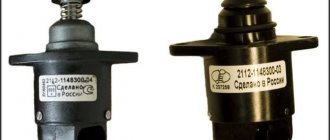
Reverse sensor
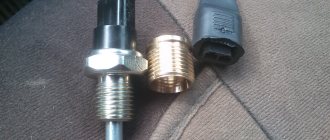
To turn on the reversing lamps on the Prior, a special sensor is used, which is installed in the gearbox housing (gearbox). It is he who is able to disable the lights. This sensor is reliable, but it also sometimes fails.
It is not possible to repair this electrical appliance, so it is recommended to replace it entirely.
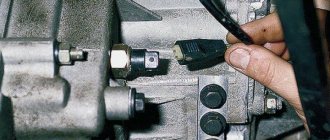
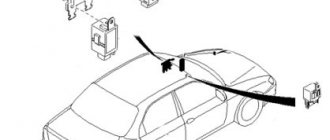
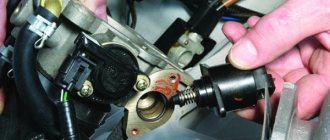
You can get to the sensor from the inspection hole, but to do this you will have to remove the crankcase protection (if equipped). We find the sensor, circled in red in the picture.
Next, remove the chip from the sensor and close it with a jumper made of thin wire, then turn on the ignition and see if the lights come on. If the lamps come on, then you need to start replacing the sensor.
Open circuit
Checking the circuit for open circuit is done using a multimeter. It is necessary to turn on the ignition on the car and set the gearbox to reverse gear. On the device, set the switch to measure DC voltage, as in the picture below.
We check whether the plus is coming to the lamp; to do this, remove the lamp and connect the device between the two contacts; if the device shows readings from 11V to 13V, then everything is normal and the circuit is working.
If there are no readings, then we connect one of the multimeter probes to the car body and take a measurement. The readings that appear on the multimeter will mean that the “-” mass is not reaching the flashlight. You need to look for a break.
If there are no readings, then the power supply circuit “+” and “-“ is open. It is best to contact an auto electrician to fix the problem.
Oxidation of contacts
Contacts can oxidize due to a poor connection between the lamp and the contact, as well as the sensor and the chip. Most often, oxidation occurs at the contact between the chip and the sensor. We check the contacts, tighten them if necessary and clean them.
After carrying out all the manipulations described above, the rear running lights of your car will shine like new.
Source: enginehack.ru
Lada Priora relay and fuse diagram
- January 15, 2015 Lada.Online 2 084 667 The relay and fuse block is also called a mounting block or a black box. In the event of a car breakdown related to electrical equipment, the fuses and relays are first checked. If a fuse is blown, you must first determine the cause of its blown before replacing it.
Where are the fuses on the Priora?
- The main mounting block of the Priora is closed with a lid and located at the driver’s left foot. To open it, you need to turn three latches 90° and unclip the lid.
- The fuse box is under the hood, which is located near the expansion tank.
- Another mounting block, which is located near the left foot of the front passenger. To gain access to the fuses and relays, unscrew several screws with a Phillips screwdriver.
Below is a description of each fuse and relay block in order.
Priora fuse box diagram
Fuse No. Current, A “Standard” and “Norma” “Norma” with air conditioning and “luxury”
| F1 | 25 | Engine cooling radiator fan | Reserve |
| F2 | 25 | Heated rear window | Mounting block, rear window heating relay (contacts). Electrical package controller, contact “10” of XP2 block. Rear window heating element. |
| F3 | 10 | Right headlight, high beam | Right headlight, high beam lamp. Instrument cluster, headlight high beam indicator. |
| F4 | 10 | Left headlight, high beam | |
| F5 | 10 | Sound signal | Mounting block, horn relay. Sound signal. |
| F6 | 7.5 | Left headlight, low beam | |
| F7 | 7.5 | Right headlight, low beam | |
| F8 | 10 | Alarm signal | Mounting block, alarm relay. Alarm sound. |
| F9 | 25 | Priora heater fuse | Reserve |
| F10 | 7.5/10* | Interior lighting, instrument panels, brake light | Instrument cluster, pin “20”. Brake light switch. Brake light bulbs. Interior lighting unit. Interior lighting. The door sill light on the right front door. Additional brake signal. |
| F11 | 10/20* | Wiper | Mounting block, high speed windshield wiper relay. Switch for cleaners and washers, contact “53a”. Wiper and washer switch, contact “53ah”. Heated rear window switch. Mounting block, rear window heating relay (winding). Windshield wiper motor. Rear window wiper motor (2171,2172). Windshield washer motor. Rear window washer motor (2171,2172). Airbag control unit, pin “25”. |
| F12 | 20/10* | Terminal 15 devices | Instrument cluster, pin “21”. Electrical package controller, contact “9” of block X2. Electromechanical power steering control unit, contact “1” of block X2. Reversing light switch. Reversing lamps. Parking system control unit, contacts “11” and “14”. |
| F13 | 15 | Cigarette lighter fuse Priora | |
| F14 | 5 | Left headlight, parking light, license plate light, trunk light | Side light lamps (left side) Instrument cluster, main light indicator License plate lights Trunk light Electrical package controller, pin “12” of block X2 |
| F15 | 5 | Right headlight, parking light | Side light lamps (right side) Glove compartment lamp |
| F16 | 10 | Terminal 15 ABS | Hydraulic unit, contact "18" |
| F17 | 10 | Left fog lamp | |
| F18 | 10 | Right fog lamp | |
| F19 | 15 | Seat heating | Seat heating switch, contact "1" Front seat heaters |
| F20 | 5/10* | Immobilizer control unit | Recirculation switch (switch on) Mounting block, relay for low beam headlights and parking lights (automatic lighting control system) Heater electric fan relay Automatic lighting control switch Windshield wiper and external lighting control unit, contacts “3”, “11” Automatic climate control system controller installation, pin “1” Automatic window cleaning system sensor (rain sensor), pin “1” |
| F21 | 7.5/5* | Rear fog lights | Light switch, contact "30" Diagnostic block, contact "16" Clock Automatic climate control system controller, contact "14" |
| F22 | -/20* | Reserve | Windshield wiper motor (automatic) Mounting block, windshield wiper relay and windshield wiper high speed relay, (contacts) |
| F23 | -/7.5* | Reserve | Windshield wipers and external lighting control unit, pin “20” |
| F24-F30 | Reserve | ||
| F31 | 30 | Electrical package control unit | Electrical package controller, terminal “2” of block X1 Electrical package controller, terminal “3” of block X1 Driver’s door module, pin “6” Threshold light of the left front door |
| F32 | Reserve |
* - for the “Norma” configuration with air conditioning and “luxury”
Relay “Norma” “Norma” with air conditioning “Lux”
| K1 | relay for turning on the electric radiator fan of the engine cooling system | Reserve | Relay for turning on the low beam and side lights of the headlights (automatic lighting control system) |
| K2 | rear window heating relay | ||
| K3 | starter activation relay Priora | ||
| K4 | additional relay (ignition relay) | ||
| K5 | space for backup relay | ||
| K6 | windshield washer and wiper relay | ||
| K7 | headlight high beam relay | ||
| K8 | horn relay | ||
| K9 | alarm relay | ||
| K10 | Reserve | Fog light relay | |
| K11 | Reserve | Front seat heating relay | |
| K12 | Reserve |
Location of Priora fuses under the hood
- F1 (30 A) – power supply fuse for the electronic engine control system (ECM);
- F2 (60 A) – fuse for the power supply circuit of the engine cooling system fan (power circuit), additional relay (ignition relay), rear window heating, electrical package controller;
- F3 (60 A) – fuse for the power supply circuit of the electric fan of the engine cooling system (relay control circuit), sound signal, alarm signal, ignition switch, instrument cluster, interior lighting, brake light, cigarette lighter;
- F4, F6 (60 A) – generator power circuit fuses;
- F5 (50 A) – fuse for the power supply circuit of the electromechanical power steering
Relay and fuse box for Halla air conditioner
- right electric fan power supply fuse (30 A);
- fuse for the power supply circuit of the left electric fan (30 A).
- right electric fan relay;
- additional relay (sequential activation of left and right electric fans);
- left electric fan relay;
- heater fan power supply fuse (40 A);
- compressor power supply fuse (15 A);
- heater fan relay;
- compressor relay.
Panasonic air conditioner relay and fuse box
- Heater fan maximum speed
- Right fan
- Fan sequential relay (low speed)
- Left fan
- Left fan fuse (low speed)
- Right fan
- Heater fan
- Compressor
- Heater fan
- Compressor
Additional mounting block Priora
- F1 (15 A) – main relay and starter interlock circuit fuse;
- F2 (7.5 A) – fuse for the power supply circuit of the ECU (controller);
- F3 (15 A) – Priora fuel pump fuse;
- K1 – main relay;
- K2 is the place where the Priora fuel pump relay is located.
Attention!
The relay and fuse diagram may differ depending on the configuration and production date of the vehicle. Current diagrams of the mounting block are presented in the operating manual for the date of manufacture of the vehicle (download from the official website).
Let us remind you that on our website you can find detailed instructions for repairing the Lada Priora with your own hands.
Keywords: Lada Priora mounting block | Lada Priora torpedo
103 6
Found an error? Select it and press Ctrl+Enter..
Source: https://lada.online/do-my-self/repair/repair-lada-priora/page,1,3,218-shema-rele-i-predohraniteley-priory.html
Main reasons
- The fuse has blown. Both lamp bulbs are protected by one fuse link. Together with the lamps, the fuse will most likely protect some other circuits. Therefore, if your car’s taillights not only stop lighting, but also, for example, the dashboard backlight does not work, the first thing you need to do is check the fuse. You can find out which “socket” in the mounting block the lamp circuit goes through from the repair and operating manual for your car. In many cases, the main circuits are shown graphically on the inside of the fuse box cover.
Instead of a burnt-out insert, install only a fuse of the same rating. Installing a fuse link with a higher rating may cause the vehicle to catch fire. You can familiarize yourself with all the selection rules in the article “Classification of fuses for cars.”
- Limit switch faulty.
- Open circuit (breaking off pins in connectors, chafing wires).
- Formation of oxides, corrosion at the junctions of contacts, burning of pins.
- Poor ground contact of the lights. In case of problems with the general “mass”, brake lights and turn signals may also not work. It is extremely unlikely that both bulbs stopped lighting at the same time due to contact problems in the lanterns. But a bad ground can cause the reverse gear light to not light up on only one side. Of course, in this case it is worth checking the lamp itself.
How to choose
Having decided to replace a relay or fuse in a Priora, take full responsibility for their selection and purchase. Under no circumstances should you buy cheap parts of unknown quality and origin.
It is better to give preference to original products produced by VAZ. As a last resort, buy relays or fuses from one of the well-known companies, such as Bosh, Hella or Tesla.
Well, actually the problem was that the reverse lights did not light up. At first I took the easy route and, hoping for burnt-out light bulbs, reached into the lanterns themselves, but the bulbs turned out to be intact. I bought a sensor for turning on the reverse lights at the Iskra market, the price was 140 rubles. Remembering about the nearest overpass, I went straight to it, the price of entry for an unlimited time is 50 rubles.
Very little oil spilled out:
Having put everything back together, I checked whether the desired result was achieved:
Everything works, and as a bonus, the parking sensors are working, apparently they are powered by the reversing lights, a pleasant surprise))
p.s. but it would be nice to replace the wiper, it doesn’t clean at all)
A modern car has a large number of sensors, thanks to which the ECU sends appropriate commands to the systems and components of the car. Like any device, they can break. The article discusses the 3X warning light and the Priora idle speed sensor, their purpose, operating principle, and provides replacement instructions.
When you engage reverse gear, the instrument panel fuse lights up.
December 10, 2011, 22:55 #1
When you turn on the rear, the light in front of the dashboard lights up, the turn signals and reverse lamps do not work. Only the backlight works. how to be.
December 10, 2011, 10:58 pm #2
What kind of car?
December 10, 2011, 11:17 pm #3
December 10, 2011, 11:20 pm #4
Maxut, December 10, 2011, 23:17, #3
Offhand, the frog was not checked at the checkpoint. Maybe it's shorted? Is fuse F 16 lit?
December 10, 2011, 11:28 pm #5
this fuse, where is the frog located?
December 10, 2011, 23:35 #6 + 1
Maxut, December 10, 2011, 23:28, #5
this fuse, where is the frog located?
On the box is the reverse light switch. There should be two wires going to it
December 10, 2011, 11:58 pm #7
Serega_karel, December 10, 2011, 23:20, #4
Offhand, the frog was not checked at the checkpoint. Maybe it's shorted? Is fuse F 16 lit?
As far as I know, the minus goes through the frog. From it the relay turns on. This is a short circuit somewhere else. IMHO.
December 11, 2011, 00:03 #8
marat1969, December 10, 2011, 23:58, #7
As far as I know, the minus goes through the frog. From it the relay turns on. This is a short circuit somewhere else. IMHO.
I didn’t encounter this problem with front-wheel drive, but I had the same problem with classics. And what’s the point of putting a separate minus on the frog, if both the body and the gearbox are a solid “mass”?
December 11, 2011, 00:10 #9
Could it be a wiring issue?
December 11, 2011, 00:13 #10
Serega_karel, December 11, 2011, 00:03, #8
I didn’t encounter this problem with front-wheel drive, but I had the same problem with classics. And what’s the point of putting a separate minus on the frog, if both the body and the gearbox are a solid “mass”?
If the wires are removed from the frog and shorted to the body, the rear lights will simply light up, there will be no short circuit. And if you put current through the frog, it will burn out very soon, it is not designed for high current. The frog turns on the relay, just like it does for a signal, for example.
December 11, 2011, 00:18 #11 + 1
Maxut, December 11, 2011, 00:10, #9
Could it be a wiring issue?
Maybe, of course. You can build a control yourself and check it. But if you don’t know what exactly to check, then it’s better not to go in, you can burn all the wiring. Curiosity comes at a cost.
December 11, 2011, 00:21 #12
marat1969, December 11, 2011, 00:13, #10
If the wires are removed from the frog and shorted to the body, the rear lights will simply light up, there will be no short circuit. And if you put current through the frog, it will burn out very soon, it is not designed for high current. The frog turns on the relay, just like it does for a signal, for example.
Main reasons
- The fuse has blown. Both lamp bulbs are protected by one fuse link. Together with the lamps, the fuse will most likely protect some other circuits. Therefore, if your car’s taillights not only stop lighting, but also, for example, the dashboard backlight does not work, the first thing you need to do is check the fuse. You can find out which “socket” in the mounting block the lamp circuit goes through from the repair and operating manual for your car. In many cases, the main circuits are shown graphically on the inside of the fuse box cover.
Instead of a burnt-out insert, install only a fuse of the same rating. Installing a fuse link with a higher rating may cause the vehicle to catch fire. You can familiarize yourself with all the selection rules in the article “Classification of fuses for cars.”
- Limit switch faulty.
- Open circuit (breaking off pins in connectors, chafing wires).
- Formation of oxides, corrosion at the junctions of contacts, burning of pins.
- Poor ground contact of the lights. In case of problems with the general “mass”, brake lights and turn signals may also not work. It is extremely unlikely that both bulbs stopped lighting at the same time due to contact problems in the lanterns. But a bad ground can cause the reverse gear light to not light up on only one side. Of course, in this case it is worth checking the lamp itself.
Fuse box in the passenger compartment of VAZ-2170, -2171, -2172
The fuse box in Priora is located at the bottom of the dashboard, on the left side of the steering wheel. To get to it, you need to open the cover, which is held on by three latches. Rotate each locking knob 90 degrees and pull the lid down and it will snap open.
Fuses in the interior mounting block
F1 (25 A) - radiator cooling fan . If your fan does not work, check its motor by applying 12 V directly to it from the battery. If the engine is working properly, then most likely the problem is in the wiring or connectors. Check the serviceability of relay K1.
The fan in the Priora usually turns on at a temperature of 105-110 degrees. Do not allow the engine to overheat, watch the arrow of the temperature sensor.
If the fan runs constantly and does not turn off, check the coolant temperature sensor located on the thermostat. If you remove the connector from the working sensor, the fan should turn on. Check the wiring to this temperature sensor, as well as the contacts of relay K1, move this relay, clean the contacts. If this is the case, replace it with a new relay.
F2 (25 A) - heated rear window . Check together with fuse F11 and relay K2. If the rear window does not fog up, the heating element threads may have broken. Inspect all the threads and if you find a break, seal it with special glue or varnish, which can be bought at car dealerships for 200-300 rubles. Check the connection contacts at the terminals to the heating elements at the edges of the glass, as well as the switch on the dashboard and the wiring from it to the rear window.
F3 (10 A) - high beam, right headlight . F4 (10 A) - high beam, left headlight . If the headlights do not shine on high beam, check the K7 relay and the headlight bulbs. The steering column switch, wiring or connectors may also be faulty.
F5 (10 A) - sound signal.
If the signal does not work when you press the steering wheel button, check relay K8. The signal itself is located under the radiator grille; you can get to it by removing the plastic casing from above. Check it by connecting the voltage to 12 V. If it doesn’t work, try turning the adjusting screw, or replace it with a new one.
F6 (7.5 A) - low beam, left headlight . F7 (7.5 A) - low beam, right headlight . When replacing lamps, be careful; there are separate lamps for the low and high beams, so they can be easily confused. It is better not to install lamps in high-power headlights; the reflectors may melt and the desired effect will not be achieved. Most low beam headlight problems that cannot be corrected by conventional means can be related to the light control module (LCM). The low beam relay is only available in cars equipped with a light sensor, it is located in the place of relay K1; on most cars this relay is not in the mounting block; the low beam circuit goes through the MUS block. It happens that the tracks in the block burn out; if there are problems, it is better to replace it with a new one. If the windshield wipers turn on spontaneously when the low beam is not working correctly, the problem is most likely in the windshield wiper control unit, located in the center of the dashboard, the topmost block, next to the radio, is best reached from the glove compartment, or by hand through the removed console covers at the feet.
Place of the switch in the light switching circuit
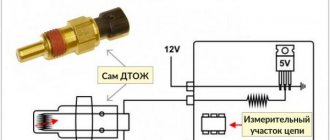
On cars with manual transmission, voltage to the lamps when reversing is supplied through a limit switch (the so-called frog), which is screwed directly into the gearbox housing. When reverse gear is engaged, the switch button is pressed inside the gearbox. The contacts inside the “frog” bridge, and current begins to flow to the lamps.
On the circuit diagram for turning on the reversing lights, we can see that on the VAZ 1118 Kalina, the current from the battery through the ignition switch (No. 2) is supplied to fuse F1. Passing through the fuse that protects the switching circuit, “+” goes to the limit switch (No. 10). The contacts are in a normally open state and close only when reverse gear is engaged. Thus, current begins to flow to the light bulbs. The second contact of the lamps is connected to the “–” battery through the common ground contact of the lamps.
Checking the functionality of the sensor
Replacing the fuse is not difficult. But checking the condition of all wiring, ringing it and replacing it if necessary is a much more difficult task.
If we talk about restoring the functionality of the reverse lamps with our own hands, then we mainly have to deal with the switch.
To check it you need to do the following:
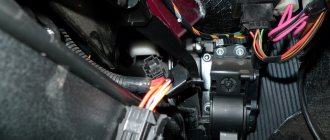
- remove the rear lamp switch chip;
- turn on the ignition;
- Using a piece of wiring, close the contacts of the sensor and the reverse gear to each other.
If at the same time the lamp lights up, then the reason lies directly in the limit switch.
In this situation, the simplest and most logical solution would be to replace a completely faulty sensor. Indeed, on many cars, replacing it is impractical, too complicated and virtually useless. It is not always possible to restore the functionality of the device. Although there are a number of examples when the sensor was simply disassembled, the contacts were cleaned, and everything returned to normal operation.
It is very difficult to say how long the restored switch will work. This could be for many years, or just a few days.
If everything is fine with the frog, then you will have to ring the circuit and look for the area where the voltage disappears. For these purposes, you will need to use a test light or a multimeter. The task is not for beginners, since we are talking about electrical circuits and working with car electrical systems. Here, for many, it will be more profitable and safer to turn to specialized specialists.
Description of the XX sensor
The idle speed sensor (IAS) is designed to stabilize the idle speed generated by the engine.
DXX on Priora
Purpose and principle of operation
The design of the XX regulator includes a step-by-step electric motor and a spring-loaded conical needle. Thanks to the IAC, the cross-section in the passage channel changes, and thus the air supply is regulated. The mass air flow sensor takes into account the amount of incoming air, and the controller, based on this information, supplies the required amount of fuel (video author - Alex ZW).
Typical faults
The XX regulator does not have self-diagnosis.
The following signs indicate its malfunction:
- unstable operation of the engine at idle;
- when the gear is switched off, the engine stalls;
- engine speed either spontaneously increases or decreases;
- if a cold engine starts, there is no increased speed;
- The speed decreases if the lighting, the stove is turned on, or any load appears.
There are two most common causes of IAC malfunction:
- contacts inside the regulator have broken;
- The guide needle is worn out.
Before changing, you can clean the sensor itself and the channel; if that doesn’t help, then replacement is necessary!
Description of the 3X sensor
If you want to back up, it is important to signal other road users about your intentions in order to avoid an emergency situation. This function is performed by the reverse sensor (RDS).
Signal indicator 3X on Priora
Purpose and principle of operation
The DZH is designed to warn of the driver's intention to reverse. In addition, in the dark and when visibility is poor, the bright light of the rear light bulb allows you to see the situation behind the car.
When the gearbox switches to reverse mode, the limit switch is activated, which receives power from the battery. Thanks to the switch, the circuit is closed, the lamp receives power and lights up. When reverse gear is turned off, the circuit breaks and the light goes out.
Typical faults
There are several reasons why the reverse lights do not light up:
- light bulbs burned out;
- wiring is damaged;
- fuse is blown;
- the insulation is damaged, which can lead to a short circuit;
- poor contact on the sensor;
- sensor is faulty.
Troubleshooting may require checking all possible causes.
Block in the engine compartment
The power fuse box is located in the engine compartment under the hood, near the left strut support. To get to it, you need to open the lid by prying the latch.
1 (30 A) - engine control system circuit . If there are problems with the electronic control unit, short circuits or other malfunctions, this fuse may blow out.
2 (30 A) - vehicle on-board circuit . 3 (40 A) - vehicle on-board circuit .
4 (60 A) - generator circuit.
5 (50 A) - electric power steering circuit.
6 (60 A) - generator circuit.
In case of any problems, it is important not to panic, to think soberly and logically. The most important thing is to diagnose and establish the cause of the breakdown. If you don’t have enough experience or nerves, it’s easier to sign up at the nearest car service center if it has a competent electrician.
I hope this article will help you deal with electrical problems and quickly fix any Priora malfunctions. If you have any experience or information, please leave a comment below, useful information will be added to the article.
Reversing at night will be a real challenge if the car's reverse lights are not on. Let's look at why the lamps stopped burning and methods for independently searching for the root causes. Most likely, knowing how to test the reverse light switch will be the most useful skill when troubleshooting.
Instructions for replacing the reverse control
To replace the 3X signaling device, you need to prepare a set of keys and a new device. It is better to carry out work on an overpass or pit.
To make a replacement you need to do the following:
- Turn off the power to the machine by disconnecting the negative terminal on the battery.
- Remove the protection from the engine.
- Disconnect the power cable.
- Unscrew the old signaling device.
- Installing a new device is carried out in the reverse order.
After installation, you need to check the operation of the 3X lights.