Video on installing an armrest in a Gazelle Business car year of manufacture:
Armrest for Gazelle (Business, Next, Farmer) I want to show you the work I did a couple of years ago, I assembled an armrest with my own hands for my car. It all started as usual with a million fittings and trimmings. After the external dimensions returned to normal, the bulk of the work moved to the table.
Next, on the table, I worked on the inner drawer itself
and then I started working on the lid itself. I decided to make a double lid, with separately opening compartments
Next I worked on the castle itself, which I also made myself
Next, work began on the panel itself. For her, I chose, as before, composite composite
DIY armrest for VAZ 2112 drawings
the time it took to choose an ergonomic option. I also decided to make a “breadbox” compartment with a lid in the center
Next, work began related to gluing the veneer
Do-it-yourself glove compartment armrest — GAZ Gazelle, 2.9 l., 2013 on DRIVE2
Good day. Probably many have encountered the fact that there is nowhere to stick the famous left elbow in the gazelle. It delivers incredibly well on long trips. After reviewing a bunch of options in stores and on the drive, it was decided to make our own version with a glove compartment for small items, because... I didn't like anything that was offered. 10 mm plywood, carpet and a bunch of stuff left over from previous crafts for the native iron horse. I quickly sketched out the drawing, took measurements, and away we go.
Full size
I cut out the necessary parts and screwed them together with self-tapping screws, drilling prematurely so that the plywood would not burst.
Full size
The lid has rounded corners for aesthetic pleasure.
Full size
I pulled leatherette over the lid of the board, placing a good piece of foam under it.
I punched it with a pneumatic stapler. The thing is convenient and practical.
Full size
The box itself was covered with dark gray carpet using the same pneumatic stapler and ABRO adhesive spray, which I have been using for a long time when carrying out similar work.
Full size
I fastened it with standard bolts and added a washer of larger diameter to each bolt.
Full size
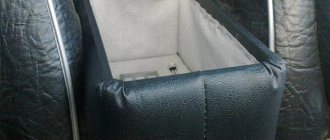
Glove compartment for small items. I made another bottom by screwing a piece of plywood from the inside.
It became very convenient and comfortable to sit
Full size
I customized a Chinese device, once ordered for ridiculous tugriks even during that course that did not cause tears, and which had been lying idle for a long time
I accept questions and criticism in comments. Thank you in advance.
dimensions, drawings, photos and videos
Armrests are the interior of the car and the comfort of the driver. The product is individual and unique. It all depends on how developed the master’s imagination is. Often this production is standard - factory-made, which is not very original. The gazelle armrest is made by the drivers themselves from various materials. Since this interior detail is small in size, you can put all your ideas into it.
This is what the armrest looks like in the Gazelle's cabin
This is what the armrest looks like in a Gas 24 car
How to tighten a car armrest with your own hands (using the Priors as an example)?
Do-it-yourself armrest assembly
Every owner of a car, even a Soviet-made one, wants to highlight his “beauty”. Some people make a car into a supercar based on its external appearance, while others focus on its internal design. Wanting to drive easily and comfortably. Car enthusiasts, whose car is not only a luxury item, but also a “workhorse,” spend most of their time behind the wheel of a car.
Armrest design option in the Gazelle cabin
So that your right hand does not lie on the gearshift knob all the time, but rests freely.
Sketch with armrest dimensions
What do you need
In order to start producing this masterpiece, you need:
- Measurement data for the location where the armrest will be located.
Height, width, depth and so on. Drawing with dimensions of the armrest for a gazelle - From these data, make a drawing on paper.
It must be clear and correct. Because these are the measurements that will be used to make the interior detail of the car. The process of cutting a template from paper - Measurements should be taken only in your own car, because they may differ significantly from measurements of the same car from a friend.
- You should take into account the handbrake (the height of its lift) and seat belt buckles.
So that later there will be no discomfort when using the seat belt. An example of the location of the handbrake in the cabin - You should also consider safety precautions when performing work.
Required materials and installation process
To work, you need a saw or jigsaw, as well as wood of small thickness. It could even be chipboard or a varnished piece from old furniture. On this wooden sheet you need to draw a drawing and carefully cut it out.
Armrest parts cut from plywood
Review of viburnum armrests
Assembled plywood armrest structure
Plywood armrest design option
Example of a finished armrest frame
DIY armrest for gazelle
Sheathing
The material must be chosen to match the tone of the car interior. You can cover the gazelle armrests with your own hands with leatherette. This will be relevant.
Example of armrest trim for Gazelle
Installing the cover
This detail requires special time. In order for the armrest not to be rigid, foam rubber must be placed on top of the lid. If you don't have solid foam, you can use a sponge.
To prevent the foam rubber from shrinking and crumpling under the casing, glue is applied to the base of the cover. Then sponges or foam rubber are placed on the glue. Let the glue dry. After this, you need to sew individual sponges or stitch foam. Excess is removed with scissors. Afterwards, felt material is placed on top and padded on all sides.
Example of a finished armrest cover
Hinges and magnet
To prevent the lid from “moving” back and forth when the driver places his hand, and to prevent it from opening, a magnet is required. After installing the magnet, you need to install the hinges with self-tapping screws. Having chosen the location for installing the cover, it is finally screwed to the armrest itself.
Mounted hinges on the gazelle armrest
Armrest for GAZ Sobol Barguzin.
Installation
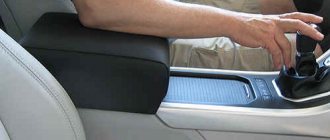
Installing your own armrest in the Gazelle is not difficult. You can simply install an armrest between the seats, but while driving it can move out of its place and cause considerable discomfort while driving. Therefore, it needs to be installed stably.
Mounted armrest for Gazelle
- A polypropylene tube in which the inner side will be steel;
- Hairpin M 8 100-110 cm;
- Drill.
Drill three holes. Insert slightly trimmed pins into them. A metal plate is placed and everything is secured. Cut a rectangle from plywood that will form the basis of the armrest. Tubes are installed into this plywood, and holes are made in the armrest itself at these places so that the pipes can go there. At this point, the process of assembling and installing the armrest can be considered complete.
How to make this part for your car with your own hands
First of all, select the material from which the body will be made, as well as the fabric for subsequent upholstery. Their thickness affects the dimensions of the future product. Next, you need to make all the necessary measurements, and only after that start constructing the drawing.
We will talk about the choice of fabric for covering a little later, but we will dwell on the material for the armrest itself in more detail.
Material selection
Wood-based material is best suited for the armrest body. It can be a chipboard, fiberboard or ordinary plywood. If the proposed design does not have curves, then your choice is unlimited. Otherwise, the only material that will suit you is plywood, since only it can be bent by holding it over steam for some time or soaking it in hot water.
To bend the plywood, soak it in a bath of hot water
Consider the thickness of the board: it should not be less than 0.8 cm or thicker than 1.5 cm. The ideal option, which will be strong enough but not particularly bulky, is plywood 1 cm thick. To cover the lid you will need ordinary foam rubber.
Don't forget to prepare the accompanying tools: meter tape, graph paper, and an electric jigsaw for cutting the board into parts.
Measurements for the future drawing
The manufacture of an armrest must begin by measuring the necessary parameters. To do this, arm yourself with a meter tape, a pen and a sheet of paper where you will write down all the data received.
- Measure the distance between the front seats.
- Holding the gear shift lever with your right (or left, depending on the location of the steering wheel) hand, determine the most comfortable height for the future armrest.
- Measure the distance from the handbrake to the back of the seats.
- To prevent the window sill from interfering with fastening your seat belts, measure the distance between their buckles.
- If you plan to install the armrest in such a way that it will be partially located above the handbrake handle, then move it to the on position, and then measure the dimensions and height of the rise.
- Measure the area where your product will be attached.
measure the distance between the seats to find out the size of the future armrest
It is very important to choose the material for the armrest upholstery before starting the actual manufacturing of the part. It may be necessary to adjust the parameters taking into account the thickness of the material.
Element design
Having made all the necessary measurements, begin drawing up a drawing of the future armrest. Be careful: even small errors can lead to your product not being installed in its place or interfering with the operation of other elements of the car.
- When creating a project, draw a diagram of the armrest taking into account all sizes and proportions. For more accuracy, draw the part from both the side, front and back. Don't forget to label the lengths of the sides: it will be easier for you to transfer the markings to the material.
- Make a drawing for the upper part of the armrest - the future cover.
- Consider how to attach the lid: will it tilt or bend. Depending on this, determine the location of the grooves or other fasteners.
- If the part is not strictly rectangular in shape, carefully work out the bends.
- Determine in advance the lengths of the screws that will be used in the work. If their sizes differ in different parts of the product, indicate this on the diagram.
- Decide how the armrest itself will be installed: using special fasteners or tightly fixed between the seats. If necessary, add grooves to the diagram at the bottom of the structure.
using the data obtained from measurements, build a diagram of the future armrest
After the drawing is ready, it needs to be transferred to graph paper (it can be purchased at any store selling sewing supplies) with strict adherence to all parameters. Be extremely careful: this pattern will serve as a model for making an armrest in the future.
Please note that there are standards that must be followed when making an armrest. According to the requirements of the United Nations Economic Commission for Europe, it must withstand a load of at least 110 kg and not interfere with the operation of the handbrake and seat belts.
Salon
The Gazelle's interior is, to put it mildly, archaic. Only the most undemanding drivers are satisfied with it in its original form. Hard plastic, uncomfortable seats, dull gray color - all this urgently needs to be replaced with more modern and aesthetic analogues.
If you are afraid of the cost of completely replacing the interior, you can purchase individual elements gradually, perhaps combining colors and materials. Start with the main things - the steering wheel, seats, power windows, because these are the ones you have to come into contact with every day. Next, you can install a central console from Gazelle-Business and an armrest with various useful drawers, which will turn it into a mini-office. Music lovers will be able to choose door cards with additional podiums for speakers.
It is also useful to read: How to modernize the appearance of Volkswagen Jetta cars using tuning
There is a wide selection of accessories available for sale for Gazelle salon decor:
- door card inserts;
- air duct covers;
- glove compartment and dashboard, made in wood or chrome, or painted in body color.
For better information content of devices in the dark, you can illuminate them with diodes, and you can also make the interior lighting lamp LED. To complement the image of a non-standard car, airbrushing with film, installing alloy wheels, a hood with air intakes in the STI style (Gazelle has the bad property of boiling even in cold weather) and other pleasant little things that create a unique style will help.
Wrapping process
To cover the product, we will again need patterns from graph paper. We hope you haven't thrown them away yet. You will also need approximately a linear meter of the selected covering material, high-quality glue, nylon threads, and a good hair dryer. First, we will discuss in more detail which materials and tools are best to choose.
The most obvious material for covering interior elements is leather. You can choose either genuine leather or eco-leather. The main thing is that the material is really of high quality and does not crack in the cold. It is best to buy specialized leather for cars. It is unlikely that a material intended for furniture will be suitable. After all, furniture is usually used in comfortable home conditions. And the car will be exposed to both direct sunlight and severe frosts.
Decorative paneling
How to cover an armrest with your own
with your hands?
The best place to start is by choosing the material. How to repair a car body yourself. Body repairs of your own cars already. The final choice here depends on the brand and prestige of the car. For example, if you are making an armrest
for a Gazelle
with your own hands
, then it would be wisest to cover it with leatherette.
How to make an armrest with your own hands for a Mitsubishi car installed in the car. The same applies to domestic passenger cars. It is also recommended to cover a self-made armrest (VAZ 2107) with the cheapest material. For greater pathos and chic, you can use Alcantura. How to make a wick at home? Wick for. How to install and remove door trim on a Skoda Fabia. If you decide to replace the door trim of a Skoda Fabia car with your own hands, then it is better to do everything in the following sequence: It is not recommended to use leather as upholstery - it is very expensive, and besides, not every car enthusiast can handle it by covering the armrest with his own hands
.
For the convenience of drivers, armrests are created. On the automotive market you can find and buy a suitable armrest inexpensively. But there are many who like to do such things with their own hands. Even though store-bought ones cost 300-1000 rubles, they are still willing to spend half a day making an armrest that they like.
The final stage
At this stage, it is necessary to install the prepared product directly into the machine itself. To do this, it is best to use a polypropylene pipe with a steel rod and an M8 pin, designed for fastening plastic elements in the machine.
After this you need:
- Insert the pins into the holes.
- Install a metal plate on the reverse side and secure with a wrench.
- Cut a rectangle out of plywood, cover it with leatherette and make a couple of holes in it.
- Install the part and put on the tubes.
- Mark holes on the armrest and make them.
- Install the finished product between the seats and secure it with nuts.
Fastenings can be designed at your discretion. Some car owners simply fix the armrest between the seats. If it holds tightly, then additional manipulation may not be required. However, it is worth pressing the product several times to make sure that it does not fall out.
If the car owner experiences discomfort when using the made armrest, then it is better to remove it or remake it.
⚫ DIY ARMREST. HOW TO MAKE AN ARMREST with your own hands. ♦DIY CAM♦
Unfortunately, not all modern cars are equipped with such an important part as an armrest for the driver. Car owners are trying to eliminate this drawback in different ways: some buy ready-made devices, others try to make them with their own hands
We will try to understand the last option in more detail.
Installation
Installing your own armrest in the Gazelle is not difficult. You can simply install an armrest between the seats, but while driving it can move out of its place and cause considerable discomfort while driving. Therefore, it needs to be installed stably.
Mounted armrest for Gazelle
- A polypropylene tube in which the inner side will be steel;
- Hairpin M 8 100-110 cm;
- Drill.
Drill three holes. Insert slightly trimmed pins into them. A metal plate is placed and everything is secured. Cut a rectangle from plywood that will form the basis of the armrest. Tubes are installed into this plywood, and holes are made in the armrest itself at these places so that the pipes can go there. At this point, the process of assembling and installing the armrest can be considered complete.
What is the first thing you pay attention to when purchasing a new car? Technical characteristics, engine power, gas tank volume and fuel consumption? Or maybe the appearance of bumpers, spoilers, headlight shape or body color? No matter how beautiful your car looks from the outside, you will spend most of your time in its interior. So taking care of the car’s interior is not a whim, but a completely necessary condition when buying a new iron horse. And if everything is more or less clear with the seat upholstery and the thickness of the steering wheel, then what about such a mysterious element as the armrest? Is he needed or not? And if you still need it, then how to make it and install it in a car that initially does not have an armrest in the basic configuration? Is it possible to create everything with your own hands or is it better not to suffer and order the work from a master?
How to make a metal armrest:
- Choosing a mounting location. In this case, these are the seat belt buckle bolts.
The lower bolt secures the seat belt buckle itself, the upper one secures the tip of the support.
- To create the armrest frame we need a sheet of iron 3 mm thick. We cut a strip of sheet metal approximately 30 mm wide.
- We bend this metal strip along the edges, as shown in the photo. There is no need for exact dimensions. Approximately what is the width of the sheet, we measure and bend it from the edges.
- Next, we drill holes on the resulting foot and on the strip itself.
We weld the hinge and stiffener.
- We also make the base for the armrest from a sheet 3 mm thick.
- We weld the profile for reinforcement.
- It turns out to be such a moving part.
- We choose corduroy fabric for covering and upholstering the armrest.
- Let's make a cover. For example this option.
- We make the lining to size. For example, several layers of padding polyester.
- We apply it to the armrest frame, tighten the base and sew it together.
- Sew on corduroy fabric to cover the bottom of the base.
- We put on the cover and tighten it with a cord.
- The end result is a car armrest that looks like this.
How to prepare for work
Choosing material for the frame
The best material is wood. You can also use a regular board. But chipboard, fiberboard, or any plywood is much more convenient to work with. If you want a structure without corners, then you can only use plywood, as it allows itself to be bent. To do this, it is held over hot steam or soaked in water.
Pay attention to the thickness of the material: the best option is 1 centimeter. A slight variation of 0.8 to 1.5 centimeters is possible
Ordinary foam rubber is used as upholstery for the lid. Tools you will need: jigsaw, graph paper, meter tape.
We take measurements for the future drawing
Of course, you can use ready-made diagrams and drawings. But in order for everything to work out reliably, it is better not to rely entirely on information from the Internet, but to act independently. Therefore, we proceed according to the following scheme:
- Measure the distance between the two seats.
- Sit in the driver's seat, grab the gearshift lever and determine what height of the future armrest is most convenient for you.
- You also need to take a measurement between the back of the seats and the handbrake.
- You need to determine the distance between the seat belt buckles.
- Measure the height of the handbrake and its dimensions.
- You also need to find out the dimensions of the mounting location for the future product.
Select materials and complete the work
To create the body and supporting parts, you can choose any wood-based material. Its thickness should be 8 mm. If there are no curves, you don’t have to limit yourself in the choice of material; otherwise, it’s better to go with plywood, which can bend under the influence of water vapor. To cut out the structural elements of the required shape, you need to have a hacksaw on hand, or even better, a jigsaw. Any material that you like is suitable for cladding. But remember that it must be resistant to wear, have a durable color and match the design of the car.
So, the parts are cut out and prepared for assembly. Make patterns in advance on paper for upholstery material. Using glue or fixing elements, we assemble our homemade armrest into the car. If no mistakes were made previously, then problems will not arise.
Using the previously made patterns, we cut out the elements for the upholstery and attach them using a furniture stapler or glue. We are working on the lid, which should be soft and slightly rounded. You will need foam rubber or regular dishwashing sponges. We place the selected material, glue and cut off unnecessary elements. Cover with felt, which we carefully glue along the edges. All that remains is to cover the finished armrest and admire your work.
Video
This video shows in detail how to make a car armrest with your own hands.
⚫ DIY ARMREST. HOW TO MAKE AN ARMREST with your own hands. ♦DIY CAM♦
Armrest option for the Renault Sandero Stepway car (Renault Sandero Stepway).
DIY armrest for Renault Sandero Stepway
How to reupholster the armrest with your own hands on a Priora.
https://youtube.com/watch?v=FiANYBM43kk
How to make an armrest from plywood and cover it with leather.
1. How to make a leather armrest for a car with your own hands from leather plywood
Ready-made new car armrests.
Armrests for cars 2021 2019 2021 2017 2021 Video
How to install hinges.
armrest!
The comfort of the car owner depends on the driver's seat
Car armrests are an important component of an ergonomic space. When the driver's hand has support, it helps to relax the muscles and relieve increased stress on the muscles of the back and elbow group
This reduces driver fatigue.
In addition, in the armrest compartments you can store various small things that you may need on the road (a bottle of water, a phone charger, etc.). If the car is not equipped with armrests, they can be purchased separately. However, universal products of this type are quite expensive, so many people prefer making their own armrests. This does not require special skills or expensive materials.
DIY car armrest: 15 drawings of different models
Logan cars from Renault have established themselves on the market as budget cars. Logan began to be produced in 2004 and has become very popular all over the world, despite the fact that in some indicators (such as safety) it is inferior to other budget cars. Logan cars have become the most popular in the domestic market and in the CIS countries. Logan’s interior, as expected, does not look very expensive, which is why many people prefer to customize it and often change the armrests. Here are 5 ideas on how to make an armrest with your own hands.
Simple, but tasteful, this can be said about this armrest. It is made of leather, fabric and plastic.
This armrest looks masterful because it was created using the base from a universal armrest.
A simple and not very beautiful armrest made of plywood, it is clear that it was made by a novice craftsman.
A simple but comfortable armrest, covered in carpet and leather. The downside is the lack of storage capacity.
Here is an example of the original Armster2 armrest, the price of which is naturally very high.
Read in full (link)
Renault Duster is a crossover car. The car appeared in 2009 and confidently took high positions among cars of the same class. The car looks stylish on the outside, but not always everything is so good inside, so many drivers prefer to pick up carpet, plywood and leather and make seats or an armrest to suit themselves.
A simple and reliable armrest, nothing superfluous, there is a large compartment for things. The armrest, despite its substantial dimensions, does not interfere with the handbrake at all.
A small homemade armrest, it has everything - good leather that is comfortable for the hand, a pull-out shelf and a compartment for bottles or glasses.
This armrest looks strange and very handicraft, but its main advantage is its small dimensions, it takes up very little space in width/
The armrest is stylish, black and didn't take a lot of work.
This is what a civilian armrest for a Renodaster looks like for comparison.
Also the original armrest for the Renaulter. There are leather and fabric options to choose from.
Read in full (link)
AvtoVAZ does not produce very many cars and, partly rightly, has not earned the best reputation; nevertheless, it has, although not a large number of different cars of the Lada series. They are all not very expensive, but many want the car to feel beautiful both inside and out, so many go for replacement of various parts and many decide to make it themselves, for example, an armrest, customizing it specifically for themselves.
Here, for example, is a homemade armrest with a huge space inside (the so-called bar). It is made of simple plywood and upholstered in leather.
This armrest is made in a minimalist style, it does not interfere with the lever at all, and at the same time it has a large bar.
This armrest is already presented without a bar; indeed, not everyone needs a container for things and can restrict space.
A large armrest, in which a light bulb was also placed to illuminate things inside. On the outside it is covered with leather, on the inside we see carpet.
Shown here is an unassembled armrest. Now we just selected the dimensions, cut out the plywood and roughly outlined how the handbrake would lie under the armrest.
And here you can see the armrest in its final form.
Read in full (link)
Kio Rio is a car that deservedly received its fame. It has been on the market for almost 20 years. The car became popular due to its discreet design, as well as great convenience in the cabin. But every person likes to customize the car specifically for themselves, some limit themselves to seat covers, while others make seats or armrests to suit themselves. Armrests can be very different, from simple and small to large and elaborate.
This armrest has not yet been installed in the car, it is completely made by itself, and it does not look very elegant, but its functionality is at the level.
This armrest is an example to everyone of how to customize a car. Here we see fur, it should be very comfortable, especially in winter.
This armrest is very elegant, but it is clear that it is not made very well; in some places the leather lies crooked.
The next armrest, simple but practical, it’s clear that the master went to the trouble of installing powerful hinges.
This armrest is not pretentious, but when you see it you are honored that it was created by the hands of a master.
Read in full (link)
Lada Granta is not a very popular domestic car. It is difficult to say that it is really good in its class, but the low price is an advantage of the Lada Grant. Not the most attractive appearance, perhaps it became the reason for such a high popularity of creating and tinkering with something special in this car.
This armrest is made of high quality leather or eco-leather. Looks much better than most solutions in the store.
The next armrest should be classified as luxury, everything is done very high quality. Beautiful color, two different compartments.
A very comfortable armrest, there is a rivet and a special recess for opening the bar lid. It looks very beautiful and tasteful.
The armrest is as simple as a car, small, but with a lot of space inside.
This armrest was most likely made by the craftsman for his wife, a very non-standard choice of skin color. Although, considering the burgundy coloring of the seats, it looks very good.
Read in full (link)
Assembly and installation of the armrest in the Gazelle
Armrests are the interior of the car and the comfort of the driver. The product is individual and unique. It all depends on how developed the master’s imagination is. Often this production is standard - factory-made, which is not very original. The gazelle armrest is made by the drivers themselves from various materials. Since this interior detail is small in size, you can put all your ideas into it.
This is what the armrest looks like in the Gazelle's cabin
This can be a very convenient niche for small but necessary things, such as a mobile phone, cigarettes, lighter, recharger, checks and plastic cards. This part of the Gazelle Next design may have cup holders, as well as some built-in keys for the car system (window lifters, switching music tracks). In many imported cars, armrests with niches are installed not only in front between the seats, but also in the back for the convenience of passengers.
In Soviet cars of early production, modifications of cars with armrests were practiced. But they were a little uncomfortable, so they were often removed. Let's say GAZ-24. The first cars produced had this thing in the car, but there were no seat belts. It is very inconvenient to fix the belt with it.
This is what the armrest looks like in a Gas 24 car
Do-it-yourself armrest assembly
Every owner of a car, even a Soviet-made one, wants to highlight his “beauty”. Some people make a car into a supercar based on its external appearance, while others focus on its internal design. Wanting to ride easily and comfortably. Car enthusiasts, whose car is not only a luxury item, but also a workhorse, spend most of their time behind the wheel of a car.
Armrest design option in the Gazelle cabin
During a long trip, the body begins to get tired, being in one position. This is especially true for the back. I want to lean on something. For these purposes, a do-it-yourself gazelle armrest was invented. So that your right hand does not lie on the gearshift knob all the time, but rests freely.
Sketch with armrest dimensions
What do you need
In order to start producing this masterpiece, you need:
- Measurement data for the location where the armrest will be located. Height, width, depth and so on. Drawing with dimensions of the armrest for a gazelle
- From these data, make a drawing on paper. It must be clear and correct. Because these are the measurements that will be used to make the interior detail of the car. The process of cutting a template from paper
- Measurements should be taken only in your own car, because they may differ significantly from measurements of the same car from a friend.
- You should take into account the handbrake (the height of its lift) and seat belt buckles. So that later there will be no discomfort when using the seat belt. An example of the location of the handbrake in the cabin
- You should also consider safety precautions when performing work.
Do you need an armrest in a car?
Some models of cars in the budget segment are sold without a special elbow rest. Drivers quickly get used to it and don’t even notice that their car is missing something. Therefore, a logical question arises: is there any benefit at all from the armrest?
In fact, there is, and it is quite noticeable. The armrest significantly reduces the strain on the arm and back muscles during frequent use of the gear lever. This is especially true in cars with a manual gearbox. When traveling long distances and even in regular traffic jams, the hand becomes tense and tired, in some cases the muscles begin to cramp, which can lead to an accident.
the armrest in the car significantly reduces the load on the muscles of the arm and back
Another nice feature is the ability to use the armrest as a place to store useful little things. A water bottle, wallet, car documents, sunglasses case and more can be placed inside and will always be at your fingertips (literally and figuratively). Expensive models often have armrests equipped with control buttons for some vehicle devices.
In addition, an ordinary armrest can create an atmosphere of home comfort in a car and make your stay in it more comfortable.
And I can’t imagine taxiing without an armrest, I’m so used to it. My right hand on the steering wheel didn’t work out for me - it’s uncomfortable and that’s it, it even seems to interfere, some kind of mismatch appears from both hands. In my case, the armrest is moved back and does not interfere with the use of the handbrake. Personally, I really need an armrest, and even when I sit in any other car and compare them, I pay attention not least to the convenience of the latter’s location.
AndRCZ
Price: 1480 rubles
Delivery by Russian Post and transport companies. Payment upon receipt or prepayment with a discount. For prepayment on a Sberbank Card - a discount of 200 rubles.
Front Armrest Features:
1. Driver's armrests are made individually for the Gazelle car, to fit the dimensions of the space between the seats of this particular car. Suitable for any modification of the Gazelle, including the latest models. Adjusted to the millimeter!
2. Installation takes no more than 1-2 minutes: you just need to insert the armrest between the seats. It may be necessary to remove the plastic protective cover from the driver and/or passenger seat. No need to drill or use self-tapping screws!
3. Installs very firmly. Doesn't stagger or wander!
4. Externally it looks stylish and modern. You can evaluate how it looks inside the car from the side photographs or from the video below this text.
5. The voluminous inner box (bar) allows you to put a phone, wallet and even a small notebook inside.
6. The armrest does not interfere with using the handbrake, control buttons on the console, or fastening the seat belt.
Dimensions: Height - 520 mm, length 320 mm, width - 130 mm, box depth - 200 mm.
Suitable for modifications: Farmer, Business, Sable, Gazelle 3302, Gazelle 2705
Color: Grey, black.
Guarantees: Payment upon receipt. 14 days for a refund for any reason. One year product warranty.
Delivery: Russian Post with payment upon receipt or with a discount for prepayment. Transport companies SDEK, PEK, KIT.
Details on characteristics and materials:
— The armrest frame is made of wood. Wood, unlike plastic, will not creak when driving. The frame is upholstered with a special material - eco-leather. Eco-leather is resistant to frost - it does not become harder, and your hand is comfortable when in contact with it: eco-leather “breathes” (and it is also perforated on top) - so your hand will not sweat.
— The armrest was tested for resistance to vertical loads - it could easily withstand a load of 60 kg.
Types of armrests
Some car enthusiasts know that the manufacturer does not provide for the installation of an armrest on the VAZ 2114. Moreover, an armrest was never on the list of possible options during the release of the 2114 model, but this accessory is very popular among many car enthusiasts. This is precisely why some companies have launched the production of armrests for the VAZ 2114
This compensated for the lack of such an important element for the car
All presented armrests can be divided into several categories:
- Model armrests. They were created for certain car models.
- Universal armrests that are designed for installation on almost any car (regardless of the manufacturer).
The armrests also differ depending on the presence of a special compartment for small items.
They can be divided depending on the design:
- with bar;
- no bar.
An element with a bar allows you to store various small items, as well as documents, inside.
Many car enthusiasts accumulate a lot of different items over the years spent behind the wheel, so an armrest with a bar will be a great way to bring order to the car interior.
Upholstery materials
Textile
When choosing fabric, you need to pay attention to practicality, not beauty. You should not opt for synthetic materials that do not last long.
You also need to focus on the colors. The pattern depends on preferences and the existing interior of the room where the sofa will be located. There are several points to consider when choosing fabric for upholstery with your own hands:
- The fabric material should smell good and not fade. A bad smell indicates the use of low-quality dye.
- Textiles can be with thick pile or thin pile. Depending on the choice, the color will be formed. The transition to dark or light can be varied by combining different piles. At the same time, when cutting, you need to take into account the direction of the pile if the upholstery is made independently. When purchasing ready-made material, you need to take this into account too.
- To reduce losses when reupholstering sofas , it is best to take fabric with a small pattern. You can use plain ones. To diversify the design, you can choose textiles with large prints (geometry, flowers). But then all the lines and shapes must be located in the same direction, similar to the stated sketch.
Foam rubber
To cover a sofa, you need a foam rubber mat with a thickness of 40 mm and a density of 30 kg/m³ (for the seat and back), and for armrests and sides - from 25 kg/m³. Foam rubber has different properties. Marking of foam rubber depending on characteristics:
- ST – standard;
- EL – extra hard;
- HS – increased softness of the material;
- L – hard;
- HR is a latex material with enhanced orthopedic properties.
Advice On the market of foam rubber materials you can find foam rubber that remembers the shape of the body. This is a very comfortable material, practical, it is good for upholstering a sleeping place. It is better to use a thick canvas-type fabric as a backing.
When choosing foam rubber, pay attention to its strength. It should not stretch or tear
The structure is only integral in order to ensure the appropriate appearance after cladding.
The smell of foam rubber should be pleasant and not give off caustic or bad-smelling substances. If there is a smell, then this indicates the use of cheap raw materials in the production of the material.
To check the quality of foam rubber, you need to do a standard test. You need to clench the foam rubber in your fist and quickly release it. When it slowly returns to its original shape, we can talk about the good quality of the material.
Good quality foam rubber consists of many small bubbles. If large cavities are visible to the naked eye, then the foam rubber is of low quality and it is not recommended to use it for covering a sofa.
How to choose the right foam for a sofa and how to change it is written here.
Leather
Sofas, which themselves are made of leather materials, are covered with leather. Eco-leather is recommended as an upholstery material, not natural leather. For a standard size sofa you need to take it with a certain margin, as the leather tightens
Before choosing the right leather fabric, it is important to take into account the design features of the furniture:
- If the sofa has a complex structure, it will be difficult to disassemble it into its component parts and cover it with high-quality leather. In such a situation, you will need to try to correctly distribute the upholstery material so that it accurately follows the shape and style of the furniture.
- If the model is angular, then the skin is pulled as tightly as possible over the joints and corners of the frame.
Old furniture must be restored before upholstery. Both the upholstery and the soft filling are replaced. In special cases, replacement of rigid parts of the frame is required (how to change springs and slats?). A successful choice of material is a choice:
- leatherette;
- eco leather;
- vinyl leather.
The choice depends on financial capabilities, preferences, and the required color.
Important
When covering a sofa with leather, the condition of the legs or wheels of the product is assessed. If you don't put them in order, the appearance will suffer greatly. The legs can be sheathed with the same material, but less cheap.
Video
This video shows in detail how to make a car armrest with your own hands.
⚫ DIY ARMREST. HOW TO MAKE AN ARMREST with your own hands. ♦DIY CAM♦
Armrest option for the Renault Sandero Stepway car (Renault Sandero Stepway).
DIY armrest for Renault Sandero Stepway
How to reupholster the armrest with your own hands on a Priora.
https://youtube.com/watch?v=FiANYBM43kk
How to make an armrest from plywood and cover it with leather.
1. How to make a leather armrest for a car with your own hands from leather plywood
Ready-made new car armrests.
Armrests for cars 2021 2019 2021 2017 2021 Video
How to install hinges.
armrest!
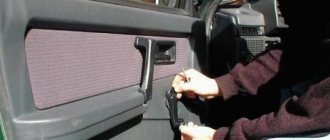
During the trip, one hand spontaneously rests on the door ledge. If there is hard plastic in this place, then it becomes uncomfortable to hold your elbow in this place. In this case, you can make the car more convenient to use by simply modifying the doors. Let's figure out how to make a soft armrest for a door.
The manufacture of the armrest is shown using the example of the Lada Vesta sedan. For other LADA cars (XRAY, Granta, Kalina, Priora, Largus and Niva 4x4) the process looks similar.
- hardboard (thick pressed cardboard) or fiberboard;
- foam;
- leatherette;
- glue;
- Double-sided tape.
We make a template using newspaper.
We transfer the dimensions of the template onto the hardboard. We glue foam rubber to it, cut it around the perimeter with a margin of a few millimeters.
We tighten it with leatherette. You need to pull the material firmly so that the armrest does not lose its shape over time. We glue the edges with glue.
We secure the armrest to the door trim using double-sided tape. The surface on the door is pre-degreased.
Now your elbow will be on the soft armrest and will not get tired. If necessary, a homemade accessory can be quickly dismantled. The door trim can be supplemented with decorative leather inserts, as well as covers for the standard armrest, gear knob and seats (details).
Let us remind you that we previously looked at other accessories for LADA cars, for example, how to make a flip key yourself.
Installation
Installing your own armrest in the Gazelle is not difficult. You can simply install an armrest between the seats, but while driving it can move out of its place and cause considerable discomfort while driving. Therefore, it needs to be installed stably.
Mounted armrest for Gazelle
- A polypropylene tube in which the inner side will be steel;
- Hairpin M 8 100-110 cm;
- Drill.
Drill three holes. Insert slightly trimmed pins into them. A metal plate is placed and everything is secured. Cut a rectangle from plywood that will form the basis of the armrest. Tubes are installed into this plywood, and holes are made in the armrest itself at these places so that the pipes can go there. At this point, the process of assembling and installing the armrest can be considered complete.
Tuning the engine cooling system
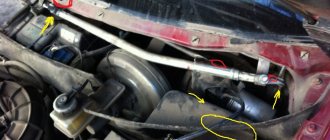
Which of the “gazelists” is not aware of the problem of summer heat? An engine heated to its operating maximum cannot be turned off: it boils! Moreover: in many cases, natural wear and tear of the engine also entails a decrease in the performance of the cooling system, as a result of which boiling can occur not only when turning off a hot engine, but even when switching from high speeds to idle.
Among the proposed solutions, the engineering service of the Avtodela magazine seems optimal to install an additional temperature sensor in the area of the lower pipe. The fan that ensures air movement through the radiator honeycombs must in this case have an electric drive.
A certain number of alterations are required when leaving the standard fan unchanged (with a belt drive) and installing an additional fan between the radiator and the body radiator grille. Placing two fans in the same working plane looks much more elegant. In the photo of the Gazelle tuning you can see the details of such a modification.
An expensive but very effective method of improving the cooling system of an old-style Gazelle engine is to replace the standard radiator with a copper one. A half action is also practiced: installing an additional copper heat exchanger with connecting the device to the lower and upper pipes.
However, installing a factory-made or home-made coil from a copper tube in front of the radiator can ruin the matter. The deterioration of the cooling system occurs due to a decrease in the intensity of the air flow passing through the honeycombs.
DIY bar armrest for Gazelle dimensions
What you will need for work: a jigsaw, self-tapping screws, a screwdriver and saw blades for it, a thick sheet of plywood (with a reserve). Printer or pattern, ruler, pencil, PVA glue, furniture stapler.
- Beginning of work.
- Take a sheet of paper and make a pattern.
- Apply it to a sheet of plywood and transfer it to the plywood, assemble the structure, cut out Alcantara or fur with a margin to bend along the edges.
- Apply glue, let dry, apply a stapler,
- Reassemble. Before screwing in the screws, use a thin drill to mark holes so that the plywood does not burst.
- Assemble the structure in the cabin.
Tuning a Gazelle involves not only changing the driving performance, but also transforming (tuning) the appearance of the Gazelle. Tuning can turn a Gazelle into an Audi or Mercedes, or at least add recognizable features to these cars. To do this, replace body kit spare parts (grilles, hoods, bumpers, lights) with tuning ones. Even Gazelle next tuning can decorate and add some convenience inside the cabin. Below you can find tuning parts for the Gazelle: covers, armrests, steering wheels, upper shelves, consoles, floor mats, including for the Gazelle NEXT. Often the driver spends most of his life in the car. While waiting for loading or unloading or in traffic jams, the Gazelle driver may get tired. Rugs, armrests, decorative panels, interior curtains, and lambrequins will help create comfort in the car interior. In addition to beauty, decorative details will provide convenience, for example, lambrequins will protect you from the sun, armrests and consoles will conveniently place small items in your pockets and make the journey less tiring.