Vehicle check
To ensure traffic safety and increase the service life of the vehicle, it is necessary to periodically carry out external and internal inspections of the vehicle. The length of the inspection depends on how well you know your car and how often you use it. While operating your car, you will learn about the rate of oil consumption in the engine and gearbox, brake and coolant, and the reliability of various systems and devices. This will allow you to plan your actions and time to inspect the car in the future. For example, if it turns out that the engine consumes oil quite intensively (albeit within normal limits), then the oil level in the engine sump should be monitored more often. If the oil consumption of your car’s engine is low and there is no visible change in the oil level over a month, you can limit yourself to a monthly check. The more familiar the car inspection activities become for you, the less time you will spend on them. However, if you encounter difficulties in servicing the car yourself or suspect that it is faulty, you must contact one of the service centers for servicing this car model. Source
Location of components and assemblies (bottom view) : 1 - mudguard of the power unit; 2 — gearbox; 3 — front suspension stretch; 4 — left wheel drive; 5 — front suspension arm; 6 — anti-roll bar; 7 — transmission control rod; 8 — jet thrust of the gearbox control mechanism; 9 — tubes of the power supply and brake systems; 10 — additional muffler for the exhaust gas system; 11 — pressure regulator in the hydraulic drive of the brake mechanisms of the rear wheels; 12 — fuel tank; 13 — rear suspension beam; 14 — main muffler of the exhaust gas system; 15 - niche in the bottom of the trunk for a spare wheel
Bottom view of the front part of the car (the power unit mudguard has been removed for clarity) : 1 - front wheel brake mechanism; 2 — engine sump; 3 - generator; 4 — cross member of the front suspension; 5 - starter; 6 — gearbox; 7 — left wheel drive; 8 — anti-roll bar; 9 — transmission control rod; 10 — jet thrust of the gearbox control mechanism; 11 — additional muffler pipe; 12 — right wheel drive; 13 — front suspension stretch; 14 — front suspension arm
From the outside of the car we check : – air pressure in the tires: inspect them for damage; – tightening the wheel bolts; – serviceability of lighting and alarm devices. You can check the operation of the brake signals without an assistant by pressing the brake pedal and watching in the rearview mirror for the reflection of the signal light from a wall, such as a garage; – no traces of leakage of oil, coolant, fuel and brake fluid.
In the engine compartment we check : – engine oil level; – oil level in the gearbox; – coolant level in the expansion tank of the cooling system; – brake fluid level in the brake hydraulic reservoir; – presence of liquid in the windshield washer reservoir; – generator drive belt tension; – condition and fastening of battery cable terminals.
Inside the car we check : – serviceability of the vacuum brake booster; – operation of the clutch and gearbox drives; – the amount of travel of the parking brake lever; – serviceability of the sound signal; – serviceability of the windshield cleaner and washer; – serviceability of instrumentation; – fuel level in the tank; – adjustment of rear view mirrors; – serviceability of door lock mechanisms.
What does the Priora front suspension diagram look like?
The structure of the part is shown in detail in the figure, where the following components are indicated in the kit:
- rounded fist;
- eccentric type bolt;
- strut responsible for shock absorption;
- lever arm;
- a rod suitable for the stabilizer;
- a bracket fixing a cushion related to the stabilizer bar;
- a stand that fits the stabilizer bar;
- transverse suspension component;
- ball type support;
- stretching;
- spring device;
- rod nut;
- a detail limiting the rebound stroke of the support located in the upper part;
- support placed at the top;
- bearing;
- silent blocks;
- a gasket created specifically for a spring device;
- spring cup at the top;
- an element limiting the compression movements of the upper support;
- compression motion buffer;
- case for protection.
What's under the hood? (for Dummies")
So, it all started with my purchase of a car (the choice fell on the VAZ 2107). And as you know, purchasing a car obliges the owner (to begin with) to understand at least a little about its maintenance and, accordingly, repairs. But for me (a novice car enthusiast) everything that was under the hood was a huge secret. Of course, experience is gained over the years, and since I didn’t have the latter (and I knew very little, practically nothing about the “insides” of the car), little by little I began to understand the design features of my Zhiguli. Therefore, so that to my colleagues (novice car enthusiasts) the engine compartment and everything in it does not seem too “dark”, in this article I will tell you what is where and what is responsible for what.
Frequent front suspension malfunctions
Maintenance and repair of the front suspension in Priora involves identifying the exact cause of the breakdown:
- If there is extraneous noise or a distinct thud is heard, the struts may need to be replaced. Check the tightness of the bolts securing the stabilizer hoses, tighten if necessary. If the cushions are worn out, replace them with new ones. If the supports at the top of the suspension strut are loosened to the body, tighten them. Assess the condition of the rubber component of the strut mount, ball joint, spring device, and compression motion buffer. If they are damaged or defective, replace them. Alternatively, check the wheels for imbalance.
- Liquid may leak from the strut, for one reason - the rod seal has worn out and collapsed. This will be indicated by the appearance of burrs on the rod, damage to the chrome surface, and mechanical defects in the sealing ring located on the strut body. Replace the old telescopic stand with a new one.
- If the suspension in the Priora breaks, you will have to replace the spring device and telescopic strut.
- It has become difficult to drive the car, it constantly skids to the side - it’s time to check the air pressure in the tires and normalize it. If the wheel alignment angles leave much to be desired, perform a wheel alignment. It may be necessary to replace the rubber lining in the suspension mounts or springs.
The device of the VAZ 2170 Priora car
Repairing auto parts yourself is a responsible task that should be taken as seriously as possible. Sometimes a faulty spare part takes the driver by surprise, forcing him to spend a lot of time and money searching for a good service station, but there is an alternative solution to the problem; this requires a small amount of knowledge and a set of tools.
When a VAZ 2170 Priora car is being repaired, you need to be extremely careful and not neglect the little things. To get acquainted with the issue, car enthusiasts often use various Internet portals dedicated to auto parts. Some of them use narrowly focused forums. But, as a rule, only generalized information is provided there, which is known initially. Where can you find a reliable source that offers really useful things? Our portal is open for this 24 hours a day. Online mode allows us to help clients at any time convenient for them. Moreover, a mobile version has been developed that is available to everyone.
Fuse
A fuse is an electrical switching device designed to protect electrical circuits by breaking the circuit due to its destruction or shutting down when a current flowing through it exceeds the permissible values.
Fuses come in several types and are used in all electrical circuits to protect vehicles from short circuits (short circuits). They are classified according to the rated current of the fuse link.
The fuse link is the part of the fuse that is destroyed by electrical current.
The rated current is the current of the fuse at which the fuse-link will operate indefinitely and will not be subject to destruction.
Operating principle of the fuse
When using a fuse in an electrical circuit, the operating current passing through the fuse does not exceed its rated current - this is its normal operation. But as soon as a current appears in the electrical circuit that exceeds the safe permissible values in this circuit, regulated by the fuse, the fuse-link, under the influence of a current exceeding the rated current of the insert, begins to melt and collapse as a result of which the electrical circuit breaks.
You can restore the electrical circuit by replacing the fuse, but only after the culprit for the increased current in this electrical circuit has been found. Otherwise, the new fuse will also blow.
content .. 48 49 50 51 ..Lada Priora (2013+). Leak under the hood (puddles under the hood)
The first cause of leakage is condensation from a running air conditioner. There is always condensation as long as the air conditioner is running. So this is quite normal. Therefore, first of all, without driving the car to the side, look where exactly the leak is. Touch the liquid with your finger and smell. If there is no smell or color, then it is condensation.
If the fluid has an odor, is dark and oily, it is most likely oil from the engine or manual transmission. If the fluid is colored (often red), oily and has a smell, it is fluid from an automatic transmission or from the power steering - the same fluid is poured in both places. If the liquid has a color, a slight smell, but not oily, it is antifreeze (if it is antifreeze, then you will not detect any color, only a smell). Now open the hood and carefully inspect the entire engine compartment. In theory, everything should be dry there and all the stains will be immediately visible. Touch with your finger the bottom of all the hoses where they are tightened with clamps: perhaps it is there that the clamp has cut through the old rubber band and liquid is dripping from the resulting cut. If so, moisture will appear on your finger. The only exception is the air conditioner pipes: condensation often falls on them when the air conditioner is running (this is normal, there is no need to be alarmed).
Engine leak
Look where it's leaking from. It is possible that it is leaking from under the oil filter or the filter itself has burst and is leaking. In this case, you will have to replace it. If you unscrew it, a lot of oil will spill out. That is, it logically turns out that it is best to change the oil and replace the filter.
There may be a leak from the drain plug. Make sure it is screwed in correctly and tightened well.
If it’s just flowing “from somewhere below,” then most likely your oil pan is broken. Try to remember the last time you drove, did you hit the bottom of anything? After all, a hole in the crankcase cannot just appear - there must be some kind of mechanical impact, usually a blow. In any case, go to a car service center as soon as possible. Look at how bad the leak is and what the current oil level is in the engine to see if you can drive to the service center yourself. If there is even the slightest doubt, it is better to get the car towed or towed, because in the absence of oil the engine will seize and you will end up with very serious money.
Manual transmission leak
It may be leaking from a loose drain plug. Make sure it is tight. If the leak is not from there, then go to a service center; you are unlikely to do anything on your own.
Automatic transmission leaking
There may be a leak in metal hoses (a breakdown or a loose tip) or a sump. If you have a broken hose or a leaking sump, you will have to go to a service station; if the tip of the hose comes loose, screw it on, and then drive around and see if it comes loose again. If it leaks again, then most likely you should pay attention to the engine and automatic transmission mounts. The fact is that the automatic transmission is rigidly connected to the engine. If at least one bearing is torn (especially oil hydraulic bearings), then misalignment appears and, under load, the engine begins to “turn” slightly relative to the automatic transmission. As a result, the threaded connections of the hoses between the gearbox and the engine become loose and begin to leak. It can only be treated by replacing the engine or automatic transmission mounts.
If it leaks from the pan, you will have to remove it and find out the cause. Either it is broken, or at the joints the liquid is leaking through the old sealant or gasket. In any case, be prepared that when you remove the pan, 4-7 liters of ATP fluid will leak out (it is expensive!). It is not worth pouring back the leaked liquid: during the draining process, particles of old sealant and dirt are guaranteed to get into it.
Power steering leak
As a rule, it can only be eliminated by replacing the hoses or the power steering itself; no “makeshift” solutions (insulating tape, cold welding, etc.) will work, since the fluid in the power steering system flows under pressure. In addition, if the power steering itself has failed, then there are no repair kits for it; as a rule, an aggregate repair method is used (that is, the old power steering is thrown out, a new one is installed).
Antifreeze (antifreeze) leak
First of all, you need to remember that the coolant in the system is under slight pressure, so you won’t be able to simply “plug” the hole. First you need to determine where the leak is. Let's assume that the radiator is leaking. Most likely, you won’t be able to seal it yourself; you’ll have to go to a service station. There they will remove it (in this case, all the coolant will leak out of the car. Do not be greedy in any case, do not collect it in a container so that after the repair you can pour it back into the car. The coolant is not that expensive, and besides, it requires periodic replacement. At the same time, change it, and there is no need to pour old dirt into the system.
You can try welding (soldering) the hole in the radiator. But if the radiator is already old, then it is unlikely that it will work well, and in a short time it will leak again. It's better to change it - it will be cheaper. What you should not use are all kinds of “cold welding” and “repair” liquids for radiators. They work poorly, but they remarkably clog the entire cooling system, getting into the thermostat and the engine itself and settling there safely, clogging the channels through which the coolant flows.
If the hose through which the coolant circulates is leaking, then everything is much simpler (and cheaper). If the hose bursts somewhere in the middle, then such a leak can be eliminated right on the road. To do this, I recommend having the following “gentleman’s kit” in your car:
- two or three car clamps per medium size - a piece of raw rubber or plumbing tape (this is not the tape that is used to twist electrical wiring, but the kind that is used to seal leaks in plumbing, sold in all stores) - preferably a piece of thin tin, aluminum, bronze, brass, copper.
We wrap the hose at the break point with electrical tape, wrap it with a piece of tin and tighten it with clamps. If everything is done carefully, the leak will stop completely. This, of course, is “snot”, but it is quite possible to drive several hundred kilometers to a suitable service station or auto shop.
If the hose leaked at the junction with the unit, then most likely it was pinched with a clamp and cracked. We remove the hose, cut it off at the crack, throw out the old clamp, put on a new one, and tighten it back.
content .. 48 49 50 51 ..
Electromagnetic relay
An electromagnetic relay is a switching device designed to relieve contacts. The work is based on the law of electromagnetic induction.
In cars, relays are used to unload contacts on control buttons, so that they, in turn, do not melt or heat up when more current appears on them. The relay consists of moving and non-moving contacts, a DC coil, a return spring, a coil core and an armature.
Relay operating principle
When a current appears on the relay coil, a magnetic field is formed in it, which in turn begins to attract the armature to which the movable contacts of the relay are attached. As a result, the moving contacts close with the fixed ones and the electrical circuit is completed.
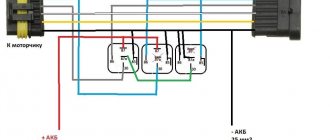
Location of fuses and relays in Priora
The fuses and relays in the Lada Priora car are located in a special block. The so-called fuse box (mounting block) or, in common parlance, a “black box”. All electrical circuits of the car come into the mounting block and are connected to fuses.
There are several fuse and relay blocks in Priora. This section will talk about the location of all the blocks.
Main fuse box
It is located under the steering column of the car and can be reached by turning the fixing clips 90 degrees. Then, by pulling the cover towards you, you will get to the fuse and relay box.
Additional fuse and relay box
An additional fuse and relay box is located under the center console in the vehicle interior; it can be reached by removing the side cover of the passenger or driver's footwell air duct. Basically, the relay and fuse for the ECU and fuel pump are located there.
Power fuse box under the hood
Another fuse box for the Lada Priora is located in the engine compartment. It houses the power fuses of the Priora car, which consume a large amount of electricity. Near the battery and ABS unit. In order to get to the fuses in this block, you need to pull the block cover up and it will come off.
Air conditioner fuse and relay box
As you know, the Lada Priora is a car with an increased level of comfort and in some Priora trim levels a climate system with air conditioning is installed. It is in such cars that there is a fuse box and an air conditioning relay. It is also located in the engine compartment, above the ABS unit. In order to get to the fuses in this block, you need to unclip the latches of the top cover and lift the cover up.
Tuning the front suspension in Lada Priora
Tuning a part first of all implies the comfort of the car, and only then does it come to the external component. To install a cool suspension that will not let the driver down on the road, you need to purchase the following materials and tools:
- Front stabilizer ŠS.
- Spacer.
- Component that reinforces the shield at the front.
- Cross member of the suspension located at the front.
- Levers brand IQ Racing Technology.
- Cross piece to match the front suspension.
What each detail is responsible for:
- The stabilizer has a mount like in foreign cars, which is something you can only dream of with a stock stabilizer. Drivers who have already installed and are using an improved version of the stabilizer note the good handling of the Priora. The component is fixed to the rack through a rod using an eyelet.
- The lower strut successfully pulls together the arms that fit the front suspension. When mounting the device, make sure that the installation site is inclined, so that the reinforcing arc passes below the jamming device and avoids contact with it.
- The component that reinforces the shield in the front part perfectly secures the steering rack to the body. To make the tuning look perfect, paint the element in the desired color.
- The cross member of the suspension located at the front amazes Priora drivers with its large weight; the part is fixed directly under the bumper. Performs the functions of “crabs” and spacers. Car enthusiasts promise amazing profits.
- Levers of a well-known brand in original quality replace all levers combined, including sabers. Castor can be replaced at the top and bottom.
Such tuning of the Lada Priora will cost approximately 14,000 rubles.
Where are the fuses on the Priora?
- The main mounting block of the Priora is closed with a lid and located at the driver’s left foot. To open it, you need to turn three latches 90° and unclip the lid.
- The fuse box is under the hood, which is located near the expansion tank.
- Another mounting block, which is located near the left foot of the front passenger. To gain access to the fuses and relays, unscrew several screws with a Phillips screwdriver.
Below is a description of each fuse and relay block in order.
Location of Priora fuses under the hood
- F1 (30 A) – power supply fuse for the electronic engine control system (ECM);
- F2 (60 A) – fuse for the power supply circuit of the engine cooling system fan (power circuit), additional relay (ignition relay), rear window heating, electrical package controller;
- F3 (60 A) – fuse for the power supply circuit of the electric fan of the engine cooling system (relay control circuit), sound signal, alarm signal, ignition switch, instrument cluster, interior lighting, brake light, cigarette lighter;
- F4, F6 (60 A) – generator power circuit fuses;
- F5 (50 A) – fuse for the power supply circuit of the electromechanical power steering
Relay and fuse box for Halla air conditioner
- right electric fan power supply fuse (30 A);
- fuse for the power supply circuit of the left electric fan (30 A).
- right electric fan relay;
- additional relay (sequential activation of left and right electric fans);
- left electric fan relay;
- heater fan power supply fuse (40 A);
- compressor power supply fuse (15 A);
- heater fan relay;
- compressor relay.
Panasonic air conditioner relay and fuse box
- Heater fan maximum speed
- Right fan
- Fan sequential relay (low speed)
- Left fan
- Left fan fuse (low speed)
- Right fan
- Heater fan
- Compressor
- Heater fan
- Compressor
Relay and fuse blocks on a LADA Priora car
The VAZ Priora passenger car, regardless of the type of engine installed, is equipped with several junction boxes. They are located under the hood and inside the car. The use of several boxes made it possible to separate circuits with high and low currents. In addition, separate small-sized mounting blocks were installed, introduced as the configuration expanded.
Main power fuse block
The vehicle's power circuits are protected by inserts installed on the positive terminal of the battery. The block is designed to protect circuits with maximum currents. To gain access to the fuses, you need to remove the plastic cover; this can be done without the help of tools.
Block diagram and its location in the car
The removal of the most powerful circuits on the Lada Priora into a separate unit located close to the battery ensured maximum protection of the car's electrical system from overloads.
The location and designation of the inserts is indicated in the photo. Depending on the year of manufacture and installed equipment, it is possible to install fuses of different ratings.
Priora power insert block
Explanation of fuse designations
Purpose and rating of the main block inserts.
| Number in photo | Denomination, A | Purpose of the element |
| F1 | 30 | Protection of power supply circuits to the ECM system (propulsion control) |
| F2 | 40 (there is a 60 A option) | Power supply for the cooling fan electric motor, additional ignition system controller, glass heating filaments, electrical package control unit |
| F3 | 30 (there is a 60 A option) | Control of the operation of the cooling fan electric motor, horn, standard alarm siren, ignition control switch, instrument cluster circuits, interior lighting, power supply for brake lights and cigarette lighter |
| F4 | 60 | First generator circuit |
| F5 | 50 | Power supply and control of the electromechanical power steering motor |
| F6 | 60 | Second generator circuit |
The given fuse diagram for the Lada Priora is relevant for cars without an anti-lock brake system. The introduction of a hydroelectronic unit on the Priora-2 series car led to a change in the purpose of the inserts.
Purpose of fuses on the battery for Priora cars with ABS (starting from the one closest to the terminal):
Mounting block: relays and fuses in the passenger compartment
The unit includes fuses, several relays, and tweezers designed to simplify the procedure for replacing burnt out inserts. The content of the device depends on the vehicle configuration.
Block diagram and its location in the car
The unit is located in the plastic frame of the dashboard at the bottom of the driver's side. The outside of the box is closed with a removable cover installed around the steering column and secured with three locks located along the lower edge. To remove the cover, you need to turn the latches 90 degrees and remove the element from the latches by pulling it towards you.
The oval marks the location of the block installation
On cars, fuse ratings may differ depending on the year of manufacture of the car and the configuration. To determine the value of the fuse link, you should use the operating instructions for the Lada Priora.
When repairing fuses, it is necessary to take into account that the instructions for the Lada Priora car change several times a year. It is not recommended to use a manual from another car.
Additional mounting block Priora
- F1 (15 A) – main relay and starter interlock circuit fuse;
- F2 (7.5 A) – fuse for the power supply circuit of the ECU (controller);
- F3 (15 A) – Priora fuel pump fuse;
- K1 – main relay;
- K2 is the place where the Priora fuel pump relay is located.
Attention!
The relay and fuse diagram may differ depending on the configuration and production date of the vehicle. Current diagrams of the mounting block are presented in the operating manual for the date of manufacture of the vehicle (download from the official website).
Let us remind you that on our website you can find detailed instructions for repairing the Lada Priora with your own hands.
Sources:
https://lada-priora.org/5-1.html https://www.automei.ru/stati-ob-avtomobilyakh/sovety-avtomobilistu/58-to https://avtorom.ru/vaz-2170- ustroystvo-avtomobilya/ https://enginehack.ru/predohraniteli-lada-priora/ https://xn--80aal0a.xn--80asehdb/do-my-self/repair/repair-lada-priora/218-shema- rele-i-predohraniteley-priory.html
Priora design
Details Published: 06/25/2011 08:44 Author: Admin SuccessfulAuto.ru
Priora design
In this article we will look at the design of the sedan {VAZ 2170}. The design of the Priora sedan car has a four-door body with supporting structures, a frame and attachments. The prior frame includes: base, sidewall, roof, frame elements. Frame parts are connected by spot, seam or arc welding. The frame is a non-separable structure that has sufficient strength and rigidity, since the frame must easily support the full weight of the Priora, all its components and assemblies, tuning parts, interior and airbrushing.
The set of attached parts of the priors includes: doors, hood, trunk lid, front fenders, bumpers. The front fenders are attached to the body using bolted connections. Other hinged units: doors, hood, trunk lid are connected to the car frame using hinges. The front and rear bumpers are plastic, painted to match the body color, and are attached with self-tapping screws. The design of the front bumper of the Priora includes a beam that can absorb energy during an accident, that is, it is soft and in order not to cause an impact on the suspension and body frame of the Priora, it crumples during an accident and thereby absorbs energy.
Anti-corrosion protection of body structure priors. Most of the body parts and panels of the priors are treated with zinc {Zn} to prevent premature rotting of the body metal. Galvanized structural parts of the priors on the inside: front and middle floor panels, side body panels, windshield pillar reinforcements. Galvanized structural parts of the priors on the outside: doors, trunk lid, hood, front and rear fenders. In total, ~30 parts of the Prior body structure are protected from corrosion.
The windshield of the Lada Priora is three-layer {triplex}. Door, rear, and all side glass priors are tempered. Windscreen, as well as heated rear window of the VAZ 2170. The side windows are glued to the body structure and provide additional support.
The front seats are separate, have control devices for changing the angle of the seat back and a mechanism for longitudinal movement of the seats. The prior seats have easily removable headrests that are height adjustable.
The rear seat of the Priora has a one-piece cushion and backrest, which is divided by a folding armrest. The rear side of the seat behind the armrest has a hatch through which it is possible to transport long loads.
The side belts are front and rear inertial, and the rear belt for the passenger in the middle is non-inertial. The design of the Priora includes an airbag for the driver. For Priora luxury equipment, the car is equipped with an additional airbag for the front passenger. Also, in an additional modification of the Priory with an additional airbag, belt pretensioners are installed, which can soften the tension of the belts in the event of an accident at high speed.
Additional mechanical options in the Priora design for the convenience of the driver and passengers: cigarette lighter, front and rear ashtrays, sun visors, heater, rear-view mirrors, handrails. The design of the driver's seat of the Priors includes mounts for a fire extinguisher at the bottom. The design of the front passenger seat of the Priora includes a mount for a first aid kit.
The Lada Priora hatchback luxury {VAZ 2172} is equipped with eyes for towing the car, electric locking of the rear doors, the trunk lock of the Priora hatchback is electric, and the front seats are electrically heated.
The control unit of the heating and ventilation system Priora provides the ability to change the volume, temperature, direction, and speed of air flow. In the body design of the Lada Priora, it is possible to extract air from the passenger compartment through deflectors with valves, which are installed in the rear part behind the rear bumper of the Priora.
The photo shows the body structure of the Prior:
Priors body structure
: 1-radiator frame, 2-upper cross member of the front part of the priors, 3-right front fender, 4-front panel, 5-hood, 6-right front door, 7-wind window pillar, 8-inner panel of the front door, 9- right rear door, 10-rear door interior panel, 11-right side panel, 12-roof panel, 13-left side panel, 14-rear suspension spring support, 15-trunk lid, 16-trunk lid interior panel, 17-side window frame , 18-rear pillar, 19-left rear door, 20-rear wheel arch, 21-center floor panel, 22-spare wheel well, 23-center pillar, 24-left front door, 25-front pillar, 26-front panel floor, 27-left front fender, 28-front suspension spring support, 29-bracket, 30-front spar, 31-bracket for towing eyes, 32-prior front panel
VAZ Priora
New Lada Priora, Khaima photo, Technical characteristics of Priora station wagon, Priora sedan, Technical characteristics of Priora hatchback, Replacing the front bumper, Dashboard of Lada Priora, Photo of the new Priora
Comments:
- In contact with
- Back
- Forward