- When starting the engine with electric start, a clicking or squeaking noise is heard
- Device electronics are not working properly
- The battery does not charge or discharges too quickly
If these problems occur, you may need to perform a test to determine if the battery is dead and if the alternator is working properly.
Follow these instructions to test your charging system. CAREFULLY!
Always read the engine and equipment manual(s) before starting, operating, or servicing the engine or equipment to avoid personal injury or property damage. See your authorized dealer or contact Briggs & Stratton if you are unsure of any procedure or have additional questions. Find all engine hazard warnings
Improper use of the battery and charger may result in explosion and burns. Follow battery and charger manufacturers' instructions
- Always wear safety glasses
- Perform battery maintenance in a well-ventilated area away from flames, sparks and other ignition sources.
- Do not tip the battery over or remove the vent caps.
Charging control with a multimeter
For those who don’t know, this is a special miniature device, which is most often produced by our eastern neighbors.
Its price on the market rarely exceeds 1000 rubles. The prefix “multi” means that it can measure a lot of useful things, but we are only interested in one parameter - voltage. It is its value that will allow us to draw conclusions about the performance of the generator. But before you check whether the battery is charging or not, it’s a good idea to make sure it’s working. Moreover, this can be done using the same multimeter. Having measured the battery voltage in idle mode, i.e. without load, indirect conclusions can be drawn about the degree of its charge. To do this you need:
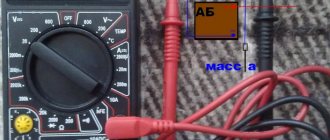
- Set the multimeter switch to the position corresponding to the measurement of direct current, with a limit greater than 12 V. The limit in the photo is set to 20 V, but it can be different for different types of measuring instruments. It should only be noted that the lower the limit, the greater the measurement accuracy;
- Connect the multimeter probes to the battery terminals. In this case, it is not necessary to observe polarity; the design of the device allows this. If the connection is incorrect, the voltage value will be displayed with a “-“ sign;
- Read the readings of the device and, using the data in the table, draw conclusions about the state of charge of the battery.
Once again, these are approximate values. More accurate data can be obtained only by measuring the density of the electrolyte. And, nevertheless, if the voltage test showed that the battery is charged less than 50%. it follows .
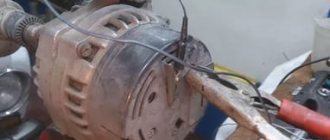
Now you can check the charging from the car generator. The sequence of actions is the same as in the previous case. The main difference is that the test is performed at idle engine speed. Therefore, safety precautions should be observed. The voltage on the battery, during normal operation of the generator and relay regulator, should be within 13.7 - 14.3 V.
Now you need to turn on the low beam headlights and heated rear window. The voltage on the battery may drop slightly, but not lower than 13.5V. Otherwise, you need to look for the reason. You need to start with the alternator belt, or rather with its tension.
And one last thing. No matter how great the temptation is to switch the multimeter to the current measurement position, you should never do this. In parallel with the battery, only its voltage can be measured. Any attempts to measure the charge current will lead to a short circuit and, at a minimum, failure of the measuring device.
A properly functioning battery will ensure easy engine starting even in the coldest weather. The stable operation of the battery and the entire automotive electrical system certainly depends on the quality of the battery. The battery is supplied with voltage during engine operation by the generator. For this reason, it will be useful to know how to check the charging of the generator.
Design and principle of operation of a car battery
A typical power source consists of a plastic case in which lead grids filled with an electrolyte solution are compactly placed. There are two contacts on the housing cover: minus and plus. They are most often made of lead.
Just like a hundred years ago, the principle of operation of rechargeable batteries has remained virtually unchanged. When electric current is applied to the battery contacts, the density of the electrolyte changes and the accumulation of charged particles in the grids begins to occur. Upon reaching a certain limit, which depends on the battery capacity, the charge reaches its maximum and is maintained. Then, when the battery is connected to a consumer, electrical charges begin to flow through the wire connections, providing electricity to the latter, while the density of the electrolyte decreases and the voltage drops.
Table of energy consumption by different equipment.
How to test a generator for performance with a multimeter?
Charging the battery is necessary in cases where it takes on part of the load of the energy supply system. How much energy does the equipment in the car need?
| Side lights and vehicle lighting | ~40 watt |
| Headlights and fog lights on both sides | ~250 watt |
| Stove fan at maximum power | ~200 watt |
| Cooling fan runs briefly | ~250 watt |
| Heated rear window | ~150 watt |
| Fuel pump and engine management | ~80 watts |
| Radio (medium sound level) | ~100 watt |
Table 1. Electricity consumption in the car by additional equipment.
By simple calculations we get a total consumption of 1070 watts, which when converted to amperes will be approximately 90A. For many car generators, such a load, and they are the first to take it upon themselves, is at the limit of the equipment’s capabilities. When a certain threshold is reached, the system will transfer part of the load to the battery. Therefore, it is necessary to carefully calculate the characteristics of the generator and battery.
The car engine does not work
Has a good battery
(read about his choice here) there should be at least 12.4 on the terminals.
voltage is 12.5 - 13. A lower value indicates the highest degree of discharge. Another reason is a decrease in capacity due to the onset of sulfation of the plates, for example. And this is already a “ringing bell” for the car owner. Moreover, at voltage = 12 and below, starting a car is quite problematic, especially when cold weather sets in.
What to do if the generator does not charge the battery
How to test a battery with a multimeter
In almost all cars, the following elements are responsible for powering the on-board systems and charging the battery:
- generator with built-in rectifier;
- relay-regulator;
- switching units and wiring.
The list, at first glance, is small, but diagnosing the cause of lack of charging and troubleshooting can cause certain difficulties.
Possible malfunctions and their solutions
First, let's find out why the generator does not charge. There are many reasons:
The alternator drive belt is broken, worn or loose. In this case, either the generator does not work at all, or the current it produces is not enough to charge the battery. It powers the onboard systems, but does not charge the battery.
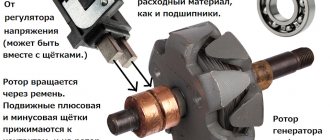
The generator brushes are worn out. In this case, the generator, as a rule, does not produce anything at all, and the entire load falls on the shoulders of the battery.
Poor contact. This usually concerns the generator excitation circuits (see below), but the problem may also be caused by the battery terminals or on-board power supply wires.
Failure of diodes. A very common reason for careless lighting. If even several diodes fail, the on-board voltage will not be enough to properly charge the battery. Failure of the entire bridge, which is not uncommon, will lead to a complete failure of the power supply system, and the entire load will fall on the battery.
The relay regulator is faulty. There may be two options here. The first is a broken relay. In this case, the battery is not charged from the generator and takes on the entire load of powering the on-board systems. Second - the relay is closed. The generator produces very high voltage (above 14.5 V). The battery receives a high charging current and “boils”, the on-board systems burn.
The fuse has blown. In some car models, the generator excitation coil is powered through a separate fuse. If it fails, the generator does not produce voltage and the battery does not charge.
Typical battery charging circuit
Basically. Charging nodes on all brands of cars are very similar, so let’s look at the troubleshooting and repair methods for the VAZ 2106 model. Let’s take a look at the circuit diagram of the charging node.
Typical diagram of a VAZ 2106 battery charging unit
When the ignition is turned on, voltage from the battery is supplied to the generator excitation winding. The other end of the winding is connected through a relay regulator to the car body, which is the negative wire. After starting the engine, the generator begins to rotate thanks to the drive belt, and voltage appears on its power windings, made according to a three-phase circuit.
The alternating voltage is rectified using a rectifier bridge, which consists of six diodes. It enters the on-board network, powering consumers and simultaneously charging the battery. If the voltage at the generator output exceeds 14.5 V, then the relay-regulator will turn on, reducing the voltage on the excitation winding, and therefore at the generator output.
Troubleshooting
We will carry out troubleshooting from simple to complex.
- We check the fuse responsible for powering the generator excitation winding.
Mounting block with fuses VAZ 2106
- We check the quality of tension and wear of the belt. If it is deeply recessed into the generator pulley, and the pulley itself is polished to a shine, then we have obvious problems - we need to replace the belt or at least temporarily tension it to normal.
- We check the relay regulator. To do this, with the engine running, connect a voltmeter (multimeter) with a measurement limit of 20 V DC to the battery. Briefly close the input-output contacts of the relay-regulator (in the diagram above - the collector and emitter of the relay transistor). If the voltage on the battery rises to 15-17 V, then the relay is faulty. We change.
Relay regulator VAZ 2106
We inspect the excitation and power wiring
We pay special attention to the connecting blocks. They must be clean, without signs of burning, oxidation or dirt. Checking the brushes
They must have a smooth, polished end surface without burning or chipping. The length of the brushes itself should not be less than 12 mm.
- Checking the diode bridge. To do this, you will have to dismantle the generator and remove the back cover from it - the bridge is located there. We disassemble and disconnect the generator windings from the diodes - they are connected through ring terminals with a screw. We test the diodes with a multimeter in diode testing mode. In one direction the device will show several hundred Ohms, in the other - “infinity”. If the semiconductor rings both ways or does not ring at all, it is faulty. We replace the entire diode module.
What not to do
There are several “methods” of verification, which are popularly called “driver’s methods”. Under no circumstances should they be used in diagnosing modern cars.
- Check by removing the terminal from the battery. This method is not without logic. Theoretically, if the generator is faulty, then when you remove the terminal from the battery, the car should stall. This method has been successfully and painlessly used on vehicles with a mechanical ignition system. It cannot be used on engines with electronic ignition, much less on injectors. The fact is that if the generator is working properly, when the terminal is removed there will be a sharp voltage surge, and the electronic control unit may fail;
- Check for spark. This barbaric method involves removing the positive terminal and short-circuiting it to ground. The result of the check is a trip to the store for a new relay regulator or diode bridge.
- Try to measure the current with the device when starting the engine. You won't be able to do this with a household tester. It will invariably burn, maybe even in the full sense of the word.
The only way to check whether a car battery is charging from a generator is with a multimeter.
How to charge a dead battery
How to check current leakage on a car with a multimeter
To properly charge the battery, you need to perform several steps step by step.
- Each battery jar must be filled with distilled water.
- Turn on the battery for charging, calculating on the charger the current consumption of 0.1 of the battery capacity.
- When bubbles appear in the jars as if boiling, the battery is disconnected from charging for 30 minutes.
- After the battery has cooled down, turn it on again for charging, but with a charge current of 0.01, that is, 10 times less than the primary rating.
- If after some time the liquid in the jars boils again, you need to interrupt the charge for 30-40 minutes.
A full, correct charge may take more than one day, since the battery will constantly have to be disconnected and then connected to the charger, eliminating the boiling of the liquid. In the future, you need to carefully monitor the level of liquid in the jars and, if necessary, add distilled water to it.
Although this procedure is simple, it still requires high-quality preparation; such work must be carried out in a special room and wearing protective glasses and gloves.
- First, the battery must be discharged to 9 volts.
- Then, every drop of electrolyte is drained from the cans.
- Fresh distilled water is poured in and the battery is infused for 1-2 hours.
- Now you can plug the battery into the charger. In this case, the charging current should not be higher than 11 volts.
- After 1 hour, it is allowed to increase the charge current to 0.1 of the full battery capacity.
- Charging continues until the electrolyte in the jars boils. This will be a signal to reduce the charging current on the basis that the procedure will last for 10 hours.
When the battery is charged, it cannot be used, it must be discharged again using the instructions and charged again. And so several times, only after 4-5 charge-discharge cycles, the battery can be installed on the car and used.
This is interesting: What is an electrolyte hydrometer and how does it work?
Battery classification
1. Depending on the design, there are:
- American, differing from their counterparts by threaded terminals located on the side wall;
- Japanese, having more modest overall dimensions;
- European, the most common batteries in our country, having a classic shape and size.
2. By type of polarity:
- with straight polarity, when the positive terminal is located on the left when viewed from the contacts;
- with reverse polarity, when the negative terminal is located on the left.
3. By battery type:
- lead-acid;
- helium;
- with Absorbent Glass Mat technology.
4. By nature of service:
- serviced, those that provide the possibility of topping up electrolyte;
- not serviceable and not dismountable.
Signs of a generator malfunction
Modern passenger cars are literally crammed with electronics; there are several dozen sensors alone, and over time the situation only gets worse. Automakers try to increase the power of the generator according to the needs of the on-board network, but this is not always possible, and therefore, if problems arise with the battery, it cannot be ruled out that it is simply not charged when the engine is running.
How can you understand that the generator does not charge the battery, or that it is not able to cover the loss of battery charge when starting the engine?
There are several signs indicating that the culprit of undercharging is the generator unit:
- light indication in the form of a lit battery symbol;
- insufficiently bright headlights;
- extraneous noise heard from the generator;
- interruptions in battery operation.
The combination of any two of these signs should alert you.
Note that all malfunctions associated with the operation of the unit responsible for powering the vehicle are divided into mechanical and electrical. The first include loosening of fasteners, wear of bearings and brushes, breakage of pressure springs, loosening of the drive belt tension, etc. There are also many electrical reasons - problems with wiring (breaks, short circuits), windings, burnout of the diode bridge, breakdowns, etc. .
An extreme case is a complete failure of the generator, which will simply immobilize your car. But this is not always a death sentence. In many cases the problem is fixable, although in some cases it will cost money, time and effort.
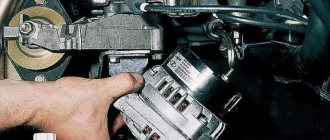
Replacing a generator is generally required only when the breakdown is quite serious, and the cost of repair, if possible, is not much cheaper than a new device.
Safety rules when checking a generator
Before you start checking a car generator, you should familiarize yourself with the basic safety rules that will help maintain the health of the diagnostician and not damage the unit. The basic rules for safe inspection and repair of a generator are as follows:
It is forbidden to check generator valves with voltages higher than 12 Volts;
- It is unacceptable to check the generator using the short circuit method, which is also called “spark”;
- If, when repairing a generator, it is necessary to replace the wires in the wiring, it is necessary that they be of the same cross-section and the same length as the wires installed previously;
- Before diagnostics, you should check the tension of the generator belt;
- You cannot disconnect consumers from the generator if its operation is being checked. It is prohibited to operate the generator with the battery disconnected;
- It is forbidden to connect terminals “B+” and “D+”. On some generators these terminals are designated "30" and "67".
Please note: If you are not only checking the generator, but also welding work on the car body, you must completely disconnect the generator and battery from the vehicle’s on-board power supply before starting.
How long does it take to charge a battery from a generator?
When the engine is running, the generator, generating energy, replenishes its supply in the battery. The charging duration depends on several criteria:
- ambient temperature;
- remaining battery charge;
- the duration of its service life;
- the magnitude of the charging current of the generating source.
How long does it take to drive a car to charge the battery? To fully charge the battery, the car must be in continuous motion for at least three hours. The storage sources of those cars that regularly travel long distances will not need to be recharged from external network devices.
Car owners often have a question: does the battery recharge if the engine is running and the vehicle is not moving? When all vehicle systems are functioning correctly, battery energy is available to start the engine or to operate electrical appliances when the engine is off. Consequently, when the engine is running, regardless of whether the car is in motion or not, the drive begins to recharge, restoring the energy reserve. The only difference is that recharging at idle, as when driving at low speed with constant stops in the city cycle, occurs more slowly than in a car moving for a long time.
Consequently, the answer to the question “How to increase the charging of a generator” is simple: regularly operate the “iron horse”, traveling long distances.
Battery charging circuit
For a general understanding of the reasons for overcharging, first consider the battery charging circuit diagram. And although it is structurally different on different cars, the general principle of construction is the same.
This circuit includes:
- Generator;
- Rectifier block (diode bridge);
- Relay regulator;
- Fuse box;
- Egnition lock;
- Charge indicator lamp;
- Battery
The recharging system works using the example of the VAZ 2106 and other cars from the VAZ classic series as follows: after starting the power plant, by means of a belt drive, the crankshaft begins to rotate the generator rotor, as a result of which this unit begins to generate electricity.
But since automobile generators use alternating current, the generated energy goes to the rectifier unit, where alternating current is converted into direct current.
After the rectifier unit, the electricity goes to the relay-regulator, whose task is to maintain the voltage in a given range.
Tips for connecting and using a multimeter
Analog
The first copies of this type of tester appeared at the beginning of the 20th century. Today, most ordinary users and specialists prefer digital meters to analog ones due to a number of disadvantages of the latter. It is only partially possible to check amperes with a multimeter of this type, since many models do not have AC meters. In addition, pointer testers do not provide updated data.
Read also: Abbreviations in electrical circuits
It can measure the following characteristics:
- DC current up to 250 mA (milliamps);
- direct and alternating voltage up to 300 V (volts);
- resistance force up to 2.5 MΩ (mega ohm)
Measuring the correct electric current with a multimeter will not be difficult with a tuned instrument. First, prepare the device. Scroll the selector to sector A and select the desired range. The kit includes two cables that are inserted into the corresponding sockets on the tester. Next, we begin the measurement procedure itself. Having touched the plus and minus points of the device being tested with the probes, we monitor the deflection of the arrow on the dial and read the value. The whole procedure takes no more than 5 minutes.
Digital
Multimeters of this type have replaced analog ones, and the main advantage over the latter is the high accuracy of the outgoing data. As in the previous case, prepare a multimeter before carrying out tests. We connect the cable to the connector marked ADC. A tester for determining current strength is connected to an open circuit.
It is necessary to cut the wire in two places and strip both ends. Then we connect them to the probes
It is important to remember that they do not touch each other. Then, the circuit can be turned on and measurements can begin.
The advantages of digital multimeters also include automation of many processes. So, some models are capable of independently setting the desired range, and will display a corresponding notification on the screen. On expensive models there are no switches between AC and DC. Again, it automatically determines the nature of the conducted flow of electricity. The wide functionality also includes a thermometer, light and frequency meters.
Getting to the repair site
Finally, about what to do if an overcharge is detected while on the road and you need to get to the place of repair.
If the voltage does not exceed 15 V, then you can safely continue driving, but try not to give high speed to the engine and reduce the number of switched on electrical consumers as much as possible (keep only the necessary ones).
If the overcharge is strong (more than 15 V), you can first loosen the tension of the generator drive belt, which will reduce its performance (although the belt will quickly wear out).
If loosening the belt does not give any results, you can turn off the generator (disconnect the wires from it). In this case, the on-board network will be powered only from the battery.
If the battery is well charged with a minimum number of consumers on its charge, you can drive 70-90 km, but after that the battery will need to be well charged.
>
Charging the battery from the generator
While the vehicle is moving, the electricity generation installation generates charging voltage, which is the main resource for recharging the storage unit. The process of charging the battery from the engine is carried out in a gentle mode, completely eliminating the possibility of boiling the electrolyte in the banks.
What kind of charging should go from the generator to the battery?
How much should the battery be charged from the generator to ensure its full operation? It is generally accepted that to fully replenish the energy costs of a battery, a generating device with a charging current volume of at least 10% of the capacity of the storage device will be sufficient. In other words, for a 70 ampere/hour battery, the generation system must provide at least 7 amperes of charging current, which will be normal charging of the battery from the generator. The power of the storage source must comply with the recommendations of the vehicle manufacturer.
If a more powerful storage unit is used, the current value generated during operation of the car engine may not be enough to fully restore energy consumption. This can further lead to battery discharge and problems starting the engine. In addition, you should remember about the load from all electrical appliances that the machine is equipped with - the generating source must also cope with it.
How can an ordinary car enthusiast check whether the battery is charging from the generator?
How to independently check whether the generator is charging the battery?
Motor vehicles of the 21st century are equipped with on-board electronic systems that control the operation of all mechanisms, and also allow checking the battery charging from the generator. If the battery loses charge, its icon on the instrument panel will light up red. In addition, with the help of modern electronic devices you can monitor the voltage value in the network.
But what about those who have an old-style car, without bells and whistles? There are so-called “driver’s” methods that allow you to check whether the generator is charging the battery:
- Removing the terminal from the battery - if the generator malfunctions, the engine will immediately stall (only suitable for systems with mechanical ignition).
- Short circuit of the positive terminal to ground for a short time - check for a spark.
The above methods cannot be used when diagnosing modern cars - the control unit, fuses or diode bridge will instantly fail.
How to check the charging of the generator with a multimeter?
The operation of the generator set should be monitored and diagnostics of current, voltage and resistance values should be carried out at least twice during the year.
How to check if the battery is charging? Diagnostics of potential difference can be carried out using two methods:
- Directly on the generator winding.
- Through the battery pack, with which the energy generation source is inextricably connected directly with a large cross-section wire.
Let's connect the wires of the device in any order to the battery terminals and determine the mains voltage, the value of which should not be lower than 12 V. When the engine is idling with the load completely disconnected, the permissible voltage is determined by the range from 13.5 to 14 V. In this case, deviations of no more than 0.2 V down or up.
Causes of battery charging failure
The main parameter in the battery charging process is the charge current. Many parameters depend on its value.
Capacity replenishment speed
There is an opinion that for normal battery charging, the charge current should be 10% of its capacity, i.e. with a battery capacity of 50 Amp*hours, the charging current will be 5 Amps. Under such conditions, it will reach its nominal capacity of 10 hours.
Imagine, you were turned on by the wires of another car in the winter, and in order to fully charge the car battery, you need to drive the car for 10 hours straight, that is, drive about five hundred kilometers.
It is believed that to replenish the battery charge to the nominal value, it is enough to drive 30 kilometers in a normal cycle, and in city traffic jams half that. That is, if your work is located more than 10 kilometers from home, this is enough not to worry about recharging the battery outside the car.
The case is different when work is close to home. You spent the capacity when starting the car, quickly drove to work, and then also home. After a week or two, your battery runs out. And not at all because there is something wrong with the car, it’s just the rhythm of the drive.
In this case, you should think about warming up the engine even in the warm season just to ensure that the battery is always charged.
Let's return to the charge current. If it is enough to drive a car 30 kilometers to fully charge the battery, and not 500, as in the example, therefore, the charging current of the car generator is not 5 Amperes, but much higher.
Battery life
The normal battery life is more than five years. Used cars imported from abroad have fully working seven- to nine-year-old batteries on board. There, however, the storage conditions for cars are different, and the temperature in winter is higher.
There are three reasons for the low durability of the battery: violation of the battery charging mode, the quality of the battery, the human factor, in other words, laziness.
Let's start with the first one. If the battery is not charged to full capacity all the time, the plates undergo a sulfation process. Sulfation, or the formation of lead sulfate on the plates, can be compared to a stomach ulcer in humans, only in humans it can be treated, but a battery ulcer is practically untreatable.
There are various methods of complete discharge-charge, charging with pulsed currents. Maybe there is some percentage recovery, but if the battery is completely dead, then alas...
The quality of the battery depends on the manufacturer. Modern technologies only affect the increase in battery capacity while reducing the size and weight, respectively, the amount of lead.
Video - how to check battery charging from a generator:
3 in 1: DVR + GPS informer + radar detector
How to protect yourself from the blinding sun and headlights while driving?
The computer of a modern car controls a large number of different parameters, including the voltage in the on-board network. This allows you to objectively assess the correct operation of the generator. On some models of old domestic cars there was a voltmeter on the instrument panel for this purpose. But most of the old fleet cars have neither one nor the other. How to check the battery charging from a car generator if the only standard means is a warning lamp. There are several ways, but first let’s talk about why it’s needed.
Troubleshooting
We exclude damage to the battery, the list of reasons for insufficient charge is significantly narrowed:
- The fuse has blown: a yellow indicator on the dashboard will indicate a breakdown. The exact fuse index is indicated in the instruction manual. Replace it with a new one, the damage should disappear;
- Broken alternator belt: a very common case, especially in domestic car brands. Failure to comply with maintenance schedules is the main cause of failure. Replace with a new one yourself, contact a service station for specialist help;
- Insufficient belt tension: during the use of the car, systematic starts, the tension weakens, and the shaft slips when starting. The first sign is the appearance of a grinding or squeaking sound when starting the engine. The breakdown can be eliminated by increasing the tension if there is a power reserve. But it is better to replace the entire drive belt. This is easy to do, a task that a car enthusiast can do;
- Mechanical damage to electrical wiring, contacts, limit switches: most likely, the negative consequences of an accident, impact, collision. You can check the integrity of the circuit with a multimeter. Remove problem areas and replace with new ones;
- Oxidation of contacts, carbon deposits: consequences of poor contact on terminal blocks. We clean the terminals with sandpaper and install them in their original place;
- The generator voltage regulator is damaged: the described breakdown is extremely rare. Elimination by replacing the regulator with a new one. Cannot be prevented or partially repaired;
- The diode bridge is faulty: most likely there are breakdowns on the housing, resulting in a short circuit. Since the part cannot be prevented, replace it with a new “bridge”.
Typical signs of a diode bridge failure:
- Rapid battery discharge;
- The candle core is white;
- Weak power of the standard fan and air conditioner; the speed does not increase when the lever is rotated;
- Dim headlights when the engine is running.
Checking the health of the diode bridge:
- We start the power unit;
- Using a multimeter, measure the voltage at the battery terminals;
- We periodically increase the speed and measure the actual voltage.
If the generator is in good condition, the voltage will increase. Otherwise, the breakdown is obvious.
To minimize the likelihood of battery or generator failure, periodically check the voltage. It should not be lower/higher than 13/14 Volts. If the voltage is higher, it means the density is increased; it must be diluted with an electrolyte, distilled water.
Recharge the battery quarterly until the missing amount of energy reserve is completely restored. The average charging cycle is 8 – 9 hours.
Systematically check the integrity of the electrical wiring, contacts, and tightness of the terminals.
Common causes of rapid battery discharge
- Initially, a power source that was inappropriate in capacity was selected. If the battery has a small capacity, and the car is equipped with a large number of various additional equipment, for example, a powerful audio system, power windows, a subwoofer, fog lights, etc., then the battery charge will not be enough for all consumers. It will be forced to produce almost maximum current, which means it will quickly discharge.
- A standard alternator undercharges the battery, for example, due to a severely loose belt. Ideally, the voltage in the car's on-board network should be from 13 to 14 volts, otherwise it will not be possible to ensure good charging.
- The battery terminals have oxidized or there is a short circuit in the electrical wires.
- Destruction of the battery plates, resulting in a significant decrease in capacity. Very often the plates are destroyed due to the fact that distilled water was not added in time.
- High leakage current. If you leave a powerful consumer on while the engine is off, then even a good battery will be discharged after some time. For example, turning on headlights or interior lighting can drain the battery in just a few hours.
It is worth noting that low air temperatures increase the rate of battery discharge, so before the onset of cold weather you should make sure that the characteristics of your battery are as close as possible to the reference ones.
There are often cases when the battery is discharged to its lower limit and it is no longer possible to start the engine with its help. In this case, you need to use third-party chargers.
How to check the operation of a generator with a multimeter
Checking the generator with a multimeter begins with measuring the voltage on the battery at idle and when turning on the interior equipment. The multimeter is switched to voltmeter mode, the red probe is applied to the “plus” of the battery, the black one to the negative terminal. After the engine is started, the voltage at the terminals should increase to 13.8-14.5 V.
Checking the generator with a multimeter
It is allowed to increase the voltage on the multimeter display to 14.8 V - this indicator is considered normal for modern cars with a large number of electronic components.
To check whether the generator is overcharging the battery, turn on the high beams and heater and turn the engine to medium speed. If the generator is working properly, the voltage on the multimeter display does not increase.
Checking the voltage regulator
If, when checking the input voltage to the battery, it was determined that the level is insufficient, the voltage regulator is checked.
To check, you will need to switch the tester to voltmeter mode. Place the probes on the ground terminal of the generator and terminal 30 or “B+”. The readings on the display should be in the range of 13.5-14.6 V. If the readings are lower, the voltage regulator needs to be replaced.
Checking the diode bridge
The most difficult thing to diagnose is the diode bridge, the so-called “horseshoe”. Its elements are located on a curved plate; it is very difficult to change power diodes in the form of disks - when installing them, soldering is not used, only welding; often the burnt-out element is simply cut out of the block. This reduces efficiency, but the unit remains in working order.
If the bridge diodes burn out, it is recommended not to repair the part, but to replace it with a new one. In 80% of cases, the diodes burn out after lighting the car.
It is better to check the bridge on a dismantled unit after complete disassembly. A breakdown often occurs when the polarity of the terminals is reversed, when the driver confuses the positions of the plus and minus terminals. Diodes with this problem burn out in pairs. A broken diode has zero resistance, the generator begins to quickly overheat, and the load on the car battery increases. You can tell that the diode has burned out by the characteristic burning smell that can be felt from under the hood.
Checking the generator diode bridge
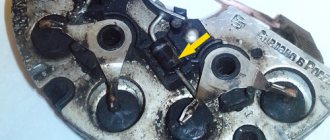
The multimeter is set to the “diode” position to test the continuity of the circuit. The first power diode on the horseshoe on the left has positive polarity. The resistance of a working diode is in one direction, when the red probe is applied to the diode, 400-700 ohms, (the black probe is applied to the horseshoe) when installing the black probe to the diode it tends to infinity.
The second diode on the horseshoe has negative polarity, therefore, when applying the positive probe of the multimeter to the output of the diode, the negative probe to the base of the horseshoe, the resistance should be infinite, when installing the black probe on the diode, and the red probe on the horseshoe within 400-700 Ohms. Each diode is dialed separately.
Winding check
The first sign of a burnt winding is a darkening of the color of the conductor insulation. The element uses copper winding and varnish insulation, which “flow” after a significant increase in temperature. During a short circuit, the color of the wire darkens, and drivers often feel a burning smell that appears at the installation site and intensifies when the engine is running. Winding burnout is determined visually; to do this, the unit must be removed and the inside of the rotor inspected through the ventilation holes.
Checking the generator winding
Rewinding copper wire is impractical - it is cheaper to change the part by choosing a similar one with suitable seats.
You can check the stator with a multimeter by switching it to ohmmeter mode. Diagnostics are carried out on a removed unit, the winding resistance between the terminals is considered to be within 0.2 Ohm, the resistance between the neutral cable and the winding should be within 0.3 Ohm. The permissible error is 2%. If during measurement the resistance tends to zero, the starter is not suitable for use.
Reasons for overcharging
A malfunction of the relay regulator is the most common cause of battery overcharging.
Due to a breakdown, this unit ceases to perform its functions and “passes” all the voltage generated by the generator into the on-board circuit, and it can reach 25 V. Naturally, not a single electrical appliance in a car is designed for such a voltage, so the elements of the on-board network begin to burn out .
Regulator failure can be partial or complete. In the first case, this element still performs its functions, but “passes” a voltage slightly higher than needed (for example, 15 V).
In this case, the overcharge of the battery can only be detected by readings from measuring instruments or the on-board computer. Electricity consumers practically do not “suffer” from such voltage, but even such an overcharge negatively affects the condition of the battery - with a constant process, the battery “boils out” and fails.
If the relay-regulator is completely malfunctioning, high readings (over 16 V) begin to damage consumers - light bulbs and fuses burn out first, then other devices. A significant excess of voltage can cause a fire in the electrical wiring.
Despite the fact that a partial breakdown of a relay does not pose a significant threat to the vehicle’s on-board network (with the exception of the battery), it should not be ignored, since at any moment it can develop into a complete failure of the element.
Since the relay-regulator is the only element that prevents the battery from overcharging, many car enthusiasts, when they detect increased voltage in the on-board network, immediately replace this unit.
But installing a new regulator does not always help; often the problem remains. Naturally, suspicion in this case falls on the generator. This unit can actually overcharge in the event of a breakdown of the diode bridge or a break in the windings, or a breakdown of the armature to the housing.
READ ON THE TOPIC: Car generator voltage, normal at idle and under load.
But if replacing the regulator relay does not help, you should not immediately change or send the generator for repair.
IMPORTANT: Often the reason for overcharging the battery lies in poor contact of the wiring of the battery charging system circuit (described above).
The reason is very simple: at the point where the contacts are oxidized, resistance arises, which the relay-regulator “perceives” as a load in the on-board network. For example, this can happen in the fuse box.
To compensate for it and prevent a drop in voltage, the regulator begins to “pass” large values, resulting in an increased voltage being supplied to the battery.
Therefore, in searching for the cause of battery overcharging, you should first check the relay-regulator, then the charging system circuit (all connections, as well as the fuse), and only after that remove and diagnose the generator.