Design
The task of the driver and car owner part-time is to constantly monitor the condition of the brake system.
Failure of one of its elements can lead to serious consequences. Therefore, you should know what exactly is included in the braking system.
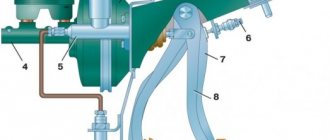
The components of the vehicle are:
- Brake fluid reservoir mounted on the GTZ;
- Metal pipelines of two circuits;
- Flexible brake hoses for front and rear wheels;
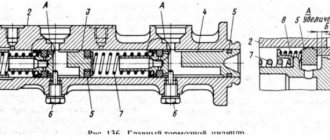
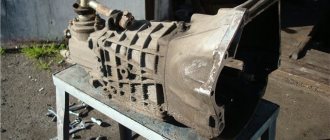
- GTZ (brake master cylinder located in the engine compartment);
- Brake cylinders of front and rear wheels;
- Pressure regulator;
- Brake fluid level sensor;
- Vacuum booster.
Tank with fuel fluid
According to the recommendations of experts, replacement of fuel fluid is carried out once every 3 years, but at least once every 45 thousand kilometers.
Procedure for pumping brakes using the CASCADE program
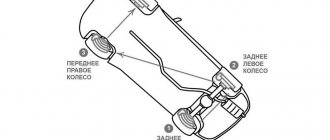
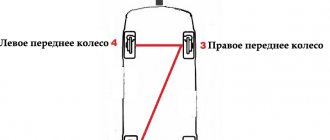
Unscrew the cap of the brake system expansion tank and pump out the old fluid. Fill the reservoir full of new brake fluid. During operation, you will need to constantly monitor the level of brake fluid in the reservoir so that the system does not leak air. In one two-minute pumping cycle, about half a tank of fluid is consumed (depending on the car model). Next, we pump the brakes on the wheels one by one, starting with one of the rear ones, then moving to the opposite front, then the remaining rear, then the remaining front. The fact is that the brake system consists of two circuits that need to be pumped in turn, and each circuit, in turn, includes two wheels: the first circuit is the rear left and front right, the second is the rear right and front left.
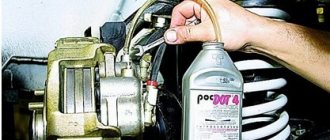
We jack up the desired wheel, remove it, put the hose on the fitting (the other end of the hose is in a bottle with liquid), unscrew the fitting - the liquid gradually comes out by gravity. For complete pumping, it is necessary to create pressure in the system, and this is where the CASCADE diagnostic scanner will help us. We connect to the car via the VAG - COM cord, setting the switch in the adapter to the position corresponding to the ESP/ABS unit.
In the program, select the make and model of the car, connect to the ABS/ESP unit and activate item 09. HCU AIR BLEEDING - Removing air from the brake system (see video below). You can hear the built-in compressor starting to work under the hood, pumping brake fluid into the line.
Reasons for replacement
There are several characteristic malfunctions that must necessarily entail the replacement of the TJ.
- The presence of leaks from the brake cylinders, which lead to the loss of a large amount of fluid.
- The appearance of air pockets in the pipeline and hose system. They arise due to a leak in the brake system elements.
- Scuffs or deformation of flexible hoses installed on wheels. They also require replacement of the hoses themselves.
- Violation of the integrity of the sealing rings in the main brake cylinder, which leads to leakage of the working substance.
- Fluid leaking through the sealing ring of the pusher on the rear wheels.
- Violation of the tightness of the system circuit. This can be felt by a partially collapsed brake pedal.
- Mechanical failure of one of the elements of the braking system. In addition to repairing or replacing them, you will definitely have to change the TZ.
Choice of TZ
IMPORTANT! To ensure normal functionality of the braking system, the brake fluid must be selected correctly. Modern compositions such as "Rosa" consist of 93-98 percent polyglycols. The remaining percentages are additives that help combat oxidation and corrosion on the metal components of the vehicle.
To choose the best option for a brake substance, you should take into account the main parameters of its selection so that it meets the requirements of the VAZ 2114 model. After all, this is the car we are talking about.
| Index | Requirement |
| Boiling point | It must be high so that steam bubbles do not form inside the system and block the flow of liquid |
| Viscosity | Good viscosity ensures efficient pumping of fluid through the system |
| Hygroscopicity | This criterion is responsible for the ability of a substance to absorb water |
| Lubrication | The thermal fluid should not only promote braking, but also prevent overheating of the internal surfaces due to the lubricating effect |
| Neutral to rubber | The composition should not have a destructive effect on the rubber elements used in the system |
| Corrosion resistance | The liquid should protect metal elements from corrosion and rust. |
| TZh class | You should choose the DOT 3 marking |
Having chosen the vehicle that is suitable for your car, you should replace it. It’s entirely possible to do the work yourself, but you should first read the instruction manual, consult with specialists, or watch visual video lessons.
Draining and bleeding process
Why does the brake system need to be bled?
The term "brake bleeding" refers to the process in which a small valve on the caliper (or wheel cylinder) is opened to allow controlled amounts of brake fluid to leave the system.
We bleed the brakes to release air that sometimes gets trapped inside the lines. Technically, "air" only enters the lines if there is a threat to sealing the system (for example, when flex lines are removed or replaced), because when the liquid boils, it creates "steam" instead. Vapor in brake fluid, such as air, will create a loss of efficiency in the braking system. However, for simplicity, we use the term "air" in this article to describe both air and liquid vapor.
When air (or vapor) is present in the lines, it creates inefficiency in the system because, unlike liquid, air can be compressed. So when enough air fills the lines, the supply to the pedal simply causes the air to compress rather than create pressure on the brakes. In other words, when air is present in the system, the effectiveness of the braking system is reduced. Typically, a small amount of air in the brake system will result in a soft pedal (because it takes less energy to compress the air than it does to move fluid through the brake lines.) If enough air enters the brake system, it can cause the brakes to fail completely.
How does air get into the lines? Sometimes this may be the result of a maintenance or upgrade procedure, such as replacing flex lines with standard stainless steel braids. But this is often the result of high temperatures that cause brake fluid components to boil, releasing gases from the boiling fluid into the brake hydraulic system.
ADVICE! Under normal operating conditions and without modifications to the brake system, typical original brake systems were designed to NOT require bleeding during the life of the vehicle unless the system is opened for repair or replacement. If you're just driving around town or on the highway to work, there's no need to pump your brakes! However, there are a few European manufacturers that recommend replacement on a semi-regular basis for other reasons, so be sure to check your manual or talk to your mechanic.
Those who choose autocross or sport driving can renew their brake fluid and perform an annual bleed - this is a good "early season" service item for low-speed driving enthusiasts.
We recommend: Transportation of heavy cargo. general information
Car brake system diagram
Can you handle bleeding the brakes yourself?
The brake system is one of the most important components in a car, responsible for the safety of the driver and his passengers. Therefore, the operation of bleeding the brake system must be taken seriously and responsibly. In fact, there is nothing complicated in this matter, as it might seem to the average person at first glance, but you still need to understand that the job must be done well, because the price of a mistake is your safety.
We strongly recommend not to take on this task if you are not too confident in your abilities and have never dealt with even the simplest repairs. If you more or less understand what you are dealing with, but have never tried to bleed the brakes yourself, find an assistant who has already done such repairs. And in general, bleeding the brake system will be faster and more efficient if you have a partner who will help you in this matter.
If you follow all the instructions in this article, you should not have any problems leveling your Braking System. We, in turn, will try to explain as clearly as possible how to properly bleed the brakes on your car.
Brake fluid selection
In theory, even plain water will do - since, being a liquid, water cannot be compressed. However, it is important to remember that the main function of the braking system is to convert kinetic energy into thermal energy through friction. And the reality of this process is that some parts of the brake system will be exposed to very high temperatures. In fact, it is not uncommon for the rotor temperature to reach 600ºC while the vehicle is in motion, which can raise the temperature of the brake fluid to 150ºC. Since the boiling point of water is 100ºC, it is obvious that the water in the brake system can easily boil - and therefore release gases into the brake pipes - reducing the effectiveness of the system.
ATTENTION! Water is also a big problem in cold weather if it freezes to ice!
The "obvious" solution to this problem is to use a fluid that is less sensitive to extreme temperatures. Hence the development of “brake fluid”. However, unfortunately, there is no “ideal” brake fluid. And like most things in the world, adding certain useful features usually comes with trade-offs in other areas. With brake fluid, we typically must balance the fluid's sensitivity to temperature, its cost, and its effect on other components in the system.
Simply put, you can reduce the sensitivity of a liquid to temperature by varying its ingredients. However, certain combinations of ingredients can significantly increase the cost of the fluid and can react with original materials, damaging seals and causing corrosion of the entire brake system.
Signs that there is air in the system
Brakes, which are standard on most modern vehicles, rely on brake fluid to apply hydraulic force to the calipers, which push down on the pads to slow or stop the vehicle. Air is much less dense, so it will compress too easily. When this happens, your brakes will be too soft.
Signs that there is air in the system:
- Increasing free play of the brake pedal.
- Feeling of a “soft” brake pedal.
- Pedal slip.
If you notice one or more of these symptoms, don't wait to have your brakes checked.
Reasons for air getting into the brake circuit of a car
One of the things that causes brakes to fail is if air gets into the system itself. Air can get in due to a leak, poor maintenance, or insufficient brake fluid.
If air gets into your brake system, it can cause the brake pedal to become softer or easier to press. It can also increase braking distance. This happens because the air is actually compressed inside the brake system when you press the brake pedal, rather than the piston in your caliper. This reduces the car's braking force and can cause a dangerous situation.
Adjusting the brake system
As already mentioned, the brake system of the VAZ 2114 operates on a hydraulic principle, which makes it dependent on the tightness of the connections and the pressure of the working fluid. Even minor damage to its pipelines can lead to leaks and, as a result, difficult braking.
No less dangerous than a loss of pressure due to a leak is the leakage of air into the hydraulic system. Due to the fact that gases, unlike liquids, have much greater compressibility, even a small amount of air will damage the brakes and the pedal will simply “fail” when pressed, without causing the car to stop.
If the hydraulic system is completely sealed, but the car does not brake as its owner wants, the question arises - how to improve the brakes on the VAZ 2114?
Adjusting the brakes of the VAZ 2114
The first thing you need to set up the brakes is a level area. The second is a nominal set of keys and a slotted screwdriver.
The operation itself is performed in the following order:
- Drive the car onto a level area, turn off the engine and, pressing on the rear, rock it slightly from side to side (this will help bring the suspension to the middle position).
- Remove the front adjusting bolt on the brake pressure regulator.
- Using a slotted screwdriver, establish a small gap - about 2 mm - between the spring and the lever (for greater convenience, there is a special protrusion on the lever).
- Tighten the front adjustment bolt.
After the brakes are adjusted, they should be checked with the help of an assistant. To do this, on a flat straight road you should accelerate to 40 km/h and brake.
If the car stops quickly, does not pull to the side, and the front wheels lock a little earlier than the rear wheels, then the adjustment is made correctly.
If the rear wheels are blocked first, then the setting should be repeated, increasing the gap even more, and if the rear wheels are very late, then the gap, on the contrary, should be reduced.
After adjusting the brake system, you should check the operation of the brake system on well-inflated wheels with the same pressure.
Finishing the conversation about the design of the 14th brakes and the principle of their operation, we need to say a few words about one more important point. When driving through deep puddles or a small ford, the brake structures of the car become very wet and it is very difficult to stop when you press the pedal.
In order to correct this situation, you should start, brake, move again, brake again - and so on several times. This will help warm up the brakes and return them to normal operation.
General principle of bleeding the brake system
At the moment, there are many ways and techniques for bleeding the brake system of a car. Each of them is good in its own way, depending on certain circumstances. However, they are all largely based on general principles.
At the first stage, you need to prepare everything you need to bleed the brakes.
This list includes:
- TJ stock;
- flexible hoses for drain valves;
- wrenches of the required size.
Particular attention should be paid to the pumping scheme, which provides for the alternate release of air from underwater lines.
In most cases, bleeding begins with the front left wheel. Then the air is released from the front right and rear right . The last one to bleed is the rear left one .
This sequence is used for most modern cars. But, before pumping, you need to familiarize yourself in detail with the algorithm prescribed by the manufacturer specifically for your type of car.
The principle of bleeding the brakes is that when the brake pedal is applied, air bubbles are pressed towards the cavities of the working brake cylinders. So after 3-4 presses of the brake, the pedal should be held in the depressed position until the air valve on the corresponding working cylinder is opened.
As soon as the valve opens, part of the fuel fluid, along with the air lock, comes out. After this, the valve is closed, and the entire above procedure is repeated again.
Do not also forget that during the process of pumping the brakes, you need to monitor the level of fuel fluid in the master cylinder reservoir. Also, after the entire system has been bled, it is extremely important to ensure that there are no leaks, especially at the connections of the fittings and air valves. We should not forget about the anthers. Once all work is completed, they should be put back in place to avoid clogging of the drain valve channels.
Why pump it at all?
The brake system is designed in such a way that the pads work by bringing them closer to the brake disc. This is done using brake pistons located in the cylinders, pressure created by the pump and brake fluid.
Brake fluid does not compress, but air does. Therefore, when there is air in the system, the brakes work much worse - they operate more slowly, the brake pedal sinks, the pads do not close at the same time, and much more.
The purpose of bleeding the brakes is to get rid of any air that has gotten into the system. This is done quite simply - using special fittings, air is bled (by squeezing the brake pedal) and, partially, liquid from the system. At the same time, liquid is added to the fuel fluid tank to prevent air from entering the system.
The necessary set of tools for work
When you notice the first symptoms of a problem with the brakes, you need to decide whether it is possible to contact a service center. Our specialists have the necessary experience and skills to carry out work quickly and safely. Equipment plays a special role in solving the problem.
We recommend: Spare parts for Volvo VNL trucks
If in specialized places they use unique devices with universal adapters for any car, then when bleeding the brakes with your own hands, improvised means are sufficient. To carry out this, you need to acquire a set of appropriate keys, a container for brake fluid and several hoses. The diameter of the holes must completely match the bleeder fittings.
Methods for pumping brakes yourself
The first thing you should do is prepare the new fluid that you will be pouring into the brakes.
Do not forget about the gas stop, which was already mentioned above, this can be the stops of the rear door or hood, and the container into which you will bleed the liquid.
Then you need to add brake fluid to the reservoir if required. After this, feel free to get into the cockpit and prepare the gas stop.
Press the brake pedal up to ten times quickly and sharply, then leave your foot in the locked pressed position.
After this, change your foot to the gas stop, lean it on the seat and make sure that it holds the pedal very tightly and rigidly, and there is no chance that it will come off.
After all these manipulations with the brake, go to the first selected wheel (usually the rear right) and begin to bleed the brake fluid and air from it.
To do this, you need to unscrew the fitting with a small key (pick it up in advance).
While you are bleeding air and fluid, a gas stop in the cabin presses the brake pedal tightly to the floor.
This is much more convenient than asking for help from other people with whom disagreements may arise during work.
In this method we will use a syringe and a transparent hose.
The hose must be selected with such a diameter that the “nose” of the syringe fits tightly into it.
Then everything is simple. We put the hose on the syringe, with one hand we squeeze the latter, pushing out the air, with the other hand we tightly put the hose on the bypass fitting.
We open the fitting and at the same time unclench the syringe. Liquid and air will flow through the hose.
The volume of the latter will depend on the size of the syringe selected.
As soon as the latter is completely unclenched, the valve immediately closes. In the area of the syringe spout we bend the hose.
During the first run, a little liquid will come out of the system, since the tube is still filled with air.
Therefore, there will also be air in the syringe, which you will need to get rid of by compressing it, but before that, do not forget to disconnect it from the bent hose in advance.
After squeezing out the air, insert the syringe tightly into the bent hose. Repeat the above steps again.
As a rule, during the second use the syringe will already be filled with liquid and air. We get rid of it and repeat the process.
Don't forget to add fresh fuel oil to the tank and bend the hose.
Since the hose is transparent, and this is a mandatory condition, you will see at what stage of pumping out the brake fluid the air bubbles will no longer be observed in the hose.
Disadvantages of this method:
- A lot of time is spent;
- A large number of joints through which air can leak, and this greatly reduces the efficiency of work;
- Inconvenience of work.
Therefore, although this method has a right to life, there are more effective methods for bleeding the brakes yourself.
In this method we will need two pieces of transparent hose, one long, the other short. Homemade check valve and container for collecting fuel fluid.
The most important element here is the check valve. You can use factory analogues, but you can make it yourself.
For this we need:
- Two syringes for 5 - 10 ml;
- Spring from a fountain pen;
- Light-emitting diode;
- Electrical tape or tape;
- Sharp knife.
We cut the syringes as shown in the photo below.
You will get the following elements.
Use sandpaper to sand the edges of these elements.
We insert the LED into the spring.
We assemble the structure as shown below.
General rules for bleeding brakes
Before proceeding with actual bleeding, it is worth preparing clean brake fluid. Be sure to use only the liquid that was previously poured into the car.
If it is not possible to find out the exact brand of the substance, it is better to use the liquid that is provided in the car’s operating instructions.
It is better to pump the brakes with a partner. The main task of the assistant will be to consistently press the brake pedal at a signal, but the work of the chief mechanic will fall on your shoulders.
- The first step to successful and high-quality work will be a preliminary check of each circuit and drive unit for leaks.
- Most often, problems arise with the master brake cylinder - the most inaccessible portion of air is localized in it. It may need to be pumped several times by loosening the threaded valve.
- Each car has its own unique brake bleeding sequence. You must read it in the vehicle's operating manual before starting the procedure. For most vehicles, the sequence starts with the rear wheels and is represented as "right rear wheel - left rear wheel - right front wheel - left front wheel".
How to bleed the brakes when an ABS system is installed or repairs have been carried out?
The driver can also bleed cars with an ABS system himself. To perform the procedure correctly, take into account the principle of operation of ABS on a specific car model, because this may affect the work plan. Standard systems are easy to work with in a garage environment, as they use the same procedure as non-ABS brakes. But if ESP and SBC modules are installed, you cannot do without contacting a car service - special equipment will be required.
Car owners often wonder whether they need to bleed the brakes after replacing the pads. This maintenance option does not affect the hydraulic system; no changes in integrity or tightness occur. Therefore, there is also no need to remove air.
If repairs have been performed, you may be wondering how to bleed the brakes after replacing the master cylinder. This unit is the main one, as it ensures the distribution and supply of working personnel. The procedure is considered quite complicated and one driver cannot cope with this; an assistant will be required.
How to pump the GTZ:
- When the assistant takes the driver's seat, you need to close all the holes in the cylinder, leaving only the first one free.
- The brake is depressed, and at this moment all the holes are closed, after which the pedal can be released.
- The manipulations are repeated until the brake fluid appears from the hole at the moment when the partner presses the pedal.
- The liquid should come out in a stream and when the pedal is in its original position, you need to connect the working fluid supply tube. In this case, the fitting is not completely tightened.
- The final fixation is carried out when the assistant presses the pedal again, giving the appropriate signal.
Using this method, you pump all sections with your own hands. When all the tubes are connected, check the quality of the system and the absence of air. If abnormalities are found, the brakes will need to be completely bled.
Procedure
Success and high-quality pumping of the brake system lies in following the entire technology of action:
- The first step is to replace the fluid in the GTZ tank or check its quantity and, if necessary, top it up to the maximum level.
- For more comfortable work, it is necessary to clean all air release valves on each wheel from dirt, dust and deposits.
- According to the correct sequence provided in the instructions, it is necessary to unscrew the fitting plug on the desired wheel and attach the prepared hose over the valve.
- The second end of the tube is placed in a previously prepared container with brake fluid.
- The partner progressively presses the brake pedal from 3 to 5 times and at the last movement fixes the pedal in the pressed position.
- At this time, you need to unscrew the air valve halfway. After opening the valve, liquid along with air bubbles will begin to flow through the tube into the container. When the pressure of the liquid escaping into the container disappears, the valve can be screwed back firmly, and your partner can release the brake pedal.
- The process may have to be repeated several times on each node. The main thing is to maintain the wheel sequence and control the amount of fluid in the master cylinder reservoir.
After pumping is completed, you need to make sure that the fitting plugs are tight and that the brakes are operating. After the test, if successful, the brake operation will return to normal. If the driver still feels problems in operation, then perhaps attempts to bleed the brakes with their own hands were unsuccessful, or there is a problem with the wear of the pads or discs.
Front wheels:
1. Turn off the ignition and apply the brake approximately 20 times to release the ABS control pressure.
2. Fill the brake system reservoir to the very brim.
3. Place a transparent hose onto the right front wheel bleeder valve. Place the other end of the hose into a container of brake fluid.
4. Have an assistant press the brake pedal until pressure appears in the system. Then, while holding the brake pedal depressed, unscrew the valve. When the pedal resistance stops, close the valve.
5. Repeat this procedure several times until the liquid in the hose is free of bubbles.
6. Close the valve and fill the reservoir with brake fluid.
7. Pump the second “wheel” in exactly the same way.
Rear wheels:
1. Turn off the ignition and apply the brake approximately 20 times to release the ABS control pressure.
2. Press and release the brake pedal.
3. Turn on the ignition, put on the hose and open the air bleed valve of the right brake cylinder. Close the valve as soon as there are no more air bubbles in the hose.
Attention! The ABS pump should not run for more than two minutes, otherwise it will overheat. Thus, after every two minutes it is necessary to take a ten-minute break to cool the pump.
4. Turn off the ignition and prepare the left wheel brake valve.
5. Bleed the second “wheel” in exactly the same way.
6. Turn on the ignition and wait until the ABS pump turns off on its own.
7. Add fluid to the brake reservoir to the Maximum.
avtoexperts.ru
The brake system is one of the life support systems of a car and, a priori, should always be in technically sound condition. Plus, it is necessary to follow the manufacturer's recommendations regarding the timing of brake fluid replacement (about 50,000 km on most models).
The hydraulic brake system is based on the fact that the fluid is not compressed, but this is provided that there is no air in the system that has entered the circuit for various reasons. This is because air can compress under pressure, which negatively affects the effectiveness of the braking system.
Bleeding the brake system
The effectiveness of the brakes is also influenced by factors such as:
• Condition of brake pads and discs;
• Wear of brake drums;
• Condition of brake calipers;
• Wear of shock absorbers.
Signs that there is air in the system:
• The brake pedal has become less hard;
• The pedal fails;
• Reduced braking efficiency;
• Increased braking distance.
Reasons for air getting into the brake circuit of a car:
• Broken brake hose or its scheduled replacement;
Broken brake hose
• Any repair of the brake system when the circuit itself opens;
• Replacing the fluid if the work is performed using non-special equipment.
Methods for bleeding brakes:
• On a special installation in a car service center;
• Leveling up with an assistant;
• Self-bleeding brakes.
Using installation
Replacement is carried out by replacing the old fluid with a new one under pressure.
• New fluid is poured into the installation;
Pour brake fluid into the expansion tank
• Connect it using adapter fittings to the expansion tank;
• Raise the car on a lift;
• Special containers are connected to the bleeding fittings; and unscrew the fitting one turn;
Unscrew the fittings
• Apply pressure and watch when new clean fluid does not flow through all the wheel cylinders and the fittings are tightened and the equipment is disconnected from the master cylinder reservoir;
• Bleeding the brakes is not required, since it is guaranteed that no air can get into the system.
With an assistant:
The pumping procedure for a specific model is indicated in the machine’s operating manual. You will need new brake fluid, a wrench for unscrewing the bleeder fittings, a container to collect the old fluid and a hose (preferably transparent).
• Work is performed on an inspection pit or on a lift;
Car on the inspection pit
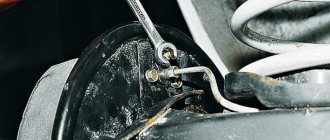
• Bleeding fittings are cleaned;
Brake bleeder fitting
• A little brake fluid is poured into the collection container to block air from entering the circuit;
• Following the instructions in order, attach the hose to the fitting of a certain wheel (usually the one farthest from the main cylinder), the second end of the hose is lowered into a collection container;
Brake bleeding diagram
• Liquid is poured into the tank (if there is none);
• The team assistant presses the brake pedal several times and holds it down;
Press the brake pedal
• The fitting is unscrewed and the liquid, together with air, enters the collection container;
Bleeding the brakes
• The process is repeated until air bubbles appear in the liquid;
• The fitting is tightened and the operation is repeated on the next wheel according to the instructions;
• When performing work, the level in the tank is periodically checked and added if necessary.
Without assistant:
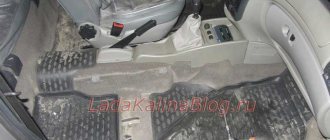
• Using a stop.
The owner himself presses the brake pedal several times, holds it in the lower position, and places a prepared stop between the pedal and the driver’s seat. Having installed the stop, unscrew the bleeder fitting on the wheel. The procedure is repeated for each of the wheels according to the scheme. For work, you can use a gas stop, for example, a hood shock absorber.
• Using a wheel nipple
Instead of the standard tank cap, a similar one is used, into which a nipple fits. The cap is screwed onto the master cylinder reservoir, the hose from the wheel pump is screwed onto the nipple and pressure is created (I don’t overdo it with pumping). The fitting opens and liquid under pressure flows into the drain container. The operation is carried out on each of the wheels.
Recommendations for work:
• Do not mix different liquids and do not use liquids of different classes, due to their different boiling points;
• Do not allow the level in the expansion tank to drop too low, which will lead to air leaks into the system;
• The pressure in the tank when working with your own hands should not be higher than 0.8 atm, so as not to damage the tank itself;
• In case of any deviations in the operation of the brakes, without delaying the rescue “later”, immediately identify and eliminate the malfunction, since with faulty brakes the “later” may not occur.
Tips before bleeding the brakes:
- The entire procedure must be carried out with an assistant; his task will be to press the brake pedal.
- You only need to add brake fluid of the brand that was poured into the system. If you don’t know what was filled, then see what the manufacturer of your car recommends. And when pumping, there should always be at least 1/2 level of liquid in the tank, or not lower than o.
- Before you begin, first inspect the entire brake system - all the pipes and devices to find out where the fluid is leaking. If everything is good, then you can start pumping.
- If the car has ABS, then it should be disabled. ABS is turned off by removing the corresponding 40-amp fuse link in the engine compartment relay/fuse block. The sequence of bleeding the brake mechanisms is carried out in a strictly specified order:
- rear right;
- front left;
- rear left;
- front right.
We recommend: How to replace brake pads?
The whole procedure was carried out on a VAZ 2110 car. It can be used on any other make of car. But first, you should familiarize yourself with the technical documentation of the car and find out some of the possible subtleties of bleeding the brakes, if any.
How to bleed the brakes
Regardless of what make and model of car you own, as well as what year it was made, sooner or later you will have to face the fact that the time will come to replace any consumables, or repair some parts of the car. It’s worth noting right away that almost 99% of the replacement and repair work can be done with your own hands by almost any car owner. But in order to independently figure out what happened to your vehicle or find detailed instructions on how to fix this breakdown, read the block of repair articles on our website, which describes and clearly shows everything you need to know to bring your “swallow” into perfect condition!
Every car owner undoubtedly needs to be able to bleed the brakes (BL) on his own vehicle, because this procedure is very simple, and it must be carried out after some specific actions that are closely related to this system. Accordingly, why go through unnecessary financial waste by contacting a technical service center? As they say, a penny saves a ruble, do not forget about this famous saying. You will perform the pumping on your own, without resorting to the recommendations of specialists.
Below is the content:
- PT order
- How exactly should the circuits be pumped?
- When Fri
- How to carry out this procedure yourself?
- The most common mistakes during PT
Follow the procedure as directed and try your best not to make the following mistakes. We assure you that it is possible to remove air from the brakes yourself without outside help. With or without ABS. It is not difficult to upgrade with ABS, however, it can be safely attributed to another topic of conversation, one can even say that it is a separate material.
We would like to draw your attention to the fact that if there is an anti-lock system with ESP and SBC modules, then the path lies with the service, where the necessary equipment and devices are at hand.
When reading the information below, you may get the impression that you will not be able to cope. However, we promise that you will handle everything perfectly. We believe in your strength! You will definitely succeed!
Now let’s move on to step-by-step instructions, which in the future will play an exclusively positive role in your life, because you will always find a way out of this current situation. And a knowledgeable person is worth his weight in gold in the modern world.
So, let's begin. What is the PT procedure?
You can accomplish this task without outside help. Otherwise, your friend will not leave you alone with your trouble and will definitely come to the rescue. His support will consist in the fact that he presses the pedal at your command. The sequence of pumping actions should be looked at in the manual for a specific brand of vehicle.
If there is no diagram in front of you, then the PT is performed in the form of the letter “Z”. Which means that the PT is carried out in the following order: right rear - left rear - right front - left front wheel.
In order to perform PT, use a container for brake fluid and a transparent rubber hose.
Next we will tell you how PT? This is also very easy and you can completely cope with this task! You just need to believe in yourself and your strengths. You just have to carefully follow our instructions. There is no point in doing anything on your own in such matters.
First, you must have clear access to the brake bleeder fittings. For your convenience, install the “iron horse” on a special lift and remove the existing wheels. Remember that you need to clean the fittings from various impurities, dirt, dust around all existing wheels and pour a small amount of so-called “brake fluid” into a pre-set container.
Sequential procedure : Fill the master cylinder reservoir with new brake fluid. Then connect the hose to the fitting, and lower the other end into a container with liquid. Give the command to your friend to press the pedal a couple of times and hold it until the liquid flows out. Unscrew the fitting and the liquid will flow out. Carefully monitor the level of liquid in the tank and, if necessary, top up. Repeat the previous two steps until the brake fluid is clean and free of air bubbles and tighten the fitting. Perform similar actions regarding the remaining wheels.
This is what the bleeder fitting on a brake caliper looks like. A hose is attached to it. Now your knowledge base has expanded a little more and has become higher. Keep gaining experience.
When to perform PT? Be extremely careful when resolving this issue! Follow our tips and recommendations! And then the desired result is guaranteed to you!
Similar actions are performed when it is necessary to eliminate air from the brakes. This often happens when changing brake fluid, and this, in turn, happens every fifty to sixty thousand kilometers, or in other words, once every couple of years.
Bleeding is carried out after repairing the brake system: changing the master cylinder or vacuum brake booster. Bleeding is also necessary if, due to damage to the hoses or a drop below the required fluid level in the expansion tank, depressurization occurs.
The pedal will tell you about the need to carry out this procedure - it will become soft and sink. And the brakes will be sluggish. In addition, this may indicate a serious problem that is associated with the brake disc or pads. Thus, if pumping does not have the desired effect, you should go to a professional - brakes are not to be trifled with! And this must be understood!
How is PT without assistance? Indeed, situations arise on the path of life when no one is nearby, and in this case you can solve the problem yourself. As they say, live and learn. This knowledge will not be superfluous for you.
We told you how things are going with our friend above. But what if there is no one next to you at that moment, and this procedure is vital? Yes, indeed, no one is immune from the fact that at the most inopportune moment for you, you will find yourself alone with your trouble, and in this case, no one will help you except yourself. You will rely only on your theoretical and practical knowledge. In such a situation, you can do the following: carry out the PT yourself if there is a gas stop. The actions are the same as during a PT with a friend, but instead the pedal is held by the gas stop. That is, press the pedal a couple of times, hold it there, lock the stop and bleed the brake fluid. When the latter flows, the stop itself will press the pedal to the floor to the permissible maximum. PT using a syringe : insert the syringe into the lid of the tank, so that nothing gets in or spills out. Follow our instructions carefully and you will achieve the desired result. Fill the syringe with brake fluid in advance, replace the regular cap with this device, unscrew the fitting, install the container and apply pressure with the syringe. Next method: with modified cap . You need to insert a car nipple into the last one, which is also on the tank. Place the cap with the nipple on the tank, then one end of the hose with a clamp for connecting to the cap, and the other on the spare chamber, inflated to no more than one atmosphere. Open the fitting and bleed out the liquid with air bubbles. Well, you've done it. Agree, it’s not difficult. Nothing is impossible and you have just convinced yourself of this.
Changing brake fluid and bleeding
PT with a hand-made device
Device for PT in-house. Thanks to the image, now you will know that it is possible to create the necessary device on your own.
We have listed the most important options for PT without outside help, however, most car owners have their own methods in stock, which, in general, are not very different from the above.
Common mistakes made during PT
Before you start PT, take into account the 3 most common mistakes made during this process. Therefore, it is strictly forbidden to: mix types of brake fluid . A mixture of mineral brake fluid with glycol is harmful to the rubber cuffs of the hydraulic drive and the system becomes clogged with clots. We do not recommend combining liquids (DOT - numbers three, four, five). This is explained by the fact that different boiling temperatures and characteristics will decrease. It is strictly forbidden to bring it to such a state that the level of brake fluid becomes below normal . Then air will enter the system. It is strictly forbidden for high pressure to arise in the brake reservoir . When PT is carried out on your own, do not overdo the pressure in the tank, otherwise it will simply burst. We recommend a pressure of zero point eight (0.8) atmosphere.
We hope and sincerely believe that now you have the necessary knowledge, both theoretical and practical, and now you are unlikely to find yourself in a situation that would take you by surprise with regards to this issue.
Thank you for using our materials to solve certain problems of your “swallow”. We wish that the minimum number of problematic situations arise. However, if they do arise, we will do everything to make sure that the issues are resolved more easily and in the end you receive exceptional satisfaction from the work done. Good luck! We express our deep gratitude and gratitude to you!
Front brake mechanism
The design of the front brake mechanism on the VAZ 2114
The front brake mechanism consists of the following components:
- Brake disk. Directly connected to the wheel hub and rotates with it. Slowing down the rotation and stopping the disk leads to the slowing down and stopping of the wheel.
- Pad guide. Serves as a holder for the pads and a base for the guide pins.
- Caliper. It combines the pads, cylinder, and piston into a single unit and ensures uniform transmission of force from both pads to the disc.
- Brake pads. They directly act on the disc, squeezing it on both sides and slowing down the movement.
- Cylinder. A sealed cavity in which the piston moves.
- Piston. Under the influence of hydraulic fluid pressure, the pad is pressed against the disc. Thanks to the “floating clamp” system, the second block is pressed simultaneously. This ensures uniform wear of their linings and discs and guarantees effective braking.
- Seal ring. Prevents fluid leakage and ensures system tightness
- A cover to protect the guide pin from dirt, allowing for unhindered movement of the pads.
- Guide finger. Allows the pads to move evenly and adhere to the disc with their entire plane.
- Protective cover. Protects the disc from road dirt.
The front wheels are equipped with disc brakes. They automatically adjust the clearance from the pad to the disc. The caliper and cylinder form a floating caliper, which creates the same even force on both pads. This ensures uniform wear of the linings. To monitor their wear, there is an indicator on the inner block.
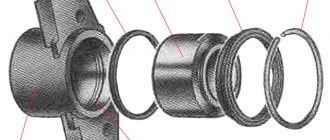
Rear wheel brake
Rear wheel brake on VAZ 2114
- Hub nut
- Hub flange. The brake drum is attached to it
- Lower tension spring
- Left pad
- Thrust spring
- Cylinder
- Upper tension spring
- Guide bar
- Eccentric
- Right pad
- Pad cover
Tip: when driving through deep puddles or fording a river, the brakes get wet. This dramatically reduces braking efficiency. Immediately after overcoming a water obstacle on a straight section and at low speed, brake several times. The pad linings, discs and drums will become hot and dry. The system's efficiency will be restored.
In general, the braking system of the VAZ-2114 is simple and reliable. For a person who has experience driving cars of other brands, servicing it on a “fourteen” will not be a problem. But even those drivers who got behind the wheel of a car for the first time can easily understand the operating principle and operating features of the VAZ-2114 brake system. But remember: it is better to service the brake system at warranty service stations from experienced technicians.
Differences and specifics of bleeding brakes with ABS
The anti-lock braking system allows you to control the vehicle's handling when braking. After pressing the pedal, the central control panel receives a response signal from sensors installed on the front and rear wheels. Thanks to the control system, the wheels slow down at the same speed as the car itself. In other words, thanks to ABS, the car cannot skid.
Regardless of the manufacturer, most devices have common characteristics:
- Electronic speed sensors on the hubs;
- Pressure controllers for main brake fluid lines;
- Electronic unit for signal processing.
Unlike most cars with simple braking systems, bleeding anti-lock brakes is difficult. For the procedure to be successful, it is necessary to familiarize yourself in detail with the theory of ABS operation. However, if the hydraulic accumulator, valves and pump are located nearby due to the design solution, the pumping technology will be very similar to the standard one.
Before starting work, in addition to standard tools, you must acquire a scanner to read information from the electronic unit. However, if the car has additional sensors, it is better to take the vehicle to a specialized salon. Any improper intervention calls into question the safety of road users.
Usually, for successful bleeding with the ABS system, it is enough to monitor the pressure in the hydraulic system. The standard value is 180 atm, but to work with the brakes it must be reduced - turn off the ignition and apply the brake 20 times. Only after this, some of the liquid will splash out and the pressure will drop significantly. After reducing the pressure, you can begin to turn off the ignition and disconnect the connectors and controllers on the GTZ tank for further manipulations.
How to properly and quickly bleed ABS brakes with your own hands
The procedure for bleeding the brakes is influenced by the design of the system, the location of components and the presence of additional electronic modules. The correct sequence is important. You need to start by relieving the pressure in the hydraulic accumulator. To do this, you need to turn off the ignition (it is not necessary to start the engine) and pump the pedal.
A simple secret to quickly pumping brakes. Video:
Read how to bleed ABS brakes and stock up on the following materials, parts, accessories and tools:
- spanner;
- a rubber (possibly plastic) hose with a diameter corresponding to the thickness of the fitting tip;
- brake fluid;
- container (necessarily transparent). This is where you will drain the old brake fluid.
You cannot do without an assistant who must press the pedal on command. You will perform manipulations with the fittings that ensure the removal of liquid.
Bleeding ABS brakes, where the components are located in one unit, differs little from the standard procedure. The only thing you need to do is turn off the system by pulling the fuse. This method works on domestic Ladas.
You can take advantage of the built-in pump. Then you will have to pump with the ignition on or even with the engine running. The sequence and order of bleeding the brakes starts with the right front cylinder and looks like this:
- disconnect the terminal of the level control sensor fixed on the expansion tank cover;
- remove the cover;
- open the brake reservoir;
- fill the reservoir to the brim with brake fluid;
- put the hose on the tip of the fitting;
- lower the end of the hose into a container to collect liquid;
- open the fitting by turning it a quarter or half a turn;
- to activate electronic systems, turn on the ignition;
- release the brake;
- wait until the pump expels the airy mixture;
- release the brake pedal;
- Tighten the fitting with a wrench.
The brake bleeding scheme is no different on any car, be it Patriot, Lacetti, Ford, Passat, Gazelle. First, air is removed from the “far” circuit (for “left-hand drive” cars it is on the right), then from the “near” circuit.
Important: When bleeding, keep an eye on the brake fluid level. If it falls below the minimum, the system will fill with air. Then the work has to be done again.
To bleed a system with components located in different places, a diagnostic tester is needed. It connects to the car and allows you to control electronic components using a smartphone or computer. In this case, you will also have to unscrew the fittings and drain the airy liquid. However, no manipulation of the pedal is required. Instead, the valves and electric pump must be activated using the appropriate menu items. This way you can bleed the systems on the VW Passat B6 and other modern cars.
Bleeding the brakes using the Priora as an example
Before you bleed the ABS brakes, you will have to drive the car into a pit. This will help you gain convenient access to the fittings on the rear cylinders and will allow you to avoid removing the discs during operation. On the Priora, the procedure for pumping brakes with ABS does not differ from that adopted on simpler models. The only difference is that the work must be performed by first turning on the ignition. In this case, the solenoid valves will be in the open position.
How to properly bleed the brakes on a Priora with abs with your own hands, video:
The work starts from the right rear and is done like this:
- disconnect the wires from the tank lid;
- unscrew the lid;
- Fill the reservoir with brake fluid to the brim;
- remove the protective cap;
- loosen the fitting using a spanner wrench;
- connect a tube to the tip of the fitting;
- lower the tube into the container;
- pump the brake pedal;
- press and hold it in this state (you need an assistant for this);
- open the fitting by turning it with a key;
- wait until the fluid flows out (the brake pedal goes down);
- tighten the fitting;
- pump up the pedal and release the “brake” until liquid that does not contain air bubbles comes out of the tube;
- tightly tighten the drain fitting;
- remove the tube with the spanner;
- put on the cap.
After this, it is necessary to repeat the work on the remaining three cylinders. To access the fittings on the front cylinders, you will have to jack up the car and remove the wheel rim.
Pumping the brakes using the example of “Grants” and “Kalina”
The technology for pumping brakes with ABS on the Kalina and Granta models is no different from that described in the section for Priora. Therefore, you can safely use it1, it is suitable for the entire model range of the VAZ brand.
Advice: after bleeding the brakes, do not rush to leave the garage immediately. It is necessary to check their system functionality. Make sure there are no pedal dips or leaks.
Practical tips and nuances when bleeding brakes
Even if you follow all the points of the detailed instructions, you cannot be completely sure of the correctness of your actions and a reliable result. Experienced motorists know that the secrets of any independent manipulations in the car lie in the details.
While working with each wheel, it is worth tilting the car slightly in the appropriate direction. In this case, the air inside the system will rise up and flow faster to the threaded valve. Additionally, the process is activated by a slight vibration if you tap on the caliper.
In addition to the main method, you can bleed the brakes by gravity. It is necessary to unscrew the valves and add the necessary brake fluid to the supply tank in time. The procedure is quite lengthy and is only available to experienced car enthusiasts. Moreover, it is not suitable for vehicles equipped with return pressure control valves.
Bleeding the brakes, relying solely on your own experience, is fraught with breakdowns in the brake system. Incorrect actions can lead to large accumulations of air in the lines. Before you start working, you should familiarize yourself with the experiences of other people or watch training videos on the Internet:
Sources
- https://luxvaz.ru/vaz-2114/199-zamena-tormoznoy-zhidkosti.html
- https://DriverTip.ru/repair/kak-pravilno-prokachat-tormoza.html
- https://remontvazov.com/tormoznaja-sistema-vaz-2114
- https://pricurivatel.ru/prokachka-tormoznoj-sistemy.html
- https://vvm-auto.ru/publikatsii/674-kak-pravilno-prokachat-tormoznuyu-sistemu
- https://fastmb.ru/autoremont/20-prokachka-tormoznoy-sistemy-poshagovaya-instrukciya.html
- https://NaDomkrat.ru/ustroistvo-avtomobiley/tormoznaya-sistema/tormoznaya-sistema-vaz-2114
How to bleed brakes
To bleed the brakes according to the standard procedure, two people are needed. To do this, you need to pour brake fluid into the master cylinder reservoir, after which one person sits behind the wheel and presses the brake pedal from time to time. An assistant, having cleared dirt from the brake cylinder fittings before bleeding, unscrews the fitting. The first one at this time begins to smoothly press the brake. As soon as bubbles stop coming out of the fitting along with the brake fluid, and a clean stream comes out, the brake cylinder fitting is tightened.
All other wheels are pumped in the same way. At the same time, you need to remember that you should start bleeding from the farthest wheel from the driver, then the second rear one, then the passenger one, and lastly, the wheel next to the driver. During bleeding, it is necessary to monitor the level of brake fluid in the main reservoir so that it does not fall and air does not enter the system.
There are other sequences for bleeding the brakes, it all depends on the design features of your car.
Since it is often difficult to find a partner for this job at the right time, it is worth learning how to bleed the brakes without outside help.