HF wires (stand for high-voltage) are needed as direct impulse conductors from the ignition device to the fuel ignition system (directly to the spark plugs). If the pulse does not flow or does not flow properly, the gasoline will not burn properly in the cylinder and the engine will not operate as it should.
High-voltage wires VAZ 2114
Naturally, high-voltage wiring tends to fail. Signs of malfunction of high-voltage wires may be the following:
- The wiring is broken
- The wiring is broken, current is flowing past
- On the contrary, the wiring has heated up, the resistance is higher than normal
- The fine conductive vein has ruptured
At the same time, with all this, the engine will definitely shake and twitch. By the way, if you look under the hood and see how the wires sparkle when the ignition is on, then this is a direct guide to replacing the wires!
Wiring characteristics
In this case, a basic skill is required on how to check high-voltage wires with a multimeter. By the way, you can probably check in another way, but this is the most correct and logical. But for now let’s talk about something else, even if you realized that the explosive wires of the VAZ 2114 are dead, in any case, you will have to buy new ones.
Operating conditions are also special:
- Operating temperature varies from -60 to +110 degrees
- Resistant to oiling and other substances.
The technical specifications are as follows:
- Maximum voltage 22 kV
- Breakdown voltage minimum 40 kV
- Electrical capacity maximum 100 pFm
- Service life 8 years
GOST standards are old, from the Soviet period, but since the fourteenth ones were basically discontinued, the spare parts for them are those that remain in stock. These parameters do not quite adequately fit the Euro 2 standard, much less a higher class. Such standards require greater power and special requirements in terms of electromagnetic compatibility. But, whatever one may say, even old wiring can be adjusted to fit the engine of the fourteenth.
The main points that are needed for a competent choice of explosives are the following:
- Resistance of high voltage wires
- Breakdown voltage
- Electromagnetic force
- Price issue
After you have decided on the quality of high-voltage wires, you can master checking high-voltage ignition wires with a multimeter.
Wiring check
Checking high-voltage ignition wires begins with a simple diagnosis, because all of the above symptoms of problems may indicate a breakdown of other parts of the engine system or something else. For a simple check it is better to wait until dark. Then you need to expose a small section of the wire on one side and the other and close one end to the body of the car or battery, and the second is needed for maneuver: we move it along the wiring joints, plugs, and so on. When there is a hole there will be a spark immediately. The result is obvious - replacement is required. But this method is primary; it concerns direct current leakage, which is not always the reason for the non-operating state of high-voltage devices. In the case of voltage, such a number will not work.
To measure it, you need to know what resistance the high-voltage wires should have. After all, each wire from a specific manufacturer has its own resistance, technical characteristics and dimensions:
1) Tesla - 6 kOhm, it is often counterfeited, then you can squeeze out as much as 8 kOhm
2) Elephant - from 4 to 7 kOhm
3) ProSport tends to zero
4) Kargen - 0.9 kOhm
Checking high-voltage ignition wires with a multimeter
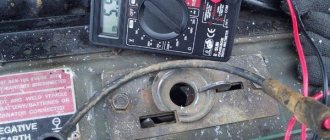
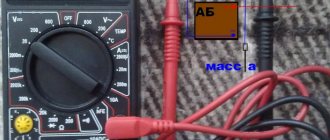
For measuring work, you need a simple multimeter, which we switch to ohmmeter mode. We measure one wire at a time, removing one by one from the cylinders from left to right and from the coil itself. The procedure is simple:
- make sure the car is turned off
- remove the end of the wire from the fastener on the cylinder
- remove the opposite end from the ignition coil mounting
- you need to connect both ends to the multimeter
- read the readings
- write them down so as not to forget
- We do this three more times with the remaining wires
Normal resistance is numbers in the range from 3.4 to 9.8 kOhm. Of course, all this depends on the manufacturer; this parameter is printed on the rubber skin of the wire. If you have a difference with the permissible value, which varies from 2 to 4 kOhm, this is normal. But no more! If more, then the wires are not suitable for driving, they need to be changed.
We always replace wires as a set! Even if one has fallen into disrepair, and the rest are in good technical condition.
That's basically it. Now you should replace the old wires with the purchased new ones.
What should be the resistance of the ignition wires?
BB wires (high voltage) serve as intermediaries between the ignition coil and car spark plugs, the impulse necessary to start the car passes through them. They are designed for high voltage and are covered with a special insulating layer, ensuring minimal loss of pulse value.
The normal resistance of high-voltage ignition wires will necessarily be proportional to the length of the element. That is, in fact, the larger the element, the greater the resistance value it can have.
As a rule, the manual indicates the upper level, above which you cannot rise. For many cars it is 25 KOhm at a temperature of 20 degrees.
There are also manuals that indicate that the optimal resistance should be 5 KOhm +/- 1. On auto forums you can find information that this number in practice increases to 8-12 KOhm. If the wire breaks, the resistance will increase greatly.
What does resistance depend on:
- Car model and power
- Wire Specifications
For new and serviceable wires, in most cases the optimal values will be 7.5-10-11-14.
In any case, the resistance of the high voltage wires of the machine will be different for different cars and you need to follow the manual. Also, the indicator directly depends on the selected wire manufacturer.
Here are examples of the difference in performance of parts from different manufacturers (in KOHM):
- "Tesla" - 6;
- "Kargen" - 0.9;
- “Elephant” – 4-7;
- “ProSport” – tends to 0.
Sn00pi › Blog › How to check BB wires? Troubleshooting.
How to check high voltage ignition wires?
Automotive high-voltage (HV) wires play an important role for internal combustion engines, since they help transmit high current from the ignition coil to the spark plugs. The serviceability and efficiency of the wires determines the timeliness and intensity of ignition of the fuel-air mixture, and therefore the correct and uninterrupted operation of the engine. Despite their simplicity, wires have many different “sores” and can cause a lot of troubles to their owner, which in one way or another will affect his nerves and pocket.
Malfunctions of high-voltage wires (common problems):
As a rule, the malfunction boils down to the fact that current either does not flow to the spark plug at all, or it does, but in limited quantities. This can happen for the following reasons: — There has been a break in the current-carrying wire through which the pulse travels. — There is a current leak, that is, the insulation is damaged and the current flows to the side. — The resistance exceeds the permissible value. — Problems in contacts (with a spark plug or ignition coil).
In the event of a break in the current-carrying wire, the effect of an internal spark occurs, in other words, an electrical discharge is formed between the ends of the broken wire, which reduces the voltage and causes an electromagnetic parasitic pulse. This impulse, in turn, negatively affects the correct operation of many of the vehicle's sensors. One such damaged high-voltage wire can cause vibration and interruptions in engine operation. Due to a damaged high-voltage wire, ignition in the cylinder occurs late or every other time, as a result, the synchronous operation of the cylinders and the engine as a whole is disrupted.
How to check high-voltage wires? Effective ways:
First of all, it is necessary to check the explosive for the absence of visible damage (cracks, fractures, etc.). Make sure there is no breakdown, this can be determined even without instruments, just look under the hood in the dark; in the event of a breakdown while the engine is running, a spark will be visible on the explosive wire. You can check high-voltage wires using a wire. To do this, you need to take a piece of wire in the dark and strip it on both sides. Then one end must be shorted to ground (machine body), and the other end must be drawn along the entire length of the explosive wires, as well as joints, caps, etc. A spark will form at the breakdown sites.
This is interesting: Reasons why the scooter does not start when cold
You can also check the resistance of the high voltage wires, for this you will need a multimeter. — Turn on the ohmmeter mode. — Remove the wire from the spark plug of the first cylinder and the ignition coil. — Connect the multimeter electrodes to the ends of the wire and look at the readings.
In good wires, the resistance should vary from 3.5 to 10 kOhm, depending on the type of wires themselves. Information about resistance is most often indicated on the insulation of high-voltage wires. Check each wire, the spread between them should not exceed 2-4 kOhm. If there is a large variation, replace the wires. By the way, they are changed as a set, that is, all together.
To complete your reading of the resistance of the most popular high-voltage wires: Tesla - 6 kOhm Slon - from 4 kOhm to 7 kOhm (4 kOhm - 1st cylinder and up to 7 kOhm - on the last cylinder) ProSport - almost zero resistance Cargen - 0.9 kOhm
Note! The resistance of high-voltage wires varies depending on the length, thickness, and material from which the wires are made.
Checking high-voltage ignition wires with a multimeter
It is important to know!
Every motorist should have a universal device for removing scratches on a car of any color. The effect is visible within 10 minutes, and the action of RENUMAX will pleasantly surprise you with its simplicity and effectiveness. Read more >>>
Procedure:
- Turn on the ohmmeter mode on the multimeter.
- Connect the multimeter electrodes to the two ends of the wire and check the resistance.
Serviceable high-voltage wires must have the resistance indicated on the wire insulation.
Most often, the resistance should be in the range of 3.5 - 10 kOhm. The permissible spread of all wires should not exceed 2-4 kOhm. Faulty wires must be replaced as a complete set. How to check high-voltage wires with a multimeter, video:
How to check high-voltage wires without a tester:
- Visual inspection for damage and cracks.
- In the dark, with the engine running, inspect the surface of the wires for breakdown (a spark will be visible on the surface).
- You will need a piece of wire, connect one end to ground (car body), and run the other end along the entire wire and joints, as well as caps. If there is a break or breakdown, a spark will appear in these places.
By the way, do you know what high-voltage zero-resistance ignition wires are?
In order to get rid of constant fines from cameras, many of our readers successfully use Special Nano Film for license plates. A legal and 100% reliable way to protect yourself from fines. Having familiarized ourselves and carefully studied this method, we decided to offer it to you.
In order to get rid of constant fines from cameras, many of our readers successfully use Special Nano Film for license plates. A legal and 100% reliable way to protect yourself from fines. Having familiarized ourselves and carefully studied this method, we decided to offer it to you.
Do you use a multimeter to check high-voltage wires?
Replacing high-voltage wires Kalina 8 valves
ENGINE 11183 1.6L 8-valve JSC AvtoVAZ, the engine is known to car enthusiasts under the names: 11183; engine 21114; 2114; Kalina motor; motor Kalina, etc. VALUE Cylinder displacement, cubic meters. cm - 1.596 Rated power, l. With. (at 5200 rpm) - 82 Maximum torque, Nm (at 2700 rpm) - 120 Number of cylinders - 4 Number of valves per cylinder, pcs. — 2 Total number of valves, pcs. - 8 Cylinder diameter, mm - 82 Piston stroke, mm - 75.6 Spark plugs - A17 DVRM, BPR6ES (NGK), etc. Cylinder operation diagram - 1 - 3- 4- 2 Power system - Injector (distributed injection with electronic control) Fuel Unleaded gasoline AI-92 Fuel consumption, l./100 km. (city/highway) - 8.8/5.7 Lubrication system Combined (splash + under pressure) Type of engine oil - 5W-30, 5W-40, 10w-30 and 10W-40 Amount of engine oil, l - 3.5 Cooling system — Liquid, closed type Coolant — Based on ethylene glycol Motor life, thousand hours. (theory/practice) - 150/300 Weight, kg - 127
Car problems: 1-Reduced speed and traction for a couple of seconds. 2-On gasoline (there is still gas) it makes a little noise... 3-In the dark there is a bright ring of breakdown around the spark plug insulators.
Old high-voltage wires: Tag-No. 9216 01/21/13 13:03:54 PES/SCC SAMARA RUSSIA On the other hand: PES/SCC RUSSIA SAMARA 2190 3707080 rev.00C Wire resistance. 1-5.5 kOhm 2-4.7 kOhm 3- Does not show, infinity. 4- 3.2 kOhm
I bought new high-voltage wires: high-voltage wires with 8 valves. "Milena" 2111-3707080 For all fuel-injected VAZ cars (8kL) Resistance up to 7 kOhm How to connect.
AVTOVAZ's recommendations for spark plugs are as follows: Applicability of spark plugs for VAZ cars.
JSC ZAZS, Russia A17DVRM BERU, Germany 14R-7DU CHAMPION, England RN9YC NGK, Japan BPR6ES DENSO, Japan W20EPR BRISK, Czech Republic LR15YC BOSCH, Germany WR7DC
JSC ZAZS, Russia - AU17DVRM BERU, Germany - 14FR-7DU CHAMPION, England - RC9YC NGK, Japan - BCPR6ES DENSO, Japan - Q20PR-U11 BRISK, Czech Republic - DR15YC BOSCH, Germany - FR7DCU
Interelectrode gap: Classic ignition system - 0.5 mm (tolerance +0.05) BSZ - 0.7 mm (tolerance +0.05) Injection - 1 mm (tolerance + 0.1) (this is for us)
I came to the following conclusion for myself:
From studying various topics. 1st place BOSCH, WR7DPX 1.1mm = from 220 RUR 1 piece 2nd place EZ Standard. T17DVRM 1.0 mm = 280-380 rubles 4 pcs. 3rd place - NGK, BPR6ES - 11...1.1mm = 500 rubles 4 pcs.
We get the car from the passport. BOSCH, Germany WR7DCX 1.1mm = 345 rubles 4 pcs JSC “Robert Bosch Saratov” or EZ, Russia A17DVRM A15DVRM 0.7-1.0 mm = from 185-220 rubles 4 pcs. NGK, Japan BPR6ES = from 150 rubles pcs
Checking high-voltage wires.
1 Method. At night, in a dark place, with the lights turned off, open the hood, start the engine, and carefully inspect the coil and armor wires for a bright white glow near the spark plugs and breakdown in the wires and coil. It would be advisable for someone to turn on the gas; there will be a more pronounced glow in the event of a breakdown.
High voltage ignition wires: how to check and recognize the symptoms of a malfunction
Many car enthusiasts are accustomed to calling high-voltage ignition wires spark plug wires. The second name more clearly describes their task in a car, which boils down to transmitting electric current from the ignition coil to the spark plugs. From the name you can understand that these wires are different from all the others installed in the car. Their peculiarity is their ability to withstand high voltage passing through them and protect other machine components from it. Every driver should know how to check high-voltage ignition wires, since operating the car in a faulty condition can lead to failure of expensive devices and parts.
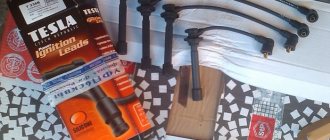
Buying new wires
In this section we will describe which high-voltage wires are best purchased for Kalina at a car dealership.
Standard wires from universal parts from AvtoVAZ will cost approximately 500-600 rubles. Set includes 4 pieces. Components for Kalina from early years of production are cheaper - about 400 rubles. High-voltage wires Kalina 8 cells. 50-70 rubles cheaper. Wires from third-party manufacturers, including foreign ones, are available for sale. For example, wires of the “HUCO” brand are distinguished by an increased insulating layer and, accordingly, cost more - about a thousand rubles. A complete ignition wiring harness for a Kalina costs about five thousand rubles in online stores.
Among “Kalinovodov” “high-voltage” brands “SLON” are popular. These products are distinguished by their ductility, resistance to fractures and, in general, have a longer service life compared to factory components at a competitive price - about 700 rubles.
Design of high-voltage ignition wires and requirements for them
High-voltage ignition wires are designed quite simply. They consist of a conductive element with a metal tip, two plastic caps and reliable insulation.
The most important element of spark plug wires is the insulation, which performs two functions:
- Does not allow moisture to enter the conductor;
- Minimizes current leakage during transmission.
Metal tips of spark plug wires are necessary to ensure electrical connection between the wire leads and the contacts of the spark plug and ignition coil. It is necessary that the metal attachments:
- They were securely fixed on the wire and firmly connected to the elements on the terminals, thereby preventing the dissipation of transmitted energy;
- They had increased anti-corrosion protection, which is necessary for long-term operation of the wires.
Plastic caps are also an important element of spark plug wires. Their task is to protect the terminals of the ignition coil and spark plugs from the influence of the external environment. Like metal tips, plastic caps should be connected as tightly as possible to other parts in the current transmission circuit.
Based on the information above, it is possible to identify the main list of requirements that apply to high-voltage wires. They have to:
- Cope with assigned conductive tasks;
- Reduce current leakage to zero during its transmission from the ignition coil to the spark plugs;
- Withstand the aggressive environment of the engine compartment;
- Work at different temperatures.
Heat, vibration, aggressive environment - the developers of spark plug wires try to protect them from all this. Insulation works, but it also has its own service life, which cannot be clearly defined. Over time, high voltage wires will become less efficient and will need to be replaced.
—>Auto parts and service stations —>
The main task of the high-voltage wires of the ignition system of gasoline engines is to transmit the ignition pulse from the coil (coils) or ignition distributor to the spark plugs of the internal combustion engine.
Along with this, high-voltage wires perform the following functions: ensuring high-quality insulation of high-voltage pulses; minimizing radio interference; protection against failure of ignition system elements. If the electrical parameters of the high-voltage wire are violated, the car engine begins to “triple”, there is a large loss of car power, and the car’s starting system may fail. Such a malfunction must be corrected immediately, as it can lead to a complete failure of the ignition system, malfunction of the vehicle’s mechanical components due to uneven engine operation.
Probable causes of malfunction The most common cause of malfunction of high-voltage wires is natural wear and aging. They are located in close proximity to the engine. During vehicle operation, especially in the cold season, the daily temperature difference can be more than 100 degrees Celsius. The insulating properties of the wire coating material gradually decrease. The wire begins to crack, moisture, vapors of aggressive liquids (antifreeze, washer fluid), oils, and salt solutions for treating road surfaces penetrate into it. Once the cracks reach the current-carrying conductor, a high-voltage signal can penetrate to ground. The insulating properties of the wire will be impaired, and the ignition impulse will not reach the spark plugs. Often wires lose their conductive properties as a result of mechanical stress. This usually occurs at the junction of the live conductor with the contact connectors of the spark plugs and ignition coils. When installing explosive wires, it is necessary to lay them correctly, be sure to attach polyester-vinyl crimp clamps, and avoid unnecessary mechanical forces. Wires can fail if the maximum high voltage level is exceeded. This situation is possible in the event of a breakdown of the coil along the primary winding.
Symptoms of faulty high-voltage wires
If the insulation breaks or the plastic caps are damaged, current will leak, which will lead to the following problems:
Difficulty starting the engine;- Unstable operation of the engine in idle mode;
- Increased hydrocarbon content in emissions;
- Radio interference, which can lead to malfunction of the multimedia system, electronic control unit and other devices.
A serious violation of the insulation of high-voltage wires will lead to the fact that all electronic components of the car will begin to act up. The sensors will begin to give incorrect readings, the ECU will send incorrect commands, and the current will no longer reach the spark plug in the amount required to produce a spark. This risks disrupting the synchronous operation of the engine cylinders, which will lead to vibration and interruptions in operation.
Replacement and connection of high-voltage wires on Kalina
This type of repair work is one of the simplest during car operation. Apart from a set of new wiring, the car owner will not need anything (it is better to buy silicone-based wires - they remain elastic at low temperatures). Before repairing the wiring, you need to “de-energize” the car by disconnecting the battery terminals. There is no need to start work if you are not confident in your own qualifications. It is better to pay experienced servicemen than to spend money on a new ignition system later.
The most important thing: do not disrupt the order of connecting high-voltage wires on Kalina . Each wire in the set is connected strictly to a specific cylinder. Wires usually vary in length. The sockets in the ignition unit also contain matching numbers.
The spark enters the cylinders in a certain order. The wires must be connected accordingly. The order is:
- First cylinder;
- Third cylinder;
- Fourth cylinder;
- Second cylinder.
It is better to check the location of the cylinders before starting work according to the vehicle’s operating manual. Cylinder numbers are read from left to right. The first one is closest to the timing belt.
It is recommended to remove and connect the wires one at a time to minimize the risk of incorrect connection order. During installation, you need to check that the new VPs do not rub against nearby structural elements, get pinched or break.
After completing the replacement, you need to “power” the car and start the engine. If the problems persist: the engine stalls or stalls, then the order in which the new wiring was connected was violated.
How to check high voltage wires
Finding high-voltage wires under the hood is not difficult, and diagnosing them is not fraught with any difficulties. There are three ways to check high-voltage wires, each of which allows you to determine whether there is a breakdown in them.
Visual diagnostics
The easiest way to check spark plug wires for insulation damage is to visually inspect them. It is necessary to carefully check that there are no cracks, cuts or severe abrasions across the insulation area.
Another way to visually check spark plug wires is to observe their operation at night. It is necessary to open the hood of the car at night, start the engine, turn off the headlights and watch the high-voltage wires. If they have strong insulation breakdowns, in the dark the “crickets” will be visible to the naked eye.
This is interesting: The main mistakes that car drivers make when involved in an accident
Wire check
To check the spark plug wires, an ordinary wire with stripped ends on both sides can be used. In the dark, with the engine running, it is necessary to short-circuit one part of the wire to ground (the car body), and run the other part along high-voltage wires in search of a place where the stripped tip will begin to produce a spark. It is important to check not only the insulating material around the conductor, but also the plastic caps.
Diagnostics with a multimeter
A multimeter in automotive diagnostics is most often used as a voltmeter, but it also has another useful function - the ability to measure resistance. To take measurements, you must completely remove the high-voltage wires (or disconnect one wire on both sides). Next, with the probes of the device set to ohmmeter mode, you should touch both sides of the wire, as a result of which the multimeter will display information about the resistance.
The resistance of serviceable high-voltage wires is up to 10 kOhm. At the same time, it can vary practically from zero. This depends on the type of wires themselves, the insulation used in them, the length, the presence of microdamages, and so on.
Procedure for removing and installing the ignition module
- The first thing you need to do is open the hood of the car and disconnect the negative terminal from the battery; for this you will just need a 10 key, as was written above.
- After this, you need to disconnect all the high-voltage wires from the spark plugs; just pull them with force.
- Immediately after this, we remove the wires from the ignition module itself, this is done with a simple movement of the hand, just with a little effort, pull them towards you, all four pieces one at a time.
- And then, we move all the wires to the side so that they do not interfere with us. And immediately remove the power plug from the module body, as shown in the photo below, by slightly pressing the latch and pulling it towards you
- And at the same time, it is necessary to disconnect the plug from the knock sensor (since they are located on the same wiring harness), so that nothing unnecessary interferes with us during dismantling.
- We move the winding to the side, you can hook it to the cooling fan, then it definitely won’t interfere.
- Now we need a 5-point hex to unscrew the 4 bolts securing the ignition module housing, three of which are in plain sight, but the fourth is under the module at the bottom.
- When all 4 bolts are unscrewed, you can safely remove the ignition module and install a new one in its place, if necessary.
- Please note that high-voltage wires must be connected in strict accordance so that the numbers on the block match the numbers on the wires.
- The cylinder numbers on the wires look like the photo below:
- We carry out installation and replacement in the reverse order, and do not forget to connect the plugs to the ignition module and the knock sensor, and also put the terminal on the battery. And one more piece of advice: when removing a block, look at its markings and the numbers that are there - buy exactly the same module so that there are no problems later during dismantling.
How to check ignition wires with a tester
Most vehicles are equipped with high voltage lines that are designed to transmit electrical current from the ignition coil to the spark plugs. They, like any car part, have unpleasant properties during operation - they fail.
Low resistance reduces the cost of electrical energy passing through the cable, which affects the operation of the vehicle as a whole. If the quality of the ignition cable does not meet the required quality of the vehicle manufacturer, then the high voltage creates a large amount of electromagnetic and electrical interference. And electromagnetic interference will have a detrimental effect on on-board electronics, of which there are a lot in modern cars. Incorrect operation of the vehicle's electronic system will have a detrimental effect on engine performance.
Requirements for high-voltage wires
Modern manufacturers adhere to the following basic requirements when manufacturing wires:
- chemical resistance of insulation to aggressive environments;
- increased resistance to temperature changes;
- low resistance;
- in operation, the current should flow only from the coil to the tip of the spark plug, there should be no leaks
In the event of a malfunction, voltage leakage may occur, and this will entail an increase in fuel consumption, engine performance will deteriorate and exhaust toxicity will increase.
Malfunctions in high-voltage ignition wires
The main problem with wiring is considered to be a problem with the spark plugs due to insufficient voltage. The cause of this malfunction may be:
- broken wires inside the insulation;
- voltage leakage due to poor insulation quality;
- cable resistance is higher than permissible;
- absence or poor contact between spark plugs and high-voltage lines.
In a ruptured high-voltage cable, an electrical discharge occurs, which causes voltage loss. As a result, it is no longer the rated voltage that is supplied to the spark plug, but an electromagnetic pulse.
A damaged high-voltage cable can cause incorrect operation of many vehicle sensors and cause interruptions in engine operation, since ignition in the cylinder occurs late and may not always work, which entails a disruption in the synchronization of the cylinders.
SIGNS OF MALFUNCTION OF HV WIRES
Any problems with the ignition of the fourteenth may indicate that something is wrong with the high-voltage wires.
. The main sign of breakdown of high-voltage equipment is the absence of sparks on the spark plugs due to the fact that the current does not reach the spark plugs themselves, or it does, but in insufficient quantities.
Signs of malfunction of high voltage wires are as follows:
- Mechanical damage is visible on the surface;
- Cracks have formed on the insulation of the wires;
- The conductive copper wire located inside the insulating coating has broken;
- The contacts have oxidized at the points where the GDP is connected to the spark plugs and the coil;
- High-voltage wires constantly overheat due to incorrectly selected resistance.
Any of these malfunctions causes the engine number fourteen to malfunction - it will twitch or stall even at idle speed. This happens due to the fact that when the cylinders are damaged, an insufficiently powerful spark plug is supplied to the cylinders, due to which the fuel in the cylinders ignites late or every other time.
A broken high voltage wire is one of the most common and, at the same time, most unpleasant problems. When a wire is torn, an internal spark (electric charge) is formed, which occurs at opposite ends of the explosive wire. The resulting internal spark is a parasitic impulse that circulates throughout the vehicle's wiring. Because of this, the sensors of the fourteenth function incorrectly or fail.
Checking high-voltage ignition wires
You can check the ignition line using a regular multimeter; it will help you determine which wire is the problem. The reason for checking may be unstable engine operation at idle and under load, as well as failures of sensors that are influenced by the electromagnetic field.
If one or more wires malfunction, the current and voltage to the spark plug will not be fully supplied, as a result of which the engine and spark plugs will not operate properly. The main task of a multimeter is to check for breaks and determine resistance in cables.
If, during a test with a multimeter, it is revealed that the standards do not comply, then the high-voltage cable must be replaced.
Inspection of ignition wires
Before checking with a multimeter, it is worth conducting a visual inspection of the high-voltage line yourself for insulation damage, melting or chips. Frequent causes of cable breakdowns are careless repairs or their contact with hot motor parts. The cause may also be contact with active chemical elements on the insulation.
It is necessary to pay special attention to the contact part of high-voltage wires; they should not show signs of soot and oxidation. During inspection, you can also check for breaks in the high-voltage cable. To check, you need to start the engine and look at the high-voltage line. Sparks will jump at the rupture points.
Checking with a multimeter
To check with a multimeter, the first step is to remove the ignition wires.
To check with a multimeter, you need to select the resistance test mode; it is advisable to set the range from 3 to 10 kOhm. No resistance in the cable means there is an open somewhere. Then it is not suitable for further use and requires replacement. In general, the ignition line resistance value should be approximately 5kOhm.
Often the normal resistance is stamped into the cable insulation. It should be remembered that the normal resistance of the high-voltage line in the kit should not differ greatly; the difference should be no more than 2-3 kOhm.
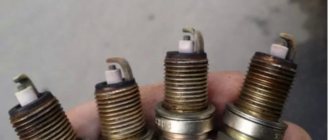
Checking and replacing spark plugs
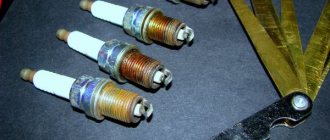
Spark plugs can be checked with a special tester, which is sold at a spare parts store.
Or, with the help of an assistant, you can check the spark plugs by turning them out and inserting them into the tips and positioning them as shown in Figure 2.
The assistant turns on the starter, while you watch for a spark between the electrodes of the spark plugs. Of course, these methods cannot show the complete characteristics of candles.
Since the spark plug must be subjected to special testing in a special installation. Using a special installation, the spark plug is checked for pressure, temperature, insulation and sparking, etc.
When purchasing spark plugs, it is advisable to check them in the store with a tester and visually inspect them for deformations and cracks in the insulator.
Spark plugs should be replaced every 30,000 km. Spark plugs A17ДВРМ or their foreign analogues - LR15YC-1 (BRISK) and WR7DCX (BOSCH) should be used.
To do the job you will need a special 21mm spark plug socket wrench.
1. Disconnect the high-voltage spark plug wire.
2. Wipe with a rag and blow with compressed air from a tire pump the area where the spark plug is installed.
3. Using a 21 mm socket wrench for spark plugs, unscrew the spark plug.
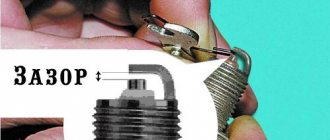
4. Before installing the spark plug, use a set of round feeler gauges to check the gap between its electrodes. The gap should be 1.0 -1.15 mm.
5. Adjust the gap by bending the side electrode.
To avoid damaging the threads in the cylinder head, you should first screw the spark plug in by hand and then tighten it by inserting the wrench into the wrench extension. The spark plug tightening torque is 30-40 N/m.
A poorly tightened spark plug can fly out during operation and damage the threaded part of the spark plug hole in the cylinder head. But you can’t overtighten the candle either.
6. Wrap the spark plug into the cylinder head.
7. Similarly, we replace the spark plugs of the remaining cylinders and connect high-voltage wires to them.
Choosing wires when purchasing
When purchasing, not only the brand of wires and the manufacturer are taken into account. Particular attention should be paid to the engine model. This is due to the fact that when designing cars, the manufacturer sets certain wire standards that must be taken into account when repairing or replacing.
One of the selection criteria is the voltage for which the wires are designed. If the cable cannot withstand the voltage, an insulation breakdown may occur, resulting in failure of the wire. Also, when choosing, you need to take into account the material from which it is made.
Characteristics of conductors
The characteristics of high-voltage elements are determined by the length and material of the core. When purchasing a kit, it is recommended to check its authenticity to avoid unscheduled car repairs.
Manufacturing materials
High voltage wires can be made of ferromagnetic alloy, copper or non-metallic graphite-coated filaments. The choice of cable depends on the characteristics of the vehicle's electrical system.
When replacing an element, you can follow the recommendations from the service book or the normal resistance of the wire that was installed previously.
Wire length
The length of the voltage elements depends on the car model. The cables that connect to different cylinders are not the same length. The size of the longest element that fits the first distributor socket and the first cylinder is 36-81 cm. The shortest element that fits the 4-6 cylinder has a length of 11-22 cm.
You can select the right size according to the description of the car model and make or according to the length of the already installed conductor.
Product authentication
To verify the authenticity of a product, you must:
- examine the packaging and wires (they should contain information about the manufacturer, operating conditions and composition);
- evaluate the correct spelling of the brand name and instructions (a typical mistake is the word “silicon” instead of “silicone”);
- inspect the elements, evaluate the quality of workmanship and the tightness of the caps;
- twist the wire tightly (the part should not crunch, and the central core should not move relative to the insulation layer);
- if possible, try to melt the outer insulation with a lighter (the protective layer should not melt).