Self-identification of problems
The procedure is not difficult. The easiest way is visual. The most difficult one involves a detailed study of the engine’s performance.
One of the obvious signs of these breakdowns is a malfunction in the engine. For example, it may be difficult to start, or it may have an idle speed.
Other signs are:
- The first is related to the rotation of the crankshaft. If it rotates at the required frequency, but the engine itself does not start, this is a sign of lack of ignition. In other words, the air mixture does not ignite.
- If a mixture of fuel and air flares up in the cylinders, the engine may operate extremely unstable.
- When starting the engine, the starter does not function. As a result, the engine also fades out.
- Very high fuel costs. If the composition of fuel and air does not ignite, then the power of the power unit is reduced or drops to zero. Power losses can be compensated by supplying an increased dose of fuel to the cylinders. And the result is an impressive waste of fuel.
- The catalyst is not working. If there is no ignition in the technology, there is no combustion of the air-fuel composition. And the fuel that does not ignite ends up in the catalyst. And there it oxidizes. And the catalyst stops functioning.
- A cold engine does not start well. When turning the ignition, cold ones accumulate condensation. And it is considered an excellent conductor of electricity. If the distance between the electrodes increases, then the degree of breakdown voltage should develop. It cannot be developed independently, because the energy will be eliminated through the indicated electrodes, as well as through a ceramic cone.
- There are traces of mechanical defects on the surface. This is a sign of either complete breakdown or malfunction.
- There are carbon deposits and deposits on the electrodes. The candles themselves smell like fuel. This is evidence that the system itself, and every single one of them, is faulty.
- A damaged cable carrying high voltage can seriously impair normal operation.
Checking high-voltage ignition wires with a multimeter
It is important to know! Every motorist should have a universal device for removing scratches on a car of any color. The effect is visible within 10 minutes, and the action of RENUMAX will pleasantly surprise you with its simplicity and effectiveness
Read more >>>
Procedure:
- Turn on the ohmmeter mode on the multimeter.
- Connect the multimeter electrodes to the two ends of the wire and check the resistance.
Serviceable high-voltage wires must have the resistance indicated on the wire insulation.
Most often, the resistance should be in the range of 3.5 - 10 kOhm. The permissible spread of all wires should not exceed 2-4 kOhm. Faulty wires must be replaced as a complete set. How to check high-voltage wires with a multimeter, video:
How to check high-voltage wires without a tester:
- Visual inspection for damage and cracks.
- In the dark, with the engine running, inspect the surface of the wires for breakdown (a spark will be visible on the surface).
- You will need a piece of wire, connect one end to ground (car body), and run the other end along the entire wire and joints, as well as caps. If there is a break or breakdown, a spark will appear in these places.
By the way, do you know what high-voltage zero-resistance ignition wires are?
In order to get rid of constant fines from cameras, many of our readers successfully use Special Nano Film for license plates. A legal and 100% reliable way to protect yourself from fines. Having familiarized ourselves and carefully studied this method, we decided to offer it to you.
In order to get rid of constant fines from cameras, many of our readers successfully use Special Nano Film for license plates. A legal and 100% reliable way to protect yourself from fines. Having familiarized ourselves and carefully studied this method, we decided to offer it to you.
Do you use a multimeter to check high-voltage wires?
Diagnosis
How to check the spark plugs on the injector yourself? This technique is considered one of the most common and used types of checks. In everyday life, diagnostics proceeds in the following stages:
- The elements are properly cleaned: carbon deposits and other contaminants are removed.
- Using a probe (a device for controlling the gap), the distance between the electrodes is adjusted.
- The wire is strung.
- The candle is applied to the metal side of the automobile power unit. This creates the required electrical interaction.
If you have difficulty checking using this principle, then how can you check the operation of the spark plugs on the injector? You can simply start the starter, and then the engine itself. When a blue spark immediately forms upon startup, it means everything is fine. If you get a spark with a red tint, or not at all, a replacement is needed. The spark plug spark test is now complete.
Multimeter device
Looking for a spark
Let's imagine a situation: a driver discovers a faulty spark plug, spares no expense, installs a good set of new ones, starts the engine, and the picture remains the same - misfires. Is it really marriage? Not at all. We are looking for a deeper problem. First, let's look at the high-voltage wires. Sometimes they are inspected even before the spark plugs are checked (for example, on VAZs the wires are sometimes not maintained for 30 thousand). If everything is clean, check the coils. In 90% of cases after spark plugs, one of these things turns out to be faulty. The remaining 10% are already advanced cases - low compression or a stretched chain.
Diagnostics using a multimeter
How to check spark plugs with a multimeter? A multimeter is an extremely convenient device for carrying out such diagnostics. It is also called a tester. It should not be confused with a bench test. Stands can be found at service stations. It is completely unsuitable for home use. Checking spark plugs with a multimeter: using probes, you can examine them for the presence of an internal short circuit.
Using a multimeter is quite simple. Moreover, by its design it is not a complex device. How to check the resistance of a spark plug with a multimeter? To identify potential short circuits, the following actions are performed: the probe of this device is placed on the element, the last probe is placed on its base part. If a spark forms upon contact, then there is no problem. It is ready for further use. Here's how to check your spark plugs with a spark plug tester.
Checking with a multimeter
Some people say that you cannot check spark plugs with a multimeter. Yes, we won’t be able to see the spark, but it’s quite possible to check the resistance of the spark plug with a multimeter. This value will make it clear whether she is alive or not.
Measuring spark plug resistance with a multimeter
How do you check spark plugs for resistance with a multimeter? We connect the black wire of the multimeter to the “Com” connector, the red wire to a special socket with a resistance icon Ω. We switch the device regulator to the appropriate mode (Ohmmeter), up to 20 kOhm. We take our spark plug and connect to the central diodes on one side and the other.
Location of the center spark plug diode
Having rung the spark plug, we will see the resistance on the multimeter screen - conditionally 4 kOhm. If the measurements show a number less than 2 or more than 10, there is a malfunction.
Note! Some multimeters may show incorrect resistance readings. To find out if the device is working, before checking the spark plug for functionality, you need to short-circuit the red and black probes. A zero should appear on the screen.
If checking the spark plugs with a multimeter showed zero resistance, could they be good? Quite. To do this, look at the markings. If there is no resistor in it (and, accordingly, the letter R on the marking), the device will show zero. These spark plugs are called zero resistance spark plugs. All others must have resistance when measured with a multimeter.
Popular brands:
Kia Rio, Nissan Almera
Diagnostics using a special gun
This is a rather interesting technique. And it is often used for home diagnostics. This requires a special gun to check the spark plugs. This device has been used in global automotive practice for quite a long time. But domestic car enthusiasts began to widely use it relatively recently.
This technique involves testing under special pressure. Algorithm for this operation:
- The candle is placed in a special slot in the gun. Then the cap is attached to it.
- After securely fixing the spark plug, you should pull the trigger of such a pistol. After pressing, the greatest concentration is required.
- If after this pressing a spark is formed and a light appears on the gun itself, it means that the part being tested is operational.
The indicated technique has not gained great popularity among Russian car enthusiasts, since it does not guarantee absolute confidence in the good working conditions of the spark plug. In addition, the test is carried out under pressure. And in a pistol it differs significantly from the pressure in automotive technology. But thanks to this technique, the driver can have absolutely no doubt that the spark plug will break. Moreover, if this fact was determined during the verification process.
Correcting the situation
Adjusting the gap is quite simple; you only need special feeler gauges, which are sold at any auto parts store. After unscrewing the spark plug, inspect them for damage. If there is no damage, the next step is to clean the spark plugs.
After this, check the gap with a feeler gauge. It is impossible to determine it by eye. How to set the gap? You can bring the contacts closer by tapping with the handle of a screwdriver, and move them further away with a screwdriver. The main thing is to act carefully so as not to break off the electrode. He doesn't like repeated bending back and forth. After this, check again using a spark plug gap gauge.
Why even bother with any gaps? This is the biggest mistake car enthusiasts make. Normal clearance has the following advantages:
- Excellent engine performance, which is not only a guarantee of safety on the road, but also easy starting.
- Gasoline savings of 5-7% are also a serious argument.
- Increasing the service life of the engine and the spark plugs themselves, they will last longer.
Comprehensive information about the spark plug gap
And so the garage team of mechanics froze for more than an hour, trying to start the engine in every way, until one of them decided to check the order of the wires. Nobody could have thought that this was possible. Why did I tell you this? Do not mix up the wires when manipulating the spark plugs, and check the order if, after checks, adjustments or replacements, problems arise with starting the engine.
That's all, friends, now you know how to adjust the gap on the spark plugs, and you can do it yourself, subscribe to updates and don't forget to share links, see you later.
Source
Cleaning candles yourself
In many cases, diagnosing a spark plug comes down to cleaning it. After all, a candle covered with soot and dirt begins to work worse and worse.
Self-cleaning takes place using the following methods:
- Manual method . No auxiliary devices are required here. It is extremely important to be careful, otherwise the electrode may be damaged. Also, sharp objects are not needed in this case. Will do: a metal brush, a toothbrush, fine-grained sandpaper.
- Application of sand . You need a container with it and a drill. A candle is placed in the last one. Its end with the electrode is placed in sand. Let's start the drill. We look at the quality of turnover (insignificant).
- Using a sandblasting machine . This method effectively removes deposits and carbon deposits. Different types of sand are used here. The operation takes place with the effect of compressed air.
- Chemical cleaning . This method helps to quickly eliminate deposits. Here, agents such as acetone, the drug (Fairy or its analogues) and vinegar are used. A composition for cleaning the carburetor or a rust remover is also suitable. Some craftsmen use Coca-Cola for cleaning. Any of these products is applied in a layer of approximately 3 mm. This lasts for about 4 minutes. Then rinse with drinking liquid. Matches or wooden sticks are used to clean the outer part.
- Application of silite . Candles are placed in a jar. This product is poured into it. After which the container is placed under hot water. This results in a chemical reaction. There is an hour wait. You can then clean the electrode with a standard toothbrush.
- Using vinegar . The candle is placed in a jar with it. Stay time – 1 hour. Then a little electrolyte is added to this composition. Next, the candle is cleaned. You can use a toothpick.
Checking spark plugs, injector
Let's check the spark plugs of the injection engine 2111 (1.5 l) of VAZ 21083, 21093, 21099 cars.
The reason for such a check is usually the appearance of signs of malfunction in its operation. For example, the engine idles, pulls poorly, there are pops in the muffler, dips, jerking, twitching, etc.
Checking spark plugs, injector
It is not worth checking the serviceability of the spark plugs for a spark (by unscrewing them and placing them on the engine) on an injection engine with an electronic control system. There is a risk of burning the controller (ECU). Therefore, we will assess their condition based on their appearance and technical parameters.
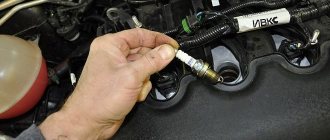
Turn out the spark plug
We use a high head or a spark plug wrench set to “22”. Before unscrewing the spark plug, we clean its well with a brush and blow it with compressed air to prevent dirt from entering the combustion chamber.
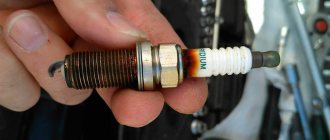
Inspect the electrodes and threads of the spark plug
There should be a gray or brownish dry coating on the spark plug electrodes. It indicates that the spark plug and the vehicle's engine are operating normally. You don’t need to check this candle further and move on to the next one.
If there is a black and dry deposit on the spark plug electrodes, the engine is running on a rich fuel mixture (pay attention to the injectors).
A black oily coating indicates that oil has entered the combustion chamber (the oil seals or oil scraper rings are faulty). The presence of oil on the threads most often indicates wear of the valve stem seals, and on the electrodes - oil scraper rings.
Reddish coating of different shades - gasoline contains a lot of ferrocenes (ferrous additives that increase the octane number). Current leakage due to such plaque and weakening of the spark are possible.
Destruction or burnout of the electrodes - the spark plug does not match the heat rating of the given engine (too cold).
For more information about diagnosing an engine based on carbon deposits on the spark plug electrodes, see the article “Diagnostics of an injection engine based on carbon deposits on the spark plugs.”
Inspecting the spark plug insulator
Cracks and damage to the insulator are not acceptable. A red rim at the nut contact point is unacceptable. This is evidence of current leakage to ground. In this case, the spark will be weak (or disappear altogether) and the engine will idle.
Checking the gap between the spark plug electrodes
If the spark plug is single-electrode, then you need to check this gap. For the injection engine 2111 of VAZ 21083, 21093, 21099 cars, its value is in the range of 0.8 - 1.35 mm (optimally 1.1 mm). We measure the gap with a round feeler gauge or, as in the picture at the beginning of the article, with a 1.1 mm drill. A flat probe is not suitable, since on a spark plug that has been running for some time, there is a transfer of metal from the side electrode to the central one. As a result, there will be a recess on one, a tubercle on the other, and only a round probe will fit into such a shaped gap.
If necessary, adjust the gap by bending the side electrode.
We pay attention to the marking of the spark plug and its correspondence to this engine
The spark plug must correspond in its technical characteristics (in particular, in terms of heat rating) to the engine in which it is installed. See “Applicability of spark plugs on VAZ car engines.”
We replace defective spark plugs identified during the inspection with new ones or known good ones. If the mileage on an old set of spark plugs approaches 30,000 km, it makes sense to replace it entirely for preventive purposes.
Notes and additions
To quickly check the ignition system in general and the spark plugs in particular, you can use a spark indicator for fuel injection engines. It is put on the spark plug and a high-voltage wire is put on it. The engine starts and on the indicator you can see whether a spark jumps to the spark plug or not.
The spark plug tightening torque is 30-40 N.m (on a cold engine).
TWOKARBURATORS VK -More information on the topic in our VKontakte group
More articles on the 2111 engine ignition system of VAZ 21083, 21093, 21099
— Engine ignition system 2111 (ECM January 5.1 and M1.5.4N), diagram
— No spark, VAZ injector
— The idle speed of an injection engine floats, reasons
— High fuel consumption of an injection engine, reasons
— Engine does not start, injector
Creating your own tester
The testing method with a tester is quite effective. But if you don’t have such a device, you can create it yourself . Here the basis is a lighter, and the operations are as follows:
- The lighter is disassembled. The piezoelectronic component with a pair of wires is eliminated.
- The ends of the wire are slightly extended and insulated.
The wire is attached to the top contact, and the base of the unit is attached to the body.
The essence of testing with such a device is this: if a spark is visible when you press its button, the spark plug is working well. If there is no spark, the spark plug is broken.
Diagnostics. Glazing technique
How to check the spark plug for functionality? The technique assumes that the upper side of the insulator will change its color. You should get a yellow color with a good, almost glossy shine. These candles look like glass.
This dilemma arises after a very careless drive in a car. There may be too much use of kickdowns and over-throttle. This disrupts the formation of sparks at high speeds, and glass formation occurs on surfaces. This defect cannot be eliminated on your own. And the spark plugs need to be replaced.
It is important to promptly diagnose spark plugs in order to avoid engine problems in the future.
Video: how to check spark plugs with a multimeter:
Video: how to check the spark on a spark plug
DIY crafts for car enthusiasts
Sometimes, there are situations when a car’s engine starts to misfire and those car enthusiasts who have at least a little knowledge of engines begin to meaningfully look for the reason for this.
You can order a taxi at favorable rates here https://ekonomtaxi.ua/. Professional drivers will take you to the right place in comfort.
Well, as a result, the turn comes to the candles. Yes, of course, you can check the spark plugs even with a simple tester or multimeter, and in this article we’ll talk about just that.
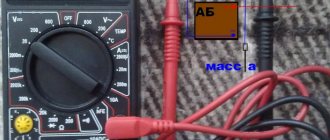
To check the spark plugs, we need any multimeter that has a resistance measurement mode. We select the multimeter mode 200 kOhm or more, connect one probe to the upper central electrode of the spark plug, and the second probe to the ground of the spark plug, that is, to any face of the nut-shaped shape on the spark plug.
If the multimeter shows any resistance or just zeros, then the spark plug is faulty and needs to be replaced with a new one.
We have made the first measurement of the candle, now let’s check the second option.
To do this, set the tester or multimeter in the measuring range of 20 kOhm, connect one probe to the upper electrode of the spark plug, and connect the second probe to the lower, central electrode of the spark plug.
Here the resistance is different for each engine and each car, but there must be resistance; if it is not there, then the spark plug is completely faulty. Inside the spark plug electrode there is a resistor that performs two tasks, the first is to reduce the spark arc so that it does not melt the central electrode and shorten it over time, which would gradually reduce the spark plug gap. And its second task is to eliminate radio interference produced by a spark plug.
If, when measuring all spark plugs, one has deviations of 5 - 15 kOhm from the others, then of course it should be replaced, since the resistance of all spark plugs should be approximately the same + -2%.
After measuring your candles, you will know for the future what resistance they should have and based on this, you can select analogues of candles based on resistance.
But I want to warn you that there are spark plugs with zero resistance that are installed on certain types of engines, and if you install such spark plugs on your car without knowing it, you can first of all damage the ignition coil, this is in the best case, and in the worst case Vehicle ECU.
It would be a good habit if you measure even new spark plugs in order to know their parameters and characteristics, and thereby prevent the installation of a defective spark plug on your car.
It is advisable to check your spark plugs once a month or immediately if the engine is not running stable, in order to prevent serious repairs. Have a good trip everyone.
Popular;
- Instructions for replacing spark plugs in a car
- What does a brown band on a spark plug mean?
- How to simply check the ignition coil directly on a car
- How to measure leakage current with a multimeter
- How to check the weight of a car or why the engine won’t start.
- How to simply measure and find the leakage current in a car
- How to check a temperature sensor, operating principle.
- How to unscrew a broken spark plug from the cylinder head.