What does the VAZ 2114 cooling system look like and what components does it consist of? This is exactly what you will learn from our article. It would not be superfluous to mention that the cooling system on cars, starting with the VAZ 2108, is almost the same. There are minor differences, but they are not very significant. But let's take a closer look at the design.
Circulation scheme
Like any other modern car engine, the VAZ 2114 has liquid cooling with forced circulation. Antifreeze is used as a liquid (the domestic analogue is antifreeze). The liquid is driven by the impeller of the pump. The cooling system pipes of the VAZ 2114 provide the connection of all elements. So, a thin pipe goes from the engine block to the heater radiator. With its help, hot antifreeze is supplied to the interior for heating. The operation of the entire system depends on the temperature of the liquid in the thermostat:
- Less than 85 degrees - circulation only in a small circle.
- More than 85 degrees – the liquid moves in a large circle.
The only difference between the large and small circle is that when moving along the first circle, antifreeze enters the main radiator.
Briefly about the car
The VAZ-2114 hatchback is a fairly popular car that can still be found both on domestic roads and on the roads of the entire post-Soviet space. It was produced by AvtoVAZ OJSC from 2003 to 2013 and was one of the variants of the restyled series of the Samara-2 (VAZ-21093) family of cars.
During mass production, various engines with the same type of cooling systems were installed on it, which operate on the principle of internal heat exchange using a special cooling mixture of the “Tosol” type.
Cooling system diagram
Liquid pump (pump)
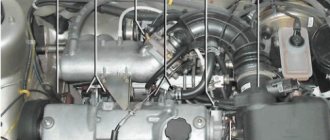
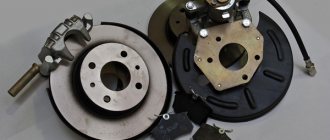
On a VAZ 2114 car, the engine cooling system works due to the fact that the antifreeze is in motion and under pressure higher than atmospheric pressure. The movement is created using a pump installed on the right wheel side directly in the engine block. Driven by a timing belt. Examination:
- Drain the antifreeze from the system (there are two holes for this). This should only be done on a cooled engine!
- Unscrew the three bolts securing the plastic cover to the engine block.
- Use a key set to “17” to loosen the roller nut. This allows the timing belt to loosen.
- Remove the belt and look at its condition. If it is “eaten” from the outside (by 1-3 mm), then this indicates that the belt is slipping due to the pump being worn out.
- Take the pump pulley with your hands and try to move it, rotate it in different directions. If there is play or jamming, the pump must be replaced. Otherwise, the cooling system of the VAZ 2114 (injector or carburetor, it doesn’t matter at all) will not work correctly.
Pump replacement
To replace the pump, you need to unscrew the three bolts that secure it to the engine block. But you need to take into account that some difficulties may arise during removal. Very often the body just gets stuck. Therefore, it is advisable to lightly tap the pump housing, trying not to damage the important elements that make up the cooling system of the VAZ 2114.
After removing the pump, you need to thoroughly clean the entire surface in the engine block so that there are no problems when installing a new one. You can use silicone sealant, which is applied to the paronite gasket in a thin layer on both sides. Pay attention to the package. In addition to the pump, the kit should contain bolts with engraving washers, as well as a gasket.
Bleeding the system
After all the replacement work has been completed, you can pour antifreeze into the cooling system and start pumping. To do this, loosen the clamp that fits to the injector (and more specifically, to the throttle valve). It is by this that you will judge how well you got rid of traffic jams. But, in fairness, it is worth noting that on the engines used in the VAZ 2114, pumping is very simple.
Pour antifreeze into the expansion tank, you need to maintain the level between the marks. Then start the engine and warm it up to operating temperature. In this case, the plug should be closed, open as needed to add antifreeze (if the level drops). That's all, the repair is complete. Let's briefly learn about the remaining elements of the cooling and heating system of the VAZ 2114.
Cooling system VAZ 2115 - design and repair
Certain elements of the cooling system, already mounted on the motor, and the manipulations with them were previously described in detail by me according to the assembly order. For a complete understanding of all the components and the system as a whole, I recommend reading the post about the pump and supply pipe, as well as the post about installing a thermostat from a Lada Granta car.
Before installing the power unit on the car, the main engine cooling radiator and its forced air cooling system were already installed in place. Since, instead of a serial cooling fan, I used dual fans from a VAZ 21214 (Niva), I had to slightly change the radiator mounting system on the body, and also make supports for the fans.
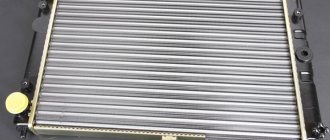
When choosing a new radiator, I gave my preference to a “copper” all-soldered one, produced by the Orenburg Radiator Plant. I purchased it in November 2013 from the clubturbo online store. The price of the radiator at that time was 2,470 rubles.
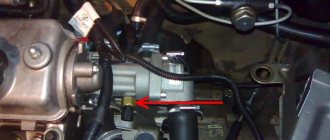
As you know, the standard radiator is installed on three rubber pads, one on the top (1111-1302060
) and two lower ones (
2108-1302060-20
). After attempting installation according to this scheme, the radiator was in contact with the car body in the places indicated in the following photo.
Red arrows marked the places of contact of the radiator with the body.
Perhaps this is a feature of these particular copper radiators, I can’t say for sure, because I don’t remember on what pads my previous aluminum one was installed. But in any case, in this situation there is a simple solution - replacing the lower pillows with two upper ones, which is what I actually did. It turned out just perfect. Next we had to come up with a new top mount. I solved this problem by making a steel plate with three holes. Through two of which the plate is rigidly attached to the body, and in the third hole a rubber bushing for the radiator electric motor is installed ( 2103-1308030
), through which the upper radiator is mounted.
Now the radiator was quite securely fixed to the body. I’ll also add that this radiator has a hole for installing a fan switch sensor ( 2108-3828010
) used with carburetor engines. Not my case, but I still had to buy a new one as a plug. If desired, you can use it as a backup. I had to think about the design of the fan mounting, which I also purchased on the clubturbo store website in March 2014 at a price of 2,300 rubles. Based on the specifics of the operation of this unit, in which vibration is known to occur, the supports had to have damping properties to minimize the transmission of unwanted vibrations to the body, and also have an aesthetic appearance. After several fittings on site, I roughly imagined the future design of the supports. Of course, this could not have happened without modifications to the body. I was forced to cut down two brackets with numbers 21093-8401045 and 21093-8401044. I don’t even know their purpose, but I assume that they were used on the first generation Samar. If anyone has 100% information on this matter, please comment.
As a result, the fan mounting consisted of upper and lower supports. The lower ones included two hexagonal profile posts, each of which, on one side, had an M6 threaded hole at the end, on the other, a cylindrical tenon with an outer diameter equal to the outer diameter of the remote fastening sleeve 21030-1308031, and also having an M6 threaded hole at the end. One side of the posts are attached to the body with a bolt through the existing holes in the lower part of the radiator frame, and the other side through custom rubber bushings to the fan housing.
The initial parts for the manufacture of the above bushings ( damper supports
) served as: oil level indicator tube seal 2112-1009078 and hood stop bushing 2108-8407134. Having subjected these parts to extraordinary refinement using a utility knife and an emery wheel, the result was barely distinguishable from the factory version.
Oil level indicator tube seal 2112-1009078.
All that is needed from the hood stop bushing is a cap of a larger diameter. Having carefully cut it off, I also finished it on a sharpening machine. In the future, it is installed on the front side of the fan housing mount, which has also undergone minor modifications. After dismantling the serial metal brackets with which it is supplied, it was necessary to drill out the existing mounting holes to a diameter equal to the diameter of the hole for the seal of the oil level indicator tube in the crankcase ventilation fitting 21120-1014213, with the required eccentricity.
To implement the upper fastening and at the same time minimal modification of the body, two L-shaped brackets were made from a rectangular steel pipe in accordance with GOST 8645-68. The method of attachment to the car body and fan housing is carried out according to the principle of lower supports.
The following work on the cooling system was carried out after installing the engine on the car. Here all that remained was to select the required size pipes and self-tightening clamps of Japanese origin.
Initially, I planned to assemble the system using silicone pipes, and even purchased them long before the start of assembling the system, two whole sets. Why two?
As it turned out later, the first ( full set
) was intended for a carburetor engine. Now I can’t answer unequivocally how I got away like that. Most likely, this was facilitated by the lack of a proper description of the product on the clubturbo online store website, or perhaps simply by the lack of personal experience in this matter at that time.
Cooling system pipes for a carburetor engine. They were purchased in November 2013 at a price of 2,400 rubles.
The second set was purchased some time later. It consisted of only three pipes, the so-called main radiator pipes. This time the kit was designed for an injection engine. But this did not fully compensate for the mistake I made.
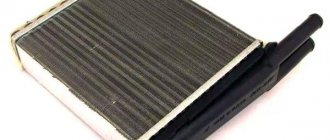
Radiators
One is installed in the heating system (volute) of the cabin, the second - in the engine compartment. The first is necessary for heating the cabin in cold weather; it can be forcibly connected to the cooling system; for this purpose there is a tap installed in the partition between the cabin and the engine compartment. The second radiator turns on automatically, so to speak, when the antifreeze temperature reaches 85 degrees, using a special device - a thermostat. Essentially, a thermostat is a small mechanism based on a bimetallic plate and a return spring. When heated, the plate bends and moves the valve, which opens the way for antifreeze into the main radiator of the VAZ 2114 cooling system.
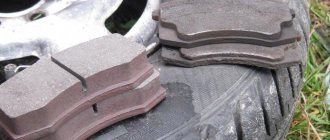
Signs of a broken cooling system pipe
The first and most common sign of a cooling system failure under the hood or under the car is wet and slightly greasy spots of coolant. These are the first signs that a pipe has burst somewhere. Also in the cabin on the instrument panel, there is a special indicator that will show the low fluid level in the expansion tank.
If the sensor fails, the engine temperature will rise rapidly, which may result in the engine boiling. It also happens that you can smell antifreeze in the cabin; this is an indicator that the pipe may burst not under the hood, but under the front panel or in the area of the interior partition and engine.
Many experienced car enthusiasts advise, from time to time, to simply check the level of antifreeze in the expansion tank. Inspect the pipes for greasy, oily stains and do not delay repairs if this is detected.
How to find a coolant leak in the system. First of all, it is worth inspecting the expansion tank for leaks. Next we move on to the radiator, since it is most often damaged. When inspecting, special attention should be paid to the joints of pipes (nozzles) and honeycombs, which are easily damaged.
Next, we inspect the pipes and hoses themselves along their entire length, since it is through them that the coolant circulates. Do not forget about the clamps at the connection points; due to engine vibration, the clamps may become loose, which means the pipe may come off the mounting point and leak.
The last and most unpleasant failure of the cooling system is liquid getting into the oil jacket. As a result, checking the oil level with a dipstick or opening the filler cap to fill the oil, you can see how it foams. This is the first sign that coolant has gotten into the oil.
Plug, sensors and expansion tank
And a little about the little things that, as it may seem, do not greatly affect the operation of the engine. But still, if the functioning of the plug is disrupted, the engine will begin to boil. And the reason is that it has two valves that, working together, maintain a pressure of just over one atmosphere. Consequently, if the valves become clogged, the pressure in the cooling system increases sharply (the liquid expands, but the air that was in the tank has nowhere to go).
Personally, on my VAZ 2109 the tank once swelled, a little more and it would have burst! Now I’m writing and I’m surprised how things didn’t come to this. When I stopped and opened the hood, I was simply stunned - the tank was round, like a ball, seething, steam was pouring out from everywhere. Therefore, the condition of the plug is extremely important for the normal functioning of the system.
The same is true with sensors - one, which is installed near the thermostat (if the power system has an injector, such a circuit is used), serves not only to generate a signal for sending to the indicator, but also to turn on the electric fan. The signal from the sensor goes to the electronic control unit, which is responsible for promptly turning on/off the electric fan.
Removing air from the cooling system
Often during repairs, air enters the cooling system, which forms an air lock and interferes with the normal operation of the entire system. In order to remove such a traffic jam, there are several ways. Simplest:
- warm up the engine to operating temperature and turn it off;
- unscrew the coolant pipe clamp on the throttle body;
- remove the heating pipe of the throttle assembly, bleed the air and after the coolant begins to flow out, put it back on the fitting and tighten the clamp.
ATTENTION: the leaking antifreeze has a temperature of more than 90 degrees Celsius.
A little about prices
The average prices of all components of the VAZ 2114 cooling system are as follows:
- Pump - 800 rubles.
- Thermostat - 400 rub.
- A set of pipes - about 1300 rubles. (including heater pipes).
- Heater radiator - 800..900 rub.
- Main cooling radiator - 1600 rub.
- Expansion tank - 250..300 rub.
- Tank cap - 50 rub.
- Antifreeze - 800..1000 rub. (capacity 10 liters).
These prices for components and materials are current at the time of publication of the article. Of course, they can change at any time. Therefore, it is worth checking the price in your region.
A faulty faucet, radiator or heater fan in a VAZ-2114 does not bode well in winter - it will be cold in the car. In the warm season, each of them will bring discomfort to driving a car in its own way. Therefore, the faulty unit must be replaced.
Malfunctions in the cooling system
As a rule, due to malfunctions in the cooling system, the engine overheats, and this leads to engine failure. Any of the elements may be faulty.
- It may leak. Possible leakage through aluminum tubes and plastic tanks. Often the plastic outlet for the return hose of the expansion tank breaks off.
- It may clog, and for this reason the engine will heat up.
Pipes. Because of them, antifreeze leaks due to the fact that the pipe:
Thermostat. Depending on how incorrectly the valve in the thermostat operates, the internal combustion engine can:
- Overheat (in this case, the antifreeze “throws out” through the expansion tank).
- Do not reach operating temperature. As a result, the car drives poorly, and in cold weather it is cold inside the car.
Water pump(three main problems):
- Noise and play in bearings. It is not worth driving with such a defect for a long time; the pump may jam or fall apart.
- Liquid is leaking through the inspection hole. It also signals the imminent “death” of the part.
- Broken impeller. With such a defect, the engine overheats very quickly.
- A faulty fan also leads to overheating of the internal combustion engine.
The clamps may be faulty or poorly tightened. It happens that thin hoses become clogged with debris (“return”, throttle valve heating).
Replacing the heater valve VAZ-2114
We drive onto a pit or overpass. We put the car on the handbrake and first gear. Drain the coolant into the prepared container. To do this, first, with the expansion tank cap closed, unscrew the drain plug on the engine cylinder block (if the tank cap is sealed and tightly screwed, then antifreeze will hardly flow). Then, instead of the drain plug, we screw in a hose (from a mixer works well) and open the reservoir cap - the coolant flows neatly into the container with minimal losses and without getting dirty on the engine.
We loosen the clamps of the pipes going to the valve from the engine. From the engine side, use a metal brush to clean the threads of the 2 bolts securing the faucet to the engine compartment bulkhead. Then we conscientiously treat these threads with WD-40 or brake fluid. This is a mandatory condition, failure to comply with which can lead to serious difficulties when unscrewing the nuts. We leave the dirt and rust on the threads to “acidify” and do not tighten the nuts yet.
We remove the pipes. Let's go to the salon. We dismantle the side trim of the torpedo in the middle at the feet on the passenger side. Loosen the clamps of the pipes at the tap. We prepare a rag to collect a small amount of antifreeze that may leak onto the carpet when removing the pipes. Disconnect the pipes. We return under the car. Using a 10mm wrench (socket or socket), unscrew the nuts of the faucet mounting bolts.
In the cabin, pull the faucet towards you. Then we remove the control cable clamp from it, and then disconnect the cable itself. We install the new tap in the reverse order.
Replacing heater cables on a VAZ 2114
Sometimes situations occur when, for one reason or another, the product becomes bent or even breaks off. Such cases require removing the device and replacing it with a new one. Recommendations for analysis are as follows:
- The metal clips that hold the cable in place must be disconnected.
- One end of the cable is connected to the tap, the other side to the lever for adjusting the air temperature in the cabin. Any sequence of disconnection can be followed. But it will be most convenient to first disconnect the end from the stove tap, unfasten all the clips and, last of all, disconnect it from the lever.
- Now the product should be carefully removed from the case.
- When reinstalling the new part, start by attaching it to the tap.
There are a lot of different models on the auto goods market that differ in length, thickness, various types, and shapes of both ends. In order not to make a mistake when purchasing a new product, we advise you to take it with you to the store. Usually cables are sold in one set of several pieces at once.
So we learned how to change the heater cables on a VAZ 2114. The most important thing when carrying out work is not to rush, to understand the principle of operation of the hot and cold air supply mechanism. We wish you warm heaters!)
Where is the heater valve located inside the car? It is located at the very bottom of the dashboard, the easiest way to get to it is from the passenger seat.
Replacing the VAZ-2114 heater fan
In the cabin under the steering wheel, using a 10mm wrench, unscrew the nut securing the heater to the body and remove the fan motor ground wire terminal (in black insulation) from the stud, and then disconnect the power supply positive wire connector.
Remove the cabin air filter, located under the windshield in the middle. Using a Phillips screwdriver, unscrew the 5 screws that fasten the air supply side grilles. We remove the grates. We unscrew the 4 screws securing the protective casing, which we then remove. Unscrew the 2 screws securing the fan to the base of the heater.
We pull the electric motor power wires out of the passenger compartment through the rubber seal. We remove the fan from its housing (air supply box). Remove the seal from the fan casing. We use a flat screwdriver to pry up the latch of the casing, which we separate into 2 parts. Having released the 2 mounting brackets, remove the motor cover and remove the electric motor along with the impeller.
Installation of a new fan is carried out in reverse order.
Repair and replacement of faulty stove elements
It is completely impractical to change the VAZ 2113–15 stove. First of all, this is quite expensive - buying a new stove without a tap and pipes will cost 4-5 thousand rubles. Moreover, replacing the heater is very labor-intensive - you will need to completely remove and then reinstall the panel. The job may take a full day and will require an assistant. It is much easier to identify the faulty element and replace only it.
Restoring the stove radiator
If a stove radiator is clogged from the inside, you can try to clean it of scale and deposits with various household cleaning products, such as Comet, Krot, Silit, or other chemically active substances. Some car owners use Coca-Cola for this purpose.
It is better to carry out the flushing procedure with the radiator removed, but you can do without dismantling it. To do this, drain the coolant from the system, remove the pipes from the radiator and pour a cleaning agent inside. Then the engine starts, the heater turns on and runs for several hours. After this, the radiator is thoroughly washed by connecting a hose with running water to it and dried with compressed air.
In the event of a leak, restoring the radiator is much more difficult. This can be done by soldering. However, most radiators are made of aluminum, damage in which can only be soldered with a powerful soldering iron using special fluxes and solders. But even in this case, there will be no guarantee that the radiator will be fully operational. It is much easier to replace it - a new product for the VAZ 2113-15 costs about a thousand rubles.
Replacing a stove radiator without removing the panel
The VAZ 2113–15 instruction manual states that access to the radiator can only be achieved after dismantling the panel. However, craftsmen came up with an algorithm for replacing the radiator with only partial disconnection of the panel from the body. To do this you will need:
- crosshead screwdriver;
- keys for 7, 10 and 13;
- a container for draining coolant from the cooling system with a volume of at least 5 l;
- a wide and shallow container for draining liquid from the heater radiator;
- dry rags;
- oilcloth or thick polyethylene film.
The radiator is replaced as follows:
- We drive the car onto an overpass or inspection hole.
- Disconnect the negative terminal from the battery.
- Using a 10mm wrench, unscrew the bolts securing the engine protection and remove the protection.
- Place the container under the drain plug, unscrew it with a 13mm wrench and drain the coolant.
The bolt plug for draining the coolant is unscrewed with a 13 key - Unscrew the cap of the expansion tank. This is necessary to speed up the drainage of antifreeze by equalizing the pressure in the system with atmospheric pressure.
- After draining the coolant, screw the plug back in.
- From the passenger compartment, close the heater tap by moving the control lever to the extreme left position.
- Move the front passenger seat all the way back and fold out its backrest.
- In the center of the panel, use a Phillips screwdriver to unscrew the self-tapping screw covered with a plug.
The self-tapping screw is closed with a plastic plug - From the passenger seat, unscrew the four screws securing the left panel cover.
- Unscrew the four screws securing the instrument panel.
The instrument panel is secured with four self-tapping screws - We unscrew the six fastening screws (three on top and three on the bottom) and remove the steering column casing.
The steering column cover is secured with six self-tapping screws - Disconnect the connectors from the cigarette lighter and radio.
When replacing the radiator, you need to remove the cigarette lighter and radio connectors. - Remove the plastic covers of the stove control levers.
Remove the plastic covers on the damper control levers - Unscrew the two screws securing the upper part of the center console. Disconnect the console.
The upper part of the console is attached to the sides with two self-tapping screws - Unscrew the screws securing the diagnostic connector.
To remove the connector you need to unscrew two screws - We completely dismantle the console.
Before removing the console, you must disconnect all electrical connectors. - We unscrew the screws securing the panel base to the body.
The base of the panel is attached to the floor with two screws - Unscrew the four screws on the side panel fastenings (top and bottom).
On the sides the panel is attached to the body with self-tapping screws at the top and bottom - We unscrew the screws securing the panel to the base according to class=”aligncenter” width=”458″ height=”404″[/img] In the center the panel is attached to the base with self-tapping screws
- We remove the electronic control unit.
All connectors are disconnected from the control unit - We slightly lift the panel on the right side and fix it using improvised means.
The partially dismantled panel is pulled back and fixed - When access to the radiator is open, cover the floor under it with oilcloth, on which we install a container for collecting coolant.
To prevent coolant from spilling on the floor, you will need a shallow, wide container. - Using a Phillips screwdriver or a 7mm wrench, carefully unscrew the clamps securing the pipes;
The pipes should be removed gradually, allowing the coolant to flow into the container without pressure. - Drain the coolant from the pipes and radiator.
- Unscrew the radiator mounting screws.
The radiator is secured with four screws - We remove the old radiator.
- We install a new radiator.
- We put the pipes on the fittings and secure them with clamps.
- We assemble the panel in reverse order.
Video: replacing the VAZ 2113–15 heater radiator without dismantling the panel
https://youtube.com/watch?v=JYC8ijuYJdg
Replacing the heater tap
To replace the stove tap you will need:
- wrenches 10 (preferably socket) and 13;
- crosshead screwdriver;
- dry rags.
The algorithm of actions is as follows:
- We place the car on the inspection hole, unscrew the bolt plug and drain the coolant.
- In the cabin, unscrew the four screws securing the left panel cover.
- In the engine compartment we find pipes going from the engine to the tap. Use a screwdriver to loosen the clamps and remove the pipes.
The pipes are fixed with metal clamps - In the cabin, under the panel on the passenger seat side, we find the heater tap and the pipes coming from it. Use a Phillips screwdriver to loosen the clamps and remove the pipes, having previously laid rags under the tap in case of coolant leakage.
When removing the pipes, you need to cover the floor with dry rags - In the engine compartment, using a 10mm wrench, unscrew the two nuts on the studs connecting the valve body to the body.
To dismantle the tap, you need to unscrew two nuts with a 10mm wrench - We take the faucet out of the cabin and disconnect the drive cable from it.
Before dismantling the tap, you need to disconnect the drive cable from it. - We install a new faucet.
- We reassemble in reverse order.
The process of replacing the VAZ 2113–15 heater tap is described in more detail here.
Replacing stove pipes
When replacing a heater radiator or heater tap, it is advisable to replace the pipes as well. To ensure access to them, you will need to perform the actions provided for in paragraphs 1–25 of the instructions for replacing the radiator. Then you need to loosen the clamps and remove the pipes from the stove tap from the passenger compartment. After this, the pipes going from the engine to the tap are disconnected from the engine compartment. All this is done using a Phillips screwdriver.
After installing new pipes, do not immediately tighten the clamps too much. First you need to assemble everything, add coolant, start and warm up the engine and check the connections for antifreeze leaks. When the rubber of the pipes warms up, the clamps can be tightened a little more.
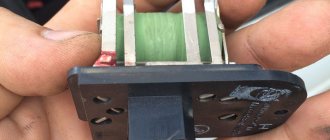
Replacing the heater resistor
If the stove fan can only operate in one mode, regardless of the switch position, you need to check the resistor. To do this you will need:
- Phillips screwdriver;
- fine-grained sandpaper;
- multimeter
The work order is as follows:
- Disconnect the negative terminal from the battery.
- Using a screwdriver, unscrew the screws securing the right cover of the center console.
To remove the cover you need to unscrew four screws - We find a resistor under the cover on the heater body, disconnect the connector from it and inspect the contacts. If there are traces of oxidation on them, remove them with sandpaper.
The resistor is installed on the heater housing - We connect the connector, the battery and check whether the fan is working in other modes. If not, disconnect the battery and use a screwdriver to unscrew the screw securing the resistor.
- We remove the resistor and use a multimeter to measure the resistance of the additional element and the entire device. It should be 0.2 and 0.8 ohms, respectively. If the resistance is greater or less, change the resistor and reassemble in the reverse order.
To determine the health of the resistor, you need to measure the resistance of its windings
Replacing the VAZ-2114 heater radiator
We drain the coolant as described in paragraph 2 to replace the valve. We remove the glove compartment, which consists of three parts, and the side panels at the foot of the passenger seat. In this case, it is necessary to unscrew absolutely all the screws that are visible. You should not miss the fastenings to the floor (2 screws on the sides, on the left and right sides of the panel at the bottom near the ECU) and 2 screws at the passenger door pillar. Another one is hidden under a flap in the upper left corner of the panel near the buttons.
We unscrew all the screws securing the cables on the passenger side - on the right and left, closer to the middle of the cabin (here are the most “difficult” ones - 3 pieces). Gently pull the main panel on the passenger side towards you. If it goes with difficulty, then you should check whether all the fasteners are unscrewed. You can additionally remove the plastic tips from the damper and heater adjustments.
When the panel moves away from the body, you need to place an object (for example, a plastic bottle) into the gap that appears. We place some larger dishes under the radiator so as not to flood the floor with antifreeze leaking from the radiator and the system.
Loosen the pipe clamps. We free the radiator from the pipes and wait until the antifreeze stops leaking. Unscrew all the nuts securing the radiator to the body.
It takes two people to remove the radiator - you will need the help of one person. One person lifts the panel as high as possible, and the second one at this time removes the radiator - pulls it down, turns it and pulls it towards himself.
The new radiator is installed in the reverse order. After installing the radiator, do not immediately begin installing the panel and glove compartment.
First you need to check the tightness of all connections - fill the system with coolant and start the engine.
If everything is fine, then we finish replacing the radiator.
The cooling system of the VAZ 2114 is of great interest to motorists. Model 2114 machines have a hidden cooling system based on the use of a special cooling mixture. The movement of the cooling mixture occurs under the influence of a mechanical pump.
The assembly principle of many Russian cars is carried out rather poorly, so the performance of many mechanisms, including the cooling system of the VAZ 2114, leaves much to be desired.
To identify and carry out the necessary repair work, you need to have an understanding of the condition and method of operation of the cooling system.
Radiator pipes VAZ 2114
Next comes the upper radiator inlet pipe, connecting the radiator to the engine block head.
This hose goes to injection engines. Its internal diameter is 32mm, see catalog number 21082-1303025.
The next one is the lower radiator outlet pipe, which connects the radiator to the engine cooling system thermostat.
Its catalog number is 21082 – 1303010, internal diameter is 32 mm.
“Angle” pipe for connecting the thermostat to the water pump (pump).
Catalog number – 2109-1303093-01. This pipe fits almost all front-wheel drive VAZ models.
The expansion tank pipe is popularly called the “filler pipe.”
It serves to connect the expansion tank to the thermostat. Through it, antifreeze enters the cooling system when the system is filled or topped up through the expansion barrel. See catalog number 21082-1303080 for its number.
Stove pipes VAZ 2114
The pipe that connects the heater to the block head is often called “big goose” in everyday life because of its resemblance to this bird.
The hose supplies coolant from the block head to the heater radiator. We look at the catalog number 2114 – 8101206.
These considered rubber hoses are reinforced, except for the throttle heating hoses and antifreeze steam exhaust hoses.
The goose curve hose is located under the hood of the car and serves to drain coolant from the heater radiator to the water pump.
Catalog number of the crooked goose 2114- 8101208, factory BRT.
The “short” pipe connects the thermostat to the engine block head.
Shorty catalog number 2108-1303082, BRT plant.
The “small” cabin pipe of the stove supplies coolant to the radiator of the stove, through the tap, from the “crooked goose”.
Its VAZ catalog number is 2114-8101200 from the BRT plant.
The cabin “large” outlet pipe is designed to drain coolant from the heater radiator through the “big goose” hose to the water pump.
Catalog number 2114-8101204 from the BRT plant.
Under the hood, the “big goose” supplies coolant to the heater radiator through a tap. And it takes the liquid to the pump from the radiator of the “goose curve” stove through the “large” cabin hose. For example, thanks to a set of rubber pipes, coolant circulates through the heater radiator.
The rubber pipe, the so-called injection “breather”, serves to connect the valve cover of the block head with the “snail” (2111) for supplying air to the engine.
The upper catalog number of the factory breather is 2111-1014058-10.
All connections presented in the video are located under the hood and in the interior of the VAZ 2114 car, related to the cooling system. In addition to the large breather pipes, small breather pipes and volutes, which serve for the passage of air.
The car also contains well-known gas supply hoses, brake hoses, a vacuum hose, as well as windshield washer fluid supply and others. They will also need to be viewed on video and described in the article.
All rubber hoses in a car need constant replacement, as they are exposed to aggressive liquids and gradually lose their properties. They lose their elasticity, become tanned, crack and sometimes break when used for a long time without replacement.
Therefore, it is recommended to periodically review their condition and replace them if any malfunction is detected.
This video ends the review; I hope that the video will be useful to someone both for information and when servicing their car.
Watch the video
Thank you for watching the video, subscribe to the channel, write comments and ask questions.
Disadvantages in the cooling system
The VAZ 2114 engine cooling system has a big drawback, because... requires constant monitoring, frequent maintenance and necessary repairs.
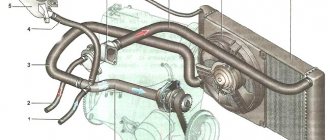
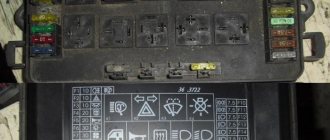
Cooling diagram for VAZ 2114 : 1 – element in the form of a plug for the expansion tank; 2 – expansion tank; 3 – hose for draining liquid from the pipe; 4 – hose passing between the radiator and the expansion tank; 5 – hose leading from the radiator; 6 – tank to the left of the radiator; 7 – aluminum tube; 8 – plug systems; 9 – tank to the right of the radiator; 10 – drain plug; 11 – middle of the radiator; 12 – casing for electric fan; 13 – plastic wings of the electric fan; 14 – electric motor; 15 – toothed pump pulley; 16 – pump impeller; 17 – camshaft drive belt; 18 – engine block; 19 – pump pipe; 20 – radiator hose with supply function; 21 – heater radiator hose with drain function; 22 – hose supplying coolant to the throttle pipe; 23 – exhaust pipe; 24 – hose for refilling; 25 – heater radiator hose with supply function; 26 – thermostat; 27 – coolant temperature sensor; 28 – coolant level indicator sensor.
Cooling system pipe
What is a pipe? There are often several of them in a cooling system; they connect individual parts into one sleeve and are the basis for cooling.
Pipes can be divided into two types:
- diverting;
- leading
From the names it becomes clear that the outlet pipe is designed to drain coolant, and the inlet pipe is designed to supply it. To cool the engine, antifreeze or antifreeze is most often used, since at very low temperatures they tend not to freeze.
Operating principles of the 2114 cooling system
The performance indicator is based on the internal heat exchange effected by the cooling mixture. This option is the most effective.
The movement of the cooling mixture is carried out by force under the influence of a pump operating from a drive belt. The cooling mixture is filled into the system by pouring into the expansion tank. The volume of the VAZ 2114 cooling system depends on the engine size.
An electric fan is installed on the shaft of an electric motor; its operation is based on sensor readings, thanks to which it begins to perform its functions or stops them.
The thermostat valve is considered an important component of the system; it is equipped with valves: main and additional. It also includes a storage device that senses changes in temperature fluctuations in the air.
When the coolant temperature reaches approximately 87 degrees, it activates the main valve, which releases liquid into a large circuit. When the temperature reaches 102 degrees, the valve stops at 8mm.
Changing the coolant strictly according to the maintenance regulations
It is important to change the coolant frequently to prevent engine damage, because Over time, it loses its properties and is subject to heating.
To carry out work on changing antifreeze or antifreeze, you need to know the important components:
- Know the period during which you can use cooling liquid, antifreeze for 2 years, antifreeze for 5 years.
- Monitor the mileage for fluid changes, usually from 20,000 to 40,000.
- Check the condition of the fluid, paying attention to the color; if the color has changed after use, the fluid must be replaced.
Of course, the best choice would be antifreeze as a coolant, because... It has a longer shelf life, unlike antifreeze, and the system wears out less. But the price indicator for antifreeze is much cheaper.
When flushing the cooling system, you must:
- Drain all coolant from the system, tighten the plugs tightly and fill with distilled water to the maximum mark.
- Start the engine and warm up until operating temperature is reached.
- Let it run at about 3000 rpm. Be sure to monitor the movement of the engine temperature scale to avoid overheating.
- Then turn it off and leave it for 7 minutes, after which we pour the water out of the system. In case of water contamination, repeat the procedure until the effect of clean water is achieved.
Flushing the system and replacing the coolant
Repairs related to replacing the coolant on a VAZ-2114 car are carried out if:
- The color of the mixture in the expansion tank has changed. This usually happens after 20 - 40 thousand kilometers;
- repairs were carried out that required a complete drainage of the mixture.
In general, coolant replacement is carried out in the following order:
'); if(“undefined”===typeof loaded_blocks_drive){loaded_blocks_drive=[]; function n(){var e=loaded_blocks_drive.shift(); var t=e.adp_id; var r=e.div; var i=document.createElement(“script”); i.type=”text/javascript”; i.async=true; i.charset=”utf-8″; i.src=”https://www.drivenetwork.ru/data/”+t+”.js?async=1&div=”+r+”&t=”+Math.random(); var s=document.getElementsByTagName(“head”)||document.getElementsByTagName(“body”); s.appendChild(i); var o=setInterval(function(){if(document.getElementById(r).innerHTML&&loaded_blocks_drive.length){n(); clearInterval(o)}},50)} setTimeout(n)}loaded_blocks_drive.push({adp_id:e ,div:t})})(47602)
- 1. Completely drain the cooling solution. To do this, you need to open all the plugs and taps, and also remove the radiator and expansion tank caps. Drain the mixture only after the engine has cooled down (In a hot engine, the temperature of the solution can be more than 100 degrees Celsius).
- 2. Rinse the cooling system with distilled or clean water. Begin the washing procedure after all the old mixture has drained. It is recommended to flush the engine block and radiator with warm water. Otherwise, it is recommended to fill in cold water, warm up the engine, and then drain the water. The color of the water determines how dirty the system is and repeats the flushing process until the flowing water becomes clean. Only after this they begin to replace the mixture.
- 3. Pour a new cooling solution into the system, having previously closed all plugs and taps. Pour liquid into the tank in a thin stream until the maximum mark is reached. Air pockets are not allowed. Then the expansion tank and radiator caps are closed. In order to prevent the rubber pipes from drying out, they must be lubricated with silicone grease.
- 4. Start the engine and let it idle until the heater radiator fan turns on. After this, you can turn off the engine and, after cooling, check the fluid level in the tank. If the fluid level has not changed, then everything is normal and the work is completed. If the liquid level in the tank has decreased, you need to make sure by visual inspection that there are no leaks. If they are not there, then add fluid, start the engine again and repeat the test.
Why is the cooling system malfunctioning?
The main malfunction of the cooling system occurs as a result of incorrect operation of the thermostat. In a particular case, the only solution will be to replace it.
Before you begin work on replacing the thermostat valve, it must be checked for serviceability by starting the engine while it is cool. When the engine warms up to about 90 degrees, touch the pipe at the bottom of the radiator, it should be warm, this indicates the serviceability of the valve; if the pipe is cold, the valve must be replaced.
VAZ 2114 car models have an aluminum radiator; it is equipped with two additional tanks; the left one has a partition.
The cooling system is quite simple, so you can carry out repairs yourself. The radiator is the main component of the car’s cooling system, its main function is to prevent engine overheating by removing warm air from the engine to the outside.
The radiator consists of:
- The radiator itself.
- Bottom tank with pipes.
- Top tank with pipes.
Replacing cooling system pipes
The cooling system of the VAZ-2114 car uses 4 rubber pipes:
- upper supply pipe - supplies cooled liquid from the radiator to the engine;
- lower outlet pipe - removes the heated liquid below from the engine to the radiator;
- two short pipes that connect the water pump and thermostat to the system.
If the pipes fail, they must be replaced. In this case, it is best to purchase silicone pipes.
To remove old and install new silicone (rubber) pipes, you need a set of wrenches, several screwdrivers and silicone lubricant.
Repairs associated with replacing pipes must be carried out in the following order:
- 1. Disconnect and remove the battery;
- 2. Drain all coolant mixture;
- 3. Remove the fan, soundproofing upholstery, trim and frame trim from the windshield;
- 4. Clear access to the air collector by removing its fastening elements;
- 5. Remove the front housing and release the clamps that hold the pipes;
- 6. Remove the pipes from the fittings and install new ones (silicone or rubber) in their place. Secure the new pipes with clamps. Before installation, it is recommended to lubricate the rubber pipes with silicone grease. It is also advisable to lubricate the clamp screws with silicone grease. Subsequently, this will allow you to easily unscrew them;
- 7. Install all the removed parts in their places, flush the system and fill it with new coolant mixture.
Radiator replacement
- Initially, the plug from the expansion tank is unscrewed, and the radiator plug and cylinder are also removed.
- The cooling mixture is poured into a clean container.
- The radiator ventilation system is disconnected from the power supply.
- We disconnect the rubber tubes from the radiator system and expansion tank.
- All bolts are disconnected from the surface of the casing.
- Carefully holding the radiator, we take out the casing along with the fan.
- At the end of the work, the radiator is completely free and can be removed.
Before you begin, remember that when removing and subsequently installing the radiator, the engine must be in a cold state.
After replacing the radiator or repair work, it is installed in place and secured in the same way, but in reverse order. After installation, be sure to start the engine and check the result.
DIY engine radiator repair
The main problem as a result of which the radiator needs to be replaced or repaired is leakage of the cooling mixture, as a result of the presence of a hole or defects in the system.
Liquid usually leaks at the joints of plastic and metal parts. If the leak is small, just pour a special mixture into the radiator along with the cooling liquid, and under its influence the leak will disappear on its own.
If the leak is large enough, the radiator will have to be replaced.
Before proceeding with replacement, check the radiator for leaks; to do this, you must:
- Fill the bathtub with water.
- Plug the holes in the pipes tightly.
- The radiator is released into the water approximately 30-40 cm and a pressure of 0.2 MPa is applied.
- See if bubbles appear or not.
The radiator must be replaced after an accident in the event of a frontal or side impact.
Thermostat repair
The thermostat sensor also serves to maintain the set temperature norm. It blocks the movement of the cooling mixture into the radiator until the engine heats up to the desired temperature of approximately 90 degrees. Liquid begins to flow through the thermostat when Celsius reaches 95 degrees. Using a thermostat, the engine takes minimal time to warm up. The thermostat is located between the engine and the cooling radiator.
Common problems:
- The valve is closed - the engine, when not warmed up, holds speed very poorly and may stall.
- With the valve open, you can drive during frosts, or turn on the heater to maximum mode, otherwise the engine will overheat.
When carrying out repair work on the thermostat, it is allowed to lightly tap the housing with a screwdriver to move the valve.
If it is necessary to completely disassemble the thermostat, it is important to tightly close the pipes to avoid antifreeze leakage, only then disassemble the thermostat. At the end of the repair, it is better to replace the antifreeze.