How to remove the door trim on a Priora: front, rear - step-by-step instructions
Removing the car door trim is a mandatory procedure if you need to carry out certain operations - repairing wiring, installing new equipment such as speakers or window lifts.
Cars from the Lada Priora line have a standard door mechanism design, which allows you to open it by following the same instructions regardless of the model. The vehicle owner only needs patience, a set of tools and strict adherence to instructions to avoid damage to the trim. The design of the rear and front doors on cars is slightly different, but the general principle of operation is the same.
Tools for removing car trim
The standard list of tools includes:
- It is advisable to have a special kit for removing the trim; if you don’t have them, you can use a flat-head screwdriver or something similar;
Set of tools for removing trim and clips - Phillips screwdriver;
- TORX key (T20);
- spare pistons/clips for fastening.
It should be taken into account that the clips may crack when removed, so it is better to stock up on additional copies just in case. It is preferable to buy the kit in advance to save time at work
It is worth paying attention to what model the clips are purchased for - only for the Priora, the rest do not match in size
Clips for door trim of different Lada models
If electronic elements are installed in the doors, you will need a wrench - this applies to window lifts.
It is necessary to have space to open the doors to the sides, so you need to empty the garage/box of unnecessary things that interfere with the procedure.
Another option is to take the car outside in warm weather, and collect all the removed elements in a tool box with pre-prepared compartments, so that nothing gets overlooked during reassembly.
It is imperative to disconnect the battery if there are electronic components in the doors, so as not to provoke a short circuit and the need for premature replacement of wiring and other spare parts - just remove the negative wire
When using screwdrivers, the best option would be to wrap them in electrical tape so as not to scratch anything (including the paint on the metal), and you need to work with the tools carefully - without sudden movements
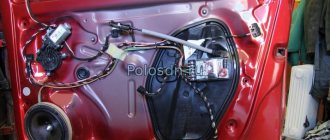
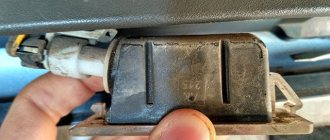
Dismantling begins by unscrewing the screws located near the door handle. Next you will need to remove the screws holding the power window control module
At this stage, care must be taken not to damage the glass itself. The window lifter element will need to be removed along with the module for controlling the mirrors
Next you need to work in the following sequence:
- if there is a speaker in the door, then it is necessary to dismantle it;
- unscrew three screws from the bottom of the casing;
- the screw at the door handle is unscrewed;
- Next you will need a TORX wrench; use it to unscrew two bolts in the recess on the armrest;
- The pad on the armrest itself, in addition to the bolts, is attached to latches - you may need a flat-head screwdriver to unlatch them. Be careful! The latches are quite fragile and can break if pressed hard.
- the wires are connected to the removed cover with a special plug; it is simply removed;
- the door lock is twisted;
- Now the trim is held in place only by clips around the perimeter of the door.
Removal is recommended to be done using special trim removers so as not to break the clips. You can operate from any of the angles - the casing is pryed up and carefully, but with little effort, removed from the clips. Location of clips on the Priora door
How to remove a door on a Priora: rear, front. Photo instructions
Removing doors may be necessary for various reasons. This includes straightening metal after a minor accident, removing traces of rust and restoring paintwork. In any case, you need to know the sequence of operations. It is not necessary to contact a service station - you can carry out the procedure yourself.
Door Removal Tools
Before starting the manipulations, you need to prepare the tools. To work you will need:
- heads for 10 and 13;
- key - “ratchet”;
- head extension;
- Torx T20 bit;
- adapter for nozzle;
- Phillips screwdriver.
In some places of the casing there are plastic holders, so-called clips. You can remove them without damage using plastic spatulas designed for removing plastic clips.
Trim Removal Tools
This is a highly specialized tool, not every car owner has it. In this case, you may have to purchase new upholstery fasteners, since the old ones may break if they are exposed to inappropriate tools. You can try replacing the blades with a shoe knife or similar tool, but a good result is not guaranteed, since you can, again, break the fasteners or scratch the upholstery.
How to remove the front door trim on a Priora
Dismantling operations will involve disconnecting the electrical components of the door. Before starting work, remove the negative terminal on the battery. This is done using the key at “10”. Release the tightening and carefully remove the contact. It needs to be moved away from the terminal to avoid accidental contact.
After the power to the car is turned off, you can begin to remove the trim. The process is carried out in stages:
- Open the door. Below, under the upholstery, there are three cross-shaped screws. They should be unscrewed.
- There is also a screw for a screwdriver in the body of the handle for opening; we also unscrew it.
- Remove the two T20 Torx bolts from inside the door handle.
- The pocket is secured with latches. Carefully pry it up and release it. The entire handle, along with the power window module and side mirror adjustments, should come out. Disconnect the block with wires and put it aside.
- Now you should unscrew the locking cap by hand.
- We move to the side of the door from the salon. We carefully pry up the bottom corner and try to free the upholstery from the fastenings. If you have shoulder blades, we do it with them. Otherwise, you can use a wide flat screwdriver. The latches may burst, it's not a big deal.
Important!
Try to keep the screwdriver as close to the latch as possible. Otherwise, the upholstery itself may be damaged. If you use special blades, place their edges under the latch.
- We continue to release the casing, moving up and in a circle.
- When the entire element remains in your hands, we disengage the opening mechanism.
- We remove the upholstery to the side.
- The insides of the door opened before us. Unscrew the two screws securing the handle module and window regulator. Let's take it off.
- There is a nuance to this point. When the upholstery has already been removed before, there may be no sound insulation. But if there is one, remove the large piece first, and then the small one.
At this point, the work with the casing can be considered completed.
You can watch more information about removing the trim from the front door of the Lada Priora in the following video:
How to remove the front door on a Priora
We proceed according to the following scheme:
- We disconnect the block of wires going to the window regulator.
- Disconnect the connection to the locking mechanism.
- There is a rubber corrugation at the front of the door. We pry it up with a flat screwdriver and pull it out of the grooves.
- Now you can remove the wiring harness from the doors. We take them aside.
- Let's move on to the stroke opening limiter mechanism. Depending on the year of manufacture of the car, it can be secured with 8 or 10 mm bolts. We select a suitable head and use a ratchet wrench to unscrew them from the car pillar.
- There are loops left. To do this, use a 13 mm socket to unscrew the bolts. The fastening is tightened tightly, so you will need a powerful wrench or a regular wrench.
Advice!
It is advisable to carry out this procedure with an assistant who will hold the door as the fastenings are loosened.
- By freeing the hinges, the door can be removed from the body.
Stages of removing the casing
Before removing the trim from the clips, you must remove all bolts, clamps and fasteners that are located in different parts of the door. It is most convenient to do this in a certain order.
Before you begin removing the door trim, disconnect the negative cable from the battery.
From the front door
To remove the door trim on a Lada Priora, you need to get rid of all the fasteners. To do this, follow the following procedure.
Unscrew the button responsible for locking the door and remove it. Unscrew the screw on the inside door handle. Remove the handle by carefully moving it away with a flat-head screwdriver. Find the two screws in the special pocket that secure the power window control module. They can be hidden under a rubber mat. Unscrew both screws and remove the ESP module. Now you need to disconnect the connector with wires from it. Locate the three screws at the bottom of the door that secure the trim to the door. Turn them inside out. This way you got rid of all the screws and fasteners. Now you need to take a flat-head screwdriver and carefully pry off the casing at the bottom. Unsnap all eight clips, which are indicated in the diagram, starting from the bottom of the door
Be careful at this stage: broken fasteners are quite difficult to repair. Carefully remove the trim. If done correctly, you should encounter almost no resistance.
Location of the main screws that prevent the removal of the casing
Due to their small size, screws and clips are often lost. To make the reassembly process easier for yourself, before starting work, prepare a container where you will put all the small parts.
To install the trim in place, place it against the door. Make sure the fasteners are in place. Insert and tighten the lock button. Thanks to this, you can pre-fasten the door components. Make sure the handle fits into its hole. Now you can snap all the clips into place and screw the screws back in.
Video: how to properly remove the trim from a Lada Priora car with your own hands
From the back door
The procedure for removing the trim from the rear door of a Lada Priora is not much different from what was given in the instructions for the front door. The exception is when working with window lifters: here they have a slightly different mechanism.
- Unscrew the door lock button and remove it.
- Using the same screwdriver, carefully press out the window lifter handle lock.
- Pull out the handle itself and its lock.
- Remove the screw holding the inner door handle trim.
- Remove the trim using a flathead screwdriver.
- Remove the two screws located in the small pen pocket under the rubber mat, and then remove the pen.
- Starting at the bottom of the door, remove the trim from the clips. The operating principle is the same as for the front door.
The rear door is assembled in the reverse order.
Be careful when working with wiring, especially those for window regulators. It is quite thin, so it can tear easily.
As you can see, the process of dismantling both the front and rear door trim of the Lada Priora is not particularly complicated and does not require many tools. A set of two screwdrivers will be sufficient. To avoid damaging the door, follow the main rule: not only unscrew the screws, but also remove the parts attached by them. All additional elements, such as door handles or window lifters, will greatly interfere with the process of removing the trim. If you strictly follow all the instructions, you can easily disassemble and reassemble the door trim without resorting to the help of specialists from car services.
Recommendations for working with car doors
General principles for working with front and rear doors include fixing the structure in one position so that there is no chance of injuring your fingers and simply exposing yourself to discomfort due to constantly moving doors. There are several tips to make repairs easier:
- if the casing is being removed for the first time, it is preferable to use video/photo recording in order not to confuse the fasteners and installation paths of individual elements;
- after dismantling the casing, it is necessary to clean the structure inside: remove all dirt, dust, moisture, and remnants of insulating materials;
- To save money in the future, it is best to eliminate all shortcomings. For example, if there is corrosion under the casing, it must be removed. Similarly with faulty wiring - this will eliminate problems with the speakers (wheezing, broken sound) and other problems;
- When painting doors and correcting defects, dismantling may be required to facilitate further work. When installing back, adjustment of the hinges is required.
It is mandatory to check how easily the doors close after installation - you will need to close and open the car several times. If there are difficulties, this is a reason for additional adjustments. In any situation, you will need to clean the frame with alcohol. Under no circumstances should the anti-corrosion coating be removed from the bottom, since this is the part that is subject to the greatest loads.
Removing the front door trim of the Lada Granta
To carry out work to replace or repair car parts, sometimes you have to disassemble the front and rear doors of the car, which is not so easy to do. Lada Granta car owners also have to face such difficulties, but by following the simple instructions described below, you can easily do all the work yourself.
Why do you need to remove the door trim?
This procedure is relevant if you need to carry out repair and restoration work on the doors of a Lada Granta car. For example, it could be:
sheathing repair. If the plastic is cracked or broken in some places, the door cards will need to be repaired after removing the trim. It will be possible to solder a metal mesh into the inner part of the casing. This way the damage will not spread, and the cracks can be sealed with a primer and covered with paint. Another way is to reupholster the doors with new material; New interior trim for Lada Granta
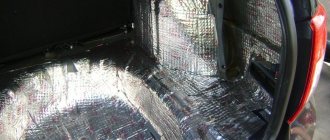
noise and vibration insulation. In order to improve the acoustics in the cabin and make the doors close quieter, it is necessary to eliminate squeaks and rattles. To do this, after removing the skin and disassembling the structure, you should glue a special material, for example, “Vibroplast”
It is important not to forget to seal all technical holes with vibration material. Then all the elements should be assembled and installed in place; Installing soundproofing on a car door. door reupholstery
door reupholstery
If you need to update the sheathing material, you should first remove it and disassemble the entire structure. The front doors are more difficult to cover because there are more bends and holes. Therefore, all calculations must be made correctly. Glue the material from the center and stretch it to the edges using an industrial hair dryer. You need to make cuts in the right places. When the surface is processed, all structural elements can be installed in place; Interior trim
airbrushing in the interior. Recently, it has been important to improve the appearance of not only the external surface of the car, but also the interior. To do this, for example, they do airbrushing on fabric on the door trim or ceiling of a car. The material must be painted black or dark blue. Then, using an airbrush device, you need to apply stripes in the form of lightning. After the paint has dried and the trim has been installed in place, you will see amazing effects in your Lada Granta car. You can choose any motif and color scheme.
Instructions for removing the trim on a car door
So, in order to remove the trim from the front doors of a Lada Granta car, you must sequentially perform the following steps:
- Take screwdrivers and prepare new clips.
- Disconnect the negative terminal of the battery.
- Remove the door lock button.
Door lock button - Using a flat-head screwdriver, pry out the fastening screw plug.
- Then remove the screw using a Phillips screwdriver.
- Unscrew all screws securing the door trim.
Location of the casing fastening screws - You need to remove the material from below, from the corner. To do this, insert a screwdriver between the metal and the casing.
- Continuing to remove the coating, you should move in both directions from the corner.
- If there are any devices installed in the doors, they must be turned off and then the covering must be removed completely.
- After this, you can begin the work you intend to do.
- Installing the trim in a Lada Granta car is done in the reverse order.
So, if you have a desire to improve the quality of your Lada Granta car, you can always bring any ideas to life on your own. All you need is time, tools and suitable materials.
Instructions for removing the front door trim (door cards) on the Lada Priora
Before carrying out work, it is recommended to disconnect the negative terminal from the battery. This will eliminate the possibility of a short circuit occurring during the process. After this, we arm ourselves with the above-described set of tools and carry out the following actions:
- First you need to unscrew the top part of the car door lock - the flag.
- Remove the mat from the bath by prying it with the plastic pry bar from the kit.
- Using a TORX screwdriver, unscrew the two screws that secure the plastic tray (on the driver’s side with the power window control console and side mirror adjustment).
- At the bottom of the casing, unscrew the three screws with a Phillips screwdriver.
- The decorative trim of the door opening handle is attached with a self-tapping screw with a cross-shaped head. We unscrew the screw.
- Pry off the decorative panel of the door handle with a plastic crowbar from the kit, and then remove it. You need to pry it off from the front side (there is a latch in the form of a tongue), and this must be done carefully so as not to damage the casing. The photo shows how the master pries it out with a screwdriver, but this is not recommended, as the plastic casing can be scratched. If you use a screwdriver, it is recommended to first insulate its tip with electrical tape.
- We remove the cover.
- It is not necessary to remove the power window control console from the door card if you do not plan to change the trim. However, after separating the card from the door, you must remember to disconnect the power cable. If you prefer to dismantle the console, then you need to pry it off with a plastic spatula.
- Using the plastic spatula from the kit, insert it between the card and the metal part of the door, and then carefully snap off the trim around the perimeter.
- To dismantle the front door trim on a Priora, it is not necessary to remove the triangular decorative element of the side rear view mirror.
- Disconnect the power supply terminal of the electric locking drive.
- We remove the map, and if the car is in a luxury configuration, then it is important not to forget to disconnect the power cable for the illumination of the exit area of the car.
After performing the necessary operations with the inside of the doors or trim, we return the card to its place. Assembly is carried out in the reverse order of removal. It is important to consider some important points:
- Before installing the casing in place, check the condition of all the clips (there are 8 of them on the front cards). Products with damaged legs or caps must be replaced. It is better to replace them immediately than to re-do dismantling work later due to the appearance of creaks in the doors;
- connect the block to the backlight;
- remove the console power cord if it is removed. If not, then also connect the chip to the console connector on the back side;
- insert the door lock into the hole in the card, and then install it by pressing on the trim at the locations of the pistons.
Only after all the clips are connected to the door (engage with the mounting holes), you can continue the procedure for installing the dismantled parts, and finally screw in the screws.
This completes the process of dismantling the front doors on the Priora. The video below shows in detail the procedure for dismantling products for the right and left doors, respectively.
Removing door trim on Grant
It is necessary to remove the front or rear door trims on a Lada Granta car in various cases, which can be listed below.
- Failure of the motor or the window lift mechanism itself
- Replacement of side door glass
- Sealing the internal door cavities to improve sound insulation
- Repair or replacement of locks, cylinders or opening handles
The replacement process is quite simple, so you can do it all yourself without any problems. At most, this will take no more than 10 minutes.
So, before starting the repair, you need to open the car door and use a thin screwdriver to pry off the plug, under which there is a screw securing the trim. Clearly shown in the photo below.
Then unscrew the screw securing the inner door pocket, which is also the handle.
After this, it is worth unscrewing two more screws that are located at the bottom of the Granta upholstery - which secure the so-called pocket.
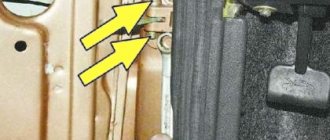
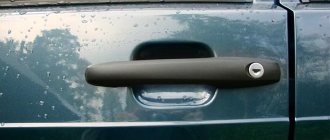
We unscrew the screw securing the door opening handle and then remove the protective rubber cover in the area of the rear view mirror control handle. This is clearly shown by the yellow arrow.
After this, you can carefully pry it from the bottom of the upholstery and with sharp, but at the same time careful jerks, pull it off the latches.
It will not be possible to completely remove it right away, since the power wires to the window regulator unit will interfere, which must be disconnected.
Also, if you have front speakers connected and they are installed on the trim, which is often the case, the wires from them must also be disconnected.
After which you can finally remove the door trim on the Grant and carry out the necessary work further, for which all this was even necessary! Installation of the casing occurs in the reverse order and will not be particularly difficult.
Removing and installing rear door trim on Lada Granta cars
As for the rear door, its trim is not much different in terms of fastenings from the front door. But still, there are some different points that should be mentioned.
- The presence of a full door closing handle means that there are two more screws that will additionally secure the trim. They are located under decorative plugs.
- There is no power window control unit, so there is no need to disconnect extra wires when removing.
Replacement or installation is carried out in the reverse order of removal. The price of new skins in case of damage and the need for replacement ranges from 4,000 to 6,000 rubles for a complete set.
How to properly remove the door trim on a Priora
As mentioned above, this procedure should be done extremely carefully. At the same time, there is nothing particularly difficult in the work of removing the door card. This applies to both the front door and the back door. Before proceeding directly to removal, it is recommended to disconnect the negative terminal from the battery, since there are power wires inside the door.
After this, unscrew the 2 screws holding the inner door handle and the control unit for mirrors and power windows. Next, carefully remove this module by removing it from the casing. Now you can release the latch holding the wiring harness going to the power window buttons and disconnect the corresponding block. Then unscrew the screw that secures the lining of the inner door handle that opens the lock, and remove it.
After this, we move on to the lower part of the door card. Here you will find 3 screws - they should be unscrewed. Next, remove the door lock button - it is simply unscrewed by hand, rotating in the opposite direction to the clockwise direction. If everything went well, take a flathead screwdriver and pry out the trim. This must be done extremely carefully - make sure that all the clips pop out of the holes in which they are located.
Now you can remove the soundproofing gasket. To do this, you need to unscrew the 2 screws holding the bracket for the mirrors and power windows control unit and remove it. After this, you can remove the soundproofing pads - first the large one, then the small one. Here again, extreme care will be required so as not to damage anything.
Removing the rear door trim is an even simpler procedure. The algorithm of actions here will be exactly the same as at the front. At the same time, there is no control unit for mirrors and power windows on the rear door, so the process of removing it is even easier. In addition, there is no longer any need to remove the terminal from the battery. You will also have to remove the window handle. This is a very simple operation. Gently pry it out with a flathead screwdriver using a little force. Next, remove the handle and socket. That, in fact, is all the differences.
In order to put the door card in place, all this work is done in reverse order. Again, pay special attention to the process of directly installing the sheathing so as not to break anything. In fact, there is really nothing complicated here. You can completely do all the work yourself.
How to remove the door trim of a Lada Priora yourself
The car brand was released twelve years ago, and since then has been very popular among drivers. And it’s not surprising, because the cost of a high-quality product from the domestic automobile industry is quite low. Many car enthusiasts can afford to buy it. Repairs and service are cheap, and some parts can be replaced yourself. For example, from this article, readers will learn how to remove the Priora door trim.
The assembly quality of the parts is at a high level, even able to compete with the assembly of some foreign cars, so components will have to be repaired or replaced only after the time specified in the technical instructions for the car. The huge advantage of the Priora is that the engine does not “eat” huge amounts of fuel, which allows you to save money.
In some cases, vehicle owners want to replace the door trim on the Priora. Achieving this goal is quite simple; you will need a minimum of tools. Lack of experience should not be scary; even people who are not involved in such repairs will be able to remove the old door trim and install a new door trim according to the instructions.
How to remove the trim
The process is divided into three main stages:
- Finding all screws and fixing elements, unscrewing the bolts.
- Removing door trims.
- Dismantling the casing.
The covering of the rear and front panels is removed separately. These steps will be described in detail below in the article; if you do not want to go to a car repair shop, we will provide instructions on how to remove the door trim on a Lada Priora car.
Why is dismantling necessary?
The upholstery of the Lada Priora car is available in several colors. If a car enthusiast wants to change the interior color, then he will have to change not only the seat upholstery, but also the door trim. Components such as noise insulation or insulation cannot be installed without first removing the sheathing.
If the window lifts are damaged, or the door handles are damaged, you will also have to remove the Priora door trim, notice the broken components, and install it back. Also, over time, the cladding loses its appearance, stains appear that cannot be removed.
How to dismantle the casing: instructions
The front and rear door trim can be removed separately:
You will need the following tools:
- flat screwdriver;
- Phillips screwdriver;
- clips and pistons to which the covering is attached.
It is not necessary to complete the last point, but it’s better to stock up on clips and pistons in case you break the old ones. In order not to waste time and not run to the store, it is advisable to buy the kit in advance.
When choosing caps or clips for Priora, pay attention to what brand they are intended for. These components for Priora are similar to parts for Kalina
The difference is in length - for Kalina, the clips are one and a half millimeters longer. Ask consultants for help, they will help you choose the right parts.
Front door
So how do you remove the front door trim? Reading the instructions:
- Unscrew the door lock latch.
- Unscrew the screw securing the handle to the door. Remove the screw and remove the handle.
- Unscrew both bolts that hold the switch block. Remove the unit; to do this, unclip the wires from the connector.
- Find the three fixing screws at the bottom of the door, unscrew them, and set them aside.
- Unclip the trim clips using a flathead screwdriver. Using the flat tip of a screwdriver, pry up the edges of the casing and carry out the process from the bottom up.
Such simple manipulations allow you to remove the front door trim. Install the new or old covering (depending on the purpose) in the reverse order
Backdoor
How do you remove the rear door trim? See instructions:
- Remove the socket from the glass receiver handle.
- Move the fasteners aside.
- Carefully remove the window handle and set it aside.
- You will find three bolts at the bottom of the door, unscrew them.
- There are four latches on top; unscrew them with a Phillips screwdriver.
- On the side, where the handle is located, there is another bolt, unscrew it.
- There are two screws on the other side of the door, unscrew them.
- Take a flat-head screwdriver and pry up the trim from below, gradually separating it from the door. Perform manipulations from the bottom up.
Install the door trim in reverse order. A map of the location of the fasteners can be found on the Internet, so you will be sure that you are unscrewing the bolts that secure the covering.
Conclusion
The dismantling process will not take much time and effort. It is so simple that the decision to go to a workshop and order a replacement of the covering there seems irrational. Following the instructions, everyone will be able to remove the Priora's trim.
We independently remove the door trim from the Lada Priora
Sometimes an annoying squeak appears inside the car. As a rule, either the dashboard or the door trim creaks. No car is immune from this, and Lada Priora is no exception. To get rid of the squeak, you will have to remove the door trim. We will talk about how to do this with your own hands in this article.
When dismantling is necessary
- The car owner decided to get rid of the squeaking noise that occurs when driving by gluing the door panels from the inside.
- It was decided to increase the sound insulation of the cabin by placing a layer of sound-absorbing material under the door trim.
- One or more mechanisms located under the trim have failed (primarily this applies to window regulators, door locks and handles).
Tools
- Flat blade screwdriver (medium size).
- Crosshead screwdriver.
- Set of new door holders.
- Insulating tape.
Removal sequence
- The front door on the driver's side opens and the rubber panel above the power window buttons is removed. Under the protective panel there are two self-tapping screws that can be unscrewed using a Phillips screwdriver.
This pair of screws needs to be unscrewed. In the niche of the handle there is another self-tapping screw, which is also unscrewed with a Phillips screwdriver.
It unscrews with a Phillips screwdriver
- Three screws are removed from the bottom of the door.
- The door lock release button is turned counterclockwise several times and removed. There is a locking pin underneath it. It is neatly recessed down under the door trim.
The lock rotates counterclockwise - Now the trim panel is held in place only by plastic latches located along its entire perimeter. The panel is carefully pulled back, and the tip of a flat-head screwdriver is inserted under it. Using this screwdriver, the latches are opened one by one.
- After opening all the latches, the panel is carefully lifted up so that its upper edge comes out of the window glass groove. As soon as the top edge is free, the panel is removed and the wire from which the window regulator is powered is disconnected.
Trim panel completely removed - All of the above procedures are repeated for the front passenger door.
- During dismantling, the casing can be easily scratched. To prevent this from happening, it is recommended to wrap the blade of a flat-head screwdriver with electrical tape. Two turns will be enough.
- Practice shows: no matter how carefully the car owner acts when opening the latches, one or more of them will still break, because the plastic is very fragile. So it makes sense to purchase a set of spare latches in advance. And when purchasing, you must definitely clarify that the latches are needed for the Priora, and not for the Kalina (they look exactly the same, but the latches for the Priora are 1.5 mm longer).
Video: How to remove the front door trim on a Priora
How to remove from the back
Above is the sequence of actions when removing the trim from the front doors of a Lada Priora car. The steps for removing the trim from the rear doors are similar. There is only one nuance: there will be 2 more plastic latches on the rear panels.
Other nuances
As you can see, there is nothing overly complicated in dismantling the door panels. All that is required is the ability to carefully handle a screwdriver. The most important thing is not to forget to disconnect the power cord for the power window. It is thin and breaks easily, and most often it breaks at the root, right at the connector, which seriously complicates its restoration.
Step-by-step instructions for removing the front door trim
In fact, it's not that difficult to do. First, let's figure out what tools are needed to remove the trim. Before work, prepare the necessary materials.
For work we will need:
- straight metal screwdriver;
- metal Phillips screwdriver;
- clips for fixation;
- thick tape for insulation.
Let's start dismantling the front door trim of the Lada Priora. The actions are performed in the following order:
- You must unscrew and remove absolutely all the screws located around the door handle. Carefully unscrew them using a Phillips screwdriver. Now slowly remove the bolts securing the window lift control module to the door. Inspect it and find the fastenings that need to be removed.
- Next, you will remove this module and the mirror adjustment system of your car. Take them off. Set the parts aside.
- Having disconnected the clamp located inside, remove all the wires that are connected to the systems and lead to power supplies. Make sure that no current is flowing through them, otherwise you may get injured.
- Now start unfastening the trim fasteners near the handle. Unscrew all the bolts one by one. Use the screwdriver you feel most comfortable using.
- After this, carefully peel off the trim. Set it aside.
- The facing part of the door is fixed with screws. To remove it, just unfasten them. Then get rid of the button blocking the lock. Take it out.
- Now slowly lift the trim using a screwdriver and remove all the plastic fasteners. Then set them aside.
- That's it, job done.
Step-by-step instructions for removing the rear door trim
Roughly speaking, the principle of operation is absolutely the same as with the front door. The only significant difference is that the rear door does not have a lift-lowering mechanism.
- Using a flat-head screwdriver, you should unfasten and push aside the mounting handle that raises the window of your car.
- Unfasten the handle mechanism and its lock from the shaft using a screwdriver.
- Remove the screw that secures the door handle trim, located inside the trim, and move it to the side.
- Use a flathead screwdriver to pry up the trim and remove it.
- Ready!
Summarize
Removing the trim is not as difficult as you think
Please note that you will need several different screwdrivers to get the job done, as well as some insulating tape and clips. It’s better to prepare your tools in advance
The procedure is the same in both cases. It is enough to remove all the fasteners and carefully remove the casing. This procedure is mandatory before repairing parts and mechanisms located inside the door. Thus, you can easily access the parts protected by it.
Basic operating rules:
- Work carefully, try not to damage the parts.
- Don't lose any fasteners or parts you've removed.
- Ensure your own safety when working.
Sheathing fastener diagram
The fasteners on the rear and front doors of the VAZ-2170 are located differently, so the procedure for dismantling the trim will be slightly different. In order to easily remove all the decorative elements of the door, you need to study the principles of their fastenings.
Front door fasteners
Before removing the door trim, you need to understand what parts it consists of. To do this, take a look at the diagram.
the front doors of the Lada Priora consist of several elements
- Front door trim trim.
- Front door trim.
- Front door trim.
- The screw is self-tapping.
- Front door trim insert.
- Front door trim pocket.
Pay attention to where the trim fasteners are located.
location of the fasteners that hold the door trim
Eight clips that hold the trim in place are located at the top of the door, as well as on both sides. They hold tightly enough so that nothing dangles while the car is moving. However, removing the trim is fairly easy once you have removed all the other screws and trim.
Rear door fasteners
The structure of the rear door of the car is slightly, but different, from the front.
rear doors of Lada Priora consist of several elements
- Front door trim trim.
- Front door trim.
- Front door trim pocket.
- The screw is self-tapping.
- Upholstery trim.
Front door diagram. Catalog numbers of parts
Soundproofing front doors on Lada Granta
The pasting process is not complicated.
We prepare:
- 2 sheets of Visalis AL, dimensions 460x700 mm or more in reserve;
- 1 sheet of Bitoplast, size 1000x700 mm;
- half a meter of corrugation for wiring the front door;
- degreaser;
- hair dryer or any other heating device;
- gloves;
- tools, screwdrivers;
- rags.
Algorithm of actions
- After installing the structure (the process is described above), degrease the surface, clean it of dirt and corrosion.
- At the same time, we evaluate the condition of the vibration-isolating gasket and cover it with a new one.
- Cut Visalis into the required sizes.
- We lubricate all driving mechanisms and hinges.
- We isolate all possible sound sources.
- We cover the surface of the upholstery with vibration-absorbing material.
- We heat the Bitoplast and press it against the metal surface of the door.
If the algorithm is followed, the doors will close silently, as if in a foreign car.
The process of dismantling the structure is described above; we follow its points. After installation by screwing it onto the hinges, we proceed to assembly and filling the inside. Instead of worn rubber seals, we install new ones. This completes the self-replacement process.
The sequence of dismantling the door trim
- First of all, carefully remove the decorative trim that covers the mirror adjustment. We dismantle it using the same clip cutter or a flat screwdriver (but very carefully).
- Remove trim from door handle. Also, using a clip on the side of the lock, pry up the lining and remove it. Remove by hand to avoid cracks.
- Remove the screw from the door handle.
- Next, place the clip on the side under the handle and bring it to the middle of the width of the handle. The panel should pop out without much effort. The panel, as a rule, has a special spike in the center that can easily be broken. To remove it carefully, you need to slightly lift the panel and at the same time slightly pull the trim towards you with a clip puller.
- Now the wires are visible. They must be disconnected from the power window controls.
- At this stage there are 3 screws left at the bottom of the door. We unscrew them. Usually on all cars there are 3 screws at the bottom of the door.
- The casing is now held in place only by internal clips. We grab the casing from below and carefully pull it towards us. The clips should come loose and clicks will be heard.
- After the pistons have fired, we lift the casing up and release it. Clips can become fragile over the years, so it is advisable to install new ones.
Dismantling and installation of Priora door trim
To remove door cards you need:
- flat screwdriver;
- crosshead screwdriver;
- door card clips.
The procedure for removing the casing is as follows:
- Unscrew the bolts securing the door handle;
- Unscrew the bolts securing the power window control module (on the front doors);
- remove the power window control module and the mirror adjustment system (on the front doors);
- disconnect the wires going to the controls (on the front doors);
- remove the door handle;
- unscrew the three screws securing the casing;
- remove the door lock control button;
- remove the door card by unclipping the fastening clips.
Important: during the dismantling process, the plastic fastening clips often break. Therefore, you need to prepare new fastening clips needed for subsequent installation of door cards.
Installation is in the reverse order.
Dismantling begins by unscrewing the screws located near the door handle. Next, you will need to remove the screws holding the power window control module. At this stage, care must be taken not to damage the glass itself. The window lifter element will need to be removed along with the module for controlling the mirrors. Next you need to work in the following sequence:
- if there is a speaker in the door, then it is necessary to dismantle it;
- unscrew three screws from the bottom of the casing;
the wires are connected to the removed cover with a special plug; it is simply removed;
Location of clips on the Priora door
Useful and visual videos of removing the front door trim from a Priora:
Reassembling the door after carrying out the necessary operations is carried out in the reverse order. You just need to make sure that all electrical and mechanical components are connected correctly. Contacting a workshop will not be a rational decision if you study the instructions in detail and do everything exactly as described and shown in the pictures. The first time the process will take a little longer, but later working on the car will become much easier.
How to remove and replace the rear door on a Priora
If there is a need to remove the rear door on a Priora, then this is also not difficult to do.
It is important to take into account the following features of dismantling work:
- In order to remove the product after unscrewing the fasteners, you must first disconnect the rubber cover from the door. It should be disconnected at the junction with the door, and not the body part (depending on which side you plan to pull the wire from).
- Next you need to remove the door card. You can read how to do this.
- If there is no need to dismantle the door card, then you should disconnect the power supply to the power window console and lock. It is located near the seat belt mechanism (B-pillar) under a plastic decorative trim.
- There is no need to completely remove the cover. To do this, unscrew the fastening element, as shown in the photo.
- And move the cover aside.
- Disconnect the chip with the wire from the power window control console (if equipped) and insert it through the hole.
- Similarly, disconnect the chip from the electric lock drive, and also insert the wire through the hole.
- After this, unscrew the opening limiter mounting bolts using an 8/10 socket, depending on the modification.
- Using a "13" key, unscrew the two bolts securing the hinges.
- Have an assistant hold the door while unscrewing the bolts.
Installation of a new door is carried out in the reverse order of removal. This completes the expert description of the process of removing the rear door on a Priora, and with the help of these instructions you can implement the procedure yourself without the need to contact a car service center.
If there is a need to replace products on a Priora, then you should know that products from the VAZ-2110 are suitable for this car. They are completely identical except for some points, as you can learn from the video material below.
In addition to everything, it is important to note that if you install a door from a VAZ-2110 on a Priora, then you can save about half on the cost of the product. The replacement process does not take much time, and even a beginner can cope with its implementation
Door trim repair
In case of noticeable damage to the surface of the door trim, it is possible to eliminate the consequences using several materials:
To fix the material, you will need gel or glue, depending on the situation, and the cost of the work for the machine owner directly depends on the area being processed. You can do the same with inserts. The following materials are used:
- eco leather;
- Genuine Leather;
- velours;
- leatherette;
- fabric for covering the ceiling of a car;
- Alcantara.
The choice of material depends solely on the preferences of the car owner and his budget.
How to remove door trim
The door trims on the Lada Priora car are attached in the same places as on the tenth family, but the removal procedure will still be different. So, they generally have to be removed for various reasons:
- to replace the casing itself due to damage, etc.
- for replacing door cylinders, locks or glass
- installation of acoustics (front speakers)
- when soundproofing doors
If for any of these reasons you need to remove the front door card, then below is a list of the necessary tools:
- Torx bit t20
- Bit holder and adapter
- Phillips screwdriver
The procedure for removing and installing casings on Priora
First of all, you need to open the car door, and then unscrew the three screws securing the trim from the bottom. This is clearly shown in the photo.
After this, again using a Phillips screwdriver, unscrew the screw from the recess of the door opening handle.
Now we unscrew the locking cap itself by hand, as shown in the photo below.
Now, using a T20 Torx bit, unscrew two screws in the recess of the door handle.
Having pryed this pocket open and freed it from the latches along the edges, we take it out. It is assembled with a control unit for power windows and mirrors. In order to remove it, you need to disconnect the block with the power wires. There is nothing complicated about this.
Next, we slightly pry up the corner of the skin, trying to carefully free it from the clips on at least one side.
Next, we slowly move up and, as if in a circle, we try to “tear” the casing from the fastenings.
When you have already released it from all sides, you can carefully disengage the opening handle and remove the upholstery completely, as is clearly shown.
I think that it is possible to show the result that is obtained in the end.
Now you can carry out all the necessary actions, for the sake of which this part was dismantled in the first place. After completing the necessary work, you can perform the installation in the reverse order.
If the clips securing the upholstery to the door were damaged during removal, the broken ones must be replaced with new ones. The cost of a set of plastic parts for the entire Priora car is no more than 250 rubles.
I think that to make the presented material more accessible, you can show a video review prepared specifically for this article.
priora-remont.ru
How to remove the rear door trim on a Lada Priora
If you need to fix any problems with the rear door, you will need to remove the trim. You can do this yourself, read more below.
We remove the rear door trim on the Lada Priora:
The Priora door trim is held on by pistons and screws.
Unscrew the two TORX screws in the door handle, under the rubber mat.
Using a figured screwdriver, unscrew the self-tapping screw inside the niche of the door handle.
Unscrew the door lock latch.
Now the trim is held in place only by plastic clips around the perimeter of the door.
We pull the casing towards us, gradually snapping off all the pistons starting from the bottom. Then we lift the trim up a little and disengage it from the glass opening.
We completely remove the door trim.
I hope you were able to remove the door trim. I advise you to pay attention to the small styling: do-it-yourself rear lights in red film.
Source
How to remove the door trim on a Priora: front, rear - step-by-step instructions
Removing the car door trim is a mandatory procedure if you need to carry out certain operations - repairing wiring, installing new equipment such as speakers or window lifts. Cars from the Lada Priora line have a standard door mechanism design, which allows you to open it by following the same instructions regardless of the model.
The vehicle owner only needs patience, a set of tools and strict adherence to instructions to avoid damage to the trim. The design of the rear and front doors on cars is slightly different, but the general principle of operation is the same.
Tools for removing car trim
The standard list of tools includes:
- It is advisable to have a special kit for removing the trim; if you don’t have them, you can use a flat-head screwdriver or something similar;
Set of tools for removing trim and clips - Phillips screwdriver;
- TORX key (T20);
- spare pistons/clips for fastening.
It should be taken into account that the clips may crack when removed, so it is better to stock up on additional copies just in case. It is preferable to buy the kit in advance to save time at work
It is worth paying attention to what model the clips are purchased for - only for the Priora, the rest do not match in size
Clips for door trim of different Lada models
If electronic elements are installed in the doors, you will need a wrench - this applies to window lifts.
It is necessary to have space to open the doors to the sides, so you need to empty the garage/box of unnecessary things that interfere with the procedure.
Another option is to take the car outside in warm weather, and collect all the removed elements in a tool box with pre-prepared compartments, so that nothing gets overlooked during reassembly.
It is imperative to disconnect the battery if there are electronic components in the doors, so as not to provoke a short circuit and the need for premature replacement of wiring and other spare parts - just remove the negative wire
When using screwdrivers, the best option would be to wrap them in electrical tape so as not to scratch anything (including the paint on the metal), and you need to work with the tools carefully - without sudden movements
Dismantling begins by unscrewing the screws located near the door handle. Next you will need to remove the screws holding the power window control module
At this stage, care must be taken not to damage the glass itself. The window lifter element will need to be removed along with the module for controlling the mirrors. Next you need to work in the following sequence:
Next you need to work in the following sequence:
- if there is a speaker in the door, then it is necessary to dismantle it;
- unscrew three screws from the bottom of the casing;
- the screw at the door handle is unscrewed;
- Next you will need a TORX wrench; use it to unscrew two bolts in the recess on the armrest;
- The pad on the armrest itself, in addition to the bolts, is attached to latches - you may need a flat-head screwdriver to unlatch them. Be careful! The latches are quite fragile and can break if pressed hard.
- the wires are connected to the removed cover with a special plug; it is simply removed;
- the door lock is twisted;
- Now the trim is held in place only by clips around the perimeter of the door.
Removal is recommended to be done using special trim removers so as not to break the clips. You can operate from any of the angles - the casing is pryed up and carefully, but with little effort, removed from the clips. Location of clips on the Priora door
How to remove the front door trim on a Priora | Avto-Gid
In this article we will talk about how to properly remove the front door trim on a Lada Priora car yourself. As a rule, this procedure is carried out in several cases: when various malfunctions occur in the wiring running through the doors, when the owner of the car installs additional sound insulation, when installing an alarm system and audio system speakers (if the car was purchased without them).
List of tools:
- Flat and Phillips screwdrivers;
- A complete set of plastic caps (just in case they break).
Safety precautions
- Before starting work, disconnect the battery terminal ("minus"), otherwise you may receive an electric shock.
- Step-by-step instructions on how to remove the front door trim on a Priora:
Removing the trim from the driver's door
The algorithm for disassembling the driver's door structure is similar, but there are some subtleties of this process:
- First, the plugs are removed from all fasteners. They are pryed off with a screwdriver.
- The panel plastic will be easier to remove if you first unscrew the fragment for adjusting the mirror structures. Unlike the passenger door, the driver's door has one screw. It is located under the plug.
- The opening mechanism is removed last.
- If your car is equipped with electric mirrors with remote control, then to remove the rear view adjustment panel you need to unscrew the screw located at the bottom.
Recommendations
When the front right door trim requires dismantling, this procedure can be done with your own hands if you adhere to the clear algorithm described above and with basic caution. But today there are people who don’t even know which side of the door the trim is on.
Especially for such citizens, there are car services and service stations, where all the necessary procedures will be performed efficiently, quickly and at a reasonable price. There are few such places and one of them is Uremont.com. So far, not a single car enthusiast has regretted visiting this site. Here everyone will receive high-quality car repair services.