The main function of the clutch hydraulic drive is to provide short-term separation of the flywheel and transmission when changing gears. If the VAZ 2107 clutch pedal is pressed very easily or immediately falls through, you should think about bleeding the hydraulic cylinder of the release bearing drive. To accurately identify the problem, it is necessary to check the level of working fluid in the master cylinder reservoir. You can repair the clutch without contacting a car service specialist.
- Design of the main elements of the hydraulic drive
Design and purpose of the clutch master cylinder - Replacing the master cylinder
- Dismantling and assembling the master cylinder
Video: replacing the clutch master cylinder VAZ 2101–07
- Video: replacing the clutch slave cylinder VAZ 2101–2107
- The clutch does not disengage completely (the clutch “drives”)
- Tools and materials
Video: bleeding the clutch VAZ 2101–07
The principle of operation of the VAZ 2107 clutch drive
The clutch is engaged and disengaged using the release bearing. Moving forward, it presses on the spring heel of the basket, which, in turn, retracts the pressure disk and thereby releases the driven disk. The release bearing is moved by the clutch on/off fork. This fork can be pivoted in different ways:
- using drive hydraulics;
- flexible, durable cable, the tension of which is automatically adjusted.
The clutch is engaged and disengaged using a release bearing, which presses on the spring heel of the basket, thereby retracting the pressure plate and releasing the driven disc
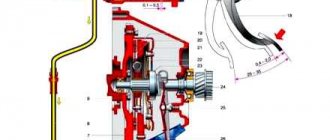
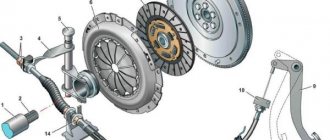
The operating principle of the VAZ 2107 clutch hydraulic drive is quite simple. When the engine is running and the clutch pedal is in the up position (depressed), the clutch and flywheel rotate as a unit. Pedal 11, when pressed, moves the rod with the piston of the master cylinder 7 and creates brake fluid pressure in the system, which is transmitted through tube 12 and hose 16 to the piston in the working cylinder 17. The piston, in turn, presses on the rod connected to the end of the clutch engagement fork 14 Rotating on the hinge, the other end of the fork moves the release bearing 4, which presses on the spring heel of the basket 3. As a result, the pressure disk moves away from the driven disk 2, the latter is released and loses traction with the flywheel 1. As a result, the driven disk and the gearbox input shaft stop. This disconnects the rotating crankshaft from the gearbox and creates conditions for changing gears.
Find out how to diagnose the clutch yourself: https://bumper.guru/klassicheskie-modeli-vaz/stseplenie/stseplenie-vaz-2107.html
What parts and tools are needed
After you have placed your VAZ-2107 on the inspection groove, it is important to prepare a list of required parts and tools. Without them, it will be impossible to carry out the work. So, you will need:
- eight wrench;
- TJ, or brake fluid;
- hose up to one meter long;
- some kind of container where you can drain the brake fluid, preferably transparent.
Then you can proceed directly to the pumping process. To do this you will need:
- Open-end wrench or socket wrench 8;
- Container for draining (with a small amount of liquid);
- New fluid;
- Silicone transparent tube;
- Rags.
This is all the required equipment.
An interesting fact is that with identically used drives on different “Classic” models, the bleeding process is different, so methods for pumping a hydraulic drive on VAZ-2106 and VAZ-2107 vehicles will be described below.
Malfunctions of the VAZ 2107 clutch hydraulic drive
Incorrect operation of the hydraulic drive leads to disruption of the functioning of the entire clutch mechanism.
The clutch does not disengage completely (the clutch “drives”)
If it is difficult to engage the first speed, and the reverse gear does not engage or is also difficult to engage, it is necessary to adjust the working stroke of the pedal and the stroke of the control rod. Since the gaps are increased, they need to be reduced.
The clutch does not engage fully (the clutch “slips”)
If, when you sharply press the gas pedal, the car accelerates with difficulty, loses power on inclines, fuel consumption increases, and the engine overheats, you need to check and adjust the pedal stroke and the distance of movement of the working cylinder rod. In this case there are no gaps, so they need to be increased.
The clutch operates jerkily
If the car jerks when starting from a stop, the cause of this may be a malfunction of the return spring of the main circulation center or the control center. Saturation of the working fluid with air bubbles can lead to the same consequences. It is necessary to find the causes of unstable operation of the clutch control hydraulics and eliminate them.
The pedal falls and does not return
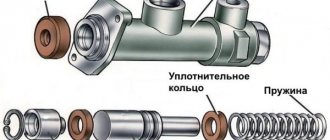
The cause of pedal failure is usually an insufficient volume of operating fluid in the reservoir due to its leakage in the working (usually) or master cylinder. The main reason for this is damage to the protective cap and penetration of moisture and dirt into the cylinder. The rubber seals wear out and gaps form between them and the cylinder walls. Through these cracks, liquid begins to flow out. The rubber elements should be replaced, fluid should be added to the tank to the required level and air should be removed from the system by bleeding.
Do not add used brake fluid to the hydraulic clutch control system, as it contains tiny air bubbles.
Adjusting the travel of the pedal and pusher of the working cylinder
The free play of the pedal is regulated by a limiting screw and should be 0.4–2.0 mm (the distance from the top position to the pusher stopping in the master cylinder piston). To set the required clearance, use a wrench to loosen the lock nut of the screw, and then rotate the screw itself. The pedal stroke should be 25–35 mm. It can be adjusted using the working cylinder pusher.
To adjust the position of the clutch pedal using the limit screw, you will need a measuring ruler and a 10 mm wrench.
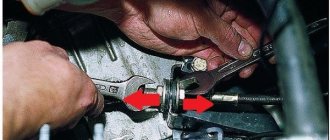
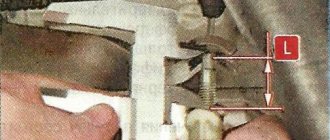
The length of the working cylinder pusher directly affects the gap between the end of the release bearing and the fifth basket, which should be 4–5 mm. To determine the size of the gap, you need to remove the return spring from the release bearing fork and move the fork itself by hand. The fork should move within 4–5 mm. To adjust the gap, use a 17 wrench to loosen the lock nut while holding the adjusting nut with a 13 wrench. During the adjustment, the pusher must be fixed. To do this, it has an 8 mm wrench flat, which is convenient to grab onto with pliers. After setting the required gap, the locknut is tightened.
Adjusting the length of the working cylinder rod allows you to change the gap between the release bearing and the fifth basket, as well as the magnitude of the clutch pedal stroke
Management
This is done using a brush that uses steel wire instead of bristles.
Work on pumping the clutch on a VAZ 2106 must be carried out on an overpass or pit. You will also need the help of a partner.
The tools we need are:
- brake fluid;
- rubber hose;
- capacity;
- key to 8.
The best option for VAZ 2106 is Neva M
Algorithm of actions
- First of all, pour fresh liquid into the VAZ 2106 tank to the bottom mark of the neck.
- Now you need to slightly loosen the fitting located on the working cylinder.
- Next you need to put a hose on it.
- We lower the other end into a container (preferably transparent) in which the remaining wateriness is located.
- At this stage you will need the participation of your partner. It is necessary that he press the pedal until its movement begins to become difficult.
- Next, he must hold the pedal in this position.
- You need to loosen the fitting little by little. At this time, liquid will begin to flow through the hose.
- If you see bubbles in the outlet, this means there is air in the system.
- When moisture starts to come out, you may notice that the clutch is failing.
- Wait until it falls completely and tighten the fitting.
- At this time, your partner should start pumping again.
- Repeat this until there are no bubbles in the outlet.
- During operation, the liquid level will naturally drop. Therefore it needs to be topped up.
- Make sure that the liquid does not fall below ten millimeters from the bottom. If the level drops too low, air will return to the system and the job will have to be repeated again.
- After completing the work, you need to check the level.
- If necessary, top up to the lower neck line.
- We tighten the cap of the VAZ 2106 tank.
- Disconnect the hose.
- We tighten the fitting.
First of all, make sure that there is no grinding of gears when the pedal is fully depressed and reverse gear is engaged. If this is still heard, it means that air remains in the system and all work will have to be repeated.
This video shows how pumping occurs correctly on VAZ 2101-2107 cars.
The VAZ “six” is equipped with a clutch drive, which uses hydraulics in its design. Such hydromechanical systems require increased attention and maintenance, which includes bleeding the hydraulic clutch of the VAZ 2106, carried out as necessary. The essence of such an operation as bleeding the clutch is to remove from this system a certain volume of air masses that has entered during operation.
Air may also end up in the hydraulic system after repair work has been carried out due to depressurization or after replacing the working fluid used in it. Accordingly, before you start bleeding the clutch, it is imperative to eliminate the causative defects, otherwise all the work carried out will be in vain. Indeed, due to defects in this system, breakdowns in the associated units and transmission elements are possible.
Working fluid for hydraulic clutch of VAZ 2107
The clutch hydraulic drive uses a special fluid, which is also used in the brake system of classic VAZ models. In both cases, it is necessary to create a working environment that can withstand high pressure and does not destroy rubber products. For VAZ, it is recommended to use such compositions as ROSA DOT-3 and ROSA DOT-4 as such a liquid.
In classic VAZ models, it is recommended to use DOT-3 or DOT-4 brake fluid as the working fluid for the hydraulic clutch.
The most important characteristic of fuel fluid is its boiling point. At ROSA it reaches 260°C. This characteristic directly affects the service life of the liquid and determines its hygroscopicity (ability to absorb water). The accumulation of water in the liquid liquid gradually leads to a decrease in the boiling point and the liquid loses its original properties.
For the hydraulic clutch of the VAZ 2107, 0.18 liters of fuel fluid is required. It is poured into a special reservoir for working fluid, which is located in the engine compartment near the left wing. There are two tanks there: the far one is for the brake system, the near one is for the hydraulic clutch.
The service life of the working fluid in the VAZ 2107 clutch hydraulic drive, regulated by the manufacturer, is five years. That is, every five years the fluid must be changed to a new one. This is not difficult to do. You need to drive the car onto a viewing hole or overpass and perform the following steps:
- unscrew the lid of the working fluid reservoir;
- clean the working cylinder from dirt;
- unscrew the fitting with the hose and insert the end of the hose into a previously prepared container;
- by pressing the clutch pedal, ensure that the fluid is completely drained from the system;
- screw the fitting into place;
- add fresh brake fluid;
- bleed the clutch hydraulic drive according to the algorithm described below.
What kind of service is this?
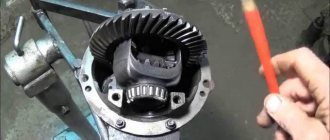
Like any other part of the car, the clutch requires constant maintenance. Changing the clutch fluid, changing the engine oil or replacing the brake fluid is a simple but very important procedure to ensure the normal operation of this mechanism. The clutch in a car is necessary to temporarily disconnect the engine crankshaft from the gearbox. This procedure is needed to change gears. This mechanism also allows you to move off smoothly without significant jerks. Untimely replacement of brake fluid in the clutch hydraulic drive or untimely change of oil in the transfer case leads to disruption of these functions, which significantly complicates the operation of the vehicle. Using the example of the “classics” we will analyze this procedure.
Replacing brake fluid in the clutch
Only brake fluid is poured into the clutch drive due to its special properties, due to which it resists compression. This helps to avoid depressurization, leading to complete breakdown of the mechanism. When you fill the fluid, the main thing is not to mix up the brake and clutch reservoirs. The latter in the “classic” is closer to the wing.
Replacing clutch fluid is carried out in several steps:
Merging
- Before starting work, it is recommended to wipe the tank to remove dirt and dust.
- Unscrew the lid and set it aside in a visible place.
- Call an assistant while you unscrew the cylinder fitting with a wrench. Take the container, point it to the desired location and ask an assistant to press the clutch pedal until all the liquid has drained.
Pouring
- Once all the liquid has been pumped out of the tank, ask an assistant to stop his actions. At this time, tighten the fitting yourself to the initial position.
- Fill with new fluid and check the cap for defects. If they are present, this may cause a lack of tightness and replacement of the lid.
Leveling up
1. Immerse the free end of the hose into a container with working fluid. Using an 8 mm wrench, unscrew the bleeder fitting 3/4 of a turn.
2. An assistant sharply presses and smoothly releases the clutch pedal. In this case, liquid with air bubbles will begin to be forced out of the hydraulic drive into the container. If the release of air bubbles has not stopped and the pedal has reached its lowest position, tighten the fitting. Check the fluid level in the tank and add it if necessary.
3. Repeat operations 1 and 2 again until the bubbles stop appearing.
4. When the release of air bubbles from the system stops, sharply press the pedal and hold it, tighten the fitting.
Attention! If the release of air bubbles does not stop, check the tightness of the system connections. If leaks are found, repair the system.
It is recommended to replace the fluid in the clutch hydraulic drive every five years of vehicle operation.
We pump the hydraulic drive when air gets into the system for one reason or another.
The presence of air in the hydraulic drive leads to incomplete disengagement of the clutch (the clutch “drives”) and, as a result, difficult gear shifting.
We carry out the work together on an inspection ditch or a lift.
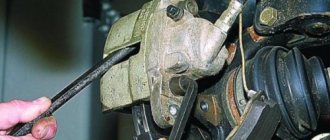
We clean the bleeding fitting of the clutch slave cylinder from dirt and, if necessary, add fluid to the reservoir.
We remove the protective cap and put a rubber hose on the head of the fitting, the end of which is lowered into a container with a small amount of liquid.
A transparent hose is convenient - the bubbles of the air being removed are clearly visible in it.
An assistant presses the clutch pedal 3–5 times at press intervals of 2–3 s and holds the pedal depressed.
Unscrew the fitting 1/4–1/3 turn. The pedal will move forward.
When the flow of liquid with air bubbles from the hose stops, tighten the fitting, after which the assistant releases the pedal
We repeat the operation until air bubbles stop coming out of the system, monitoring the liquid level in the tank and adding it as necessary.
When replacing the fluid, pump the system until fresh, lighter fluid comes out of the hose.
If, despite prolonged pumping, air bubbles come out of the hose, check the reliability of the connections, find out if there are cracks in the tubes or leaks in the connections with the fittings.
Air may enter through damaged master or slave cylinder o-rings.