VAZ 2107 starter repair
The engine is started on a modern car using an electric starter. Failure of this device can occur for various reasons related to its defects or natural wear and tear of the unit. Repairing a VAZ 2107 starter makes sense only if the cost of spare parts and labor does not exceed the price of a new one. In any case, first you need to establish the causes of the malfunction; this can be done by analyzing their external manifestations:
- Idle rotation of the rotor indicates a breakdown of the overrunning clutch.
- Clicks of the solenoid relay in the complete absence of other signs of starter operation indicate burnt contacts.
- Lack of rotation of the starter rotor can be caused by wear of the brush assembly or a break in its winding.
In some cases, unsuccessful attempts to start the engine are due to a low battery charge. Drivers usually face this problem in winter. Starter repair begins with its removal, cleaning of contaminants and a thorough inspection.
What to do first
Lada 2107 Logbook Electric trunk lock VAZ 2107
Disassembling the mechanism is not a priority task, since the starter’s power supply is connected to the battery, so you need to start with it. If the car is not too old, it is unlikely that the problems will lie in the design of the starter itself. It is enough to clean the contacts of the battery or the device itself for everything to work again in the desired mode.
Difficulties begin when the machine has worked for a long time and its operation has not been delicate. If, after a complete check of the electrical equipment of your VAZ 2107, the starter still does not start or continues to work intermittently, then the reason is inside the device and it is necessary to remove and disassemble the starter. On this model, both in carburetor and injection versions, it is installed rather inconveniently. To get to it normally, you will have to drive the car onto an overpass or inspection hole.
Disassembling the VAZ 2107 starter
After the ignition is turned off, you can begin the “operation”. It must be done in the following order:
- remove the ground terminal from the battery;
- if there is a protective mud casing at the bottom, then it must be dismantled;
- remove the electrical wires from the solenoid relay;
- unscrew the three mounting bolts (two upper, one lower);
- remove the starter.
As you can see, nothing complicated. The only thing is that in the case of an injection model, mechanics advise removing the inlet pipe extensions as well. Now we have to disassemble the device itself.
Dismantling the unit
To perform this operation, you need a set of wrenches and a portable lamp to illuminate the work area. The procedure for dismantling the starter is as follows:
- Disconnect the battery.
- On the solenoid relay, unscrew the nut on the contact pin and remove the wire connecting it to the battery.
- Turn off the control circuit.
- Using a key set to “13”, unscrew the three bolts securing the starter to the cylinder block.
- Carefully remove the device from its seat and, unfolding it, remove it from the engine compartment.
When dismantling the device, be careful not to damage nearby wiring.
Diagnosis of faults and disassembly of the mechanism
The starter, removed from the engine compartment, must be cleaned of dirt and traces of technical fluids. The procedure for disassembling the mechanism is as follows:
- We remove the solenoid relay from the starter housing and, having unscrewed the tightening screws, disassemble it into its component parts. During the inspection, special attention is paid to brass contact groups, the burning of which can lead to failure of the mechanism.
- We remove the cover of the device and check the condition of the brush assembly. Significant wear on the tracks and wear of carbon parts is a common cause of starter failure.
- The integrity of the rotor winding is checked using a multimeter set to resistance measurement mode.
- The overrunning clutch is checked by hand; a working device allows only one-way rotation.
After establishing the cause of the failure of the electric starter, you should take care of purchasing the necessary spare parts.
Electric starter repair
Methods for restoring device functionality depend on the nature of the malfunction. The easiest way to deal with burnt contacts on the solenoid relay is to sand them with fine sandpaper. The slip rings are also cleaned and polished when replacing brushes. Other faults are eliminated by replacing failed parts or assemblies.
Repairing the starter yourself allows you to save money on purchasing a new device. The restored mechanism is mounted on the car in the reverse order of removal and connected to the on-board network. We check and start the engine with the repaired starter.
Source
VAZ 2107 starter repair
If, when you turn the key in the ignition switch, you cannot hear the starter on a VAZ-2107, then you need to check the condition of the battery and make sure that the electrical circuit of its motor is working properly. The car owner can independently diagnose the device. Repair almost does not require the use of special equipment and tools.
Design, purpose, models
The “seven” starter is an electric motor that provides the car engine with the necessary energy to start. The unit receives power directly from the battery. The power of the devices is approximately 1.5-3 kW.
The Lada 2107 is equipped with two PU variants - reduction and traditional. The first model is the most common today, as it has a higher efficiency and requires less current. Its price is only 10 percent higher than the cost of a simple starter, so it is used by many.
In addition to the usual elements of the starter, the reduction one includes a gearbox. It increases the technical capabilities of the device, but is also a weak point. Especially if the part is made of poor quality, from poor material. If you buy a gear control unit, then only from a well-known company - this will avoid counterfeits.
Here are the starters that are installed standard on a VAZ 2107 with carburetor power:
- ST-221 1.3 kW with a cylindrical collector and a single-winding pull-in relay - these devices were equipped with the world’s first standard versions of Zhiguli;
- KZATE 35.3708 with a different winding and a rear part device, consisting of three windings.
And here are the launchers that are installed on injection “sevens” today:
- Bulgarian starter Dynamo;
- Chinese LTD Electrical at 1.35 kW;
- Belarusian BATE 425.3708;
- Belarusian Fenox;
- Bulgarian Eldix;
- German Oberkraft.
Of these devices, Fenox stands out, capable of starting a car engine well in winter, and Oberkraft, which creates large torque with its small size. Also, starters from Varta, Denso, and Cargo may be suitable for the VAZ-2107. The average price of PU varies between 3-4 thousand rubles.
In addition to the original ones, the “seven” is equipped with starting devices from other cars. As a rule, these are some Russian cars and foreign cars. The main thing is that the fixation holes and parameters converge. The most preferable for the injection “seven” is called a PU with a gearbox from Niva Chevrolet.
Starter VAZ-2107
The commutator-type electric motor used to start the engine is located on the side of the crankcase of the power unit. The parts are connected to each other by bolts with a hexagonal head. Power is supplied from the battery.
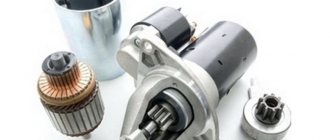
The power of the device is sufficient to rotate the crankshaft at air temperatures down to -35 ° C (without preheating the oil). The appearance and design of the device are shown in the photo in the spare parts catalogues.
Removing the starter and protective screen
To repair the starter, it must be removed from the car. If the car is relatively new and the starter has not yet been removed, then the heat-reflecting protective screen is in its rightful place. It will prevent you from removing the starter, so you need to remove it first.
The protective screen is attached on top to two studs with 13 nuts and on the bottom with a 10 head bolt. And if the nuts can be unscrewed with a simple wrench, then to unscrew it you will need a long thin socket wrench. Many, having removed the protection, do not put it back in place, but it is better to do it anyway. Without it, the starter gets very hot from the exhaust manifold, especially in summer in traffic jams.
Starter guard and bottom bolt location
Video of starter removal
Purpose
The device is designed to force the engine crankshaft at startup. The product is equipped with a special Bendix clutch, which engages with a ring gear mounted on the flywheel of the power plant. The electric motor is controlled remotely using a contact group in the ignition switch through an additional relay.
Starter electrical connection diagram
There are 2 types of electric motors for starting the power plant:
- On cars with a carburetor, a standard starter is used; torque is transmitted directly from the rotor to the ring gear.
- On some carburetor cars and VAZ-2107 with an injector, a gear-type drive was installed. By using a planetary gear, the current in the power circuit is reduced and the torque is increased.
Is the design of the “seven” starter complicated?
The starter is responsible for starting the engine. This is an electric motor with 4 poles and the same number of brushes. It is located in the lower part of the engine compartment on the right side of the cylinder block, as shown in the photo from under the hood. Fixation on the clutch housing is carried out using three bolted connections.
This element is not designed for long-term operation; its only function is to provide the engine with the required torque. Having completed the task, the part returns to a state of rest. So any major fault will result in vehicle failure. The design of the VAZ 2107 starters and other models of this line is the same. If there are some differences, they are insignificant.
It is important to know that the starter can be geared, then the circuit will be a little more complicated, but for the issue under consideration we will not touch on this.
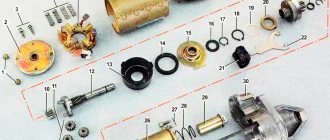
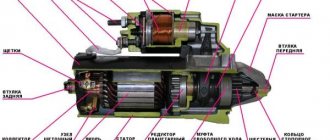
The starter device includes more than 40 small elements from which the main parts are assembled - a DC electric motor, a bendix and a traction relay. They are easy to find in the photo. The functions of the motor include transmitting torque to the crankshaft through a gear transmission. Thanks to the retractor relay, the movement of the bendix is ensured. In addition, the relay is also responsible for closing the contacts of the electric motor. Bendix is a small part, but it performs a very important task - it ensures coupling between the shaft and the flywheel crown. And only after this is it possible to rotate the crankshaft.
Diagnostics of VAZ-2107 starter faults
- no rotor rotation;
- clicks when trying to start;
- extraneous sounds when the device is operating.
Starter won't start
The electric motor does not work due to battery discharge or winding failure. When the battery is discharged, the lighting devices do not turn on or the lamps glow dimly, and when you try to start the engine, a click is heard, after which the indicators go out.
Crackling sound when starting the starter
A cracking sound indicates a breakdown of the solenoid relay, which cannot engage the rotor gear with the flywheel ring. The repair consists of checking the wiring and measuring the resistance of the windings. A damaged relay must be replaced.
The starter clicks but does not turn over
The defect indicates insufficient voltage in the power supply due to battery discharge or oxidation of the contact pads. When the battery is low, the clicking sound is accompanied by a decrease in the brightness of the lamps. The defect is observed when there is poor contact between the battery contacts and the wiring terminals.
Examination
The starter on the “seven” is tested in this order:
- the device is pulled out from the machine and thoroughly cleaned with a wire brush;
- the PU body is connected to the battery negative, and the traction terminal is connected to the positive - the starter did not work, the test continues;
- To inspect the brushes, the back cover of the PU is separated - if more than 1/3 of them are worn out, there is a reason to replace the coals;
- the resistance of the coils is measured - the normal value is 10 kOhm, otherwise there are breakdowns in the circuit;
- The tester examines the contact pins - the value should be above 10 kilo-ohms.
The starter also needs to be inspected visually. There should be no cracks or other mechanical damage on its body and the solenoid relay.
If diagnostics confirm that the VAZ-2107 control unit has malfunctions, repair or replacement is carried out. In the first case, the device is removed from the machine, then disassembled and defective. If the collector, windings and other important parts are severely damaged, it is better to immediately replace the device with a new one.
| Speedway | I've been trying to start the car for over 2 days now! It all started with the starter either working or not. Either it turns perfectly, then there is silence (the retractor clicks, but somehow quieter than usual). I made a mistake about the wiring, but no - I threw the wire directly from “+” to the retractor - still nothing, there are clicks, but the knee does not turn. The mass is 100% ok, I checked that too. I took off the starter, tried to connect it - it turns, and how! I put it back on the car - sometimes it turns, sometimes it doesn’t... Such nonsense. Then I decided to change the retractor... I installed a used one, but before installing the starter on the car, I decided to check it separately. I connected the standard wiring - it turns, everything is in order. And as soon as I screwed it to the gearbox, I started to get weird again. And if with the first retractor the car started every other time, then with the second the starter turns, but does not stop! You can take the key out of the lock, and it will oil until you remove the terminals from the battery, and, accordingly, de-energize it! Although without load, on a workbench, both with the first and with the second relay, the starter works perfectly! In this regard, the question is... Could the starter itself somehow “break down” in such a way that no matter what relay you install, there will always be such garbage??? I disassembled the starter, cleaned it, checked the brushes - at first glance everything was fine. And he spins, and he spins like that! But when you put it on a car, it’s capricious. Maybe buy and check another relay, but what if the problem is in the starter itself??? Does anyone have any ideas? Temporarily overcame the problem this way: I left the second relay, but so that the starter would not turn on its own, I removed the thick wire from the “+” battery from the starter altogether, and instead threw in my own wire, tying it to the excitation. Now the circuit looks like this - there are two wires coming from the starter - a thick power cable from the retractor and a thin excitation wire. They are connected into one wire, the other end of which I connect to “+” with the battery. When the car starts, I remove the end of the wire from the terminal, the starter is completely de-energized, stops turning and you can go. It starts normally this way, but I’m tired of opening the hood and shorting something there every time. I thought about installing a relay through the ignition switch, but what kind of relay can withstand such a powerful current?? |
| Dr. House | look at the starter relay itself, the bendix could be covered, but does it disengage with the flywheel after that? |
| Robinson 66 | I think yes. If I hadn't come out, I would have heard it. With the engine running, if you apply current to the starter, a wild crackling noise is heard (as if you turn the ignition key again while the car is running), which means there was no engagement until that moment. Yes, and I had already driven many kilometers along the highway like this - if I had not disengaged, the starter would have been completely ground up there by now. When I start the car, apparently there is some kind of too strong current flowing, or what? Why do the nickels in the retractor “stick”? I repeat, from the outside there is nothing “criminal” inside the starter. Fork, brushes - everything is intact... |
| Jean | The nickels are apparently rams... but if the current really increases more than usual, then you already have to look for the reason, either it is a load due to thick oil or wedging in the bushings |
| Speedway | I cleaned the starter housing at the junction with the gearbox. From the “-” battery there is an additional pigtail to the engine. In the end, I even hooked the “crocodile” with one end to the starter, the other to the “-” terminal and to the body. Still no success |
| Robinson 66 | so it is necessary from the battery to the starter, it is better to exclude the body since the thin ground wire to the body is not intended for high currents |
| KarlYa | Once there was such garbage, it turned out that the wire on the brushes was burnt out, in the normal position it did not work, but when turned to one side it works. |
| MarineRuth | It looks like the author forgot to put a return spring in the retractor. According to the subject - in the first retractor it was enough to clean the power contacts and not change anything |
| Raspundizer | maybe the ignition switch was full....on the nickel I also had it, it turned out the bendix was full, I turned it with my hands |
| Karkarov Filya | I would look at the electrics, because the voltage does not go away, and perpetual motion has not yet been invented. |
| Vovik | if the retractor is turned 180 degrees, then such an effect as not turning it off will be observed |
| Statham | On the classic there is also a problem with the starter. The retractor clicks, but the starter does not turn. If, by bridging both bolts on the retractor and the excitation terminal of the retractor, the engine starts normally. First, I apply “+” to the retractor - it clicks, then I apply current to the starter - it starts the engine... It feels like the retractor provides normal engagement with the flywheel, but for some reason the current does not pass through the heels. As I understand it, the problem is in a faulty retractor... But could it be that the problem is not that? I just changed it recently, it’s somehow strange that it broke so quickly. What can happen to it that it stops passing high voltage through itself? I wanted to clean the nickels, but the retractor is not removable... |
| Seryoga 66 | I’m not at all sure, but still look at the contact group of the ignition switch) there were also various problems with starting on the classic, and often because of the contacts in the lock... usually everything either melts or it turns inappropriately. precariously short... |
| Alex House | Did you change the start relay that was on the wing (it used to be there)? |
| Rudiger | People have this problem: the VAZ 2107 has an injector, when it’s cold everything always works fine and starts right away. But when it’s hot, sometimes when you turn the ignition key to start, a click occurs (as if the retractor is triggered) but there is no start (the starter does not turn), I try to turn it a couple of times again and it starts. I removed the starter, all the contacts were clean, I tried to bridge the connection, the bendix throws it out, the starter turns, everything works. What could be the problem? And why only hot? |
| Gray78 | Have you checked the starter bronze bushings? Did you disassemble the retractor? It is also possible that the starter is overheating. Is there a tin under the collector? |
| Rudiger | There is no tin, I didn’t disassemble the retractor. The starter housing itself is not hot, but the retractor is yes |
| Anton 48 | Disassemble and check the negative brushes; if they are hanging, the starter relay will click and the retractor will not work. It's easy to check - one person holds the key at the start and an assistant makes one light blow to the starter body. If it works, take it apart and make sure the brushes move easily in the holders |
How to repair a VAZ-2107 starter with your own hands
To repair the starting unit yourself, you must:
- remove and disassemble the device;
- check the condition of the windings, bushings and brushes;
- replace damaged elements;
- perform reassembly and check the correctness of the electrical wiring connections.
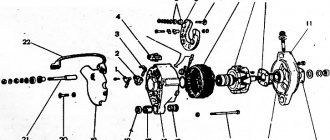
Dismantling and disassembly
To remove and disassemble the unit you must:
- Disconnect the terminals from the battery, and then remove the battery from the engine compartment.
- Remove the protective shield under the power unit, which limits access to the electric motor.
- Unscrew the nuts holding the wires to the starter housing.
- Using a wrench, unscrew the bolts connecting the electric motor housing to the power unit crankcase.
- Pull the assembly out of the seat.
- Unscrew the solenoid relay nut and remove the assembly from the electric motor housing.
- Unscrew the tightening bolts and carefully remove the covers, and then remove the rotor from the stator.
Replacing bushings
Replacement of starter bushings is carried out when the gap between the shaft and the support is increased. Due to a violation of the relative position of the parts, the rotor touches the stator plates. To eliminate the defect, it is necessary to remove worn parts.
The damaged front support is knocked out of the mounting hole with a handy tool, the rear blind bushing is removed with a puller or drilled out on a machine.
To install new elements (made of bronze or composite material), mandrels made of soft material (for example, wood) are used. During installation, do not warp parts or use excessive force.
Before installation, the composite bushings are kept for 5-10 minutes in a container with motor oil, which saturates the porous surface. Bronze bearings are lubricated when installing the rotor shaft.
Replacing electric brushes
To supply voltage to the rotor windings, a flat commutator and brushes (made of a mixture of graphite and copper powder), pressed by springs, are used. The number of brushes corresponds to the number of poles; the design of the elements includes an elastic stranded wire. During operation, the graphite elements wear out and burn, and at the same time, wear appears on the collector.
Replacement of graphite brushes is carried out according to the following algorithm:
- Remove the back cover of the case.
- Unscrew the screws securing the brushes (there are 4 elements in total).
- Remove worn elements and install new brushes.
- Clean the stator cavity from residual wear products of graphite elements.
- Install the removed parts in their original places.
Repair of starter retractor relay
The electromagnetic retractor relay ensures the movement of the gear on the rotor, which engages with the flywheel ring gear when the electric starter is connected to the vehicle's on-board network. The device is located on the body of the starting unit; the design of the circuit includes an additional power relay (located under the hood).
If the unit breaks down, it is necessary to check the functionality of the control relay. It is recommended to tighten the fastening screw and make sure that there are no oxides on the contact plates and wiring.
To test the relay, you must close the starter directly. If the rotor rotates, the electromagnetic unit must be replaced. Additional diagnostics involves measuring the voltage of the windings with a test device.
Serviceable coils have a resistance of 75 and 55 Ohms (for the holding and retracting windings, respectively). If the value differs from the factory parameters, then the unit must be replaced; it is impossible to repair the relay with your own hands or in a workshop.
The owner can remove the relay on the installed starter. After disconnecting the battery, the surface of the electromagnet is cleaned of dirt, and then you need to disconnect the wires (secured with nuts).
Then the bolts securing the relay to the motor housing are unscrewed. The assembly is disengaged from the rear cover. The new electromagnet is installed and connected in the reverse order.
Starter assembly and installation
The unit is assembled in the reverse order. The design of some units includes retaining rings or cotter pins that must be installed in place. The connected unit must be checked for functionality. The starter assembly procedure is shown in videos filmed by the owners in the process of self-repairing the unit.
Source
We repair the starter on a car with an injection engine
- We remove the mudguards, both main and additional. This action is impossible if you do not have a socket wrench size 8. Using it, you need to unscrew 4 screws that are located on the main panel, or rather, on its side and front fastenings, as well as 2 bolts located on the additional one. There is also a lower screw, but it has a different diameter. To remove it you will need a 10 mm socket wrench.
- Now, using a long 13mm socket wrench, unscrew the bolts that secure the clutch housing and starter. After this, unscrew the bolts with which the starter is attached directly to the bracket and the inlet pipe extension.
- We remove the stretch marks of the intake pipeline and very carefully, using the same wrench, unscrew the exhaust manifold nut, and then remove the shield.
- We disconnect the wire that we have left from the battery terminal and remove the tip located on the contact rod.
- The traction relay output must be freed from wire 50, and then the starter itself must be removed. Now it can be disassembled. Before doing this, try to thoroughly clean the part to remove any dirt stuck to it.
Once the starter is in your hands, the procedure is as follows (by the way, it is absolutely identical for any type of engine of the above car):
- check the solenoid relay. After connecting the 50th relay output to the “plus” terminal of the battery, we connect the starter housing directly to the “minus” terminal. This way, it will become clear whether the problem is in the relay itself or is it in something else. If it is in working condition, then a distinct click will be heard during this action;
- To check the integrity of the windings, you need to get rid of the starter cover and disconnect the brush assembly. Using an ohmmeter, check whether there is a short to the starter housing;
- if the results of our test showed that the relay still works, we take out the anchor. To do this, unscrew the bolts securing the starter casing, remove the lock washer, as well as the gaskets. Then unscrew the two nuts and completely remove the back cover. Thus, the starter winding housing is freed from the studs;
- unscrew the nut of the eccentric rotation axis and remove it from the body, disconnecting the armature.
At this point, the process of disassembling the starter can be considered complete. The anchor, by the way, cannot be repaired, but it can easily be replaced with a new one. Reassembling the starter is carried out in the reverse order.
Installation and repair of VAZ 2107 starter - fault diagnosis
Starting the engine is a responsible task. When the motor has already started, its movement is supported by the flywheel, which acts as a torque accumulator. In addition, the crankshaft itself has counterweights. Both the flywheel and the crankshaft structural elements create inertia, thanks to which the engine does not freeze at a “dead point”. But in order for all this joy to set in motion, an impulse from the outside is needed. And this is what the starter creates.
In terms of design or operation, the VAZ 2107 starter is practically no different from similar devices for other cars. The only difference is that for the VAZ, as for many gasoline engines, you can use a low-power starter, while a diesel engine requires much more energy to start.
Design and principle of operation of a gear starter
What makes a gear starter more reliable and efficient?
Its difference from the “classic” one is the presence of a gear transmission between the armature and the bendix. The VAZ 2107 gear starter design allows (due to high armature speeds and the use of a reduction gear) to obtain greater torque with less energy consumption, which increases the efficiency of the device. Particularly successful are solutions based on planetary gearboxes.
The principle of operation of a gear starter is no different from a conventional one - electrical energy is converted into mechanical energy.
It works like this:
- voltage is supplied to the solenoid relay, which supplies current to the winding and armature;
- the relay moves the gear along the armature shaft to the engine flywheel;
- When the power to the relay is turned off, the gear returns to its place and the starter is turned off.
The peculiarity is that the torque from the shaft is transmitted to the flywheel through a gearbox, which increases efficiency by 50%. This doubles the resource of the unit and reduces the load on the battery when starting the engine.
Types of starters
There are two main types of starters, which differ in design and efficiency:
- Gearless , also simple or classic. This is the first design in which the motor armature and bendix are placed on the same shaft;
- Gearbox . It differs from the classic one in that a gearbox with a planetary gear is installed on the armature shaft, which drives the bendix.
The classic unit has certain disadvantages, which at one time forced engineers to reconsider its design. The most important of them is low maximum power. As car engines grew in size, so did the need for more power to run them. To obtain it, it would be necessary to increase the size of the starter, and therefore its weight and cost.
The gearbox design allows you to “squeeze” more power out of the unit while maintaining its compact dimensions and low weight. For its efficient operation, less energy is needed, which means that even a “slightly damaged” battery will not become a serious problem.
How to choose a starter and review of models and costs
It is not difficult to select a starter for the domestic “Seven” - due to the popularity of the model and the simplicity of the engine design, the car can even be started from universal electric motors. The most popular options for Russian cars are the following models:
| Manufacturer | Part number | Device type | Power, kW/h | Approximate cost, rub. |
| IZH | 2107.3708000-01 | Geared | 1. 2 | 3200 |
| IZH | 2107.3708000-02 | Geared | 1. 3 | 3500 |
| BATE | 425.3708000 | Geared | 1. 4 | 3900 |
| BAKE | 425.3708340 | Geared | 1. 5 | 4200 |
| ZiT | 5722.3708 | Geared | 1. 5 | 4500 |
| ZiT | 5722.3734 | Geared | 1. 4 | 4100 |
| DYNAMO | 1.3R 3.102 | Geared | 1. 5 | 4500 |
| DYNAMO | 1.3R 3.103 | Geared | 1. 3 | 3600 |
The minimum permissible power for a VAZ 2107 starter is 1.2 kW/h, the maximum safe one is 1.5 kW/h. Installing an electric motor of inappropriate power can seriously reduce the service life of the power unit, as well as cause a short circuit or failure of the vehicle's electrical systems.
To protect yourself from purchasing a low-quality or unsuitable electric motor model, always check the part numbers for compatibility with the VIN number of your car, and also ask the seller for a certificate of authenticity of the device.
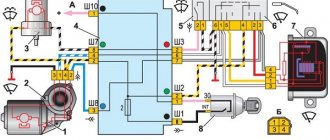
Starter connection diagram
The electrical circuit for connecting the starter consists of the starter itself, the battery and the ignition unit. In cars with an injection engine, which is controlled by a controller, there is an additional unit - an auxiliary relay. But on old VAZs that have a carburetor installed, it is not there.
A simple electrical circuit of the starter group looks like this:
- From the positive terminal of the battery, the power cable is connected to the contact bolt of the traction relay cover;
- The second cable from the battery goes to pin 50 of the ignition switch, and from it to pin “50”, connected to the windings of the traction and holding relay;
- The connection to ground is carried out through the starter housing, which is adjacent to the engine housing. The starter does not have a separate wire for ground.
Typical connection diagram for a “classic” starter
If there is an auxiliary relay in the circuit, it is connected after the ignition switch. If the controller allows the engine to start, the auxiliary relay contacts close and current flows to the starter through contact 50.
How does the starter start the engine?
Let's take a closer look at the principle of operation of the starter. After closing the contacts, the current flows to the winding of the traction relay. At this time, the anchor moves and extends the bendix. The gear of the latter is connected to the flywheel ring. When the armature reaches its final position, the contacts close, allowing current to flow to the starter motor winding. The device begins to rotate and the car starts.
The Bendix returns to its original position as soon as the flywheel begins to rotate at a higher speed than the starter shaft. And the supply of electrical energy to the device stops when the key returns to the first position. A gear starter is also installed on the VAZ 2107, in this case the current flow pattern is slightly different; it reaches the armature through a gear drive. Thanks to this, power is significantly increased. This is not the only difference that the gear mechanism has, but we won’t talk about that now.
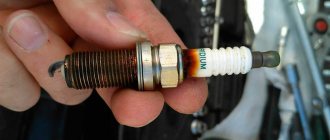
This is interesting: The meaning of spark plug color
How to remove and replace the starter
There is one problem with replacing the starter on a VAZ 2107: since it is located at the bottom of the engine, it is quite difficult to get to it from above. It is better if the replacement is carried out in a pit.
Otherwise, the order of how to remove the starter looks like this:
- Disconnect the battery terminals;
- If a rear mudguard is installed, remove it;
- You can remove the battery to free up more space;
- Unscrew the clamp of the wires going to the starter;
- Remove two wires from the contacts of the traction relay;
- Then unscrew the starter mounting bolts, two upper and one lower (there may be problems with it without a hole) and remove the old starter.
Installing a new starter is done in the reverse order:
- Screw the unit into place with bolts. The longest bolt is screwed in first, then the other two;
- Secure the wires to the body;
- Replace the wiring harness clamp;
- Return the battery to its place along with the support;
- Connect the battery terminals, check how the new starter works;
- Replace the mudguard.
Remember about safety: if you lift the car with a jack, be sure to use wheel chocks and safety spacers!
Review: Gear starter StartVolt VAZ-2101 - A powerful replacement for the standard classic starter.
View from the side of the box:
Another side surface of the package:
The next side shows the starter power, its starting speed, and the minimum temperature of its efficiency:
Starter power 1550W. significantly exceeds the power of the standard Zhiguli starter, which has a power of 1300W. The starter kit comes with a passport with a warranty card, but it all consists of advertising parts for the electrical equipment of the car manufactured by the StartVolt company. The photo shows a receipt pasted by the seller with the cost of this starter:
The starter itself in the box is carefully placed in a foam shock-absorbing cell:
At the rear end of the starter you can see its power terminals and copper parts:
The starter itself is manufactured in China under license and under the control of a Russian company, it is compact and its weight is small, about 3 kg:
The working part of the starter is somewhat smaller than the similar part of a standard starter; the gear feed mechanism and the starter fastening itself are, of course, standard:
View of the starter itself from the other side:
I would like to note the fact that the 13 wrench nut on the upper terminal at the top right in the photo (the lower nut on the copper bolt) was loosely tightened, and we managed to tighten it well. When tightening this nut, the force may cause the black cage of the round insulator of the solenoid relay to turn slightly, from where the copper bolts come out. To prevent this from happening, you need to tighten the nut carefully, without excessive lateral forces, and hold the cage itself with your hands. If the clip still turns a little, you need to carefully return it to its place with your hands and force. In the working position, this clip is fixed with an internal lock, and you can feel this fixation with your hand. In the following photo you can evaluate the comparative dimensions of the new and old standard Zhiguli starter:
The difference, as they say, is visible to the naked eye. After installing the new starter, the car's engine was started. To be honest, I was delighted when the starter was working. The speed of the crankshaft at startup is such that it seems that the spark plugs have been pulled out of the engine, and cylinder compression has ceased to interfere with the operation of the starter. The startup sound has also changed dramatically. I also liked the fact that when the starter is turned on, the voltage drop in the on-board electrical network is relatively small. So far, the operation of this starter on the car brings true satisfaction. All that remains is to wait for the winter cold and check the confidence of starting the engine in the cold. I think such a starter will be able to do it.
This is interesting: How to decarbonize piston rings
Do-it-yourself diagnostics and repair of VAZ 2107 starter
The starter device is quite complex; it consists of a large number of individual parts. On the one hand, the more parts there are, the lower the reliability of the device, but there is also a plus: some elements can be repaired or replaced. And making repairs yourself is not so difficult, especially since individual parts and ready-made repair kits have been sold for a long time.
However, before repairing, you must first determine what exactly is wrong with the engine starting system. It may be enough to charge the battery and the problem will go away, or maybe you will have to go for a new starter. To understand what the problem might be, you need to identify the main “symptoms”.
Checking the VAZ 2107 starter
To find out if the problem is really with the starter, you can remove it and check it. But before you check the starter, it’s better to find out whether you can get by with “little blood”:
- Inspect the battery terminals and, if necessary, clean them of oxides;
- Check if the battery is sufficiently charged;
- Inspect the wires leading to the starter for damage. If possible, “ring” them with a multimeter;
- Inspect the terminals on the starter, there may be poor contact there.
If everything around the starter is in order, the check procedure is as follows:
- Remove and wipe the starter;
- Check the solenoid relay: connect the positive terminal of the battery to its contact, and the negative terminal to the starter housing. Did the Bendix extend until it clicked? This means that the reason is not in him;
- Remove the back cover and inspect the brush assembly. If there is wear on the paths or the embers are worn out, it will have to be replaced;
- Use a multimeter to check the rotor winding (measure the resistance). The normal resistance value is 10 kOhm, less means a short circuit, and if the resistance goes off scale, there is a break in the winding;
- Use a multimeter to check the contact plates (measure the resistance between them and the body). Normally it should be more than 10 kOhm;
- Check the overrunning clutch: a good one rotates only in one direction, a broken one rotates in both.
Starter performance check and repair
First of all, you should clean the starter housing from dirt, which inevitably accumulates on it during the operation of the car. Then connect the mechanism to the battery: the “negative” wire to the starter housing, the “positive” wire to the contact of the traction relay. A characteristic click should follow, and a drive gear will appear in the front “cutout” of the casing. Now use an ohmmeter and check the armature windings for opens and shorts. To do this, you need to open the cover at the back of the starter and remove the brush holders with brushes.
Then connect the ohmmeter with one end to the armature body, and the other - alternately to the sectors of the winding. If there are no short circuits or breaks, the instrument needle will fluctuate from a minimum value of 10 kOhm and above.
Now comes the integrity check of the stator winding (in other words, located inside the housing, along the walls of the cylinder). Here you simply connect the ohmmeter contacts to the copper wire terminals. The arrow of the measuring device should “lie” in the area of the highest value if there are no problems. If there are breaks or short circuits in the windings of the starter or solenoid relay, there is no point in bothering with repairs if you have never dealt with electromechanics and have not encountered the technology of manufacturing electric coils. It is best (and easier) to purchase a complete starter and install a new starter.
Checking the integrity of the stator winding
An operation that can really be called a repair is replacing brushes. You can easily find out that they are erased during diagnostics. It is enough to turn the starter on its side when it is connected to the battery and turns properly. If the unit immediately stalls, brush wear is to blame. Replacing parts is simple and accessible even to a beginner. It was already mentioned above that it is enough to remove the cover at the rear of the starter. When the brush holder is removed, the springs in it will themselves push out the brushes, which will hang on the wires. Replacement is a matter of minutes.
The main thing is to never allow oil or fuel to come into contact with brushes or wire windings. Electrics do not tolerate moisture or grease. Therefore, during any operations with starter parts, especially when assembling it, act carefully and, if possible, stay away from liquids and fuels and lubricants.
There is one rare malfunction when the starter turns on, but nothing turns. In this case, the bendix is to blame - a device that prevents the teeth of the drive gear from sharply hitting the flywheel. Its main malfunctions are wear of the rollers, the gear itself, weakening of the pressure spring or unsuitability of the lubricant. This part is inexpensive, changes quickly, and therefore there is no point in bothering with repairs. It is better to purchase it in a store; replacement is done on the “return” when the starter is being assembled.
Sometimes the armature bushings need to be replaced, but this is extremely rare because they are made of very reliable material and wear only appears after a really long period of use. There are only two of them - in the toe and back cover. The process of knocking the bushings out of their seats is usually confusing, but by choosing the right attachment, you won’t ruin anything. Next, a part of the required diameter is lubricated and pushed into the hole. If things get tight, don’t use more force; it’s better to sand the bushing body and try again, otherwise the socket may simply burst.