Any car sooner or later needs repairs, and if the gearbox becomes difficult to engage, most likely the problem lies in a faulty clutch. Replacing it on VAZ cars is not a difficult job, but quite labor-intensive, and requires certain metalworking skills.
Replacing the VAZ clutch cable
VAZ-produced cars come in both front-wheel drive and rear-wheel drive, and they also have different clutch drives. If all VAZ classic cars have a hydraulic drive, then in many front-wheel drive cars (2108-2115) the release is controlled by mechanics, and the control element is a cable. Like all parts, the clutch cable (TC) wears out over time and therefore needs to be replaced periodically. The reasons for vehicle failure are:
- jamming of the cable itself in the “jacket”;
- breakage of the remaining threads of the vehicle;
- break of the cable itself.
If the vehicle itself is intact, but the clutch has become difficult to squeeze out, you can try to lubricate the cable. Litol or other grease is suitable as a lubricant, but it should be noted that this is a temporary measure, and you still need to prepare to replace the VAZ clutch cable. Changing the vehicle on a Zhiguli 2108-2115 is very simple:
- We disconnect one end of it from the pedal;
- unscrew the cable fastening nuts on the gearbox bracket (in Figures 1 and 2);
- disconnect the vehicle from the plug on the gearbox.
In order to remove the vehicle, we pull it out into the engine compartment, then install a new part, and use the nuts on the bracket to adjust the cable tension.
How to replace the cable on a VAZ-2110?
There are two ways to replace a torn drive, one of which is more time-consuming and requires removing additional elements from the car, but is more convenient.
With the second method, you don’t need to remove anything from the car and everything is done faster, although the ease of execution is worse. At the same time, the algorithm of work for both methods is the same, so let’s look at how everything is done using the first method, it is still more convenient and also does not take much time:
- We place the car on a flat surface or the side of the road (when performing work on the road) and immobilize it with a handbrake or wheel chocks placed under the wheels. Let's see if the cable is really torn, or if the reason for the failure is a broken release bearing fork. For ease of work in the engine compartment, the battery can be removed from the car;
- We release the cable in the engine compartment.
If it is torn, then you can immediately pull part of it out of the winding simply by disengaging it from the lever with the clutch fork. In the case when the replacement is carried out due to “fluffing”, then first unscrew the nuts securing the cable braid (they are also adjusting) from the mounting bracket located on the gearbox housing. We take two keys for 19 and loosen them, after which we take them out through the slot. Then we loosen the two nuts (8 and 10) of the clutch release drive and only after that we pull out the tip, for which we press the fork lever with our hands and remove the cable together with the thrust bushing. - Remove the windshield wiper bracket; to do this, unscrew two nuts. Pay attention to which direction the plane of the bracket is directed;
- Since the drive is removed through the passenger compartment, from the part of the cable running in the engine part, we remove everything that can prevent it from being pulled through the technological hole - the thrust bushing, nuts 19 and washers.
- Let's go to the salon. It is necessary to remove the cable end from the mounting rod on the pedal. To do this, we climb under the dashboard and find a fixing plate that keeps the tip from jumping off the rod. It is located under a protective cover.
Replacing a VAZ clutch disc
On VAZ models, replacement of the drive (basket) or driven clutch disc is periodically required; repairs to the vehicle are necessary in case of wear or breakage of parts. The main malfunctions of the clutch basket (CB) are:
- grinding the petals 2108-15 (they are erased by the release bearing);
- breakdown of the “spider” 2101-07;
- wear of the KS plate;
- breaking off steel petals.
The main malfunctions of the clutch driven disc (DC) are:
- grinding off friction linings;
- weakening or wear of damper springs;
- DS hub breakage.
In any case, replacing a disk on VAZ cars involves removing and installing the power transmission.
Clutches VAZ 2101
Gear shifting in a car transmission occurs through the operation of the clutch. The clutch mechanism consists of several elements that wear out during operation. For timely diagnosis of breakdowns, it will be useful for you to know their structure.
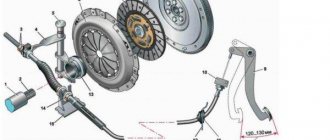
Rice. VAZ car clutch diagram
| 1 – locknut of the clutch release fork pusher;2 – clutch housing;3 – working cylinder of the hydraulic clutch release drive;4 – release spring of the clutch release fork;5 – valve cap for bleeding the hydraulic clutch release drive;6 – clutch diaphragm pressure spring;7 – friction linings of the driven disc;9 – driven clutch disc;10 – rivet-damper stop;11 – damper disc plates;12 – front sealed ball bearing of the gearbox input shaft;13 – driven disc hub;14 – damper spring;15 – pressure ( drive) clutch disc;16 – front cover of the clutch housing;17 – engine crankshaft flywheel;18 – flywheel ring gear;19 – bolt securing the casing to the flywheel;20 – primary (drive) shaft of the gearbox;21 – clutch release clutch thrust bearing ;22 – spring plate for fastening the thrust flange;23 – thrust flange of the pressure spring;24 – rear ball bearing of the gearbox input shaft;25 – drive gear of the gearbox input shaft;25 – clutch release clutch;26 – clutch release fork;27 – friction thrust flange ring; | 28 – fork ball joint;29 – fork retaining plate;30 – fork cover;31 – stepped rivet (9 pcs.) fastening the pressure spring support rings and thrust flange plates;32 – clutch cover;33 – clutch release fork pusher;34 – adjusting thrust nut; 35 – master cylinder plug; 36 – tube fitting socket for supplying fluid to the working cylinder; 37 – piston return spring; 38 – clutch release master cylinder; 39 – bypass hole; 40 – flexible hose fitting for supplying fluid from tank;41 – inlet (compensation) hole for filling the cylinder;42 – master cylinder piston;43 – piston o-ring;44 – clutch pedal pusher;45 – master cylinder pusher piston;46 – cuff seal channel;47 – piston cuff;48 – hole (0.2 mm) for air outlet; 49 – damper friction rings; 50 – damper friction disk spring; 51 – valve for bleeding the hydraulic clutch release; 52 – piston support plate; 53 – working cylinder piston; 54 – plug working cylinder with a socket for the fluid supply fitting to the working cylinder |
Replacing the VAZ 2106 clutch
On a VAZ classic, the clutch can fail for various reasons, and the problem may not necessarily lie in the basket or disc; often the cause of the breakdown is the clutch slave or master cylinder (MCC). Signs of a faulty GCS:
- the clutch does not appear the first time, you have to press the pedal several times;
- The pedal squeeze is “waddly.”
A defective cylinder head can be identified by external inspection; if the cylinder is faulty, it begins to leak. Clutch 2106 is replaced on a car lift or pit, the gearbox is dismantled, and then the disc and basket are removed.
Clutch replacement for cars
VAZ 2106
On a VAZ classic, the clutch can fail for various reasons, and the problem may not necessarily lie in the basket or disc; often the cause of the breakdown is the clutch slave or master cylinder (MCC). Signs of a faulty GCS:
- the clutch does not appear the first time, you have to press the pedal several times;
- The pedal squeeze is “waddly.”
A defective cylinder head can be identified by external inspection; if the cylinder is faulty, it begins to leak. Clutch 2106 is replaced on a car lift or pit, the gearbox is dismantled, and then the disc and basket are removed.
VAZ 2107
All cars of the VAZ-classic family have almost identical power units and transmissions. The engines are very similar in appearance, they differ only in cylinder capacity and fuel system. Manual transmissions on the “Classic” differ only in the number of gears – there are 4-speed gearboxes. and 5-st. Manual transmission. All clutch baskets 2101-07 are the same, only the DS differs - the “penny” discs (2101) have friction linings that are smaller in diameter than the DS 2106.
Replacing the VAZ 2107 clutch is done in exactly the same way as on 2106 models.
VAZ 2109
On front-wheel drive VAZ 2108-09 cars, the clutch changes in approximately the same way as on a VAZ classic, the only difference is in removing and installing the gearbox - on the “nine” there is no driveshaft, but you have to remove the wheel drives (CV joints). There is also a difference - the VAZ 2109 has a cable drive (all “classics” have a hydraulic drive). Replacing the clutch on a VAZ 2109 is somewhat more difficult than on models 2101-07, and therefore the work takes longer.
VAZ 2114
The VAZ 2114 car has almost the same gearbox and engine as the 2109 model. The only difference is that many “nines” have carburetors, while the 2114 cars have injection engines. Therefore, replacing clutch 2114 is fundamentally no different from replacing clutch 2109.
VAZ 2115
If there are slight design differences between the VAZ 2109 and VAZ 2114 in the power unit and transmission, then there is absolutely no difference in engine and gearbox parts between 2114 and 2115, the cars differ from each other only in their bodies:
- VAZ-2114 is a hatchback;
- VAZ-2115 – sedan.
Accordingly, replacing the VAZ 2115 clutch is carried out in exactly the same way as on a VAZ 2114 car.
VAZ 2110
The 2110 clutch elements themselves (basket and disc) have slight differences from the parts of the VAZ 2114-2115 - DS 2110 has an increased diameter (200 mm on the “ten”, and 190 mm on the 2114). But in principle, all these parts are the same, and the 2110 gearbox is removed in exactly the same way as on the “fourteenth” or “fifteenth” model. Therefore, replacing the VAZ 2110 clutch is practically no different from replacing it on cars 2113-2114-2115.
VAZ 2112
The difference between VAZ 2112 and VAZ 2110 cars is the same as between 2115 and 2114:
- VAZ-2112 – hatchback;
- VAZ-2110 – sedan.
It follows that replacing the VAZ 2112 clutch is carried out according to the same principle as on the 2110 model. From all of the above, we can conclude that on all front-wheel drive cars of the VAZ 2108-15 family, the replacement work itself is almost the same, the difference lies only in the details themselves .
Replacing the VAZ 2107 clutch
All cars of the VAZ-classic family have almost identical power units and transmissions. The engines are very similar in appearance, they differ only in cylinder capacity and fuel system. Manual transmissions on the “Classic” differ only in the number of gears – there are 4-speed gearboxes. and 5-st. Manual transmission. All clutch baskets 2101-07 are the same, only the DS differs - the “penny” discs (2101) have friction linings that are smaller in diameter than the DS 2106.
Replacing the VAZ 2107 clutch is done in exactly the same way as on 2106 models.
How to change the clutch disc on a VAZ 2107?
Many VAZ 2107 car owners carry out repair work on their car on their own. And the clutch mechanism is no exception. Although this task is labor-intensive and cannot be called simple, the owners of 2107 have long learned to do it on their own. Today we will tell you how to replace the clutch disc of a VAZ 2107: the video will be presented at the end of the material.
The clutch in a vehicle plays the role of ensuring smooth gear shifting by briefly disconnecting the VAZ engine from the transmission system. It is precisely because the car has a clutch that it can move off smoothly without overloading the engine and helping to increase the service life of most of its elements. This includes the gearbox itself.
VAZ 2107 car
We repair it ourselves (VAZ classic)
We replace the DS and KS on a rear-wheel drive VAZ as follows:
- place the car on a car lift or pit;
- turn off the engine, put the car in neutral gear;
- remove the gearbox lever mounting cover (unscrew the screws);
- we dismantle only the upper part of the gearbox lever; there is no need to remove it completely (we disconnect it at the place marked by the arrow in the figure);
- unscrew the propeller shaft bolts, dismantle the shaft itself (make marks on the cardan and rear axle gearbox - this is necessary in order to secure the shaft according to the same marks during installation to avoid unnecessary vibrations);
- disconnect the speedometer cable from the gearbox, as well as the control center;
- unscrew all the gearbox fasteners (including the traverse), remove the gearbox;
- unscrew the six bolts securing the basket, remove the parts;
- We put new parts in place and put everything back together.
When installing new spare parts, the disk must be centered, otherwise the manual transmission will not fit into place. A factory mandrel or an old “primary” from a “classic” gearbox is used as a center.
Do-it-yourself VAZ clutch replacement (front-wheel drive)
Unlike VAZ classics, on front-wheel drive 2108-2115 it takes a little longer to change the clutch, and the work of removing the gearbox is more labor-intensive. But with experience, professionals perform the operation of removing the gearbox quickly, and besides, there is a method in which it is not necessary to completely dismantle the gearbox; it is enough to just hang it up.
We do the replacement ourselves without completely removing the gearbox as follows:
- we hang the car on a car lift; if the work is being done in a pit, we place tripods under both front sides of the underbody;
- remove the battery terminal (minus);
- unscrew the front wheel bolts and remove the front wheels;
- unscrew the clutch cable mounting bracket from the box and move the cable itself to the side;
- dismantle the speedometer cable (if you do not remove it, when you move the gearbox, it may become overtightened and as a result burst);
- unscrew the ball joint nuts on each side (left and right bearing);
- unscrew the starter and move it to the side;
- unscrew the nuts of the front wheel hubs;
- unscrew the three fastenings of the lower gearbox casing and remove the casing;
- if there is protection under the engine, it must also be removed;
- dismantle the left mudguard;
- remove the three bolts of the left “crab” (bracket), which is attached to the front left, next to the front bumper;
- unscrew the fastening of the left lever (in the area of the wheel);
- loosen the other lever fastening (in the area of the box), move the levers down so as not to interfere;
- remove the left gearbox cushion;
- unscrew the bolts securing the gear shift rod, disconnect the rod;
- unscrew the rear gearbox cushion;
- unscrew the top two bolts securing the gearbox to the engine, screw in the long bolts of the cylinder head instead;
- unscrew all other transmission fasteners - now the box on the top bolts “moves away” from the engine;
- twist the six bolts securing the basket; we install the new parts in place, tightening all the bolts, move the box towards the engine, tighten the bolts to the end through the hole in the starter (turning the crankshaft). With this method, the centering roller will not fit here, so the clutch can only be secured in this way;
- We put all the removed parts back in place.
With this method, there is no need to drain the oil from the gearbox, since the wheel drives (CV joints) are not removed from the gearbox housing. The distance between the engine and gearbox is not too large, but there is enough space to attach the bolts of the basket.
Why do you need to change the clutch?
To replace the clutch you will need to stock up on: A 13mm wrench, and in addition to all this you will also need to take two different types of screwdrivers (Flat and Phillips in this case), and you also need to stock up on a mandrel for centering the clutch disc which in a car store it costs literally 100 rubles! (You can see what this mandrel looks like, which is discussed in the article, just below in the section: “For beginners!”)
When should you change the clutch?
During operation, the clutch of any car wears out over time, and the first signs of a worn clutch that a car will show are:
- Increased noise that begins to appear very clearly when changing gears in the car.
- Jerks can also occur when starting a car, and they can also occur while driving when you depress the clutch pedal, then engage a gear, and then when you release the pedal, the car jerks forward slightly.
- In addition to all this, if the clutch malfunctions, the effect that the clutch “slips” may occur. This is when you are driving a car and at the same time you press the gas pedal, let’s say to the floor, and your car does not accelerate, but the engine speed increases sharply and even reaches the red zone, this effect is popularly called the clutch “Slipping”.
- And in conclusion, we note one more effect, called the “Leads” clutch. The first signs of this effect are as follows: let’s say you engage first gear and at this time the clutch pedal is still fully depressed, but even despite this the car starts to roll. This effect is called the “Leads” clutch.
How to replace the clutch on a VAZ 2101
Removing the gearbox
This operation is not particularly complicated, but it requires certain skills and knowledge of the sequence of work. The complexity of the operation lies in the fact that many elements have to be unscrewed and disconnected, and access to them is not always convenient.
To remove the box you will need the following tools and accessories:
- A set of keys and sockets (including keys for 10, 14, 17, 19);
- Screwdrivers (thin flathead, Phillips, impact);
- WD-40;
- A section of the gearbox input shaft;
- Long wooden beam;
- Rags;
- Marker;
- Container for draining transmission oil;
All work is carried out in three places - the interior, the engine compartment, and under the car. Draw your attention to!!! To remove the gearbox you will need an inspection hole.
The removal sequence is as follows:
- We place the car in the pit and immobilize it with wheel chocks installed under the wheels. We put the gearbox in the neutral position, do not tighten the handbrake;
- First we will do all the work in the salon. At this point it is necessary to remove the lever from the box rod. To do this, pull the lever boot up, which will provide access to the fixing sleeve. You need to carefully pry it up with a thin screwdriver so that it pops out, after which you can pull the lever off the rod;
- Remove the upper plastic bushing from the rod by loosening the petals with a screwdriver, then the rubber boot and the lower bushing. As a result, there should be nothing left on the rod;
- Remove the plastic trim located under the floor covering. To do this, you need to remove the seats, their guides, etc. from the car. It is much easier to make a cut towards the rear seats, this will allow you to not disassemble the interior. Having provided access to the cover, unscrew the 4 screws securing it and remove it. We turn on 1st gear at the gearbox;
- Let's go under the car. For ease of work, the exhaust system should be completely dismantled. To do this, unscrew the muffler from the exhaust pipe. To make it easier to unscrew bolts and nuts, you should treat them with WD-40 in advance;
- Having removed the muffler, we go into the engine compartment and unscrew the nuts securing the exhaust pipe to the exhaust manifold. Then we remove this pipe from the car;
- All subsequent work is carried out under the car. Unscrew the driveshaft from the gearbox flange. Next, unscrew the two safety crossbars to lower the cardan down;
- We substitute the prepared container and unscrew the drain plug to remove oil from the gearbox;
- Unscrew the fastening of the clutch slave cylinder. In this case, there is no need to disconnect the pipe from it; after unscrewing the fastening, it should simply be moved to the side;
- Unscrew the 4 bolts securing the clutch housing cover;
- We support the back of the box with a beam and unscrew the nuts securing the cross member. Carefully pull out the timber. In this case, the rear of the gearbox will go down a little, this will provide more convenient access to the remaining elements that need to be removed;
- We disconnect the chip with the wiring suitable for the gearbox. Unscrew and remove the clutch cable;
- We get to the bottom and unscrew the starter mounting bolts. Start with the top bolt. After unscrewing the fastening, move the starter away;
- We place a support under the rear part of the engine, after lifting the box by hand;
- We unscrew the bolts securing the gearbox to the power plant;
- Supporting it with your hands, rock it up and down to remove it from the guides, and then remove the input shaft from the clutch and lower the box down;
- We install the prepared section of the input shaft into the clutch to prevent displacement of the driven shaft.
If the gearbox is to be repaired, then the VAZ-2101 gearbox is then disassembled, followed by replacement of worn elements, and then the unit is assembled and installed in place.
Removing the clutch
After the box is removed, pick up the mandrel (photo. 1) to center the clutch disc, and then install it in the central hole as shown in the photo.
3) Then, to prevent the flywheel from turning, screw one thick bolt, which is indicated under the letter “B,” into the lower left side of the block, and then using a screwdriver to secure the flywheel from turning “A,” unscrew all the bolts that secure the housing and the clutch pressure plate itself.
4) Next, remove the clutch pressure plate together with the casing, but when removing it, hold it with both hands by its casing.
5) After removing the clutch pressure plate along with its casing, proceed to removing the driven disc, to do this, take the installed disc in your hands and then remove it together with the mandrel from the place where it is installed.
Installing a new clutch occurs in the reverse order of removal.
Which clutch is better to choose for a VAZ 2107-2101
There are many samples of various auto parts manufacturers on the market. In some cases, the seats for the main system may differ, because for the VAZ model, when replacing the VAZ 2105 clutch, units from other classic models of domestic manufacturers are suitable. In addition, the manufacturer continues to produce spare parts.
However, in addition to various replacement models, there are also a large number of counterfeit products on the market, which in their geometric parameters correspond to original spare parts, but their technical characteristics do not stand up to criticism.
The most reliable purchase option. products of the manufacturer AvtoVAZ, which can be easily checked on information resources by serial and serial number. Such products are the least counterfeit; at a higher cost compared to competitors, the likelihood of running into a fake is less. Also, official suppliers of components for the plant itself have a reputation for reliable units, because for some models, from VAZ 2101 to VAZ 2103, the plant stopped producing spare parts, transferring this function to contractors.
When carrying out repair work on the clutch assembly, these components can also be checked on the VAZ 2107 for identification numbers, which makes the purchase safer. With proper care and a calm driving style, original spare parts are quite capable of overcoming the threshold of 100 thousand kilometers or more than 5 years of operation without any repairs.
In addition, simple rules for purchasing both the entire system and its individual parts:
Official manufacturers also, in addition to high-quality assembly, have various marks in the form of embossing or stamping of the batch, company logo or other identification marks.
In addition to domestic suppliers, classic models are suitable for products of some foreign manufacturers, for example, Luk or Valeo. Such products are also very popular, despite their high cost. However, at a high price, the service life of these units is incomparably higher, and the likelihood of technological defects is much lower compared to domestic competitors. At the same time, foreign units are also very popular with unscrupulous manufacturers, so the choice of such products must be approached very carefully.
READ How to Remove a VAZ 2107 Beard
Replacing the working cylinder on a VAZ 2101
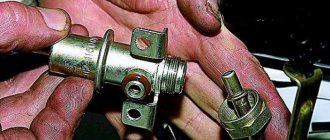
Clutch slave cylinder - not all people know what it is, but you still have to replace it from time to time, but how can you replace it if not everyone knows what it is? In short. In the car we are currently considering a classic, there are two clutch cylinders, one of which is the main one and the other is the worker. They perform almost the same function; when you press the clutch pedal, the piston (indicated by a green arrow) which is located inside the clutch master cylinder moves and thereby pushes the brake fluid further.
At this time, the brake fluid continues its path and thereby rests against the same piston (Indicated by a blue arrow), only which is already located in the clutch working cylinder, and after the brake fluid rests, it begins to push the piston and therefore it moves to the front and there, by pressing the fork, the clutch in the car disengages.
In general, we understand that there must always be brake fluid in both cylinders, but why is it needed, some of you may ask? The thing is that brake fluid is not compressible, and therefore it is used both in the brake system and in the clutch drive, in general, let's get back closer to the topic. To replace the clutch slave cylinder with a new one, you will need to stock up on: A basic set of wrenches, as well as pliers, and you may also need about 1 or 2 liters of new brake fluid!
Where is the clutch slave cylinder located?
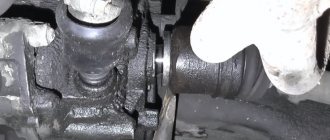
It is located next to the box, and to be more precise, it is secured with two bolts on the clutch housing itself, so you will only be able to see it unobstructed if you are under the bottom of the car, or if you look deep into the engine compartment, For more details on its location, see the photo below, it is indicated by an arrow:
When should you replace the clutch slave cylinder?
As we already understood, inside the working cylinder there is brake fluid due to which the clutch is disengaged in the car, but it happens that over time this cylinder becomes unusable and cracks begin to appear in its body and thereby the liquid that is in it gradually begins to come out of it be, it is very easy to understand if you visually look at it, and you can also understand it without looking at it at all, but how to do this you ask?
The thing is that if the cylinder becomes unusable and brake fluid begins to come out of it, then the first thing that will happen to the clutch pedal is that it will become very easy to press, that is, the system will not be airtight, so to speak, and if the system is not is sealed, then the clutch will practically not work, that is, you press the pedal, it is pressed very lightly and the clutch does not engage, this is perhaps one of the most common problems that happens when the clutch slave cylinder fails.
Removal
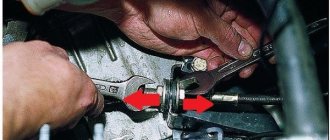
1) To remove, first you will need to stock up on a wrench and, using the wrench, loosen the nut that secures the hose to the cylinder.
2) Then put the wrench aside, and then use pliers to pull back and then completely remove the release spring from the cylinder.
3) Next, without removing the pliers, straighten and then remove the cotter pin from the hole located in the tip of the pusher of this cylinder.
4) Next, using a wrench, remove the two bolts that secure the cylinder to the clutch housing of the gearbox.
5) Now disconnect the bracket from the cylinder, which was also bolted together with the cylinder itself and which serves to secure the tension spring.
6) Then, grasping the working cylinder with your hand, carefully remove it, while removing the pusher, which is indicated by the arrow, from the hole located in the fork.
7) And then completely unscrew the nut that secures the hose to the cylinder, and then completely remove the cylinder from the car.
Important information about the release bearing on the VAZ 2101-VAZ 2107
Welcome! Release bearing - not all people know what it is, why it is needed in the operation of the engine and how to determine that it has become unusable and some other little things, so today we will answer all these questions regarding the clutch release bearing.
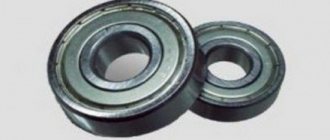
What is a release bearing, why is it needed in engine operation and what does it look like?
This unit looks like an ordinary bearing, but only a coupling is necessarily installed on it, so how can such a bearing be purchased and installed assembled with the coupling. (Coupling indicated by arrow)
In scientific language: The release bearing itself is intended only to retract the clutch pressure plate from the driven disk; in other words, it is activated only when you press the clutch pedal (Indicated by number 17 in the photo) and when you hold it, that is, when you are in the car you press the pedal, and after pressing the pedal, the release bearing (Number 10) presses on the release levers (Number 9), thereby separating the clutch pressure plate (2) from the driven one (3) so that the gears that are in the boxes (One of many gears of the box, indicated by number 12) have stopped rotating, because as we all know, in order to switch gears to the gearbox, its gears must be stationary.
So, after the clutch is pressed and the gearbox gears are stationary, you can safely change the speed without fear that the gearbox will fail, and after switching the speed you will most likely begin to smoothly release the pedal and thereby the release bearing will go back, so after as soon as you remove your foot from the pedal, the release bearing (10) will go back together with the pressure plate (2) and the fork (13), but here the bearing essentially does not play any role, since it simply goes back and this happens due to the fact that the springs that are installed between the clutch basket and the pressure plate (8) are straightened, and because of this the entire clutch drive, so to speak, falls into place, that is, the pressure plate, the release bearing itself, etc.
When do you need to change the release bearing, or how can you tell if the release bearing has become unusable?
As such, this bearing does not have a specific shelf life, but there are several options that can help you understand that the release bearing has become unusable, namely:
Usually when it fails, it starts to make noise, but this noise only happens when you press the clutch pedal and when you hold it, in other cases there should not be any noise, but if you do not adjust the gap between the working cylinder pusher and with a fork, then in this case the bearing will make noise even when the clutch pedal is off. (For information on how to adjust the clutch pedal, see the article entitled: “Adjusting the clutch on a VAZ.” In this article, following the link, find the section: “When do you need to adjust the clutch?” and there it will be said about this gap, which must be between the working cylinder rod and the fork, and this article will tell you how to set this gap if you don’t have one)
What should I do to make the release bearing last longer? These are the questions we are asked very often, because replacing a release bearing is not an easy job and it also pays well, so most people are surprised when they hear such a price, and after that, most people have this question.
So let's answer it. In order for the bearing to serve a long life, the first and most important thing is that there must be a gap between the current of the working cylinder and the fork (This was mentioned earlier). Therefore, if there is no gap as such, and the fork holds the rod under tension, then the release bearing will not live a very long life, because it will always be under tension.
And one more nuance. In order for the bearing to live a long life, you also do not need to constantly keep the clutch pedal depressed; in general, try to significantly reduce the time when the pedal is in the floor and try to touch it only when switching.
Replacing the clutch master cylinder on a VAZ 2101
Clutch master cylinder - thanks to it, the clutch moves away from the engine flywheel, and the principle of its operation is as follows: When you press the clutch pedal, the pusher, which is screwed to the pedal at one end and inserted into the master cylinder at the other end, pushes the piston located in the cylinder, and therefore The piston located in the cylinder moves forward, and as a result, the piston pushes out the brake fluid that is in the master cylinder. After the fluid is pushed out, it quickly flows to the clutch slave cylinder and, as a result, disconnects the clutch from the flywheel.
Important information about the release bearing on the VAZ 2101-VAZ 2107
Welcome! Release bearing - not all people know what it is, why it is needed in the operation of the engine and how to determine that it has become unusable and some other little things, so today we will answer all these questions regarding the clutch release bearing.
What is a release bearing, why is it needed in engine operation and what does it look like?
This unit looks like an ordinary bearing, but only a coupling is necessarily installed on it, so how can such a bearing be purchased and installed assembled with the coupling. (Coupling indicated by arrow)
In scientific language: The release bearing itself is intended only to retract the clutch pressure plate from the driven disk; in other words, it is activated only when you press the clutch pedal (Indicated by number 17 in the photo) and when you hold it, that is, when you are in the car you press the pedal, and after pressing the pedal, the release bearing (Number 10) presses on the release levers (Number 9), thereby separating the clutch pressure plate (2) from the driven one (3) so that the gears that are in the boxes (One of many gears of the box, indicated by number 12) have stopped rotating, because as we all know, in order to switch gears to the gearbox, its gears must be stationary.
So, after the clutch is pressed and the gearbox gears are stationary, you can safely change the speed without fear that the gearbox will fail, and after switching the speed you will most likely begin to smoothly release the pedal and thereby the release bearing will go back, so after as soon as you remove your foot from the pedal, the release bearing (10) will go back together with the pressure plate (2) and the fork (13), but here the bearing essentially does not play any role, since it simply goes back and this happens due to the fact that the springs that are installed between the clutch basket and the pressure plate (8) are straightened, and because of this the entire clutch drive, so to speak, falls into place, that is, the pressure plate, the release bearing itself, etc.
When do you need to change the release bearing, or how can you tell if the release bearing has become unusable?
As such, this bearing does not have a specific shelf life, but there are several options that can help you understand that the release bearing has become unusable, namely:
Usually when it fails, it starts to make noise, but this noise only happens when you press the clutch pedal and when you hold it, in other cases there should not be any noise, but if you do not adjust the gap between the working cylinder pusher and with a fork, then in this case the bearing will make noise even when the clutch pedal is off. (For information on how to adjust the clutch pedal, see the article entitled: “Adjusting the clutch on a VAZ.” In this article, following the link, find the section: “When do you need to adjust the clutch?” and there it will be said about this gap, which must be between the working cylinder rod and the fork, and this article will tell you how to set this gap if you don’t have one)
What should I do to make the release bearing last longer? These are the questions we are asked very often, because replacing a release bearing is not an easy job and it also pays well, so most people are surprised when they hear such a price, and after that, most people have this question.
So let's answer it. In order for the bearing to serve a long life, the first and most important thing is that there must be a gap between the current of the working cylinder and the fork (This was mentioned earlier). Therefore, if there is no gap as such, and the fork holds the rod under tension, then the release bearing will not live a very long life, because it will always be under tension.
And one more nuance. In order for the bearing to live a long life, you also do not need to constantly keep the clutch pedal depressed; in general, try to significantly reduce the time when the pedal is in the floor and try to touch it only when switching.