Purpose of the rear axle gearbox of the VAZ 2107
The main traction unit of a car is the engine. It is the source of energy that is necessary to move the vehicle.
In this case, direct transfer of energy from the crankshaft to the wheels is impossible - the latter will rotate too quickly, and driving the car will become an impossible task.
That is why two components act as “intermediaries” - the gearbox and the rear axle gearbox.
It would seem that one gearbox would be enough to transfer energy (as is done on a motorcycle). But it's not that simple.
A car has not one, but two wheels on an axle, and each of them must rotate at the same speed.
That is why the gearbox is an indispensable component of the car - it “distributes” rotation to both wheels.
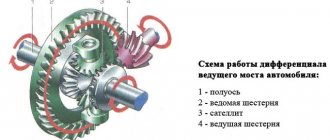
In fact, two important devices are hidden in one unit - a differential (its task is to distribute energy to the wheels in equal proportions) and a gearbox (it is designed to reduce the speed of rotation of the shaft).
Rear axle gearbox design
Modern automobile gearboxes have a rather complex design . The fact is that they are operated under very harsh conditions, so simple gear-to-pinion designs are not found today. Although, of course, a pair of gears are the basis of the gearbox. We invite you to look at the cross-section of the rear axle gearbox:
Depending on the design and tasks performed, the drive and driven gears of gearboxes may have different geometries . Depending on the shape of the teeth, the mechanism will have different efficiency, operating noise, etc. The main options include the following:
- Bevel gear. This is a pair of bevel gears located at an angle of 90° to each other. Can be used in cars with both rear-wheel drive and all-wheel drive;
- Worm-gear. This is a gear and a screw, called a worm, perpendicularly positioned and engaging each other. They are no longer used in transmissions, but in steering mechanisms - very widely;
- Hypoid transmission. A pair of gears located at an angle of 45° relative to each other. This transmission is used in cars with both rear-wheel drive and all-wheel drive;
- Cylindrical gear. Parallel gears. Transmission option for front-wheel drive vehicles.
The already mentioned gear ratio is the main characteristic of the rear axle gearbox. The higher the gear ratio, the heavier the gearbox is installed on the vehicle. For example, trucks have a gearbox with a large gear ratio - the vehicle receives a huge load capacity, but does not produce high speed. In turn, sports cars have a gearbox with a small gear ratio, and the mechanism itself (with the exception of gears) is usually made of lightweight materials - this allows a slight reduction in the weight of the vehicle. By the way, if the car is all-wheel drive, then it has a pair of gearboxes.
Diagnosis of axle gearbox failures
Gearbox malfunctions manifest themselves by the appearance of strange noise while driving. But the difficulty is that determining the source of extraneous sound is not so easy.
To accurately identify the cause, it is worth conducting a small diagnosis:
Accelerate the car on a flat road to 20-25 km/h and continue to increase speed (it is advisable to do this as smoothly as possible).
At the same time, listen to unnecessary sounds and record at what speed they appear and disappear.
Having accelerated to the desired speed, release the gas and gradually reduce the speed with the engine. Listen again to the moment when the noise becomes louder or disappears altogether.
Most often, extraneous sound in the gearbox should appear and disappear at the same speed;
Accelerate the car to 90-100 km/h and move the gearshift knob to neutral position.
Now turn off the ignition and drive the car (the car should stop on its own).
Pay attention to noises when reducing speed. If during such a test a suspicious sound appeared, then it clearly did not come from the main gear gears.
If there was extraneous noise during the first test, but not during the second test, then the problem is in the gearbox or drive gear bearing;
Stop the car and gradually increase the speed. If noises appear similar to those in the first check, then the problem is not in the gearbox.
If there are extraneous sounds only during the first experiment, and their absence in the second and third, you can safely “sin” the gearbox.
Features of replacing the rear axle gearbox
If you are convinced that such an important unit is faulty, then only replacing the rear axle gearbox of the VAZ 2107 can help out. In principle, this work can be easily done with your own hands:
- Drive the car onto the overpass (you can work in a pit in the garage).
- Place wheel chocks under the wheels (if you don’t have them, you can put regular stone or brick).
- Drain the oil from the gearbox (before doing this, it is advisable to drive the car a little to warm up the lubricant).
- Wait until all the oil has drained from the assembly.
- Remove both rear wheels one at a time and install supports.
- Remove the brake drums and axle shafts (it is better to remove the latter rather than leave it dangling from the car).
- Unscrew the gearbox and cardan.
- Make sure the gasket is intact and, if necessary, treat it with sealant.
- After 10-15 minutes, install a new gearbox and assemble everything in the reverse order.
- Add oil.
That's all. Now you know why a rear axle gearbox is needed, how to determine its malfunction and replace it. Good luck on the roads and of course no breakdowns.
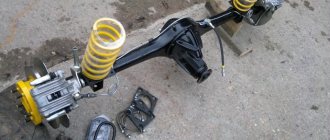
The rear axle of the VAZ 2107 must be removed to repair the gearbox or to completely replace it in the event of its complete failure. It is most convenient to carry out work in a pit, and the car must be installed in such a way that the rear axle gearbox is not above the pit.
Having driven the car into a pit, hang the rear part of the body so that you can remove the wheels. Place a jack under the gearbox and raise the rear axle slightly. In this situation, do the following:
- Disconnect the rear shock absorber lower mounting brackets.
- Drain the transmission oil from the gearbox into a previously prepared clean container.
- Disconnect the brake pressure regulator mounting bracket, then disconnect the tee with brake pipes from the bridge. Remove the rubber hose for the hydraulic brakes.
- Next, you need to disconnect the driveshaft from the gearbox drive flange. Before unscrewing the nut of the fastening bolts, apply a mark to the propeller shaft and the gearbox flange, which you will use as a guide during assembly if the axle is removed for repair and not replacement.
- Lower the rear axle a little with a jack to loosen the rear springs and remove them along with the rubber gaskets.
- Disconnect the parking brake tips from the brake flaps.
- At the final stage of removing the rear axle, all that remains is to disconnect the upper and lower reaction rods, as well as the transverse rod. Place shims under the axle so that when the axle is disconnected, it rests on them and remove the rear suspension rods.
“Quiet, the operation is underway!” or Replacing the rear axle gearbox seal on a VAZ 2107
The sequence of work when replacing the gearbox seal is as follows:
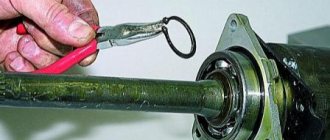
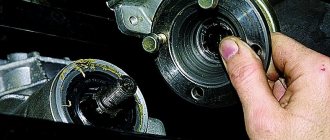
- We measure and record the moment of resistance to rotation of the flange (the axle shafts must be removed!).
- Unscrew the flange nut.
- Remove the flange from the shaft splines.
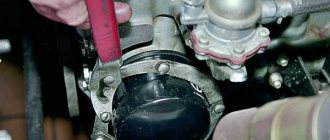
- Using expansion pliers, remove the oil seal. If you don't have pliers, you can pry it off with a screwdriver. Be careful not to damage the surface of the socket.
- We inspect the flange. If its surface has a pronounced groove in the place where the working edge of the oil seal rubbed, then before installing the new oil seal, insert a washer 1 mm thick into the socket. If the flange is damaged on the working surface, replace it with a new one.
- Lubricate the outer surface of the oil seal with lithol and carefully drive it into the crankcase socket using a mandrel of suitable diameter. If there is no mandrel, press in the oil seal by evenly tapping the end along the circumference of the outer diameter. Make sure that there are no distortions - the working edge should be strictly perpendicular to the shaft axis.
- We inspect the lead-in chamfer on the flange. It should not have defects that could damage the working edge. We install the flange, avoiding sudden movements and impacts, so as not to knock the spring off the oil seal. Before installation, you can lubricate the flange chamfer with transmission oil to make the process easier.
- We tighten the nut, periodically checking the moment of resistance to rotation of the flange. Remember that at the end of the tightening the resistance in the bearings increases much more intensely than at the beginning. The moment of resistance to rotation should be 1–2 kgf.cm greater than what we recorded before unscrewing the nut. In any case, if the moment exceeded 9 kgf.cm, and the bearings in the bridge were still old, remove the flange again, take out the inner ring of the bearing and change the spacer sleeve. If the bearings are new (new means they have not traveled a single kilometer, because after a hundred kilometers they can be considered old for adjustment purposes), then the normal moment of resistance to rotation after tightening the nut for them should be in the range of 16–20 kgf. cm. Replacement of the rear bearing affects gear alignment, so please refer to the appropriate instructions for this procedure.
To prevent self-loosening, the flange nut has a special plastic insert, which, when crushed against the thread, creates additional resistance both when screwing and unscrewing. As a rule, such nuts can withstand up to ten unscrewings without losing their locking properties. If in doubt, get a new nut.
We reinstall the axle shafts and brake drums, screw on the driveshaft, and fill in the oil. We make a test drive and if everything is in order, we enjoy life, until we suddenly find a treacherous spot under the bridge again...
Read, it may come in handy: Checking the functionality and replacing the vacuum booster
Video: How to carry out work on a VAZ 2107
Signs of a malfunction of the rear axle gearbox of the VAZ 2107
- Choose a flat section of the road and gradually accelerate on it from 20 to 90 km/h. While driving, you should listen carefully and note the appearance and disappearance of extraneous noise from the rear axle gearbox.
- Release the gas and start braking with the engine. While the speed is decreasing, you should also note the moments when noises appear and disappear.
- Accelerate the car to approximately 100 km/h and, switching to neutral, turn off the engine. While the car is coasting, note the presence and disappearance of noise.
To verify the presence or absence of a mono problem like this:
If the noise remains the same when operating without load as under load, the problem is not in the gearbox. Other rear-wheel drive components should be checked.
Dismantling the rear axle gearbox VAZ-2107
We remove the rear axle gearbox (see the article - How to replace the VAZ-2107 axle gearbox).
Install the gearbox on the table for assembly
Using a 10mm wrench, unscrew the bolt securing the locking plate of the adjusting nut of the right bearing of the differential box
We also remove the plate on the left side.
We mark with a core the location of the differential box bearing caps on the gearbox housing
Using a 17 wrench, unscrew the two bolts securing the right bearing cover of the differential box
Remove the right bearing cover
Remove the adjusting nut
Remove the outer ring of the differential box bearing.
Similarly, remove the cover, remove the adjusting nut and remove the outer ring of the left bearing of the differential box.
If we do not change the differential box bearings, then we mark their outer rings so as not to mix them up during assembly.
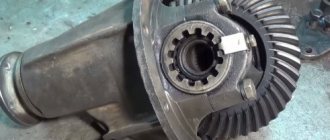
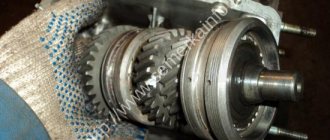
Remove the differential box assembly with the main drive driven gear, inner rings, cages and bearing rollers.
From the gearbox housing we remove the drive gear assembly with the adjusting ring, inner ring, separator and rear bearing rollers and spacer sleeve
Remove the spacer sleeve
We strike with a hammer through a drift on the inner ring of the rear gearbox bearing
Removing the inner race of the bearing
Remove the drive gear adjusting ring.
We remove the oil seal from the socket of the gearbox housing (see the article - How to replace the drive gear oil seal of a VAZ-2107 gearbox)
Removing the inner ring of the drive gear bearing
Using a drift, knock out the outer ring of the front drive gear bearing
Remove the outer ring of the bearing.
Having turned the crankcase over, we also knock out the outer ring of the rear bearing of the drive gear.
To disassemble the differential, use a puller to compress the inner race of the differential box bearing.
If there is no puller, insert a chisel between the end of the inner ring of the bearing and the differential box
By striking the chisel, we move the inner ring of the bearing
Insert two powerful screwdrivers or mounting spades into the gap
We press the inner ring of the bearing.
We also press the inner ring of the other bearing.
Holding the differential box in a vice with soft metal linings, use a 17mm wrench to unscrew the eight bolts securing the driven gear to the differential box.
Using a hammer with a plastic striker, knock the driven gear off the differential box
We take out the satellite axis
Rotating the satellites, remove them from the differential box
We take out the semi-axial gears
We take out the support washers
We wash the gearbox parts, inspect and read the article on checking the condition and assembling the gearbox.
Reasons for failure of the VAZ 2107 gearbox
- untimely replacement of transmission oil;
- use of low-quality oil;
- operation of the bridge with insufficient oil level;
- Frequent vehicle slipping or operation under extreme load conditions.
To repair the rear axle of a VAZ 2107, you will need:
Work must be carried out on a lift or inspection pit.
Before removing the gearbox, it is necessary to drain the transmission oil that is poured into the rear axle of the VAZ 2107. To do this, place an oil container under the drain hole of the axle and unscrew the drain plug.
The next procedure is as follows:
Adjusting and repairing the gearbox requires some skills and careful adherence to technology. It is also necessary to have pullers, stands and special tools. If the above is not the case, you should entrust the work to professionals.
Disassembling the gearbox is performed in the following sequence:
When disassembling the gearbox, it is necessary to put marks on the bearing caps in order to then install them in their original position. To do this, you can use a core (which is more reliable) or a pencil. Marks must be placed on the covers and on the body, so that later during assembly they can be aligned. You should also mark the left and right covers so as not to confuse them.
The inner rings with the separator are removed using a hammer and drift. You need to knock out the rings by lightly tapping them in different places. If you hit only one place, you won’t be able to pull out the ring.
The main pair is available in several variations and determines the gear ratio. The higher the gear ratio, the greater the traction; the lower, the higher the maximum speed of the machine. There are three standard versions of the main pair, used on different VAZ models.
Reference: the VAZ 2102 axle had the maximum gear ratio (4.44). After this model was discontinued, finding pairs with this ratio became problematic, but as practice shows, the best option is installation on a VAZ 2107 with a 1.5-1 engine ,6 gearboxes with 2103 (4.1 gear ratio). When choosing this gearbox in conjunction with a five-speed gearbox, traction and speed are maintained.
Where is the gearbox located?
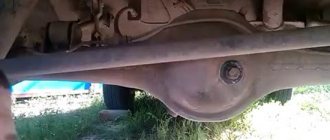
On the "sevens", as on all representatives of the rear-wheel drive family, the gearbox is located at the rear, under the bottom of the car. It connects the cardan to the VAZ 2107 axle and causes the wheels of the car to rotate. Rotation occurs thanks to axle shafts engaged in the gearbox, which, due to the technical features of the rear axle of the VAZ 2107, will have to be removed later. If the car is lifted, or when viewed from a garage pit, the gearbox is simply impossible not to notice.
Signs and malfunctions of the classic rear axle gearbox
Replacing a gearbox with your own hands is a labor-intensive process, which includes not only the purchase of a new unit (quite expensive), but also time costs. Therefore, before you start, you need to make sure that the gearbox is faulty. You can define the signs like this:
- gradually accelerating the car, listen carefully and remember at what moment the noise appears;
- while driving, start engine braking (remove your foot from the gas pedal at speed), at this time listen to the gearbox and note the moment the noise appears;
- accelerate the "seven" to hundreds, switch to neutral and turn off the engine - listen to how the gearbox behaves while coasting.
“If the bridge is noisy both in neutral and at speeds, the gearbox has nothing to do with it. If the hum occurs only at speed (regardless of the number), repairs, or, as a last resort, replacement of the gearbox are inevitable.”
When the signs are identified, it is necessary to carry out another check:
- park the car, secure the front wheels with shoes;
- jack up the rear so that the bridge hangs over (it is necessary that the wheels come off the surface);
- start the engine and accelerate the “seven” to the point at which noise occurs, while the wheels should spin without load.
If the noise has not changed, then the gearbox is clearly in good working order and it is not the cause of the trouble. Here other drive units are checked. Well, if there is no noise when driving without a load, then we are talking about worn gears of the gearbox, which make noise only when driving with a load.
The “seven” gearbox itself is a fairly reliable unit that can withstand a period of 100 to 300 thousand mileage, and there is no need to even look into it. Gears, gear spacer, differential adjustment - all these problems arise during improper operation:
- the use of oil with a low viscosity level, as well as failure to comply with the terms of its replacement;
- operating the “seven” with an amount of oil insufficient for this;
- During movement, the bridge is subject to extreme loads (frequent and unsuccessful slips).
Gearbox removal process
In order to repair or replace the rear axle gearbox of a VAZ 2107, you first need to remove it from the car:
- Drain the oil. This, by the way, may be a reason to replace it.
- Separate the flanges of the cardan and gearbox. To do this, you need to unscrew four bolts and nuts. At this time, it is necessary to fix and immobilize the cardan with a screwdriver or by holding the brake pedal. After unscrewing the nuts, you need to tie the cardan to the muffler. You can simply hang it, but this can also lead to negative consequences for the cardan.
- Remove the axle shafts, because without this the gearbox cannot be removed. At the same time, you can inspect the seals, and if they are worn out, replace them. This will save time and prevent possible malfunctions.
- Separate the beam and gearbox by unscrewing all eight bolts that secure it. When unscrewing the latter, it is necessary to hold the gearbox so that it does not fall. The bolts are unscrewed - carefully remove the gearbox.
Repair and adjustment of the VAZ 2107 gearbox
Before you start repairing the gearbox and its subsequent adjustment, you need to have certain skills, backed up by skills, observe all the nuances and subtleties of this process, and also strictly follow the technological nuances of the process. Therefore, if a person starts work for the first time, then it is better to abandon this idea. In addition, you must have all the necessary tools:
- pullers;
- stands;
- a set of keys, screwdrivers and other accessories.
If something is missing, it’s better not to take risks and trust the professionals. In fact, disassembling the “seven” bridge will not be difficult, but it is one of the few components that requires professional maintenance. The gearbox is disassembled step by step:
- First you need to unscrew the shank nut;
- then the flange itself is removed, the drive gear is pulled out, and the rings responsible for the adjustment are dismantled;
- the oil seal is removed, the oil deflector is dismantled, and using a puller, the inner ring of the bearing is removed;
- the drive gear is disassembled, and the differential is dismantled, and the spacer sleeve, regardless of its condition, is subsequently changed.
To facilitate subsequent assembly, marks are applied to the bearing caps - you can use a pencil, but it is much more reliable to use a core for this. Marks are applied not only to the covers, but also to the body, this will allow them to be assembled correctly later. As for the right and left covers, they also need to be marked, because they cannot be confused; numbers and letters are applied to the covers and body in the appropriate places. The only inconvenience is that you need to carefully clean the covers so that the marks remain in place - that is why, for convenience, it is better to mark the marks.
In order to remove the cage with inner rings, you must use a hammer and drift. By lightly tapping over the entire surface, the process of knocking out the rings occurs. If you only knock on one point, it is unlikely that you will be able to remove the rings.
As a rule, all gearbox repairs consist of replacing the main pair - it takes the main “blow”. The main pair is responsible for determining the gear ratio, and it is produced in various variations. The increase in traction of the “seven” occurs due to the larger gear ratio, and the lower it is, the higher the maximum speed the car gets. Which pair to choose is up to the car owner himself, but there are some tips on this matter.
The bridge with the “deuce” was equipped with a pair with the highest gear ratio (about 4.4), but now it has become almost impossible to find a similar one, since this pair has been discontinued. The most optimal option for the VAZ 2107 is the “three-speed”, it has an indicator of 4.1 - this paired with a 5-speed works great without loss of speed and traction.
The gearbox is assembled in the reverse order (see description above), the only thing that needs to be done is to visually inspect all components for damage, clean and wash in kerosene. The gaps between the gears are subject to adjustment. It is produced by acting on the adjusting rings, the thickness of which is selected depending on the specific situation. Selection is made using probes with different thicknesses and calipers. A torque of about 18 kgf/m is the most accurate when tightening the flange nut.
It is necessary to understand that gearbox repair does not always meet the car owner’s expectations. In order for the unit to serve longer, it is easier to replace it completely than to restore it.
How to determine a breakdown
The cost of the VAZ-2107 gearbox is very high, and repairs are difficult. Not every driver can handle servicing this mechanism. Therefore, before starting work, you need to make sure that it is this gearbox that makes the noise. Follow these steps:
- On a flat stretch of road, accelerate from 20 to 90 km/h. Listen for any strange noises coming from the rear of the car. Do this carefully, acceleration should be smooth.
- Then you need to release the gas and apply engine braking. Pay attention to whether any extraneous sounds appear from the rear gearbox.
- After this, accelerate the car to 100 km/h, turn on neutral speed and turn off the engine. At the same time, while the car is moving by inertia, note for yourself whether any extraneous noise occurs.
A continuing hum, both with the speed turned on and off, indicates that the gearbox is fully operational and there are no problems with it. In the same case, when noises are heard only while driving at high speed, it is necessary to replace or repair the rear axle.
Gearbox diagnostics
In order to finally make sure that there is no problem with the rear axle gearbox of the VAZ-2107, you must perform the following steps:
- Stop the wheel chocks under the front wheels.
- The entire rear of the vehicle must be raised using jacks so that the axle is suspended. Be sure to place the machine on supports.
- Start the engine, then shift into gear and add gas. The main thing is to ensure that the speedometer shows the same speed that you reached while driving.
In the case when, during acceleration without load, extraneous noise still remains, you should understand that there are no problems in the gearbox itself. It is necessary to carefully review all other mechanisms included in the drive design. But if, when there is no load, noise does not come from the gearbox, you will have to repair it. The fact is that when gears wear out, they only make noise under load.
Features of VAZ-classic rear axle gearboxes
All VAZ classic cars are rear-wheel drive, the vehicle moves using the rear axle, which is the drive axle. The VAZ rear axle gearbox is the most important part in the transmission; it is where the main gear is located.
- 1 Device
- 2 Differences in VAZ rear axle gearboxes
- 3 Gearboxes on machine 2107
- 4 Replacing the rear axle gearbox of VAZ 2106, 2107
- 5 Defects in the gearbox
- 6 Adjusting the VAZ rear axle gearbox
- 7 Repair or replacement, which is better
- 8 Locking the rear axle gearbox VAZ 8.1 Related articles:
Why does the gearbox break?
The gearbox on the “seven” is very reliable; on many cars it covers both 100 and 300 thousand km. Moreover, not a single repair was carried out during this period. But on some vehicles, gear wear appears much earlier, usually due to improper operation.
Reasons why gearbox gears fail:
- The lubricant in the gearbox is not replaced.
- Poor quality oil is used. Only high-quality transmission oil must be filled into the rear axle, as well as into the steering gear of the VAZ-2107.
- Extreme vehicle operating conditions, heavy loads and frequent slipping.
- Insufficient amount of lubricant in the gearbox.
In other words, if you monitor the condition of the VAZ-2107 gearbox seals, the oil level, and most importantly, do not allow excessive loads on the drive, then the mechanism will last for many years.
Gearbox repair Simferopol
Along with all other transmission parts, the gearbox is an intermediary located between the engine and the wheels. It has two gears, a number of bearings, and a differential, which has four or six small gears. Also, the design of this part of the car provides for the presence of a special oil seal, without which its correct functioning is impossible.
Naturally, any motorist can take all possible measures to ensure that the gearbox lasts as long as possible. To do this, every twenty thousand kilometers it is necessary to measure the oil level, and also change it when it is not enough. If you use high-quality oil, then repair of the gearbox can ultimately be delayed.
However, sooner or later a situation will arise when gearbox repairs may be necessary (Simferopol suggests ordering this service from us). As a rule, the breakdown of this part of the car is associated with either its subsequent replacement or repair. There are several signs by which you can determine that it is necessary to diagnose this part of the car:
- Oil begins to flow;
- The oil seal fogs up with enviable regularity;
- There is play in the shank;
- Extraneous noises began to be heard in the cabin.
What tools are needed for removal
In order to make repairs, you need to remove the rear axle. To do this you will need the following tools:
- Socket and open-end wrenches.
- Punch and chisel.
- Hammer.
- Bearing ring puller.
- A simple pencil (or better yet, a core).
- Torque wrench.
- Set of probes.
- Container for draining lubricant.
- Calipers.
It is advisable to carry out repairs by placing the car on a viewing hole or lift. But if there are no such amenities, you can raise the entire rear part as much as possible above the ground. Just make sure that the front wheels are secured as securely as possible.
How to remove the gearbox
Before starting the removal procedure, you need to completely drain all the oil that is in the rear axle. To do this, place a suitable container over it and unscrew the plug. Be sure to fill in new oil after all repair work and installation of the gearbox in place.
The repair procedure is as follows:
- Unscrew the bolts that secure the propeller shaft to the rear gearbox flange.
- The rear half of the driveshaft must be disconnected and lowered down so that it does not interfere with work. During assembly, tightening is carried out with a torque of 18 kgf/m.
- Remove the rear wheels.
- Unscrew the guides that are located on the brake drums.
- Completely dismantle the brake drums and unscrew the four bolts that secure the axle shaft.
- Only after this can the axle shaft be pulled out.
- To dismantle the gearbox, you need to unscrew the 8 bolts that secure it to the rear axle.
- After all the measures taken, you can completely remove the gearbox from the car.
Be sure to check the condition of the rear axle bearings. If they become unusable, then they need to be replaced.
Gearbox repair
When making adjustments and repairs to the rear gearbox, you must have certain skills, as well as follow technology. A mandatory requirement is that you must have special tools, pullers and stands at your disposal. If you do not have all these tools, then it is better to have the rear gearbox repaired by a professional.
If you have never tried to repair rear gearboxes, but really want to do it, it is better to first learn from experienced mechanics. Disassembling the VAZ-2107 axle gearbox is not difficult, but this is a vehicle component that requires very high-quality maintenance. You shouldn't skimp on this.
Disassembling the unit
To disassemble the gearbox, you will need to do the following:
- Unscrew the shank securing nut.
- Remove the flange, then remove the drive gear along with the adjusting rings.
- Remove the oil seal, inner race on the bearing and oil deflector.
- Using a puller, remove the outer rings from the bearings.
- Disassemble the drive gear along with the differential mechanism. Subsequently, the spacer sleeve must be replaced.
When disassembling the mechanism, be sure to mark the bearing caps so that they can be installed in the same way during reassembly. It is recommended to use a pencil or core to make marks. Label the right and left covers to avoid confusion during installation. It is advisable to mark these covers using a core.
Using a drift and a hammer, you need to remove the separator and the inner rings. Please note that you should not knock too hard. The rings are knocked out by lightly tapping in a circle. If you hit only one point, the ring will not come out. When repairing a rear gearbox, the bearings or the main pair are usually replaced. These are the most vulnerable elements of the system.