Having mastered the production of the Lada Granta in the liftback body, VAZ began supplying a standard radio (not touchscreen) in the Norma+ car configurations. Let us immediately note that the radio tape recorders intended for Kalina-2 and Granta look the same, but their mounting is different, so these devices are not interchangeable. Looking ahead, let's say that a review made by the owner of a car with a similar radio is presented on video. Now let’s talk about what exactly VAZ is offering today to owners of Kalin and Grant in the Norma+ configuration.
A few words about the radio of the “normal Kalina-2”
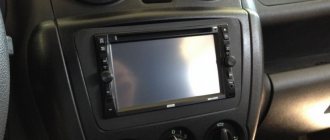
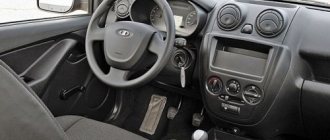
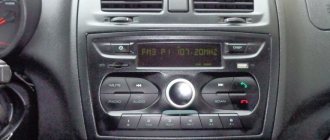
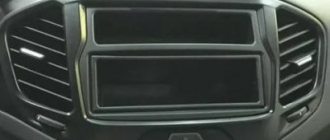
When looking at the “device”, which AvtoVAZ designates with the numbers 2190-7900010-40, it immediately becomes clear that installing such a device in a standard 1DIN compartment will not work. VAZ cars in the “Norma” configuration come from the factory with an empty compartment (its height is 1DIN), and in the “Norma+” radio tape recorder occupies the entire central part of the console. That is, the owner has the following choice: you can install a standard VAZ radio, but then the easy-to-use shelf will disappear, or you can look for and install a unit of standard height. The VAZ radio does not fit into the 1DIN high compartment. There is no touch screen on it, but under the “twist” there is a whole array of plastic buttons.
VAZ push-button radio for Kalina-2
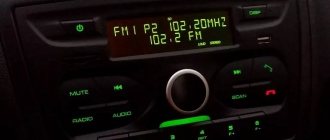
Such a radio, as we see in the photo, can be found in the only configuration of the Kalina Cross. The “device” in question differs from the Granta radio in the presence of a frame with holes. There were rumors about the release of specific units intended only for crossovers, but in the end everything turned out to be simpler - VAZ always ordered radio tape recorders from Itelma, and this tradition was continued. What exactly is offered as part of the “budget” head unit? Let's try to figure it out.
First of all, let's say that the main task of a built-in radio is to play music. To do this, it provides two hardware ports (USB, SD) located on the front panel. Radio stations can be switched using the lower buttons, and the device can also perform the functions of a Bluetooth headset - it’s not for nothing that there are “Receive” and “End End” buttons. The amplifier power is standard, the number of channels is four.
Rear speakers Kalina
If the requirements for music are not high, then you can get by with a standard shelf. If you are a music lover, you will have to buy or make an acoustic shelf.
Installing rear speakers on a Kalina Station Wagon : the wiring for the rear speakers is taped under the upholstery. There are no special features of the process, everything is simple and clear. Example, Kalina station wagon, rear speakers in standard shelves measuring 13cm:
Installing rear speakers on Kalina Hatchback . There is also nothing complicated in the process. Holes are cut in the rear shelf to suit the size of the speakers and secured with self-tapping screws.
Installing rear speakers on Kalina Sedan . Remove the rear shelf, which is held on by clips. If the speakers are larger than the standard size, for example, 21cm, then we cut out pieces of metal and fix the speakers with self-tapping screws. The shelf is installed using new clips (Author of the photo).
Is the warranty void if you installed the speakers in Kalina yourself? AvtoVAZ's response says that if the wiring is not damaged during the installation of audio equipment, then the car will not be removed from warranty.
source
Advice for future and current owners of VAZ push-button radios
The release of standard VAZ “devices”, devoid of an expensive “sensor”, has been expected for a long time. Back in the first half of the year, we were told that such a unit should appear in the fall. As you can see, VAZ was embarrassed to build a graphic display into the radio, and all information on the screen is displayed in standard symbols. The only available backlight color is emerald (there will be more of these colors in crossovers). The device is a “turn on and listen” device, and in standby mode the display displays the time.
Nuances of installing an audio system
Dismantling of the standard audio system is completed
Without knowing all the intricacies of connecting the radio, it will be impossible to carry out the installation correctly, as a result this will lead to rapid discharge of the battery.
Connect the radio in parallel sequence with the red and yellow wires. This connection allows the system to be turned on and off only using a button on the panel of the device itself. Sometimes the radio circuit is specially designed so that the amplifier is powered in standby mode. Such a system consumes more energy, so the battery drains quickly.
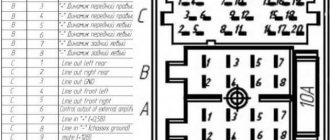
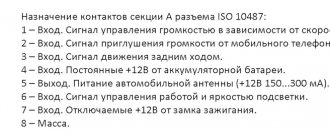
What is the correct installation of a radio? To begin with, you should highlight 4 main wires, each of which has its own color and performs a specific function. The black wire goes to ground, the yellow one provides power to the memory and the audio system itself, the red one provides a signal to turn on the MMC, and the blue one turns on the antenna and other possible devices.
Before connecting, professionals recommend assembling a simple circuit that will allow you to connect the radio through the ignition, due to which the battery will be charged much longer. When working with wires and circuits, you will need to pinout the connector. This will make the circuit easier to work with and understand.
Answers (2)
Of course you can, especially if the sizes are the same. Look at the photo for example.
You need to remove the climate control panel (held on by latches) and so on. It’s better to do this at a radio installation service.
MMS from Lada Grants
There is nothing complicated, even if you want to install a single-din radio instead of a double-din or vice versa, buy a special frame and, of course, the radio itself and that’s it)
Which one do you have now and which one do you want to install?
On VAZ cars of an earlier year of production, such as 2101, 2102, 2106, etc., such a concept as a “standard radio” was absolutely alien. But, as they say: time does not stand still, and along with it, the development of the domestic automobile industry does not stand still either. On new models of Lada cars, especially Kalina, Grant, Vesta, etc., the radio came already from the factory, and not just in the form of a music player, but in the form of a device with the ability to play video and photo formats, and of course sound.
Lada Kalina Hatchback Carrot › Logbook › 11. Installing a 2din radio (part 1)
I wrote about the speakers in the front door, I wrote about the antenna, but I didn’t write anything about the radio, and I didn’t take a lot of photos (probably because I haven’t completed them yet), so please don’t push me - I’ll have to describe everything in words.
After buying a car and the first set of goodies, I started looking at radio tape recorders. The dollar exchange rate was disappointingly raising the prices of radio tape recorders. I found the cheapest one (because I was tight on money) in DNS and bought it. Its name is Supra STM-70
and it cost me 5000 in wooden currency.
Looking ahead, I’ll say right away that it would be better to throw on another 1000 wooden ones and buy a second MYSTERY MDD-7100
, like on my Emik. Why? Yes, because the sound on the Mystery is much more pleasant (I tried changing places), deeper, but on the Supra the entire sound gamut is somehow shifted to the highs. Yes, 13cm speakers don’t know how to bass, but with this Supra they go even more into the highs, but oh well, I bought it like that, I bought it, we’ll install it.
I started by deciding to change the power supply to the radio so that the radio would only turn on when the ignition was turned on. For some reason in the standard wiring +12
and
ACC
go directly to the previous one. It turns out that the radio is always on, and this is an extra load on the battery, this is unnecessary turning the radio on and off. It’s easier for me to turn off the car and go about my business without thinking whether the radio is on or not. There is no reason for me to turn on the radio without a key.
To do this, I took a blue wire (it’s customary at AvtoVAZ that the blue wire is +12
after the key) from the heater control unit and screwed the control wire (ACC) from the radio to it.
But bad luck, before I twist everything up, wrap it with electrical tape and forget it, I decided to check it all. Everything worked for now... until I struck this same ACC wire across the body of the radio! White smoke came out of the radio and I realized that I was in trouble.
Frustrated, I put the radio under my arm and stomped home (to be honest, without hope) to see what had burned. As analysis of the device showed, I was lucky: the only thing that burned out was the track connecting the negative contact of the connector to the body. I soldered the track with a paper clip and the radio came to life.
Types of MMS
The MMS car radio is divided into only 2 types. The first one is called MMC 2 Din. Its characteristic features are that it does not have a CD drive and the Touchscreen function. The second type of radio, also without a CD drive, but with an LCD display and the “Touchscreen” function. Both MMC models are installed on the Lada Kalina car, depending on its configuration - “standard” or “luxury”.
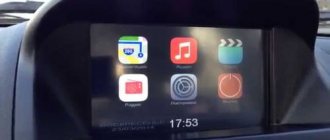
MMS with LCD display
According to its appearance, the MMS radio tape recorder with an LCD display is divided into two types. They differ from each other in their button layout. In order not to confuse them, a special catalog number is provided. The first numbers are the same - 2190 - 7900, indicating the car model on which such a standard radio is installed, as well as the brand of the device manufacturer. And the last numbers directly indicate the type of button arrangement. The numbers “010 – 00” at the end of the index indicate that the buttons are located along with the screen, having a “monoblock” structure. And if at the end there are numbers “200”, then on such a model, the buttons are located separately from the display.
The following radios can be installed in a car of this model:
- the radio may be absent altogether;
- there may be a standard 2 DIN radio with a small monitor for medium configurations;
- a 2 DIN radio with a large display can be installed, which is meant for luxury trim levels;
- the owner can install an alternative 1 DIN radio;
- the owner can install an alternative 2 DIN radio.
So, if you decide to install a large alternative radio of 2 DIN size on your Lada Kalina 2 (VAZ 2192, 2194), then out of ignorance you may encounter a small problem, which, however, is very easily solved.
The fact is that the manufacturer AVTOVAZ is now actively promoting the use of standard radios, or rather the purchase of cars equipped with standard radios. This is simply profitable for the Volzhsky Automobile Plant. But not everyone decides to buy Kalina in the top configuration or simply prefer alternative radios with better sound.
In connection with what was described above, the panel without a radio is not entirely suitable for installing a 2 DIN radio. Therefore, for a more beautiful and high-quality installation, you will need a 2 DIN adapter frame for the Lada Kalina 2 panel (VAZ 2192, 2194).
Buying a 2 DIN adapter frame for the panel Lada Kalina 2 (VAZ 2192, 2194) will not be difficult, just as it will not be difficult to install it on the car. Installation of the transition frame is carried out in simple steps, and the result will look just great. The material used to make the transition frame is high-quality plastic, specially selected for use on the dashboard of Lada Kalina 2.
The same framework exists for Lada Priora, Grant and other Lada cars of the latest generation.
If you have any other questions regarding the 2 DIN adapter frame for the Lada Kalina 2 panel, then contact us for answers in any convenient way. Happy tuning! And cool music.
- 570 rub.
- Description
- Reviews (5)
- Question answer
2DIN transition frame Lada Kalina-2 for installing a 2DIN radio in the standard console trim of the Luxury configuration.
Frame internal opening size:
Before ordering a frame, we recommend that you make sure that the dimensions of the frame match the dimensions of the radio you plan to install.
Please also note that the manufacturer of this frame positions the product as a second-class product; the frame may have some imperfections, for example, sand, bur, etc.
LCD screen
All car radio screens are divided into two types: capacitive and resistive. Capacitive is older, and accordingly, not so hardy. That is why this type of screen is not used on the Lada Kalina 2 car. Instead, the MMS radio has a resistive LCD display that can work stably, regardless of the conditions (in a very cold period of the year, or vice versa, in unbearable heat).
The screen size is 7 inches, which is quite large for a car video player. The brightness is very good, allowing you to see the picture in more detail. The Touchscreen function works flawlessly and does not require any force when pressed. Simply touch it lightly and the device will perform the desired function.
A very significant disadvantage of the MMC is the lack of a visor above the display. In sunny weather, the screen may reflect the sun's rays and glare may appear, which will obviously interfere with viewing the video or image.
Radio capabilities
On the right side of the radio there is a USB connector, which is designed to connect:
- USB Flash card (USB 2.0 and 3.0 up to 64 GB);
- USB Flash player with a memory capacity of at least 1024 MB;
- USB HDD with FAT32 file system;
- Mobile phone (only in charging mode).
On the left side of the radio there is a slot for SD cards. SD Memory Card Slot: Supports SD, SDHC cards of size 32 X 24 X 2.1 mm. SDHC up to 32 GB, SD up to 32 GB.
The file allocation table (FAT) of the connected device must be version FAT16 (2 GB). The maximum number of primary partitions should be no more than 4. It is advisable that the directory tree of the connected device have no more than eight levels. There should be no more than 1000 files in one directory.
While playing files, the display shows all the necessary information about the track. The playback source is selected using the AUDIO button on the left side of the radio. The radio has equalizer presets (JAZZ, POP, CLASSICAL, VOCAL and USER). The range of timbre adjustments for bass, treble, balance, front/rear balance is from “-7” to “+7” units.
The radio has Bluetooth and Handsfree functions. You can connect your phone by long pressing the handset button. When pairing on the phone, the inscription “MMC12” should appear in the list of found devices, the default password is “0000”. After successful connection, the BT icon will appear on the display of the radio. There is no phone book on the Kalina 2 and Grant radio, but it is possible to save up to 6 numbers in the radio’s memory. The audio system also remembers the last outgoing and incoming calls. The manufacturer does not guarantee operation of a phone in Handsfree mode that uses two or more SIM cards.
The radio allows you to listen to audio files from your mobile phone. To do this, you need to connect your phone to the radio via Bluetooth and launch the player on your phone. The manufacturer states that certain cell phone models may not work correctly with this radio, but this is not a sign of a malfunction.
The Kalina 2 and Granta radio has its own battery, which allows you to save user settings after disconnecting the battery for 10 days.
Operating system and available file formats
The standard radio of the Lada Kalina 2 car can play not only music, but also video. But, unfortunately, not all formats are available for viewing on an MMS device. The most common MP3 format is suitable for playing music. It is standard for any audio player. In addition to it, MMC can read less popular audio formats: WMA and WAV.
MMS playback formats
When playing data in this format, only sound will be produced, and the name of the current musical work, its author, the duration of the track, and in some cases, even the album, cover, and year of release of the song being played will be broadcast on the screen.
Video review of the radio
The standard radio for Kalina 2 and Grant has all the necessary functions for a modern car. The audio system works flawlessly, there are no freezes, all operations are performed instantly. The build quality is at a high level. The only disadvantage is the lack of a CD/DVD drive, but nowadays discs are becoming a thing of the past. The standard radio of the Lada Kalina 2 and Granta without an LCD display is a good alternative for those who find physical buttons more convenient than a sensor.
Download the manual for operating the radio (from page 173): To download files you need to log in to the website
Let us remind you that AvtoVAZ installs radios with an LCD display on the “Lux” configuration.
Keywords: cassette player Lada Granta | cassette player Lada Kalina | torpedo Lada Granta | Lada Kalina torpedo
Source
Pairing with devices
MMS in the Lada Kalina 2 car also has a pairing function with different devices. This conjugation can be done in two ways: via a USB connector, or using Bluetooth.
You can connect a phone, flash drive, headset, etc. Using pairing, information can not only be broadcast from the connected device to the MMS screen, but vice versa. When you connect any device, the radio saves the entered settings for it. This serves for the convenience and speed of subsequent connections. Of course, there is one drawback. When connecting several different devices, the settings are erased and the pairing process will take the same amount of time.
It is important to know that in order to read information on the radio, the source drive must have a FAT 16 or 32 file system. The memory size of the connected device does not matter.
Second installation option
There is another way to connect the radio, which will ensure that it is turned on not through the ignition switch, but using a separate button.
First, you should buy a suitable button and a contact block with the wires intended for it at any auto store. All this is not very expensive and will require no more than one and a half hundred rubles. Moreover, it doesn’t matter what the button is if the owner does not need order on the console. It can be from the main beam, or with a different image, the main thing is that it fits under the connector for spare buttons, where the plug is located. The only point is that it is advisable to choose a button with an indicator.
Mounting blocks for installing an audio system
If the wires of the block turn out to be short (and this often happens), it is better to extend them in advance by soldering. Twisting is not suitable here and should not be used.
The button is connected in the following way:
- connector A - for grounding;
- B - passes from the side lights illumination;
- C - removed from the block purchased with the button;
- D - powers the power indicator;
- 1 — battery wire (red);
- 2 - red radio wire.
In one block, two contacts should be soldered together - 2 and D. The button is installed without removing the console. It will be enough to pull out the corresponding plug.
Cut the wire that fits the contacts of the red wire of the radio and solder wires 1 and 2 into the cut. A and B should be connected to the same contacts from the rear window heating button or other similar buttons. Do not forget that during all electrical work the battery should be disconnected.
When everything is connected and soldered, you need to double-check the system and make sure that the circuit and connections are made correctly. Then the slides and the removable radio panel are installed in place. The last step is to check how everything works. Now you can turn the radio on and off with a new button, and you don’t have to worry about charging the battery. One of the nice features of this connection is that when you turn off the radio, all settings are saved.
If, out of habit, the radio was turned off with its original button, this is not a problem, because the indicator of the new button will still light up and remind you of the need to turn it off.
For those who have already installed radios on other Lada family cars, installing a multimedia device on Kalina will be a breeze.
