Every car has an element called a clutch. This unit is designed to transmit torque from the engine flywheel to the gearbox. To engage these two units (engine and transmission), a special clutch disc is used. The VAZ-2106 is equipped with a friction type element. It's single-disc here. The clutch master and slave cylinders are also used. The VAZ-2106 has a fairly simple device. However, sometimes problems happen. So, during operation, the owners periodically adjust the VAZ-2106 clutch. Photos and description of the process are further in our article.
When to do this?
Novice motorists often ask the question: when is the VAZ-2106 clutch adjusted? The clutch drive is designed in such a way that there is free play on the pedal. So, normally it ranges from 0.4 to 2 millimeters. If there is a lot of play in the pedal and noticeable “dips,” it means that the element settings have gone wrong. The car needs the clutch readjusted. VAZ-2106 will not work correctly. When there is backlash, there is no integration of the mechanism in the working joint with the gearbox. Therefore, as soon as the pedal begins to fall, you need to set the free play again.
Pay attention to the clutch slave cylinder. The VAZ-2106 is equipped with it near the transmission. The element must not contain traces of liquid leakage. If the boot is damaged or the tightness of the connections is broken, the mechanism must be replaced.
When is it done?
It is necessary to adjust the clutch on a classic after any work related to the clutch. This includes removing the gearbox, replacing the clutch basket or disc, and replacing the clutch slave cylinder. Also, adjustment is made when there is a clear shift in any direction of the clutch disengagement moment. After all, all structural elements gradually wear out, which necessitates such adjustments. Do not forget to bleed the clutch before carrying out work, releasing air from the hydraulic drive.
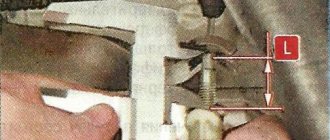
For reference, let's look at the drive adjustment data from the manufacturer. The pedal free play should be within 25-35 mm. That is, from its top position to the moment when the pusher rests on the clutch fork, there should be exactly this distance. This is checked using a ruler. To do this, bring the ruler to the pedal and press the clutch with your hand. When you feel slight resistance, this is the desired point. If the difference between the top position and the moment of switching on is greater or less, you will have to make adjustments.
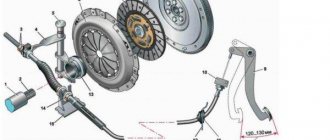
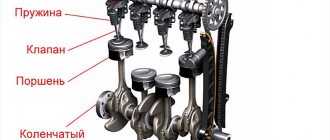
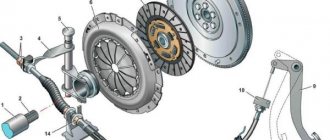
Clutch elements
.
Before you start adjusting, you need to decide what and where you need to adjust. In the cabin, the pedal travel is adjusted, sometimes drivers limit themselves to this work, believing that this is enough and if the pedal is adjusted correctly, everything will return to normal. This is partly true. But in practice this does not always happen. Experienced drivers recommend first adjusting the stroke of the cylinder pusher. This allows you to more reliably adjust the clutch itself. In addition, you can assess the condition of the parts.
Adjusting the VAZ-2106 clutch - method No. 1
In this case, we will set the gap from inside the car, directly on the pedal itself. A special bracket will be installed here. The latter has a clutch master cylinder pusher and nut. Thanks to them, the required gap is set between the two elements (pushrod and clutch cylinder).
Note that from the interior you can only set the initial pedal stroke. If the gap is two millimeters or less, we proceed to adjusting the gap from the bottom of the car.
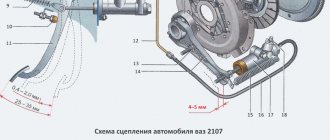
Checking and adjusting the clutch drive on a VAZ 2106 car
To adjust the clutch on a VAZ 2106 car you will need: keys “10”, “13”, “17”, a ruler or square, stop, pliers, cobra pliers. The following adjustments are made in the clutch drive:
1. In the car interior, under the steering column, there is a
clutch pedal travel, a gap is established between the pusher and the piston of the clutch master cylinder. The gap is determined by the initial free play of the clutch pedal, which should be 0.4-2.0 mm.
2. From below the VAZ 2106 car by changing the length of the pusher b
the free play of the clutch fork pusher is set, which should be 4-5 mm.
NOTE After making adjustments in paragraphs. 1 and 2, the full free play of the clutch pedal (before the clutch starts disengaging) should be 25-35 mm.
3. If the initial free play of the clutch pedal is not normal, adjust it by changing the length of limiter 14 (see Fig. 5.2 “Pedal and clutch master cylinder”).
NOTE For clarity, the images in the photo for points 4-7 are rotated 90°.
4. Holding the clutch pedal travel limiter with wrench 1, unscrew locknut 2 1-2 turns.
5. By screwing or unscrewing pedal travel limiter 1 into bracket 2, achieve normal initial free play of the clutch pedal. 6. Holding the travel stop with a wrench 1, tighten the locknut 2.
7. Repeat steps 1 and 2. Without changing the position of the ruler, press the pedal until noticeable resistance appears, selecting full free play of the clutch pedal. Use a ruler to determine the pedal movement, which will be the complete free play of the clutch pedal. 8. If the full free play of the clutch pedal is not normal, adjust it by changing the length of pusher 4 (see Fig. 5.3 “Slave cylinder and clutch release fork”).
9. Remove the clutch release fork release spring.
NOTE The release spring of the clutch release fork can not be removed, but then, when determining the free play of the clutch release fork, you will have to overcome the resistance of the spring.
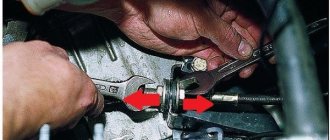
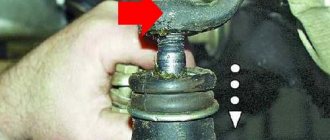
10. Install a square (or ruler) along the axis of the pusher, resting the end of the square against any stationary part of the clutch working cylinder. Press the end of the clutch release fork first forward along the direction of the VAZ 2106. Fix (remember) the position of the clutch release fork on the square. Then move the end of the fork back along the direction of the VAZ 2106 (in the direction of the arrow) and determine the free play of the clutch release fork pusher. If the free play is not correct, adjust it.
HELPFUL ADVICE To make work easier, lubricate the adjusting unit (for example, with WD-40 lubricant).
11. While holding key a
adjusting nut, use a wrench
to
loosen the locknut.
12. Holding the pusher from turning with pliers a
, unscrew the locknut with a wrench
1-2
turns.
13. Holding the pusher from turning with pliers a
, by rotating the adjusting nut with a wrench
,
achieve normal free play of the clutch.
14. At the same time, holding the pliers from turning
pusher, and use wrench
b
to tighten the adjusting nut, and use wrench c
to
tighten the lock nut. 15. Repeat steps 1, 2 and 8. Make sure that the full free play of the clutch pedal is correct.
USEFUL ADVICE Check the correct clutch adjustment in the following ways: 1. Put the VAZ 2106 in neutral gear, start the engine and warm it up to operating temperature. When the engine is running at minimum engine speed, disengage the clutch (press the pedal) and engage reverse gear. The transmission should engage without grinding, knocking or other extraneous noise. 2. While the VAZ 2106 is moving, change gears. All gears should be engaged without grinding, knocking or other extraneous noise. 3. When accelerating a VAZ 2106 car, there should be proportionality between the increase in engine crankshaft speed and the increase in vehicle speed (the clutch should not “slip”).
If the clutch actuator is adjusted correctly and the indicated signs of normal operation are absent, try bleeding the clutch hydraulic actuator. If bleeding the hydraulic clutch does not lead to the desired result, remove the clutch from the VAZ 2106 for repair.
Method number 2
Now we need to set the stroke of the fork pusher. It is adjustable up to 5 millimeters. Use a wrench to hold the travel stop. Loosen the locknut two turns. Next, turn the limiter towards the bracket with a wrench. Selectively set the required gap. After this, hold the limiter again and tighten the locknut back. We take a ruler in our hands and measure the pedal play. To do this, press the clutch pedal with your hand until there is obvious resistance. Measure how far the fork has moved back. If necessary, reset the gap.
We change the clutch with our own hands without removing the transmission
Sometimes setting the gap does not achieve the desired result. In this case, only replacing the clutch on a VAZ-2106 will help. It is quite possible to do this without removing the box. So, where do we start? First, unscrew the propeller drive bolts and the shaft itself. Next, disconnect the contacts from the reverse indication sensor. Unscrew the clutch housing bolts. Dismantle the bottom traverse. Using a thirteen wrench, unscrew the nuts of the gearbox mounting mount. The transmission itself is moved to the side opposite the engine using a pry bar. As a result, the box should lie on the exhaust pipe of the exhaust system. To prevent the unit from sagging and jumping off when replacing the clutch, support it.
How to adjust the clutch on a VAZ-2106 with your own hands
The design solution of the Zhiguli model 2106 is distinguished by its comparative simplicity and at the same time reliable operation. Thanks to these qualities, car owners can carry out most repairs and adjustments themselves. After all, contacting a service is an expensive matter, and not everyone can afford it. This article is about how to adjust the clutch on a VAZ-2106 with your own hands. The instructions will step by step explain all the stages of the work, which, in essence, are setting up the clutch system with the installation of the correct clearances between the components of the structures.
What's next
The next step is to remove the clutch basket. To do this, fix the position of the flywheel (you can use a pry bar) and unscrew the basket bolts one by one. You will need a thirteen wrench (to speed up the process, use a head with a ratchet handle). Carefully move the unscrewed basket to the side and remove the worn clutch disc. We will also need to remove the release bearing of the gearbox input shaft and the clutch release fork.
Signs of clutch problems
Clutch adjustment VAZ 2106
Perhaps every car enthusiast knows the main signs that the clutch requires replacement or its adjustment is inevitable. So, first of all, there are jerks when moving, mechanical crackling when changing gears, a burning smell in the cabin, and slipping of the clutch. All these are not even alarm bells, but let’s say alarm bells, noticing that you must understand that the main transmission mechanism requires adjustment.
Clutch adjustment
Drivers even minimally familiar with the structure of the car will be able to carry out this procedure independently. Here is a clear procedure:
What you need
- There are several types of keys: “10”, “13” and “17”.
- Emphasis.
- Cobra pliers and pliers.
- A ruler to measure the free play of the pedal.
Adjusting the clutch pedal VAZ 2106
Where to begin
- We start by setting the correct gap between the pushrod and the piston that pushes the hydraulic master cylinder. It should be 0.4–2 mm. This can be done inside the car. Under the steering wheel you can find a special clutch pedal travel limiter, and on it there is a special nut with its help, and the required clearance should be set. As a result, the working cylinder and piston should fall into place.
- Next, we measure the free play of the pedal. It should be no more than 4–6 mm. If it does not meet these standards, it must be adjusted. This is done by changing the length of the limiter. Take 2 wrenches, and slightly loosen the lock nut, screw or unscrew the limiter until you can achieve the required free play. Then you need to tighten the locknut back.
- Now proceed to adjust the free play of the release fork pusher. It should be 4–5 mm. First of all, remove the spring and put a ruler, resting it on one side against the main cylinder. Afterwards, press the end of the fork and simply record its value on the ruler. In this case, the working cylinder must be stationary. Then we move the end of the fork back and calculate the free play value. If it is not within the normal range, adjust it using a locknut.
How to adjust the clutch on a VAZ 2101-VAZ 2107?
Introduction! Before you start adjusting, you need to explain in more detail how the clutch is adjusted; for this, read the important information below:
Firstly, the clutch can be adjusted from inside the car; for this purpose, a bracket is installed on the clutch pedal itself, on which a pusher (indicated by the letter “A”) of the clutch master cylinder is installed, and due to this pusher and the nuts located on it, the clearance can be adjusted between the pusher itself and the clutch master cylinder piston.
Note! From inside the car, the clutch is adjusted only for the initial free play of the pedal, that is, the initial free play of the clutch pedal should be “0.4 - 2.0 mm”, if it is less or there is none at all, then adjust it using the pusher nuts indicated under the letter "A" in the photo above!
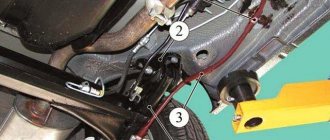
Secondly, the clutch is adjusted from below the car, but in this case you need to measure the free play of the clutch fork pusher, which is indicated by the letter “B”, and it is adjusted within the range of “4 - 5 mm”.
Adjusting the clutch pedal free play:
Note! The free play of the clutch pedal is adjusted not only by adjusting the pusher of the clutch master cylinder, but also by adjusting the pusher of the working brake cylinder. Therefore, for more precise adjustment, we recommend that you also adjust the free play of the working cylinder pusher. (How to adjust the free play of the pusher, see the section: “Adjusting the free play of the clutch fork”)
1) First, while inside the car, use the wrench indicated under the number “1” to hold the travel stop, and at this moment, using the wrench indicated under the number “2”, loosen the lock nut by 1 - 2 turns.
2) Next, by rotating the limiter with a wrench towards bracket “2”, achieve the correct initial free play of the pedal.
Note! When the correct free play of the pedal is achieved, again hold the limiter with a wrench and then tighten the lock nut!
3) Then, using a ruler, measure the full initial free play of the pedal by pressing the clutch pedal with your hand until the pedal begins to be pressed with noticeable resistance. When the pedal begins to be pressed with noticeable resistance, then use a ruler to measure the free play of the pedal, which should be “0.4 – 2.0 mm”.
Note! If the free play is again impaired, then perform a repeat operation to adjust the length of the pusher using nuts!
Adjusting the free play of the clutch fork pusher:
Check: 1) To do this, using pliers, first disconnect the release spring from the clutch release fork, and then completely remove it from the working cylinder.
Note! The spring is removed only for convenience, because in fact the free play can also be checked without removing the spring, but only in this case, when checking the free play, you will have to overcome the resistance of the spring!
2) Then, either using a ruler or a square, check the free play of the clutch fork; to do this, first install the square so that its end is fixed, i.e., rests against something (The best location for checking is shown in the photo below) .
Next, when the square is positioned as it should, press your hand forward until it stops on the clutch fork and fix it in this position. Then note the position of the fork relative to the square. After memorizing, release the fork and thereby measure its free play, which should be within the range of “4 - 5 mm”.
Note! If free play is impaired, adjust the fork!
Note! Due to the fact that the working cylinder is located almost under the bottom of the car, it is usually very dirty or the pusher nuts generally turn sour, and therefore it is almost impossible to move the nuts from their place, so to make work easier, you can spray some kind of lubricant, for example “WD-40”, to make work easier!
1) First, use two wrenches, one of which holds the adjusting nut under the letter “A”, and with the other, loosen the lock nut under the letter “B”.
2) Then, using “Cobra” pliers, secure the push from turning it (the location is indicated by the letter “A”), and then loosen the lock nut “B” by 1 – 2 turns.
3) Next, continuing to hold the pusher with pliers, by rotating the adjusting nut “B”, achieve the correct free play of the clutch fork pusher.
4) Next, again tighten the pusher “A” and the adjusting nut “B” with pliers, and then at the same time tighten the lock nut under the letter “B”.
Preparing to adjust the clutch
Some car owners are wondering how a VAZ 2106 can cost less and be better without hiring expensive professionals. Therefore, our article outlines how to carry out the entire complex of technological operations for adjusting the clutch of a VAZ “classic” with your own hands in a garage or inspection pit.
It should be understood that if deficiencies appear in this mechanical assembly, then adjustment of the clutch is required to allow correct functioning. Adjustment, a video about which is located on the Internet, is needed when pressing the foot pedal for turning on this mechanism unit reveals shortcomings in the operation of the unit. Such malfunctions include:
- dips when pressed;
- there is no complete integration of the mechanism in the working joint with the box with loss of elasticity;
- other possible shortcomings.
How to Adjust the Clutch on a VAZ 2106
VAZ 2106 independent control
clutch This is one of the main devices of a car, which ensures reliable operation and interaction of the main components of the car, driving these mechanisms into motion.
Getting ready to adjust the clutch
Some car owners are wondering how the VAZ 2106 has lower financial costs and is better without hiring expensive professionals. Therefore, our article describes how to perform the entire range of technological operations in order to adjust the clutch of a “classic” VAZ with your own hands in accordance with the criteria of a garage or inspection opening.
It should be understood that if defects are detected in this mechanical unit, the clutch must be adjusted so that it can function properly. The adjustment, a video of which is posted on the Internet, is required when pressing the pedal in order to activate this mechanism unit in order to identify shortcomings of the device. The following faults include:
- syringe when pressed;
- there is no full integration of the mechanism into the working connection with the box with loss of elasticity;
- other possible disadvantages.
To do this you need:
- tool box and other accessories;
- special mixture of WD-40 or similar solution;
- metalwork;
- special solution for the operation of the hydraulic mechanism;
- special tank;
- a ruler of a certain scale.
The necessary clutch adjustments for the VAZ 2106 are usually made at the end of technological operations in order to change the mechanical assembly as a whole. These clutch settings allow you to keep the components in working order for a long time, while avoiding huge financial costs.
First, the hydraulic drive complex of this mechanism must be checked for the presence of so-called “air locks”. If such deficiencies are identified, they should be eliminated. Experts advise changing the hydraulic fluid 100% in this case. The main task when adjusting the clutch is the need to form a certain length between the rod and the piston pump of the clutch cylinder and create the required distance between the output bearing and the friction ring on the drive type disc.
as a way to regulate the clutch drive.
How to setup
drive
clutch
cars
Vas
- classics, tips in the process. VKontakte repair groups.
Garage 56: adjusting the clutch of a VAZ 2107
VAZ clutch regulation
2107.
- Creating the correct size in the master cylinder of the mechanism, including 0.1-0.5 mm using a piston pusher. This is necessary for adjustments. the clutch pedal in its entirety, which is carried out during its assembly. This size is set by moving the pedal in the range from 0.4 to 2 mm.
- Adjusting the required clearance of the pusher movement in the cylinder of the clutch operating mechanism is 3-5 mm. This size is achieved by moving the nut assemblies while the top nut is of the locking type. The amount of pusher movement depends on the available template.
After such adjustments, the free movement of this drive of the above-mentioned mechanism should be from 0.25 to 0.35 cm. The adjustment of the clutch in the area of the joint with bearing offset and ring friction is considered linear in terms of the free movement of the working cylinder, which is 3-5 mm.
- Press the clutch fork you want to move freely 3-5mm, adjust the numbers if necessary.
- Unscrew the locknut slightly and, while holding the rod, adjust the amount of movement within the free movement spectrum using the nut, the dimensions of which should vary between 0.25–0.35 cm.
- Tighten the top nut to the required size.