- Revision instructions
- Connection diagram
- What did you improve?
It’s time to start heating the interior, otherwise in the cold weather the machine somehow stopped providing warmth, and the original fan was very noisy :( The idea of installing a fan from the eight was known for a long time, but never got around to bringing this matter to life. The first to This was decided by my friend Igor. He bought a Nyvka 213, and while it was standing in his garage, he decided to convert his heater. He dug himself, in the evenings. Then it was my turn.
So, a standard heater fan from a VAZ 2108 was purchased , the garage was cleared of snow and things began to boil. Since we did everything together, it was much more convenient to install and dismantle the stove.
To remove the top casing, simply unscrew the four bolts that hold it in place. Once the plastic is removed, you need to remove the cover blocking the air flow.
We thought about making some kind of option to leave the cover, but after much thought we came to the conclusion that it was not particularly needed :) To remove it, you need to unscrew the two nuts securing the bracket, and the cover itself can simply be broken off if it gets in the way :) Next, we take the rod and make markings on the plastic. Let me make a reservation right away: you need to move the fan a little to the side, otherwise the installation will be hampered by the hood lock. This point must be taken into account.
I recommend cutting out the plastic using a cutting machine. Very fast and convenient.
I think I would have to tinker with a nail file until I laughed :) The back wall would also have to be filed down, otherwise the fan simply wouldn’t fit in as needed. Now about the fan.
It is necessary to cut off all protruding parts of the fan mounting. Its body comes with several latches, which, to put it mildly, is not satisfactory. Therefore, before installation, we go over the joint with a soldering iron.
To attach the fan to the casing, we used strips of metal cut from the lining of old speakers. The result is a mesh that is easily and reliably fused into plastic using a soldering iron.
All joints are coated with a thermoplastic gun, and if there is none, then with sealant. In the lower part we make an additional partition made of plastic or duralumin to prevent air from escaping and water from entering directly into the stove radiator.
Everything is attached in the same way, plastic - with the help of metal strips, duralumin - with self-tapping screws. Then everything is coated with sealant.
After the main installation of the fan is completed, we install the casing with the fan in place, not forgetting to first draw out the wires. The earth is very conveniently attached to the fastening bolt, I don’t remember what???? see photo. Plus, accordingly, we take you to the salon.
So far, I have used a standard button as a rotation speed switch, but it is more convenient to install a switch from the same eight, coupled with resistance, since after a test drive it turned out that two speeds are clearly not enough.
And what hasn’t been done yet, but will need to, is to make plates on both sides of the fan to prevent direct contact with water. Made from duralumin, screwed on with self-tapping screws.
I did not remove the lower part of the stove, where the fan was located, because IMHO it does not particularly interfere and it will then be more convenient to attach corrugations to it for supplying heating to the legs. So far, only the holes for air flow to the legs have been cut, and the damper itself for supplying air to the legs is screwed on and sealed with sealant.
Along the way, the regulator for supplying coolant to the heater along with the cable was rebuilt and lubricated, the air duct was cleaned and sealed, and all debris was removed from the heater. The result exceeded all expectations. The first thing that struck me was how quiet it was! At first speed, only air noise is audible. Secondly, it began to really blow, and not that pitiful semblance of air flow that was in the standard stove.
And of course, general satisfaction from the work done :) Good luck to everyone!
Do-it-yourself car lift for the garage
- Winter is on the street. It’s cold... The stove fan died... everyone came...
- BUT: 1) the figure-eight snail was purchased a long time ago and is waiting in the wings; 2) there is a desire and time to modernize the heater...
- SO, having read the forums on installing the figure-eight snail, I do as the great gurus of the forum suggest: installing a fan like Sad Sam and Igor, Sam and other respected forum participants (sorry, I didn’t mention who); The switch was set to eight (now three speeds), the drive of the lower heater panel was made like Trener, for which a special thank you and deep bow to him.
RESULT: the engine is cold - the airflow is wonderful! the engine has warmed up - the airflow is wonderful, BUT WHERE IS THE WARMTH? It became noticeably colder. So, after traveling for two days (there was no free time), I began to figure out what was what.
DANCING WITH A TAMBORO: Having removed the lower heater casing (which is behind the beard), I find out that the radiator (and I have a standard aluminum radiator) is blown through at high speed, and the air simply does not have time to warm up! In this case, the effectively used radiator area does not exceed 30% (!).
Conclusion: I messed up when installing the fan in the boot - part of the fan output nozzle is blocked by the radiator casing and, on top of that, there is practically no air flow distribution because
the distance to the radiator is 54 mm maximum... After thinking a little, I implemented two intermediate options with air flow distributions... Each time it became much better! (but that’s not enough for me, I’m a gardener)… Then, after consulting with a friend (Zhenya, thank you), I removed all the installation dimensions…
- Having removed everything unnecessary in front of the radiator, together with my brother-in-law (Rustam, thank you) by selecting the angles of the plates, we made this thing:
- I collected it the next day alone:
Then the test - I removed the lower heater casing (which is behind the beard), turned on the fan... The distribution of the air flow from the fan is at the “good” level, the effectively used radiator area is within 90% (however, there are minor dips in the air flow pressure, the hand can barely tolerate it.
That's it, I'll calm down on this.
OPERATION: it’s -20 o outside in the morning, I start the engine. It takes a long time to warm up (but that’s another story), at 50 o the windshield quickly came off, and by the time I got to work the car became more than warm. And now I don’t need the copper, three-row radiator, which I almost bought!
How to remodel the stove on Niva 21213 with your own hands?
Do-it-yourself modification of the stove on Niva 21213 is necessary if the car’s heating system malfunctions. There is no point in delaying this, because uneven thermal regulation leads to foggy windows or icing. In any of these cases, the view of what is happening on the road deteriorates. The malfunction causes wear of individual elements of the device or manufacturing defects.
Other details
The standard heater radiator and thermostat are also replaced.
Preference is given to three-row copper radiators. They are more efficient in operation and leak less often. The thermostat is replaced with an analogue one or its thermal insert is modified. Do-it-yourself modification of the stove on Niva 21213 with your own hands is quite labor-intensive and takes a lot of time. To modify the heating system of this car, you can find ready-made kits on sale that make this work easier. The procedure is presented in the video “Remaking the stove on Niva 21213 with your own hands: video instructions.”
Fault Diagnosis
The stove supplied as standard will need to be modified for preventive purposes. The procedure will not take much time, but it will prevent many problems in the future. Driving experience suggests that the first severe frosts will undermine the “health” of the device. The list of main weaknesses is as follows:
- the optimal operating temperature range for model 2121 is from -5 to +10°C;
- inability to warm up the air in the cabin if outside is -8°C or lower;
- when the blowing power increases, the temperature does not increase;
- When driving in 2nd gear, the noise from the Niva's stove becomes significant.
That is why it is better to take the necessary measures in advance. The driver has few alternatives. On the one hand, everything remains in its place. The heating device is used at minimum power. During mild winters this is still tolerable, but with the onset of real cold weather the conditions will become unbearable. On the other hand, it's easy to spend a few hours rectifying the situation.
Further developments proceed as follows. If the heating in the car is running at ½ power, you can limit yourself to minor repairs. The main thing is to make sure that there are no noises or extraneous knocks, otherwise the Niva 21213 should immediately go for a technical inspection.
The presence of an unpleasant sound indicates the need to replace the device. A specialized retail network offers ready-made options for heating mechanisms for Niva. If desired, it can be assembled independently.
The second option is considered more preferable. When you assemble it yourself, you have the opportunity to literally personalize the stove. To do the work yourself, you will need to visit a specialized store or market to buy spare parts.
When purchasing, original parts or analogues are selected. The main thing is that they have a quality certificate. Otherwise, they cannot be installed. It would be useful to rewrite the technical data of the vehicle so as not to exceed the parameters recommended by the manufacturer.
If only fourth speed works
In cases where the motor refuses to work at the first, second and third speeds, but turns perfectly at the fourth, the same resistor with three isolated windings is to blame. If you can’t buy it, you can try to restore it yourself. True, only in the case when the thermal fuse has blown, naturally, no one will rewind the windings, the game is not worth the candle.
Fan resistor
You can remove and check the resistor without dismantling the engine. It's done like this :
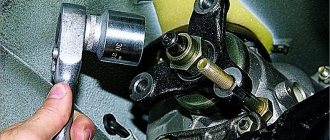
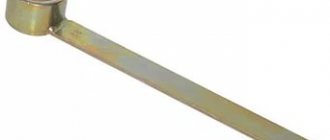
- Use a Phillips screwdriver with a short blade to unscrew the rightmost screws securing the glove compartment.
Unscrew the rightmost screws securing the glove compartment.
Move the glove compartment aside to get to the resistor.
We remove the contact block.
Unscrew the screw securing the resistor.
Built-in fuse
To replace the built-in thermal fuse, any type KSD-160 or RY01-165 is suitable . They work up to a temperature of 150-165 degrees . To solder a new resistor, be sure to use low-melting solder so as not to overheat the part, and during soldering, hold it with thick pliers for better heat dissipation. Good luck to everyone and a comfortable temperature in the cabin!
Technical details of the procedure
The efficiency of the new heating system on Niva will be determined not by the cost of the purchased parts, but by their quality. To operate, you will need the following elements: a car resistor, a figure-eight heater and a “snail”. It is a mistake to believe that only “original” spare parts are suitable for repairing a heating device. The main requirement is technical compatibility.
If in doubt, a drawing of the heating system will provide clarity. The further procedure is as follows:
- Cut a new mounting hole. This is done carefully, because the reliability of the heating system’s operation depends on the quality of the preparatory process. It is recommended to place the engine as low as possible in the air duct, otherwise the device will rest against the hood. This should not be allowed to happen, otherwise the stove fan will not last long.
Replacing the resistor
Having made sure that the fuse is working, we take steps to fix the problem: now it’s clear - it’s all about the resistor. Replacing it with a new one is not that difficult, it’s just that the location of this part creates some difficulties - getting to it is quite problematic.
To solve the problem
, just loosen the glove compartment and pull it out a little (there is no need to remove it completely). Let us warn you right away: free space is limited, so a small Phillips-head screwdriver is best.
Having reached the resistor, turn it off (pull out the terminal), and then unscrew the fastening screw. We install a new one in place of the failed resistor and perform the above steps in reverse order. At this point the repair can be considered complete. Naturally, before starting assembly, we check the stove for functionality.
A few words about the resistor itself
. Purchasing this part should not be a problem - it is not in short supply. The cost is also not amazing (about 200 rubles). Any resistor model for the 2110 line will do.
The resistor, being a mandatory component of the stove, is a speed controller connected in series to the circuit of electric fans. The injection of air heated by the stove into the cabin depends on it.
We hope that the above simple tips will help car enthusiasts resolve the issue on their own.
, without resorting to the services of a car service (it’s no secret that garage auto mechanics can easily diagnose a complete breakdown of the stove, forcing a gullible client to pay a tidy sum for its replacement).
We hope that after reading the article, you will easily cope with a non-working stove on a Chevrolet Niva without resorting to outside help.
The only requirement is accuracy and thoroughness, i.e. avoiding annoying errors during the work process, such as accidental wire breaks and the like. It is better to spend a little more time, but do the work at a high quality level.
Original parts vs analogues: practical advice
As mentioned earlier, such a choice does not affect the quality of the heating system. At the same time, car mechanics make several reservations. For those who plan to use VAZ stoves, it would be useful to check the power system. It is different for some modifications. That is why all actions are consistent with the drawings.
It is permissible to use the VAZ 2108 heater, provided that two recommendations are followed. Firstly, the mounting socket is 1-2 cm larger than the size of the device. The additional area will reduce the vibration impact. Secondly, the switch is installed taking into account the specifics of the VAZ heating system. You will have to tinker less when minor modifications to the system are needed.
The ventilation system is updated in 1-2 hours, depending on the degree of wear of the engine.
If the factory-installed “snail” has no signs of physical wear, you only need to replace the heater “engine” itself.
It’s worse if the factory equipment of a Chevrolet model has manufacturing defects. A complete replacement of the device is recommended. This will save time.
The operation of the heating system determines the comfort and safety of driving. The driver constantly monitors the system's performance. If extraneous noise appears, it is necessary to urgently carry out a technical inspection.
Source: korchim.ru
Removing and replacing and installing the heater fan on the Niva VAZ-21213 and VAZ-21214
Dear friends, today we will tell you how to independently remove and install the electric motor of the stove fan on the Niva VAZ-21213 and VAZ-21214. The procedure is quite simple; we only need two screwdrivers, a Phillips screwdriver and a flathead screwdriver with a thin blade. The reason for removing and replacing the heater motor may be its squealing due to wear on the bushings. Often even new heater motors suffer from this problem, so when replacing the heater motor, we recommend that you install a bearing motor. To get to the motor we need to remove the lower part of the stove body, and to get to it we need to remove the shelf, the radio panel and the decor on the tunnel.
In general, let's get started, and start by removing the storage shelf under the glove compartment, pick up a Phillips screwdriver and unscrew the following screws:
We move the shelf to the side. Then we move on to the decorative trim on the tunnel, it is also held in place by screws, they are located in this way, see the photo below:
Carefully remove the chips from the cigarette lighter, put the tunnel decor aside, we don’t need it for now. Now let's move on to the tape recorder panel. To begin, use a flat screwdriver to pry up the buttons one by one:
Carefully remove the terminals from them and move all the buttons to the side. We recommend labeling the terminals, this will speed up the assembly process and help avoid mistakes!
Gently pull the plastic nozzles of the stove levers towards you, they will come out with force:
Now again we take the Phillips screwdriver in our hands and unscrew the fastenings of the radio panel to the dashboard on both sides:
Then use a flat screwdriver to pry the panel from above and carefully remove
Now we have access to the stove body. But first, we unscrew the rotation relay to remove the minus chip of the heater fan from it:
Now we are interested in the metal latches of the stove, here they are in the photo, there are only 4 of them, two on each side:
They can be removed either by hand or by prying them with a screwdriver. Be careful, they are springy and can fly away in an unknown direction, to the land of lost things
After this, the lower part of the stove body falls into our hands and is calmly removed, we gain access to the culprit of the action - the stove motor:
It is also held on by two metal latches; it is more convenient to pry them off with a screwdriver:
After this, disconnect the motor wiring and remove it from the stove body
We remind you that the heater motor is essentially irreparable and if it “squealed” then the bushings are damaged and then only a replacement is needed. Ideally, straight to the bearing. When assembling and installing, do not forget to put rubber spacers on the motor, otherwise vibration will occur. We perform assembly in reverse order. So you have learned how to independently remove and install the heater motor on the Niva VAZ-21213 and VAZ-21214. Good luck to everyone on the roads and fewer breakdowns.
Source: www.vazdriver.ru
Replacing the heater (radiator)
Replacement is carried out if antifreeze begins to leak. The radiator is located behind the glove box, in a niche on the left side of the front passenger's feet.
New replacement product
The procedure includes the following steps:
- First, turn off the on-board network by disconnecting the negative terminal from the battery.
- Then you need to remove the glove compartment and side panel.
- Drain the antifreeze from the block.
- Next, unscrew the air duct blowing on the legs so that it does not interfere with removing the parts.
- Then remove the cabin air filter.
- Having unscrewed the snail, we move the damper body to the side. Then you should disconnect the wires, and take out the volute and motor.
- Next, unscrew the evaporator screws and disconnect the hose. Moving the evaporator to the side and gently pressing it to the floor, remove the device.
- Then disconnect the pipes. If there are new pipes, the old ones can be cut off.
- After unscrewing the two fastening screws, remove the heater radiator from the niche.
- We install a new device. Assembly is carried out in reverse order.
- Add coolant.
After replacing the radiator, you need to check the functionality of the stove.
Diagnosis of heating and ventilation system faults
– Cause of malfunction
Elimination method
Heater fan motor does not work:
– The heater switch is faulty (check with an ohmmeter)
– The wires are damaged, their tips are oxidized or loose, fuse No. 1 is blown (no voltage is supplied to the electric motor)
Crimp the terminals, strip the tips, replace faulty wires, a blown fuse (checking the circuits it protects for short circuits)
– Wear, hanging of the electric motor brushes, break in the armature winding, oxidation, wear of the commutator (voltage is supplied to the electric motor, but it does not rotate)
– Short to ground of the armature winding (when turned on, the fuse immediately blows)
Heater fan motor does not operate at low speed:
– An additional resistor has burned out, its wires are damaged or their tips are not tightly put on
Replace the resistor, crimp the terminals, strip the tips, replace faulty wires
– Heater switch faulty
Heater fan motor armature rotates slowly:
– The collector is dirty or oxidized, the armature winding has an interturn short circuit (the fuse may blow). Seizing of the armature shaft in the bearings (creaking, squealing, the fuse may blow)
The car interior does not heat up well:
– Insufficient coolant temperature
Thermostat valve stuck open. Replace Thermostat
– There is little liquid in the cooling system
Add cooling system fluid and check the connections for leaks.
– Sticking of the valve in the closed position, sticking of the cable flaps or breakage of the control cables, loosening of their fastenings
Replace faulty faucets, cables, valves. Securely fasten the cable sheaths, lubricate the cables with engine oil, adjust the drives
– Heater radiator is faulty
The temperature in the cabin is not adjustable:
– Sticking of the heater valve, dampers, cables in the sheaths or their breakage, loose fastening of the cable sheaths
Replace faulty faucets, cables, valves. Securely fasten the cable sheaths, lubricate the cables with engine oil, adjust the drives
Source: avtomechanic.ru
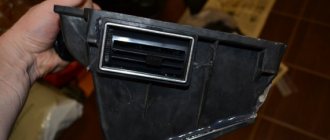
Interior ventilation
Outside air can enter the vehicle interior:
- through open door windows;
- through nozzles 2 (Fig. 1-6) for blowing the windshield, if you move distribution lever 8 and lever 7 for controlling the air supply hatch cover to the right;
- through the side nozzles 1 for blowing the door windows, if you move lever 7 to the right and lever 8 to the left;
- through holes 9 of the heater casing into the driver's and front passenger's foot area, if you open the heater cover with lever 10 and move lever 7 to the right;
- through the central nozzles 5 directly from the air supply box when the car is moving, if the regulators 3 open the nozzle flaps (summer airflow). By moving lever 4 in the horizontal and vertical directions, the direction of the air flow from the nozzle changes.
In the middle position of lever 8 and in the right extreme position of lever 7, air will flow through nozzles 1 and through nozzles 2.
If the car is moving at low speed, you can increase the amount of incoming air by turning on the electric heater fan with switch 12.