Repair of body and components of VAZ 2106
The production of the VAZ “six” began in 1976. Cars of those years, and even more recent ones, even with proper and timely maintenance, require periodic repairs. Depending on the conditions and intensity of use, it may be necessary to repair both the body and individual components or assemblies. Many jobs can be done independently, if you have a certain list of tools and an understanding of what needs to be done and in what order. Therefore, it is worth going into more detail at the various stages of repair of the VAZ 2106.
Anti-corrosion treatment
To increase the durability of the VAZ 2106 car body, the body, bottom and hidden cavities are treated with special compounds. Anti-corrosion agents are divided depending on the area of their application:
- Movili are suitable for processing hidden cavities.
- Wax mastics, PVC compounds or “liquid” plastic are used to treat the surface of a car body.
- Anticorrosion agents for the bottom - bitumen and oil mastics.
When performing rust protection, a number of nuances are taken into account:
- To gain access to the hidden cavities of the car, use standard technological holes, or drill them yourself. In this case, the cavities are plugged to protect against negative environmental influences.
- When corrosion appears, it is removed with a metal brush, and only then an anti-corrosive agent is applied to the rusted area.
- Car treatment is carried out as a preventive measure against the appearance of corrosion and rust.
Installing fender liners will protect the vehicle's wings from corrosion.
VAZ 2106 is one of the oldest domestic models; it began production in 1976, and only in 2006 the car finally rolled off the assembly line. The machine is distinguished by its maintainability and reliability, which allows you to repair the vehicle yourself.
The need to repair the VAZ 2106
The production of the VAZ “six” began in 1976. Cars of those years, and even more recent ones, even with proper and timely maintenance, require periodic repairs. Depending on the conditions and intensity of use, it may be necessary to repair both the body and individual components or assemblies. Many jobs can be done independently, if you have a certain list of tools and an understanding of what needs to be done and in what order. Therefore, it is worth going into more detail at the various stages of repair of the VAZ 2106.
Body repair
The body of the Zhiguli is one of the sore spots of these cars. Body elements are constantly exposed to aggressive environments (chemicals used to treat roads in winter, stones, sand, dirt, etc.). All this leads to the fact that no matter how high-quality the previous repair may be, after a while, pockets of corrosion begin to appear on the body, which rot through and through if nothing is done. The presence of rust not only worsens the appearance of the car, but in case of serious damage it also reduces the strength of the body, which can have a negative impact in the event of an accident. Most often, body parts such as fenders, sills, and doors are repaired on the “six” and other “classics”. The floor and side members are replaced or repaired less frequently.
Wing repair
Repairing the front or rear fenders may involve various actions, which depend on the degree of damage to the body element. If “saffron milk caps” appear on the surface, that is, the paint is slightly swollen and rust appears, then in this case you can get by with simply cleaning the damaged area with sandpaper, leveling with putty, applying primer and paint. But in most cases, the owners of Zhiguli cars do not pay much attention to such details and begin repairs when the wings are already completely rotten. This usually happens in the lower part and in order to avoid completely replacing the wing, you can install special repair inserts. For this procedure you will need the following list of tools and equipment:
Let's look at the repair using the example of the left rear fender.
We carry out the work in the following order:
Tools
To carry out work on restoring the body of the “six”, we will need the following set of tools:
- A set of hammers of different types and weights. Rubber mallets and percussion instruments with a grooved working surface.
- Special hooks.
- Reverse hammers.
- Impact spoons.
- Jack.
- Anvils and substrates of various shapes and sizes.
You should also stock up on 8 and 22 wrenches, as well as a screwdriver. You will need these tools to remove body parts such as bumpers or trim moldings.
Engine repair
Its correct operation, developed power, consumption of fuels and lubricants directly depend on the condition of the power unit. The following symptoms indicate that there are problems with the engine:
The following factors can lead to possible problems:
Cylinder head repair
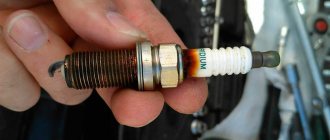
The need to repair the cylinder head or dismantle this mechanism may arise for various reasons. One of the most common is damage to the gasket between the head and the block. This causes coolant to enter the combustion chamber or the oil. In the first case, white smoke will come out of the exhaust, and in the second, when checking the oil level, an emulsion will be visible on the dipstick - a gray, creamy substance.
In addition to a damaged gasket, cylinder head valves and their seats (seats) can sometimes burn out, oil seals can wear out, or the chain can stretch. Almost all repair work on the cylinder head involves removing this unit from the engine, with the exception of replacing the camshaft or valve seals. Therefore, we will consider how and in what sequence to repair the cylinder head. To work, you need to prepare a certain list of tools:
The set of tools may vary depending on the repair work being carried out.
Removing and repairing the mechanism consists of the following steps:
For any repair that involves removing the cylinder head from the engine, it is necessary to replace the cylinder head gasket.
Replacing the piston group
The piston elements of the “six” power unit constantly work under high temperature and mechanical loads. It is not surprising that they also fail over time: both the cylinders themselves and the pistons with rings wear out. As a result, disassembly of the motor and replacement of failed parts is required. The main signs indicating a malfunction of the piston group are:
Sometimes the engine may stall, which occurs when there is a malfunction or complete failure of one of the cylinders.
If any of the above symptoms occur, you should consider repairing the power unit. Delaying this procedure will only worsen the condition of the internal elements, which will lead to higher costs. To disassemble, troubleshoot and repair a VAZ 2106 engine, you need to prepare the following tools:
The piston group changes in the following sequence:
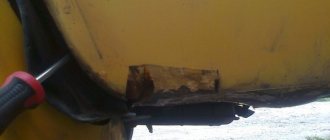
Threshold replacement
The thresholds on the VAZ 2106 during long-term use of the car become covered with rust and, as a result, rot. To replace damaged body elements, perform the following algorithm of actions:
- The doors are removed, the floor mats are removed, and the aluminum trim is dismantled.
- Remove the rusted body element. To do this, use the thresholds, dismantle them using a drill, and cut them out of the fastening with a grinder.
- Clean the work surface from dirt and remove rust.
- Next comes the installation of new thresholds. To do this, weld the connector in place of the dismantled parts.
- After adjusting the elements to size, they are welded to the car body.
- At the end of the work, a trim is attached to the thresholds, it is primed and painted.
When performing repair work to replace thresholds, the trim is washed, corrosion is removed from it, and old paint and primer are removed.
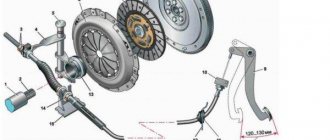
Transmission repair
The VAZ “six” was equipped with two versions of manual transmissions - four- and five-speed. Both units are interchangeable. The VAZ 2106 gearbox is simple and at the same time reliable, which allows the owners of this car to carry out repairs themselves in case of problems. The main gearbox malfunctions are:
Table: main faults of the VAZ 2106 gearbox and ways to eliminate them
| Cause of malfunction | Remedy |
| Presence of noise in the gearbox (may disappear if you depress the clutch pedal) | |
| Lack of oil in the crankcase | Check the level and add oil. Check for oil leaks, clean or replace breather |
| Worn bearings or gears | Replace damaged or worn elements |
| There is no noise, but the speeds are difficult to switch on | |
| The shift lever is damaged, the spherical washer, the gearbox lever travel limiting screw are worn out, the lever is bent | Replace damaged parts |
| The lever joint jams | Replace the worn element, lubricate the joint with the recommended lubricant |
| Rusks and dirt get stuck in the fork rod sockets | Replace parts |
| The movement of the coupling on the hub is difficult | Clean the splines, remove burrs |
| Forks are deformed | Replace with new ones |
| Clutch won't disengage | Troubleshoot clutch problems |
| Between third and fourth gear there is no way to lock the gear shift lever in neutral | |
| Broken release spring | Replace the spring or replace it if it has come off |
| Spontaneous gear shutdown | |
| Loss of elasticity of clamps, wear of balls or rod seats | Replace parts |
| Worn synchronizer rings | Replace parts |
| Clutch teeth or synchronizer ring are worn out | Replace damaged parts |
| The synchronizer spring has failed | Install a new spring |
| There is a noise, crackling or squealing sound when shifting gears | |
| Incomplete clutch disengagement | Troubleshoot clutch problems |
| Insufficient oil level in the crankcase | Check for oil leaks, add oil, clean or replace the breather |
| Gear teeth worn | Replace parts |
| The synchronizer ring of a particular gear is worn out | Replace worn ring |
| Presence of shaft play | Tighten bearing fastenings, replace worn ones |
| Oil leak | |
| Worn cuffs | Replace worn elements. Clean or replace the breather |
| Wear of shafts and nicks in places where cuffs are installed | Sand with fine grain sandpaper. Replace cuffs. If there is severe wear, replace parts |
| Breather clogged (increased oil pressure) | Clean or replace the breather |
| Weak crankcase cover, worn gaskets | Tighten fastenings or replace gaskets |
| The oil drain or fill plugs are not fully tightened | Tighten the plugs |
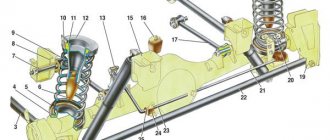
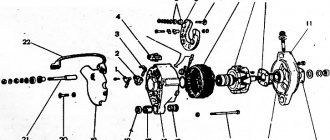
Rear axle repair
The “six” rear axle is a fairly reliable unit. Malfunctions with it occur with high mileage, prolonged intense load and untimely maintenance. The main node problems faced by owners of this model are:
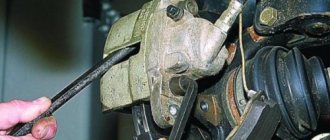
Oil from the gearbox or rear axle stocking mainly begins to leak due to wear of the shank or axle shaft seals, which need to be replaced. The gearbox seal is changed using the following tools:
The procedure for replacing the cuff is as follows:
If there is a leak in the axle shaft seal, then to replace it it is necessary to dismantle the axle shaft itself. The replacement process is not difficult. To eliminate other faults in the gearbox, you will need to remove the mechanism from the car and completely disassemble it for troubleshooting.
Only in this way can it be determined which element has failed and needs to be replaced. In most cases, hum and other extraneous sounds appear when the main pair gears, as well as axle gears, satellites, gear bearings or axle shafts wear out.
If the rear axle gearbox has been disassembled, after replacing the damaged elements, it is imperative to correctly adjust the mechanism, namely, set the clearances between the gears and the preload of the bearings.
Overhaul of VAZ 2106
The overhaul of a sixth model Zhiguli or any other car is usually understood as a complete disassembly of the units or body in order to eliminate certain malfunctions. If we are talking about body repair, then during its implementation any defects (corrosion, dents, etc.) are completely eliminated, followed by preparing the car for anti-corrosion treatment and painting.
When a complete repair of any unit is carried out, in most cases, gaskets, lip seals, bearings, gears (if they have a large wear rate) and other elements are replaced. If this is an engine, then during a major overhaul the crankshaft and cylinders are bored, the camshaft and piston group are changed. In the case of the rear axle, the main gearbox pair or differential box assembly is replaced, as well as the bearings and seals of the axle shafts. If the gearbox breaks down, the gears and synchronizer rings of a particular gear are replaced, and sometimes the input and output shafts are changed.
VAZ 2106 is an easy-to-maintain car. Almost every owner of this car can repair the body or any mechanism with his own hands, and this does not require special and expensive tools, with the exception of a welding machine and any measuring instruments. However, you can also borrow them from friends. If you have certain skills in automobile repair, then restoring the functionality of your personal vehicle will not be difficult.
Source
Process technology
The VAZ 2106 body is straightened immediately before painting the restored part:
- The surface to be treated is cleaned of dirt, washed, dried and degreased. Remove old paint from the working surface.
- Use frequent gentle blows of a hammer to smooth out the dent. If the defect is deep, then the process is performed from the edge of the damage, and gradually moves towards its center. Metal substrates are placed on the reverse side of the area to be restored. They must have the appropriate shape.
- Metal breaks are repaired using a welding machine. Next, the weld is ground.
- The area restored from damage is covered with putty. It levels the work surface.
- The putty part is sanded and painted.
The putty should be applied in a thin layer. Otherwise, the paint will become covered with numerous cracks and begin to fall off.