Replacing the front and rear brake cylinders on a VAZ 2110
The braking system is one of the most important in any car.
The VAZ 2110 is no exception. The reliable operation of its brakes guarantees trouble-free driving and safety for both the driver and his passengers. The brake system of the VAZ 2110 is divided into three elements:
- Front brakes.
- Rear brakes.
- Hand brake.
All of the above elements form a kind of brake circuits. The VAZ 2110 is distinguished by their diagonal layout.
When braking, the following brake devices are simultaneously activated in pairs:
- front right wheel and rear left wheel;
- front left wheel and rear right wheel.
This gives you a better chance of avoiding an accident, even if one of the brake circuits fails. In this case, the car moves along the trajectory chosen by the driver, and does not uncontrollably evade it (that is, it does not “skid”).
Front brake device for VAZ 2110
The front brakes are installed in the front right and left wheels respectively.
The design of the front brakes of the VAZ 2110: 1 – brake disc; 2 – pad guide; 3 – caliper; 4 – brake pads; 5 – cylinder; 6 – piston; 7 – sealing ring; 8 – protective cover of the guide pin; 9 – guide pin; 10 – protective casing.
They include:
- Brake disk.
- Brake pads (their degree of wear must be carefully monitored).
- The brake cylinder (in combination with the caliper and with proper elasticity of the sealing ring, ensures self-regulation of the distance between the discs and pads).
- Brake cylinder piston (located in the brake cylinder and equipped with an O-ring).
- Caliper (connected to the brake cylinder using bolts).
Signs of major front brake failures and how to fix them
Let's look at breakdowns of the main elements of the front brakes and briefly describe how to fix them:
- To stop a moving VAZ 2110, you need to press the pedal with significant force, then the pedal becomes very pliable and is easily squeezed. In this case, the reasons and how to eliminate them may be the following: ❶ The brake pipes, hoses or fittings connecting them are clogged or bent uncontrollably. This is revealed by inspection - in case of bends, it is recommended to replace the part, and if there are no bends, blow out the brake line (it consists of these same tubes, hoses and fittings) with air. For example, using a compressor, a rubber bulb or a large medical syringe. Of course, the entire highway must be dismantled before this. ❷ The o-rings of the brake cylinder piston have swollen and caused it to seize. This is revealed after disassembling the brake cylinder. The cause of this malfunction is engine oil getting into the brake fluid. This can be corrected by replacing the O-rings and, accordingly, completely replacing all the brake fluid. Before adding new fluid to the brake system, it is recommended to thoroughly flush the system. ❸ The pistons of the brake cylinders are tightly jammed (due to misalignment). After disassembling them, you need to replace them with new ones.
- When you press the brake pedal it moves too lightly. In this case, the reasons and how to eliminate them may be the following: ❶ Incorrect interaction of the brake discs and brake pads. Usually occurs due to uneven surfaces. The way out of this situation is to carefully grind and adjust both the brake disc and pads. ❷ Upon visual inspection, after disassembling the brake assembly, curvature of the pads is visible. In this case, you just need to replace the deformed brake pads with new ones. ❸ If the first two explanations do not apply, then most likely there is atmospheric air in the hydraulic drive of the brake system. The solution is to remove it completely. In this case, simple equipment is used, such as a rubber bulb and a plastic container with a volume of 1.5-2 liters. An assistant is needed for this operation.
- During operation, the brakes seem to jam, stick, and then it goes away. In this case, the reasons and how to eliminate them may be the following: ❶ During a visual inspection, you may notice a weakening of the caliper brackets. Therefore, the bolts securing them just need to be tightened. ❷ The inspection may also reveal that the caliper thrust plate bolts are loose. In this case, as in the previous one, you need to tighten them more tightly. ❸ If the above symptoms were not noticed, then you should pay attention to the brake disc. After studying its markings, it will probably turn out that it does not correspond to the required VAZ 2110 in terms of friction properties. The solution is to immediately replace it.
- When you press the brake pedal, you can feel the rigidity of its movement. In this case, the cause is most likely seizing or wedging of the brake cylinder pistons. The caliper may also be deformed. After disassembling the unit, the caliper and cylinders can be repaired, but it is advisable to replace them with new ones.
- When you press the brake pedal steadily for some time, it seems to fall through, the distance between it and the floor of your VAZ 2110 sharply decreases. Most likely there is a leak somewhere in the brake line or the components it connects. This can be determined by inspecting the brake system. Here you need the help of a second person. He must depress the brake pedal as much as possible, and at this time the technician must carefully inspect all brake pipes, hoses, fittings and cylinders for leaks. It is recommended to completely fill the brake system with fluid before this procedure.
- When you press the brake pedal, you feel it go all the way down, but after that the normal motion returns. These signs indicate contamination of the brake disc or significant corrosion of the parts securing it. This will be determined after inspection. Contamination and corrosion are then neutralized by thoroughly cleaning the surfaces.
- Applying constant force to the pedal, we observe its sharp lowering to the floor of the car. There may be two reasons for this. The first is a leak from the brake fluid system. Having determined this, eliminate the leak by replacing the leaky part. The second reason is that the brand of brake fluid does not match your VAZ 2110. If the brand of brake fluid is unknown, then you need to drain it, flush the system and fill it with the recommended brake fluid.
- The distance that the brake pedal was usually pressed suddenly became significantly greater than before.
This phenomenon indicates that either atmospheric air is in the brake lines. In this case, it must be removed as described above, or upon inspection, severe wear of the brake pads will be noticed (more than 30% of the thickness of the new pads has been erased). In the latter case, you need to change the pads from the entire wheel axle to new ones.
Lada 2111 Follower of the armored personnel carrier › Logbook › Ideal standard brakes of the VAZ-2111 (2110).
In continuation to the previous bortovik:
My guess is that the front calipers are due to the rare use of the car (the car is used on weekends, usually for long trips, the last one was the day before the car was put into operation, 1000 km in one breath) have become sour or the lubrication has failed time (during final assembly, due to the lack of normal lubrication, the calipers were lubricated with grease from the Mercedes A-Class brake repair kit). Well, as for the rear drums, I’ll open them up and have a look! For one thing, I will introduce you to the condition of the brake system after several years of operation.
Let's go: I take off the hubcaps and inspect the wheels. For the winter, install a winter kit, standard stamping, processed in a hypercube and painted using epoxy primer. Well preserved!
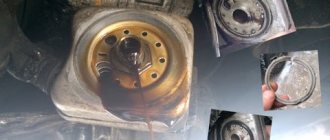
I remove the drum. Who asked why paint the inside of the drums, the brake shield and all that? Look how much more pleasant it is to work now that there is no rust)
I remove and disassemble the cylinder, its pistons move a little stiffly.
Cylinder, piston, retaining ring (this is the shape of a Volga, the stopper does not scratch the cylinder mirror at all, it is made wisely!) and cuffs
I disassemble it simply - I clamp the tail of one cylinder in a vice and press the cylinder first with a lever from a screwdriver, then by tapping with a hammer. Then I knock out the second one from the inside with a screwdriver
These are the reasons for the tight running - the pistons have begun to corrode. There are traces of corrosion in the piston-cylinder gap.
I disassemble, clean with sandpaper, polish the cylinder mirror as standard (without fanaticism. 800 sandpaper. 1500-2000 with water)
On one side there are small shells. when the piston reaches them with the cuff, there is a possibility of the cylinder leaking. I would replace it as planned during the next scheduled work, and in one go I would grind the brake drums (there are large “grooves” on the removed one and, perhaps, in one go I would change the brake pads (up to a pack. For even drums, new pads are better), but this is at the end of the post
I take mounting paste Ate 03.9902-0501.2
And I collect, carefully lubricating
I blow through the inside of the drum with a compressor, wipe the pads and the surface of the drum with a degreaser (oh, I wish I could sharpen it...) And assemble the right rear
Then I disassemble the rear driver's side. However, how much cleaner and less worn out it is here
And the cylinder is like new
I do the same with it (polishing, lubricating, assembling) and after blowing and degreasing, I assemble it. Notice how much less wear there is on the drum than in the photo on the other side
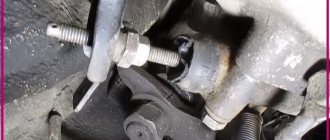
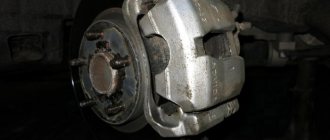
Now it's the front calipers' turn
I take it off and take out the pistons. They pull out without pressure, I pull with pliers, but how tight is the grease that was once laid...
Inside, sit by yourself. The brake is 2 years old, like all brakes. Changing the fluid by this time is mandatory!
And here is the condition of the pistons after a long time of polishing. Almost ideal, thin waistband opposite the cuff. I will say that in person it is almost invisible, this photo with flash emphasizes the wear and tear
I check the condition and tightness of the anthers. On the right there are 2 from the Mercedes - everything is completely ideal, on the left - standard ones. And surprisingly, the regular ones are also like new and sealed.
Therefore, I decide not to climb inside, the guides move perfectly, the grease for the guides from the Mercedes A-Class brake repair kit is placed inside.
I rub the pistons with 2000-grit sandpaper, sand them with felt and assemble the calipers, again with assembly lubricant. Now the pistons move by hand)
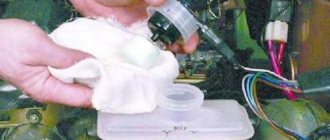
I collect it, fill it with new brake fluid (exactly every couple of years it needs to be changed to new one)
In working brakes, there should be no deposits inside the reservoir, only clean, transparent brake fluid!
I pull up the handbrake and go for testing)
And most importantly, what happened? And it turned out to go back 2 years) The brakes are stock, and even with good tires, even on wet asphalt until the wheels lock, allowing you to “hang” on the seat belts. Braking is clearly predictable. during emergency braking from high speed, the car stops smoothly, it does not cross or throw to the side (even with the steering wheel released). Blocking occurs simultaneously along the axes, front and then rear. And the body feels that the brakes are correct, the car stops with a slight trim on the nose, tenaciously biting into the asphalt with all four wheels. and not like before the autopsy, when the butt was pulled more toward itself. Well, the best part is that for smooth braking, you just need to place your foot on the brake pedal and press down a little, almost without effort, and the car starts to slow down smoothly. Actually, this is the best test for the quality of the braking system - the car should begin to brake at the initial stroke of the brake pedal. when there is still no special effort on the pedal.
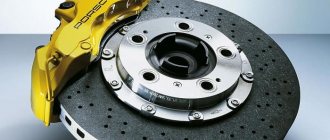
Moral of this post 1) You can quite easily make almost ideal brakes from the standard brakes of a VAZ-2110. When using good brake discs, cast iron drums and branded pads, I’m even afraid to imagine how the Lada will brake in stock. Clearly better than many new budget foreign cars. 2) To implement the first point, you must have calipers and cylinders polished and lubricated with proper mounting paste 3) The rear drums must be opened at least once a year and cleaned and purged, otherwise the right rear brake will wear out due to driving on the dirty side of the road. will wear out much faster than the left one and in a couple of years uneven braking will appear. 4) Once every couple of years, open the front calipers and check the integrity of the rubber rubber, piston wear, preventively polish and reassemble with fresh mounting paste. Completely replace the brake fluid in one go.
And most importantly, when you brake, look in the rearview mirror. After all, suddenly a dozen people with factory brakes are driving behind, where no one has climbed for 5 years))))
Source: www.drive2.com
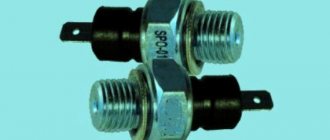
Repair of brake cylinders on VAZ 2112, 2111, 2110
In this article, you need to determine the cause of the brake cylinder failure on the VAZ 2110 car, and it will also be replaced. A good cylinder will last a long time, but you need to find one first. There are a large number of defective parts on the market that often break. To find out what condition the brake cylinders are in, you first need to remove the brake drum. If there are small leaks on the cylinder, then in any case it needs to be replaced and further operation is prohibited.
It is best to change both cylinders at once, because if one of them is worn out, the second one will soon fail in any case. You should never drive with faulty brakes and should always keep them in working order.
Checking the brake cylinder on VAZ 2112, 2111, 2110 is carried out only when the drum is removed. An assistant sits in the cabin and presses the brake pedal, the second one carefully holds the pads and watches how the pistons move apart. After such interventions in the system, in any case, it will be necessary to bleed the brakes so that all the air leaves the system and the rear brake pressure regulator drive must be re-adjusted.
The quality of the brake fluid plays a huge role in operation, but brake fluid will also play an equally important role.
Now you directly need to move on to replacing the elements themselves, you need to start with the front brake cylinder. The car is placed on a viewing hole or a lift, and the rear wheels are fixed. We remove the front wheels, unscrew the fastenings of the brake caliper connections. We squeeze the caliper in a vice, unscrew the fastenings of the connecting tube, and disconnect it. Use a screwdriver to press on the latch, which fits into the side groove of the caliper. We carefully slide the cylinder along the guide grooves, and in this case the latch should always be in the pressed position. We remove the standard brake cylinder and install a new one, and assembly proceeds in the reverse order. Now you need to fix the front wheels and remove the rear ones. Using a rubber hammer, you need to pull out the brake drum of the VAZ 2112, 2111, 2110 from its place. The end of the upper spring tie must be carefully pulled out, which until this time was connected by the brake shoe. The parking brake handle must be lifted all the way, then the brake pads will move apart and are much easier to remove. You also need to unscrew the brake pipe from the cylinder. The rear brake cylinder was removed; if necessary, it can be replaced with a new one, and the assembly procedure is reversed. Don't forget to bleed the brakes again.
If we talk about the master cylinder, then first you need to pump out the brake fluid and this can be done using a regular brake bulb. After this, we disconnect all the brake pipes and hoses. Unscrew the two nuts securing the GTZ. We remove the cylinder, install a new one or repair the old one, assembly must be carried out in the reverse order of removal.
At the end, pumping is done again, and in addition to this, the brake fluid needs to be filled to the level. When replacing cylinders, you need to inspect the condition of the pads and replace them if necessary. A quick and timely response to any breakdown makes it possible to further protect yourself from expensive repairs, which can sometimes cost several thousand rubles.
Reasons why the brakes might fail
Any problems during the braking process reduce its effectiveness, which can lead to dire consequences for everyone - the driver, passengers, and other road users.
Very often, problems arise simply because the driver uses low-quality brake fluid. If your car suddenly loses brakes, this may be due to several reasons, the main thing is not to blame the master cylinder for all the problems.
Below are the reasons why the brakes on a car fail:
- One of the main causes is usually a leaking slave cylinder. Gradually, slowly or quickly, all the contained liquid flows out of it.
- You should also check the level of brake fluid in the reservoir and the condition of the main brake.
- If traces of smudges are noticeable on the main brake, then this is the reason.
- Another possible cause of brake failure could be that the brake line is torn. For example, rubber brake hoses could fray, partially rot in some places, or get punctures.
- The working cylinders may have jammed;
If it is nevertheless noticed that the main brake cylinder is not working:
- it will show where traces of brake fluid leaks appeared;
- it will be impossible to press the brake pedal;
- on the contrary, the brake pedal can move on its own without the driver making any effort to do so.
Master brake cylinder with reservoir: 1 — master cylinder body;
2 low pressure o-ring; 3 — drive piston of the “left front-right rear brake” circuit; 4 - spacer ring; 5 - high pressure sealing ring; 6 — pressure spring of the sealing ring; 7 — spring plate; 8 — piston return spring; 9 — washer; 10 — locking screw; 11 — drive piston of the “right front-left rear brake” circuit; 12 — connecting sleeve; 13 - tank; 14 - emergency brake fluid level sensor; A - gap.
Therefore, it is possible to repair the VAZ 2110 brake cylinder, but not always. Most often, if it leaks, a repair kit will help fix the problem and restore the cylinder’s functionality. If the internal mirror in the cylinder is damaged, then, unfortunately, nothing can be corrected, since grinding is prohibited. If everything is not so scary and repairs are possible, you can do it yourself, because the price of the repair kit is quite reasonable, and almost every motorist can afford it.
What tools are required to replace a brake master cylinder?
- key to 17;
- key to 10;
- half-liter bottle of brake fluid;
- syringe;
- brake fluid.
Why is the rear brake mechanism acting up?
The hydraulic drive built into the VAZ-2110 combines in its internal design a booster and a dual-circuit pressure controller designed to control the rear brakes. If the rear cylinder is not working correctly, problems can provoke and create an emergency situation at any time when the vehicle is moving along the roadway. To prevent this from happening, the part should be repaired in a timely manner.
There is nothing surprising in replacing an old type of rear brake cylinder (RBC) with a new one; nothing lasts forever. Auto parts stores offer car enthusiasts the opportunity to purchase parts from the best manufacturers that will last a long time and guarantee safety on the road.
How to check the condition of the VAZ-2110 air conditioning center
Before you begin replacing the brake cylinder located at the rear, you need to inspect the car and establish an accurate “diagnosis”, especially since no special equipment is required for this - just a set of basic knowledge and your desire to understand the breakdown of the VAZ-2110 brake system.
See if the car has malfunctions and problems that are direct symptoms that the rear brake cylinder cannot be restored:
- Poor brake performance. For example, when pressed, the pedal easily falls down, and checking the brake system and adjusting its individual mechanisms did not give a positive effect.
- Brake fluid is coming out of the cylinder and there are marks on the shield. Even disassembling the unit and replacing the cuffs will be unsuccessful; the part will have to be replaced.
Why do the brakes disappear in the VAZ-2110?
If the brakes on a VAZ-2110 leave much to be desired, you should not blame the head cylinder (GTC) immediately, especially since there are several additional reasons for mechanism failures:
- The working cylinder is leaking; this process can occur gradually or quickly.
- Look at how much brake fluid is in the reservoir. The brake line may have broken, causing fluid to leak.
- The same thing sometimes happens with rubber hoses. They can rot or break through.
In fact, determining whether the master cylinder is to blame for brake failure or not is simple - examine its appearance. If there are traces of leaks, then your fears are not in vain.
Also pay attention to the following signs of a gas turbine engine malfunction:
- The brake pedal remains in the same position when pressed and applied.
- Alternatively, it moves idle, that is, nothing changes in the operation of the brakes.
How to extend the service life of a new fuel pump
Before installing the part, you need to know the rules that will further extend the service life of the part:
- Choose the best products in the store, created by experienced manufacturers you can trust. By saving on brakes, you won't end up cheap.
- Pay attention to marriage. A defective product is characterized by the pistons coming out of the cylinder structure by a couple of millimeters. However, this is quite enough to cause another breakdown and replacement of the part.
- Buy good brake fluid.
- Ideally, you need to change not one cylinder, but two at once. As practice shows, if one element of the system has already failed, the second one will not be long in coming either.
Rear brake cylinder replacement instructions
Replacing the rear brake cylinder of a VAZ-2110 looks like this:
- Raise the car on the lift.
- To securely secure the VAZ-2110, lock the front wheels.
- Unscrew the fasteners and remove the rear wheels.
- Using a rubber hammer, remove the brake disc.
- Carefully remove the end of the tension spring installed at the top, this spring is located right next to the brake pad.
- Lift the handbrake lever all the way to the top, you will see how the pads have moved apart, now they can be removed without any problems.
- Unscrew the brake pipe from the cylinder.
- Remove the broken cylinder and install a new one in its place.
- Assemble the knot following the reverse order of these instructions (starting from the last point to the first).
- Replacing the rear brake cylinder of a VAZ-2110 involves pumping the brakes at the final stage.
Installation of a new VAZ-2110 cylinder
Features of installing brake parts are included in the following list:
- If there is a need to replace the tank, this must be done before installing the cylinder.
- To install the master cylinder, follow the reverse order of the instructions for removing the defective attachment.
What does the cylinder installation look like:
- Try to get the pusher rod into the hole located on the master cylinder.
- Then slide onto the 2 studs, tightening the mounting nuts tightly with a 17mm wrench.
- All that remains is to connect the pipeline tubes, but do not tighten them too tightly.
- Open the reservoir cap and pour brake fluid inside.
- Place the engine compartment trim in its original place and secure the result with self-tapping screws. At this point, the replacement of the VAZ-2110 master brake cylinder can be considered successfully completed.
- Now it’s time to properly bleed the system - put your partner in the car, make a couple of pedal strokes, press and release some brake fluid along with the air. The goal is to ensure that there are no air bubbles when opening the fitting.
Video instructions for installing a new part to replace the old one on a VAZ car can be viewed below:
- Other
- Engine
- Steering
- Electrical equipment
- Transmission
- Brake system
- Suspension
- Tuning
- VAZ 2110 Other
- Engine
- Steering
- Electrical equipment
- Transmission
- Brake system
- Suspension
- Tuning
- Electrical equipment
- Steering
- Video publications
- VAZ tuning photo stream
- Operation and repair manuals
Is it possible to repair the rear brake cylinder?
This is indeed possible, you just need to have the skills to disassemble the part and know the design features. To properly disassemble the product, repeat the following steps:
- Remove the protective caps.
- Remove the pistons and elements that regulate the automatic gap from the body; this mechanism appears between the drum and the brake pads.
- After turning the piston and fixing it, you can already unscrew the stop screw.
- Slide out the O-ring and spring support cup.
- Disconnect the thrust ring and screw from each other.
Now carefully inspect the details:
- All surfaces must be smooth; scratches and roughness are unacceptable, as this will cause brake fluid to leak.
- If there are defects on the mirror base, use grinding or lapping - the latter method is gentle. The inner diameter of the cylinder must retain its dimension.
- Replace seals and protective caps.
Step-by-step video instructions for replacing the rear brake cylinder are presented below:
Rear brake cylinder: replacement procedure using the example of a VAZ 2110 car
On VAZ cars of the “tenth” family, a brake system with diagonally separated circuits is installed. This means that 2 wheels are controlled by one hydraulic drive, and 2 by another. This scheme helps to increase the level of security. After all, if one circuit fails, the second one comes into operation. However, driving with such a malfunction is strictly prohibited (if only because you will only have the left rear wheel and the right front wheel blocked). Therefore, today we will look at how to replace the rear brake cylinder yourself.
How does it work?
The operating principle of the system is to use a hydraulic drive. When the driver presses the pedal, pressure is generated in the system. The rod presses on the piston. This, in turn, transfers forces to the liquid.
Traffic safety depends on the proper operation of this system. Therefore, you need to be able to diagnose a malfunction in a timely manner. How to do it? Let's look further.
Instructions
So, how to replace the rear brake cylinder yourself? The VAZ needs to be placed on a flat area and the rear part must be jacked up, having first removed the wheel bolts. Next, remove the wheel itself. Getting to the brake cylinder is quite difficult. To do this we need to remove the drum and also remove the pads. In addition, the brake fluid hose is unscrewed.
How to remove the drum? Before dismantling it, you need to thoroughly clean it with a wire brush, removing all rust and dirt. After this, unscrew the 2 guide pins with a wrench. Next, remove the drum from its seat. This is done using a special puller. If this is not available, you can use 2 M8 bolts 6-7 centimeters long. We evenly tighten them with a wrench into the holes. This way the drum is compressed from the hub.
Now we need to remove the rear brake cylinder itself. So, remove the plastic protective cap and unscrew the bleeder fitting itself. To do this we need a key “8”. To remove the tube, you must use a 10mm socket. We break the tightening on the fitting and unscrew the element. Be careful - brake fluid will flow out of the tube. Wear protective rubber gloves when working. Next, unscrew the bolts securing the rear brake cylinder itself.
Nuances of repair
O-rings require special attention. The time the rings are in isopropyl alcohol should not exceed twenty seconds, after which they should be dried immediately using a compressor.
The surfaces of the mirror, as well as the piston elements, must be completely clean and free of rust. Every disassembly and repair of a faulty brake master cylinder must be accompanied by replacement of the O-rings, even if they are in good condition. The cuffs of the device also require attention; if they are swollen and frayed, they must be replaced.
Brake hoses are used to supply brake fluid from the master cylinder. If there are cracks or abrasions, they must be replaced. Details: https://vazweb.ru/desyatka/tormoza/zamena-tormoznyh-shlangov.html
After all, it is necessary to check the elasticity of the piston springs; this should be done under load. The length of the spring under load should be 39.01–45.9 N (3.8–4.8 kgf) - 41 mm, with another option the following indicators should be 82.01–99.48 N (8.35–10 .15 kgf) – 21 mm. When free, the spring should have a length of 59.8 mm. If the springs do not have such indicators, then they must be replaced.
Installation
Installation of the new element is carried out in the reverse order. Before installation, you need to thoroughly clean the brake mechanism from dirt using sandpaper. Degrease the seat with white spirit.
So, first you need to open the hood and add brake fluid to the maximum level. It is not recommended to mix different classes of products. Cars of the “tenth” family are filled with RosDot-4 class fluid. Please note that during pumping the level in the tank will drop. As soon as it drops 1.5 centimeters, you need to top it up again. Next we need an assistant. He will press the brake pedal at your command. So, unscrew the cap from the bleeder fitting and put the hose on it. We put its second end into a plastic bottle. We give the command to the assistant. He must press the pedal 5 times and at the last stage press it “to the floor”. At this time, you will observe how aired liquid flows out of the fitting.
Replacing the rear brake cylinder on a VAZ 2110, VAZ 2111, VAZ 2112
Welcome! Rear brake cylinder - thanks to it, the brake pads come into contact with the brake drum and from this contact, the car slows down, when the cylinder becomes unusable on one side, the wheel either stops braking at all, or it brakes but very poorly, there are still options when the brake fluid pours out through the drum, it is generally recommended to inspect the brake mechanism from time to time, it is thanks to it that the car is braked, and if at the wrong moment the brake mechanism becomes unusable, then with a very high probability an emergency situation will occur that can turn out differently .
Bleeding the brakes after replacement, should I do it or not?
It is imperative to bleed the brake system. This procedure is simple, although two people must be involved. The pumping procedure is as follows:
- We need to pump up the brakes. To do this, the pedal is pressed several times, after which it is held down.
- At this time, you need to partially unscrew the brake pipe fitting on one wheel.
- This should remove air from the system. Periodically, an assistant should pump the brakes by pressing the pedal. This procedure must be repeated until fluid sprays out of the tube when you press the brake pedal.
- After this, the tube fitting is tightened.
This procedure is repeated on each of the four wheels of the car. Before bleeding the brakes on each wheel, you need to add brake fluid to the reservoir. Only after bleeding the brakes can you go out on the road without fear that the brakes will fail at the most inopportune moment.
How to replace the rear brake cylinder on a VAZ 2110-VAZ 2112?
Removal: 1) Removing the cylinder is not difficult, we’ll even say it’s very simple, but getting to it is not an easy task, because you will have to remove the brake drum, brake pads and, most importantly, the brake pipe will have to be disconnected, and therefore the brake fluid will immediately come out of it it will flow, by the way, you can close the tube with a cap from the bleeder fitting, thanks to which practically no air will enter the system and all the liquid will remain intact (we will explain to you how to do this a little later), well, let’s proceed to the replacement, first as we already said remove all parts that prevent access to it (For information on how to remove the drum and pads, read the article: “Replacing rear brake pads on a VAZ”).
2) Let's go further, now remove the same plastic cap from the bleeder fitting (Indicated by the blue arrow), just do not lose it under any circumstances and also check its condition, it should not be cracked or otherwise broken, otherwise replace the cap to a new one, then grab a special wrench or just the most common socket wrench “8” (In general, it depends on what kind of wrench you have, but it’s also convenient to use a socket wrench, but still a special wrench for the bleeder fitting, if you have one, will come in handy ) and with its help, completely unscrew the bleeder fitting itself (This is the one that the cap covered, it has edges, in general, you will understand everything right away), then move to the brake pipe (namely, to its edges, they are indicated by a blue arrow) and when help from specialists wrench or a regular “10” wrench, break the tightening of this tube beyond the edges and with a regular wrench, then unscrew this tube and finally disconnect it (When the tube is disconnected, brake fluid will flow out of it, so that it does not leak out, cover the tube itself with a plastic the cap from the bleeder fitting), and finally, unscrew the two bolts indicated by the green arrows and remove the faulty brake cylinder from the car.
Note! When working with the brake pipe, we recommend that you first soak its nut in WD-40 and when you unscrew the nut, make sure that the brake pipe itself does not rotate (only one nut should rotate), but if you notice that the pipe along with it is walks around, this means only one thing, the tube in the nut is rusty and is already turning along with the nut itself, such a brake tube must be replaced immediately!
Installation: Installation of a new rear brake cylinder is carried out in the reverse order of removal; before installation, we recommend cleaning the brake mechanism with a brush from dirt, this mechanism simply does not like it very much and it is generally detrimental to it, in addition, if the brake pads end up in brake fluid (And if in a leaky brake cylinder, they will 100% turn out to be like that), then clean them from liquid using sandpaper (Do everything carefully and know when to stop), and degrease the surface of the brake drum itself using white alcohol or any solvent, and when everything is done established, be sure to bleed the brake system, otherwise the car will brake very, very badly (How to carry out this operation, read the article: “Bleeding the brake mechanism on a car”).
Additional video: You can see the entire process of replacing the brake mechanism in more detail and clearly in the video below:
The process of replacing the VAZ-2110 brake cylinder
If the cause of the non-functioning brakes on one of the rear wheels is determined, then you need to begin the replacement process. First you need to dismantle the old part. It happens like this:
- First you need to remove the rear wheel.
We unscrew the wheel by jacking up the car and placing additional support under the bottom.
It is better to unscrew the tip of the brake pipe with a slotted wrench.
It is more convenient to unscrew the brake cylinder mounting bolts using a ratchet head.
When working with fittings and tubes, the main thing is not to break the threads, otherwise you will have to change them too.
Old brake cylinder.
If the parts are difficult to unscrew, it is better to spray them generously with WD-40 . When rotating the nuts, you need to make sure that they rotate without tubes. If the tube turns together with the nut, it means it is rusty and stuck to the nut. This part is not allowed for use and must be replaced.
The process of installing a new cylinder
Before you begin the cylinder installation procedure, it is imperative to clean the entire rear wheel brake mechanism from dirt. If you really had to climb into the drum, then you need to carefully examine its condition, at the same time inspecting the pads . If worn, they must be replaced .
- If there has been a cylinder leak, then before installing it you need to thoroughly clean the pads from all traces of brake fluid . To do this, you can use a file or sandpaper. Under no circumstances should stripping machines be used, as the pad can be seriously damaged.
- The inside of the rear brake drum also needs to be cleaned of dirt, rust and degreased from traces of brake fluid . If the liquid remains in the drum, the shoe will slide during operation. Only after thorough cleaning of all mechanisms can a new cylinder be installed. The assembly procedure takes place in the reverse order of disassembly.
The new cylinder is in place and the pads are installed, all that remains is to bleed the brakes.
Leveling up
A mandatory procedure after installing a new cylinder is bleeding the brakes. If this is not done, the car will brake very mediocrely, since air will remain in the system.
Bleed the brakes and add fluid to the expansion tank.