This work will also be needed by those who are expecting to replace brake pads, discs, calipers, grease in the hub on a VAZ 2107 car and the like.
You will need a tool of the following quality: *Keys for 27,12,13; *Socket head 17, ratchet wrench and extension 1/2″; *Device for replacing wheel bearing races; *Vise (if there is no device); *Hammer; *Chisel; *Litol-24 or equivalent; *Kerosene or carburetor cleaner. *It’s better to have a hub repair kit, or at least don’t skimp on new nuts and seals.
There won't be a guide, you can google it by title. I'll describe the details.
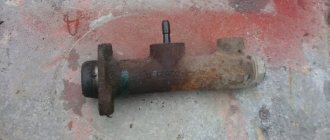
The hub on the left side fell apart right after the evacuation.
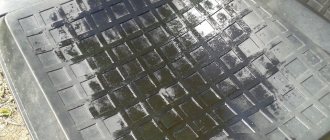
Two hub repair kits were ready in advance: everything in the picture below, two nuts each (left, right)
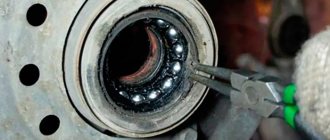
Do not remove the seals with screwdrivers, as they say in the Murzilka - you will save tools and time. This is done like this: place the hub on a flat surface or clamp it in a vice with the oil seal facing up and, placing a chisel on either edge of the oil seal, hit it a couple of times with a hammer not too hard - the oil seal will turn over, like a manhole cover in a cartoon. Nothing will happen to the bearing, because there is a spacer ring above the race.
Next, if you want to fuck, use a screwdriver, only a thin one and an impact one. If you want to save two hours, use a mandrel. The principle of its operation is simpler than a stool
The rear wheel bearings are slowly dying and it's time to replace them
The replacement process turned out to be easier than I thought)))
First, remove the wheel and drum and unscrew the 4 nuts securing the axle shaft, everything is as usual. (it is advisable to also remove the brakes themselves since it will be more convenient to put them back together)
Next we need an inertial hammer, its power was not enough and this simple device came to the rescue)))
We pull and the axle shaft comes out))
It is also advisable to replace the seals
Next, remove the old bearing from the axle shaft, remove it using a grinder
Carefully attach the new bearing to the axle shaft
Heat the locking sleeve until red hot
We throw it on the axle shaft
We put everything back together and are happy with the absence of bearing noise)))
Don't forget to click "like" )))
REPLACING THE FRONT WHEEL BEARING
To replace the front wheel bearing on the “seven” you will need the following tools:
- jack;
- set of socket heads and wrenches;
- screwdriver;
- set of open-end wrenches;
- new front wheel bearing.
SEQUENCING
Before starting work, one of the front wheels is jacked up and removed. In this case, the rear wheels of the car must be secured with shoes.
- The front wheel is removed. This gives access to the brake caliper and hub. The brake caliper is also removable.
- Now remove the protective plug located above the wheel bearing. To pry it off, you can use a thin chisel or a flat-head screwdriver.
- After removing the plug, access to the hub nut opens. On this nut, you should straighten the edge that was previously deformed by the chisel, which prevented the nut from unscrewing. This is done with a screwdriver and a hammer. After straightening the side, the nut is unscrewed and removed along with the spacer washer.
- Using a screwdriver, pry up and remove the seal covering the bearing, then the old bearing is removed from the hole. Using a screwdriver and a hammer, the separator ring located under the bearing is also removed.
- The installation site of the bearing is thoroughly wiped with a rag, after which a new bearing and a separator ring are pressed into place in place of the old bearing.
- The installed bearing is lubricated; the inner ring should be lubricated especially carefully. After this, the oil seal is installed in place.
- The lubricated bearing is placed on the hub, the hub nut is tightened, after which its side is bent again using a chisel and hammer to prevent unscrewing.
- The bearing plug is installed in place. Then the caliper and wheel are installed in place.
CALIPER
When talking about a car's suspension, one cannot fail to mention the caliper. Only the front wheels of the VAZ 2107 are equipped with this device. The reason is simple: without a caliper, the normal functioning of disc brakes is impossible. Structurally, the caliper is a monolithic steel body that houses the brake disc and pads.
The “seven” caliper is a part without which full braking is impossible
There are several holes in the caliper. They are necessary for attaching the caliper to the suspension and for installing the brake cylinders. The caliper ensures the required level of pad pressure on the brake disc and their uniform wear. If the caliper is deformed (for example, as a result of an impact), then the normal wear of the pads is disrupted, and their service life is reduced several times. But mechanical damage is not the only trouble that can happen to a caliper. Here's what else could happen:
- oxidation of moving parts. This is especially true for brake cylinders installed in the caliper. Over time, these cylinders become covered not only with an oxide film, but also with dirt. As a result, their rods stop moving normally, and this immediately affects the braking efficiency;
- occurrence of cracks in the caliper. In parts subjected to cyclic alternating loads, fatigue stresses arise, which sooner or later lead to the appearance of fatigue cracks. Once they occur, the caliper must be urgently replaced. “Tired” parts cannot be restored.
Removing and replacing the front wheel bearing on VAZ 2101, 2102, 2103, 2104, 2105, 2106, 2107
Hello, in this article you will learn how to replace the front wheel bearing on a VAZ 2101, 2102, 2103, 2104, 2105, 2106, 2107. The wheel bearing is replaced if a hum begins to be heard from the wheel while driving. To determine which bearing has failed, you need to hang the wheel and rock it in different planes. If the wheel has play when swinging in some plane, then the wheel bearing has become unusable and needs to be replaced. Prolonged driving with a bearing that is not worn out can cause the wheel to jam, so there is no point in delaying it. The price of a new wheel bearing is about 500 rubles. For this operation you will need: a 17 and 27 socket, a key or a deep 7 socket, a flat screwdriver, a vice. First, loosen the hub nut with a 27 mm socket.
Front-wheel drive features
How to replace and select the front hub for a Ford Focus 2 and restyling.
For example, let's take two cars - a “nine” and a “ten”. Let's first study the procedure for changing the bearing on the rear hub on a VAZ 2109 car. Breakage of our part in this car can occur due to the following factors.
- Reckless driving with constant sharp braking and acceleration.
- End of service life, shortened due to bad roads.
- Violation of the integrity of the oil seal.
Diagnostics is carried out according to the well-known principle: you need to shake the wheel. We list the tools and supplies needed for repairs in the following list:
- wrenches;
- hammer, round timber, wooden block;
- puller;
- Litol lubricant.
- Using wrenches, remove the wheel nuts and the central hub nut.
- We lift part of the car on a jack and remove the wheel (here there is no need to hang up the entire half of the car).
- The handbrake must not be applied!
- We twist the pins of the brake drum and dismantle it, you can use a hammer and a block.
- Unscrew the hub nut and tighten the hub with a puller.
- If the inner ring of our replacement part remains on the suspension axle, we pull it off using a puller.
- We take the removed assembly, remove the retaining ring, and use a round timber and a hammer to knock out the broken part.
- After applying lubricant, we press in new parts.
- We do the assembly by moving point by point backwards.
Now, if we compare the two instructions we have given, it turns out that the presence or absence of a wheel drive under the trunk has little effect on the number of stages, as well as their essence.
Without puller
In order to confirm this assumption, let’s consider another replacement on a VAZ 2110 car. The reasons for the breakdown are the same.
- Ruthless operation of the car on bad roads.
- Incorrect driving.
- Wear of the oil seal and the part itself.
The fact is that its cost is higher than the cost of the spare part that we are replacing, by about two or three hundred rubles, that is, at a hundred-ruble price, the bearing is three times more expensive
Therefore, the purchase of such an important device for our operation is not entirely justified. But on the other hand, the puller will be useful for many other types of work, therefore, if further DIY repairs are planned, the purchase becomes justified
So, let’s try to do without this device using a chisel and a hammer. The same could have been done according to the previously described procedure. Thus, we will need:
- wrenches - standard set;
- hammer;
- chisel;
- round timber of suitable diameter;
- Litol type lubricant.
At the initial stage, we prepare new spare parts. Next we follow the beaten path.
- Just like with the “nine”, we first loosen the hub nut and wheel nuts.
- We turn off the handbrake, jack up the car, and then remove the wheel.
- We dismantle the brake drum similarly to the corresponding paragraph of the previous instructions.
- Unscrew the hub nut.
- We screw the bolts into two opposite holes in the hub one by one and pull the assembly necessary for disassembly towards ourselves - this is a way to do without a puller.
- The inner race of our replacement part almost always remains on the axle. We pull it off using a chisel and a hammer, after removing the brake pads.
- Having removed the retaining ring, as well as the oil seal, use a hammer to knock out the remaining part of the broken part using a round timber.
After lubrication, new spare parts are installed and reassembly is done.
So, we have described the process of replacing a VAZ 2110 bearing, you can study it in the video. One thing is clear: in a VAZ with front-wheel drive, changing a treasured part is also not so easy.
The same applies to replacing the bearing on a Kalina car. The technology is very close to what we described. Only the sizes of the turnkey nuts differ.
Well, those who had the opportunity to perform the operation we are describing in the unit of the corresponding Kalina suspension will easily be able to repeat the same thing on a car that is completely similar in design. More specifically, replacing a bearing on a Lada Granta car will not be difficult for them.
Repair prices by city
But not all car owners can or want to do such manipulations with their own hands. Many people find it easier to go to a car service center.
For such people, we have compiled a summary table of the average cost of replacing bearings in the rear hub of a VAZ in relation to different large cities of the Russian Federation. This is what happened.
| City | Price |
| Moscow | 800 rub. |
| St. Petersburg | 800 rub. |
| Ekaterinburg | 700 rub. |
| Kazan | 750 rub. |
| Samara | 600 rub. |
It turns out that the price for repairing the rear suspension of VAZ cars is relatively quite low, even in the capitals. Therefore, it is worth thinking about whether to perform the operation yourself or go to the experts.
At the same time, as we found out, its cost to craftsmen is low, so all that remains is to weigh the pros and cons before you start doing the procedure yourself.
Symptoms of a problem
We independently check the generator voltage regulator on a VAZ 2107
The wheel bearing must always be in good condition. If the part becomes unusable, this can lead to an accident, since the malfunction is accompanied by large wheel play. As a result, the disc may be sheared off the wheel bolts. If such a situation occurs at high speed, a serious accident cannot be avoided. This indicates that the hub bearing needs periodic inspection, and if play is detected, it needs to be adjusted or replaced.
The main manifestations of a part malfunction are:
- Dry crunch. When a bearing breaks, a metallic crunching sound occurs while driving. It appears as a result of uneven rolling of the rollers due to damage to the separator. It is difficult to confuse this sound with any other.
- Vibration. If the element in question has severe wear, vibration appears, which is transmitted to both the body and the steering wheel. It indicates severe wear of the bearing cage, which can lead to seizure.
- The car pulls to the side. The problem is somewhat reminiscent of the case with incorrect wheel alignment adjustment, since the faulty element does not work correctly due to its parts being wedged.
Definition of failure
To determine the condition of the wheel bearing, you need to perform a few simple steps:
- Hang the front wheel on the desired side using a jack, not forgetting to put the car on the handbrake and install stops under the rear wheels.
- Place a support under the lower suspension arm and remove the car from the jack.
- Take the wheel with both hands (top and bottom) and perform movements from yourself to yourself, and no play or knocking should be felt.
- Spin the wheel. If the bearing has become unusable, a grinding noise, hum or other extraneous noise may appear.
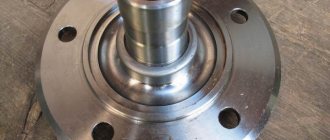
Replacing the axle bearing
The axle shaft is an integral part of the rear axle of the VAZ 2107. The axle shaft itself practically does not break, but the bearing by which it is attached to the axle housing sometimes fails. Its purpose is to rotate the axle shaft smoothly and evenly while the car is moving. Signs of bearing failure are the same as those of the hub elements. If problems occur, it is necessary to dismantle the axle shaft and replace the faulty part.
Bearing removal
Before starting work, you need to prepare the following list of tools:
- set of socket wrenches with a crank;
- hammer;
- flat screwdriver;
- chisel;
- grinder;
- new axle bearing with retaining ring.
To replace, follow these steps:
- Raise the rear wheel using a jack, then remove it, not forgetting to install stops under the front wheels.
- Remove the brake drum.
Installing a new part
After removing the bearing, you can immediately begin reassembly:
- Clean the axle shaft from dirt and wipe it with a rag.
- Press the new bearing onto the axle shaft, and then install the retaining ring. To install the latter, it is advisable to heat it up with a blowtorch, which will ensure easier installation and reliable retention after cooling.
Video: replacing the axle bearing on a “classic”
Replacing a wheel bearing on a VAZ Seven is not a complicated procedure. To carry it out, you will need to prepare the necessary tools and materials, as well as read the step-by-step instructions. If you choose a quality product and carry out repair work correctly, the bearing will work for a long time without any problems.
Checking and adjusting the tightening torque
Replacing the front wheel bearing of a VAZ Niva
Wheel bearings are tightened strictly according to the factory requirements of a specific car brand. The moment depends on:
- bearing size;
- nominal axial play of the wheel;
- diameter, thread pitch of axle, axle shaft.
To complete the procedure you will need the following tools:
- flat screwdriver;
- chisel;
- hammer;
- pliers;
- torque wrench.
The method for adjusting the hub is practically the same on different cars. Execution order:
- Loosen the bolts.
- Raise the body and remove the wheel.
- Use a flat-head screwdriver to unscrew the protective cap of the hub.
- Unscrew the edge with a chisel. If there is a locking pin, remove it with pliers.
- Check the torque with a set torque wrench. Achieve the required value.
- Reassemble the unit in reverse order and install the wheel.
Important:
On some car models, the nut is secured by pressing the edge into the groove. The nut is disposable and must be changed with each adjustment. It is recommended to replace damaged, leaking nut protective caps with new ones.
Example - adjustment on a Chevrolet Niva
It is recommended to perform the procedure on two wheels of one Niva Chevrolet axle.
Structurally, the wheel assembly consists of several parts:
- a steering knuckle held in place by a pair of ball joints;
- brake disk;
- hub assembly;
- support for mounting cylinders, brake pads.
Required set of tools:
Hammer, chisel, flat screwdriver, 27mm socket, dial indicator with tripod.
Step-by-step instructions using the Niva Chevy as an example:
- The car is secured with a parking brake.
- The wheel mounts become loose.
- The body is raised with a jack or lift.
- The protective cap is removed.
- The indicator stand is installed on the hub bolts. Place the leg of the micrometer against the drive axis.
- Measurements are taken.
The presence of a torque that differs from the tolerance indicates the need for adjustment. For this:
- Unscrew the fasteners, unscrew the axle shafts from the thread;
- make a new one;
- tighten to a torque of 19.6-19.7 N*m;
- simultaneously turn the wheel in both directions to self-install the balls;
- Check the condition of the displacement with an indicator and the tightening torque with a torque wrench.
Watch the video for 2 ways to adjust without an indicator:
Method 1:
Method 2:
Example - adjustment on a VAZ 2107
“Classic” VAZ models have a similar adjustment procedure. Design features of chassis parts:
- the hub is located under the brake disc;
- tapered bearings, paired, mounted on a journal;
- different tightening torque.
How to adjust wheel bearings:
Bearing clearance adjustment:
Preparing and disassembling the unit
The front rolling bearings are roller, cone type, consisting of two parts: external and internal. Good quality products are sold complete with the required amount of lubricant and two clamping nuts. The nuts differ in their thread, on one it is left-handed, on the other - right-handed, the first will fit the axis of the right axle, the second - to the left.
The manufacturer does not know which wheel will be replaced, so he completes the product with both nuts. Additionally, you need to purchase an oil seal, which is located at the rear of the hub and does not allow grease to leak out. You can carry out the work on a level surface, securing the car with the hand brake so that it does not roll away.
Before lifting the car with a jack, you need to pull out the metal boot covering the hub nut and loosen the latter with a 27 mm wrench. Then the wheel bolts are loosened, the car is jacked up and the wheel is removed. The next step is to remove the brake caliper, which is attached to the axle with 2 bolts; they need to be unscrewed, the part removed and moved to the side.
It is recommended to first remove the brake pads from the caliper, then it will be easier to put it back.
Now you can completely unscrew the nut, pull out the washer and remove the hub from the axle axle by hand. After this, you need to remove the old grease from all parts; it contains metal shavings.
Sign of a faulty VAZ classic wheel bearing.
A faulty bearing usually produces extraneous sounds in the form of a hum or grinding sound, and the wheel can also hang on such a bearing due to wear or due to a poorly tightened wheel nut.
To diagnose a bearing, it is enough to hang the wheels (or each separately) and rock the wheel in different directions. If there is play when rocking in all planes (wheel rotation left and right and tilt up and down), the wheel bearing may need to be replaced. But the backlash can also be due to tired silent blocks or ball bearings. To exclude a suspension malfunction, you need a second person who will check whether the wheel wobbles together with the steering knuckle or walks separately from it. If the wheel moves separately from the steering knuckle, then the wheel bearing is definitely faulty (in this case, tightening the wheel nut may briefly save the situation).
A sign of a malfunction may also be extraneous sounds when the wheel rotates (usually a hum, sometimes a grinding sound) or its uneven rotation.
You can also determine a faulty bearing by an excessively heated wheel (for example, if the front right wheel disc is much warmer than the front left one). But you can’t compare the temperature of the rear and front wheels because... They have brakes of different designs.
And so, let’s summarize everything we’ve read. The wheel bearing is replaced if:
- The wheel dangles separately from the steering knuckle.
- A hum and grinding noise is heard when the wheel rotates.
- The wheel does not spin evenly.
- The wheel rim gets very hot.
Main signs of wheel bearing wear
The problem of how to replace a wheel bearing on a VAZ 2107 will arise if the behavior of the vehicle has changed dramatically. For example, the car began to maneuver poorly, especially at maximum load, or the steering became sluggish and apathetic in terms of carrying out some emergency orders. Summarizing all available knowledge, it is realistic to formulate a list of typical signs of wheel bearing wear:
- The car enters sharp turns with additional noise and vibration. It seems that an obsessive creaking, crackling, howling escapes from under the wheels, creating unnecessary discomfort for road users.
Faulty bearing
Important! If the noise appears when turning right, it means there is a problem with the wheel bearing on the left wheel. On the contrary, if there are squeaks and squeals on the left, then you should think about how to replace the wheel bearings on the VAZ 2107 on the right side.
- The braking process may be accompanied by one unpleasant moment. The driver feels as if the brakes are hitting the steering wheel.
- There are also uncomfortable vibrations in the cabin, which strain the steely nerves of car enthusiasts.
- If the wheel bearing is already worn out, then the condition of the rubber may deteriorate, which manifests itself in rapid wear of the tread.
Thus, the question is brewing on its own, and you will have to think about how to replace the rear wheel bearing of the VAZ 2107 or at least carry out a routine inspection.
How to Determine a Bearing Failure
The VAZ-2107 axle bearing wears out during operation, and sometimes the seat underneath it breaks. Malfunctions of this element can be determined by several signs:
- A humming noise appears from the rear axle. Sometimes it turns into crackling and squeaking. Moreover, the higher the speed, the louder these sounds. This should not be confused with a similar hum that can be heard when the rear axle gears wear out.
- The balls fall out and the separator is destroyed; the axle shaft jumps out of its seat when moving.
- Increased play of the rear wheels. Diagnostics is quite simple; you just need to place the car on a jack and rock the wheel several times. A knocking sound and free movement indicate that there is a malfunction.
- Sometimes the rear wheels jam, which can result in a serious accident.
The design of the VAZ-2107 axle bearing is simple and reliable; it can last for quite a long time. But if the car experiences very heavy loads, moves on bad roads, or the bearing is made of low-quality material, the service life is significantly reduced. The bearing cannot be repaired; it will only need to be replaced. In case of deformation and excessive wear, new mechanisms must be installed.
Signs of a broken refrigerator temperature sensor
Diagnostics is complicated by the fact that the symptoms of a malfunction may be the same as in the case of breakdowns of other components. Similar symptoms are observed with depressurization, thermal relay problems, icing, freon leakage, impeller failure, and motor burnout.
First of all, since breakdowns of the temperature sensor are observed much less frequently than other parts of the refrigerator, it is necessary to at least approximately determine the absence of:
- significant icing. Ice can interfere with the movement of fan blades in no frost systems;
- depressurization. Inspect the position of the doors, the condition of the seal;
- freon leak. Characteristic signs are gurgling and significant noise in the tubes. This failure is difficult to identify for a user without experience. To find breakdowns, specialists use a foaming substance (soap solution) applied to the tubes, and also cut off parts of the line (to the evaporator, condenser) and connect them directly. Most often, holes are observed near capillary tubes, in places of soldering;
- breakdowns in the electrical circuit of the thermostat and motor. Check with a multimeter.
Then, if the probability of the absence of the above is high, proceed to diagnosing the temperature sensor.
Characteristic symptoms of a thermal sensor failure:
- The cooling of the compartments does not function correctly. The easiest way to determine a breakdown is if the refrigerator is multi-compartment and each part has a sensor. Then, if one of the boxes works normally, the second one works poorly, it means that one of the sensors has failed;
- The compressor does not turn on or turns off immediately;
- if the sensor is not supplied with power or it fails due to internal failure, that is, it does not respond to any temperature, the motor runs constantly, regardless of the actual situation in the compartments. It should be taken into account that the same symptoms are characteristic of a malfunction of the thermal relay, especially its electrical circuit (breaks, short circuits);
- if the sensor is partially operational, that is, it incorrectly displays the temperature, then disturbances in the cooling intensity are observed - it is weak or excessive (freezing) than that set by the user on the control panel.
To summarize, the symptoms of a sensor failure are virtually all cooling problems, so it is important to exclude malfunctions of other parts of the refrigerator with the same symptoms
Bearing Failure Determination
Some recommendations will help you make sure that you need to replace the wheel bearing on your VAZ-2107:
The easiest way to determine the need to replace the hub unit is to grab the front wheel and shake it in different planes
If you feel the presence of play, then it’s time for a more detailed diagnosis and most likely replacing the bearings. The front wheels of the car should be hung on a jack, while being sure to take precautions: pull the handbrake, install shoes and additional stands under the car. Grasp the top and bottom of the front wheel with your hands and then make movements. It is important to wobble the wheel, not the car as a whole.
Thus, you can accurately determine whether the product in question needs to be replaced. Another way to determine the need for replacement is to listen for humming, knocking, and grinding noises in the wheel as it rotates.
Having decided that you really need to replace the VAZ-2107 wheel bearing, you need to purchase new products and begin the replacement workflow.
Replacement features
The front hub of the VAZ-2107 car has a pair of roller bearings, one of which is called internal, and the second external. The manufacturer recommends replacing these products in pairs, on both front wheels of the car. We will find out further what the replacement of the parts in question is.
Initially, it is necessary to tear off the nuts securing the front wheel of the VAZ-2107 car. After this, we install the jack and jack up the front of the car. At the same time, do not forget to install shoes under the wheels, as well as a special safety stop to prevent the jack from falling.
https://youtube.com/watch?v=Ivp0lzdvB2E
To check the clearance, lift the front part, place it on a stand and remove the front wheels.
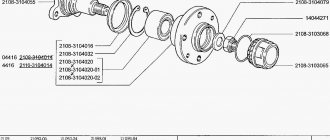
- Checking the axial clearance of the front wheel hub bearings using tool 02.7834.9505
- 1 - indicator
- 2 - bolt
- 3 - bracket
- 4 - wheel hub
Install tool 02.7834 under the wheel mounting bolt. 9505. Press the indicator leg against the end of the steering knuckle axis with the arrow in the zero position and, moving the hub along the steering knuckle axis, measure the amount of movement (clearance) along the indicator.
If the gap is greater than 0.15mm, adjust it in the following order:
- - Unscrew the adjusting nut from the steering knuckle axle;
- — install a new or used, but on a different car, nut and tighten it to a torque of 9.6 N m (2 kgf m), while simultaneously turning the hub in both directions two or three times to self-install the bearings;
- — loosen the adjusting nut and tighten it again to a torque of 6.8 N·m (0.7 kgf·m);
- Front wheel hub bearing adjustment diagram
- A - edge of the nut
- B - mark on the washer. The tightening torque of the nut is 0.7 kgf m. Loosen the nut by 20–25°
- — make mark B on the washer, then loosen the nut 20–25° so that edge A slightly does not reach mark B;
- - lock the nut in this position by pressing the holes on the neck of the nut into the grooves at the end of the steering knuckle axis.
After adjustment, the clearance in the hub bearings should be in the range of 0.02–0.08 mm. When adjusting the gap, it should be taken into account that the direction of the thread on the left axle of the steering knuckle is right, on the right axle it is left.
Replacing the front wheel bearing of a VAZ 2107 is not a complicated procedure and any driver can cope with such repairs if desired. As they say, if you have the desire, you can save on the service.
Loose bearings lead to increased wear. In this case, the alignment of the wheels is disrupted, which means increased tire wear, uneven wear of the front brake pads, and add to this a deterioration in handling. Well, the destruction of bearings while the car is moving can lead to an accident.
Front wheel bearing kit with oil seal
Replacing the front wheel bearing of a VAZ 2107
Replacing the front wheel bearing of a VAZ 2107 is not a complicated procedure and any driver can cope with such repairs if desired. As they say, if you have the desire, you can save on the service.
Loose bearings lead to increased wear. In this case, the alignment of the wheels is disrupted, which means increased tire wear, uneven wear of the front brake pads, and add to this a deterioration in handling. Well, the destruction of bearings while the car is moving can lead to an accident.
Front wheel bearing kit with oil seal
Symptoms
The main symptom of a malfunction and the need to replace the front bearings of the VAZ 2107 is loud noise when the car moves on the left or right side. The hum appears when the vehicle speed increases, for example when exceeding 50 km/h.
Diagnostics
To determine whether the VAZ 2107 front wheel bearing needs to be replaced or not, you need to:
- jack up the car;
- place a stop on the lower lever and lower the vehicle (this is done in order to prevent rocking in the silent blocks);
- It is better to grab the wheel from above and below and rock it.
In this case, there should be no backlash. After spinning the wheel, repeat the operation. Spin the wheel; no noise should appear when it rotates. If there is no play, but noise appears, then the bearings definitely need to be changed.
Adjustment
After replacing the front wheel bearings of a VAZ 2107 during maintenance or the appearance of noise, adjustment begins as during diagnostics by “hanging” the wheel. Further:
- tighten the nut until it stops, but not too much;
- by rotating the wheel and releasing the nut, we look for a position in which its rotation will be sufficiently free, and there will be no backlash;
- lock the nut.
However, it must be added that if after tightening the nut the play disappears but there is no noise, then the bearings should also be changed.
Tools
For repairs we will need:
- hammer;
- keys 17, 27;
- pliers;
- chisel;
- flat screwdriver;
- new bearings, external - number 6-7804U, internal - number 6-7805U;
- rag.
How to replace bearings
As in the case of diagnostics, we begin the repair by jacking up the car and removing the wheel. Further:
- unscrew the caliper and hang it so that it does not interfere;
- remove the nut cover on the hub;
- unscrew the nut with a 27 wrench;
- remove the washer;
- remove the hub with the attached brake disc;
- remove the small bearing separator;
- remove the oil seal;
- remove the large bearing separator;
- remove the clips with a puller or knock them out with a hammer and chisel;
- remove old grease from the hub and cap.
We perform assembly in reverse order.
- press in the bearing races;
- lubricate and install the inner bearing separator;
- install the oil seal;
- put the hub in place;
- lubricate the outer bearing separator and install it in place;
- install the pressure washer;
- tighten the nut;
- screw the caliper into place.
At this point, the replacement of the front wheel bearing of the VAZ 2107 is completed and all that remains is to adjust the tightening of the nut, this is done as I already described above.
What tools are needed to replace the wheel bearing on a VAZ 2107
Before you think about how to replace the wheel bearing on a VAZ 2107 yourself, you should evaluate the capabilities of your garage and whether there will be enough space allocated for repairs. That is, we must remember that any repair has a law: the allocated time and money should be multiplied by two. Firstly, when working with one part, another, installed nearby, may be damaged or unexpectedly fail. Secondly, it is worth considering a number of points that will require the “homemade” person to turn to the help of a friend or family members, since some points will be difficult to accomplish alone. What do you need for repairs in terms of tools?
- Jack and system for securely fixing the machine during repairs
- Wrenches of the required diameter to work with fasteners
- A screwdriver and a chisel, you can purchase special devices for removing bearings from their seats, and then pressing the products back into place.
- Rags and special lubricant for cleaning all necessary sockets and fasteners
- Set of new bearings, oil seal and fasteners
Set of tools
Replacing the wheel bearing of a VAZ 2107
The chassis of the VAZ 2107, like all classic models, is not distinguished by its design complexity, but at the same time it fully complies with the somewhat inflated endurance requirements that road surfaces impose on us. The 7 has a reliable and simple wishbone suspension, but it does not last forever, and can remind you of itself from time to time with tapping and creaking.
Signs of a worn out bearing
We immediately pay attention to the knocking of the suspension and play in the steering, and try to find and neutralize the tired part as soon as possible. The front wheel bearing behaves completely differently.
As a result of wear and tear, it does not immediately show its fatigue, but gradually. When turning right, the left wheel bearing begins to hum, and when turning left, vice versa.
It is quite possible that the bearing adjustment nut has become loose, but then the hum should be accompanied by a knocking sound. This can be easily determined by checking the play on the front wheel. To do this, hang the car on a jack and grab the wheel by the lower part and the upper part with your hands, then rock it. If there is play, then it will be enough to tighten the adjusting nut with a torque of 2 kg/cm and tighten it with a blunt chisel. If the hum continues after this, it means the bearing has worn out and needs to be replaced.
Removing the front hub of a VAZ 2107
Before starting work, place the car on a level surface, secure the rear wheels with wheel chocks and tighten the handbrake. After this, we jack up the front wheel with a jack, but it is advisable to place a stand under the lower arm after we remove the wheel. We loosen the jack, the bulk of the car falls on the stand, and now the car is securely fixed.
- Using a blunt chisel or screwdriver, remove the hub protective cap.
- Remove the front brake caliper. To do this you will need to remove the brake pads. We unpin the pad pin, take it out, and then you can use a pry bar or a large screwdriver to press the pistons into the caliper. After this, you can remove the brake pads.
- The front brake caliper is attached to the axle with two bolts that need to be unscrewed. In order not to disconnect the caliper from the brake system, we hang it on a wire so that the brake hose is not stretched.
- Let's move on to the hub. Using a 27mm socket, unscrew the hub adjustment and fastening nut. To avoid any surprises, let us remind you that the right wheel has a left-hand thread, and the left one has a right-hand thread. It's hard to confuse. Having oriented towards the cardinal points, unscrew the nut.
- Remove the hub from the axle and place it on a horizontal surface.
Replacing a VAZ 2107 wheel bearing
To replace the wheel bearings of rear-wheel drive VAZ models, it is better to have a set of mandrels and drifts for pressing out and pressing in the bearing races. Or at least a vice. But if all this is not there, we can handle it with our bare hands. We will do this in the following sequence:
- Press the oil seal out of the hub using a pry bar or a wide screwdriver. There is no need to worry about it; when replacing a bearing, the oil seal also needs to be changed, so removing the oil seal with a certain amount of healthy cynicism is justified here.
- We use any tool to knock out the old races from the hub, after which we carefully inspect the inside of the hub and rinse it with diesel fuel or gasoline to remove any remaining old grease and dirt. It is advisable to wipe the seats with a rag after this.
- We press the new bearing races into the hub. In principle, there are spacers and mandrels for this, but if everything is done carefully, you can do it with a hammer. For final shrinkage of the clip, we use the old clip.
- When the clips are in place, coat them liberally with Litol 24, but in moderation.
- We install the oil seal very carefully. There are also special mandrels for this, but if you don’t overdo it with a hammer and press it evenly, then you won’t have to run for a new oil seal.
The bearing is in place.
Adjusting the wheel bearing of VAZ 2107
Installing the bearing is half the battle. The main thing is to adjust it correctly and take it seriously. It was not for nothing that the engineers at VAZ received their salary of 120 Soviet rubles, and it was not for nothing that they wrote that the tightening torque of the nut should be in the range of 1.9-2.0 kgf/m. No one can tighten the nut by eye, so they use a torque wrench for this.
After tightening with the required torque, rotate the wheel in both directions, and then loosen the nut 15-20 degrees. We check the hub for the presence of play; if there is none, then you can roll the nut with a blunt chisel, fill the cap with grease and close it. The front suspension is reassembled in the reverse order, and the grease in the bearing is replaced every 20,000 km. Listen to the bearings, and good luck on the roads!
How to replace a wheel bearing on a VAZ 2106, 2107?
We determined that it was the wheel bearing that was faulty, bought a new one and are preparing the tools for the job:
- Hammer
- Pliers
- Socket wrench set
- Impact screwdriver (that you can hit without breaking)
- Mandrel for pressing in new bearing races
- Head 27 with a large collar (for the hub nut)
Removing the wheel bearing.
First of all, remove the cap covering the hub nut. Next, we align the rolled edges of the hub nut and unscrew it.
ATTENTION: on the right wheel the thread of the hub nut is reversed
We hang the wheel and unscrew the brake caliper.
You can remove the hub along with the brake disc.
We take out the ring separating the seporators.
We take out the internal and external separators and knock out their clips.
We clean the hub from old grease and dirt.
Installing a new wheel bearing.
Installation occurs in the reverse order of removal.
Carefully through the mandrel (an old clip as a last resort), we press in new clips, having previously lubricated their walls with motor oil or lithol.
Install the separating ring.
We generously lubricate the internal separator with lithol, put it in place and close it with an oil seal. We fill the hub a little less than halfway with lithol and place it on the steering knuckle.
Lubricate the outer separator and put it in place.
Now tighten the hub nut, but not all the way. We install the brake caliper and screw the wheel.
When all the old parts have been replaced with new ones, you need to adjust
Installing new bearings
- We clamp it in a cleat. We take a new bearing race (ring) and push it into the housing. We use a flat board, a pry bar - any strong object with a flat surface.
- We install it exactly, relative to the plane of the hub, so that it does not become distorted and fits exactly into the seat. From above, with light blows of a hammer, drive the ring as deep as possible through the pry bar. We try to tap evenly so that it fits evenly into the groove, without distortion.
To recess it all the way, you can use an old ring, using it as a mandrel. At the same time, you need to place it relative to the new holder with a larger diameter to make it easier to pull out. In addition, there are special soft metal rings of different diameters designed for pressing bearings.
If the front wheel bearing of a VAZ 2107 is being replaced in the garage, but there is nothing similar at hand, then for complete pressing we use the tool that was used to remove the old races from the hub body. Also, carefully tapping along the entire perimeter of the ring, press it in until it stops.
- For the outer bearing race, just use a block of wood. We insert it accurately into the body so that it does not warp, place a piece of wood on top and tap it with a hammer until it is completely installed in the seat. There is no need to use the old bearing ring here.
- We generously lubricate the cages of new bearings with a special heat-resistant grease.
Litol-24 and solid oil are not suitable; they may not withstand high temperatures and become liquid and lose their lubricating properties. We apply the same lubricant to the inside of the hub housing. In the “Murzilka” for repairs they advise using Litol, but practice shows otherwise.
- We insert the inner bearing into the race. We close it with a cuff with a locking ring. We evenly tap it on top through the spacer so that it fits into its seat without distortion.
- We put the finished hub with the bearing on the steering knuckle axis and install the washer. We also apply lubricant before tightening the hub nut. After replacing the front wheel bearing, it is advisable to use new adjusting nuts, since the old ones will be difficult to lock.
- Install the brake disc on the hub. Don't forget about the spacer ring (washer). We insert the guide pins through it, lubricating them with nigrol or “graphite”. We tighten them, pressing the caliper into the brake disc.
We adjust the free play of the wheel bearing, we will discuss how to do this correctly in the article: Wheel bearing play - causes of occurrence and adjustment of the wheel bearing of the VAZ 2107. We counter the nut, along its outer edges we carefully press the metal with a chisel opposite the grooves of the steering knuckle axis.
- We collect grease into the protective cap and install it in place. We return the caliper with brake pads to the disc.
Video on how to change wheel bearings yourself:
- if you tap the wheel of the VAZ 2107 with your foot, it will stagger with a slight play;
- hum when accelerating to 40-60 mph from the fault side;
- At the beginning of a problem with the wheel bearing, a hum occurs under increased load - that is, when entering turns, then a constant hum occurs.
- It is better to check the rear hubs at a car service center, since you need to “hang” the rear wheels.
- Lubricant replacement occurs in the bearings after 20 thousand km of operation of the VAZ 2107;
- In case of noise, bearings should be replaced in pairs.