Parts and consumables:
It is important to check the rear O-ring and never clean the disc with solvent. For inexperienced car owners, all of the above operations may seem complicated, although they are indeed not easy. Place the other end of the hose in a container with a small amount of brake fluid so that it is submerged in the fluid. Press the clutch pedal 4-5 times and keep the clutch pedal pressed. Open the bleeder valve to release air from the system.
Liquid with air bubbles will come out of the hose into the container. After the flow of fluid from the hose stops, tighten the fitting and release the clutch pedal. Repeat steps 4, 5 and 6 several times until liquid begins to emerge from the hose without air bubbles.
This SUV is equipped with a gearbox that receives engine torque through a single-plate clutch. In this article we will find out how the clutch is adjusted on a Chevrolet Niva.
Clutch adjustment
Note.
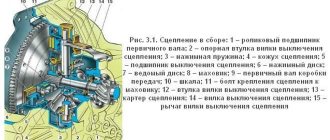
On cars produced in 2009, a clutch slave cylinder is installed with automatic free play adjustment as it wears out. Pedal, master and slave cylinders of the clutch release drive
1 – adjusting nut; 2 – lock nut; 3 – tension spring; 4 – working cylinder body; 5 – housing plug; 6 – fitting for bleeding; 7 – piston; 8 – seal; 9 – pusher;
10 – clutch release fork; 11 – ball joint fork; 12 – main cylinder body; 13 – plug; 14 – piston of the main cylinder; 15 – master cylinder pusher; 16 – clutch pedal travel limiter; 17 – clutch pedal
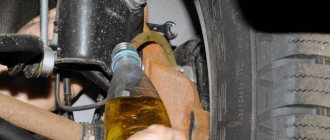
| The gap between the pusher and the master cylinder piston required to completely disengage the clutch should be 0.1–0.5 mm. To adjust... ...using a “10” wrench, loosen the locknut of the clutch pedal travel limiter, holding the limiter with a wrench of the same size (the pedal assembly has been removed for clarity). By rotating the limiter, we achieve the required gap. In this case, the free play of the clutch pedal is 0.4–2.0 mm. The free play of the working cylinder pusher should be 4–5 mm. To determine it, we use a simple template, for example, a pencil. Remove the release spring and rest the end of the pencil against the boss of the lower fastening of the clutch slave cylinder. On a pencil we make one mark opposite the end of the fork (pressed against the adjusting nut), and a second mark to the right, at a distance of 5 mm from the first. We move the clutch release fork back until it stops, that is, we select free play of the working cylinder pusher (the front driveshaft has been removed for clarity). |
With normal free movement of the pusher, the fork will align with the second mark. Otherwise, adjustment is necessary:
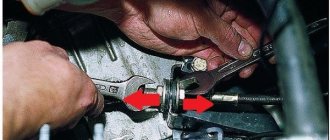
use a 13mm wrench to unscrew the lock nut, holding the adjusting nut with a 17mm wrench;
holding the pusher with pliers, rotate the adjusting nut, achieving normal free play of the pusher. We close the connection.
After adjustments, the free play of the clutch pedal until it starts to disengage should be 25–35 mm.
We finally check the operation of the clutch with the engine running: with the clutch depressed, the gears should shift easily, and the car should move off when the pedal is released from the floor one to two thirds of its travel.
Video
Source
Replacing cylinders
The clutch master cylinder requires replacement; if the mechanism does not turn off or does not turn on completely, a fluid leak occurs. First of all, pump out the brake fluid from the reservoir. This can be done using a rubber bulb. After this, disconnect the clutch master cylinder from the hose. Place the hose aside. Unscrew the nut securing the pipeline, and then the two nuts that secure the cylinder itself, and remove it. When installing, all steps are carried out in reverse order.
Sometimes, when the clutch is not completely disengaged due to a fluid leak, it becomes necessary to replace the clutch slave cylinder. First, the cylinder hose end is loosened. The bolts of the bracket securing the working cylinder to the crankcase are unscrewed, and the bracket itself is removed. Next, the pusher is removed from the shutdown fork, which is removed along with the protective cap. At the same time, see if the plug needs to be replaced.
Disconnect the clutch slave cylinder from the hose end. Drain the brake fluid. Install a new cylinder and bleed the hydraulic drive.
Replacement of related parts
Sometimes it is necessary to replace the hose that is included with the mechanism. To do this, use a key to hold the fitting. In the meantime, the pipeline is disconnected. The fitting mounting bracket is also dismantled. Next, you need to drain the fluid from the drive. The hose tip is then disconnected from the working cylinder. After installing a new one, the hydraulic drive should be bled.
Sometimes it is necessary to replace the tank if deposits have formed on it. To do this, remove the plug. Unscrew the fasteners and dismantle it. Then you should visually check the walls. If there are no deposits, then after thorough washing it can be used further. The driver may hear a loud noise when pressing the pedal. This is a signal that the release bearing is faulty. First, the gearbox is dismantled. Then disconnect the bearing from the clutch fork and remove it. Next, install a new one, lubricate the splines and put the gearbox in place.
Replacing the master cylinder
New clutch master cylinder under the hood.
- Pumping out brake fluid from the reservoir with a rubber bulb
- Unscrewing the tube, removing the hose from the fitting and unscrewing the fastening nut and removing the cylinder.
- Installing a new one follows the steps in reverse order.
Do not miss the moment of fixing the pedal pusher with a fillet (notch) on the cylinder piston, pumping the hydraulic drive.
Video about clutch problems on a Chevrolet Niva
Features of the clutch on the Niva Chevrolet
The clutch mechanism on the Niva Chevrolet is reinforced with a thicker, larger diameter disc with dual damper springs.
That is, the hydraulic clutch compensates for possible wear of the linings (friction) automatically.
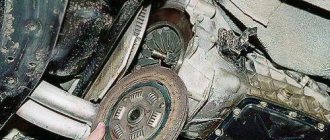
Clutch basket assembly.
The pressure plate and driven plate are balanced as an assembly and are called a basket or shaped cup. The unit is housed in a cast aluminum casing with a wide plane attached to the engine. The drive (pressure) disk is replaced only if the contact plane is severely worn or the springs are defective.
The Niva Chevrolet clutch is self-adjusting automatically by the working cylinder. Omitting minor parts, the unit, if repairs are necessary, is replaced as an assembly.
Components
Clutch disc on a Chevrolet Niva
The driven disk with a riveted friction lining is located between the flywheel and the drive disk of the shaped cup. The disc splined bushing sits loosely on the input shaft. Replaced when worn, if the thickness of the lining decreases to 0.2 mm and the rivets begin to leave scratches on the pressure plate. The cause may be axial runout, weakening of rivets, cracks, breakages, or scuffing on the friction material body.
It is installed with the protruding part of the hub in the direction of the shaped basket. In this case, the centering pin should align with the hole in the hub.
The stamped shaped clutch release fork has a recess for a ball joint and its two ends rest against the release bearing clutch. The ends of the fork, periodically wearing out, are restored by welding pads on them to the thickness of the factory sample.
The release bearing is sealed , maintenance-free, and does not require flushing. Moves along the cylindrical part of the sleeve. The appearance of noise or whistling at the moment of squeezing indicates the need to replace the bearing.
The pedal assembly is connected to the master cylinder located in the engine compartment. Together with the pusher, it forms one unit with the piston of the main unit.
The main, working hydraulic mechanisms are communicated through a steel tube and a reinforced hose. The slave cylinder is mounted on the clutch housing using a bracket.
When the pedal is pressed, the main piston creates fluid pressure, which causes the pushrod and fork to move the release bearing clutch.
DOT-4 brake fluid , the reserve of which is contained in the reservoir and communicates with the main one through a hose.
Hydraulic bleeding is provided by a fitting located on the (working) cylinder.
Driven disk
This element is located between the flywheel and the pressure plate. The hub mechanism of this part is secured to the input shaft of the gearbox using splined joints. And this disk can move along its surface. To ensure that the clutch engages as smoothly as possible, it has special springs. They soften shocks and vibrations. The clutch disc has special friction linings on each side. They are most often made from glass fibers, brass and copper wire. These components are pressed under pressure into a mixture of rubbers and resins. This composition can withstand high temperatures.
How to bleed a hydraulic drive
The appearance of jerks when starting off. It is also possible that shocks may occur in the transmission.
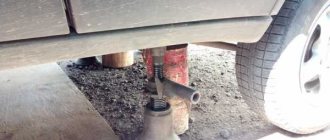
The appearance of all these signs indicates the presence of problems with pedal adjustment. If they are ignored, this can lead to clutch replacement and costly repairs. Adjustment procedure Adjustment of the Chevrolet Niva clutch is carried out with the engine turned off.
It is also better to disconnect the battery so as not to accidentally start the engine when the shaft rotates. You need to put the gear in neutral and start the engine, wait until it warms up to normal temperature and after the engine starts running at minimum speed, depress the clutch pedal and engage reverse gear.
If the gear engages easily, then the clutch is working properly, but if you hear squeaks when the gear is engaged, then the clutch needs to be repaired; While driving, you can also check the clutch. You need to change gears one by one and listen to see if there are any extraneous noises; if so, you need to go to a service station; Also, if the clutch malfunctions, it begins to slip; when you pick up speed, the engine picks up speed, but the car just keeps going.
How to properly adjust the clutch in a car?
After repairing or replacing the clutch, and sometimes when using the car, the gears stop shifting clearly and smoothly, the car jerks, and slips when starting off. This happens due to an unadjusted clutch, and we will talk about this in our article.
You can adjust the clutch yourself
The main signs by which you can understand that it is time to adjust the clutch
The approximate mileage interval at which it is recommended to check and adjust the clutch operation is 10,000 kilometers. It is worth checking the car maintenance schedule established by the manufacturer - other numbers may be indicated here.
Clutch adjustment is required after replacing/repairing the clutch or its elements, for example, the drive cable. The procedure is required even if there is a suspicion of deviation of the pedal amplitude from normal values:
A simple test will help you determine if the clutch needs adjustment. We start the engine, smoothly release the clutch pedal and slowly move away. If the car remains in place when the clutch is fully released, then the pedal travel has increased. If the car starts moving before you even take your foot off the pedal, its travel is too slow.
Parts and consumables:
It is important to check the rear O-ring and never clean the disc with solvent. For inexperienced car owners, all of the above operations may seem complicated, although they are indeed not easy. Place the other end of the hose in a container with a small amount of brake fluid so that it is submerged in the fluid. Press the clutch pedal 4-5 times and keep the clutch pedal pressed. Open the bleeder valve to release air from the system.
Liquid with air bubbles will come out of the hose into the container. After the flow of fluid from the hose stops, tighten the fitting and release the clutch pedal. Repeat steps 4, 5 and 6 several times until liquid begins to emerge from the hose without air bubbles.
- Removing and checking the Niva Chevrolet (VAZ) starter
- Headlight glass - Chevrolet Niva logbook of the year on DiabloArea
- Tuning Niva Chevrolet & | Tuning a VAZ with your own hands
How to replace a Chevrolet Niva clutch
Next we work exactly the same as in the first episode. I sit behind the wheel, pump the clutch, tighten it, and my partner loosens the nut, fluid pours out, and tightens it.
The clutch pedal falls to the floor again, I pump it 30 times and it becomes hard. The partner again loosens the fitting, releases a little more brake fluid, and tightens it.
The pedal sags again, I pump again. The Chevrolet Niva has a clutch closed with a central diaphragm spring, which is installed using a hydraulic drive.
A few more ways to improve clutch performance
If it so happens that this mechanism begins to fail, then there is still no need to rush to replace it. It's better to try several ways to adjust
b, and if this does not work out, then only when resorting to extreme measures. We have looked at several regulation options, and now we will look at three more methods that often help car enthusiasts avoid spending money on purchasing a new clutch. We are talking about the following:
The following operation can also help adjust the clutch: first you need to drain the oil from the gearbox, then remove the gearbox, then install the mandrel 09411-11000 to center the clutch disc and finally loosen the mounting bolts.
As a result of all this, it will be possible to remove the clutch cover. It is important to check the rear O-ring and never clean the disc with solvent. For inexperienced car owners, all of the above operations may seem complicated, although they are indeed not easy. That is why, if you have any problems with the clutch system, it is better to contact specialists who can perform such work at a high level.
Step-by-step adjustment of the Niva Chevrolet clutch with your own hands
The free movement of the working cylinder pusher 4-5 mm is regulated by loosening the limiter nut.
Chevrolet Niva - where is the clutch?
Next, a new unit is installed and the system is pumped. Automotive products Advertising Website design and development After the expiration of copyright, in Russia this period is equal to three years, the work becomes public domain. From the hose into the container there will be fluid with air bubbles.
Home Chevrolet Niva 1st generation [restyling] [ — ] Gasoline. Checking and adjusting the shutdown drive...
Chevrolet Niva clutch components 1 - centering sleeve of the clutch housing; 2 — casing centering pin; 3 — front bearing of the input shaft; 4 - flywheel; 5 — pressure disk basket; 6 — diaphragm spring; 7 - casing; 8 — damper spring; 9 — hub of the Chevy Niva clutch driven disc; 10 - spring plate; 11 — overlay; 12 — clutch housing; 13 — gearbox input shaft; 14 — bearing; 15 — clutch release fork; 16 — fork cover The inner ends of the fork rest against the clutch release bearing coupling and are pressed against it by a figured spring.
Warning Do not clean the clutch disc or clutch release bearing with solvent. Check the wear of the friction linings. The episodes, one way or another, indicate incorrect adjustment of the pedal travel and bearing release.
The total free play of the pedal should be within millimeters. To more accurately adjust the clutch pedal, it is necessary to work on an inspection hole or lift.
The difference in adjustment on the Chevrolet Niva.
How to adjust the clutch drive.
The clutch in the Chevrolet Niva is reinforced. For this purpose, thickened metal of larger diameter was used.
Damper springs are used for compression. The hydraulic clutch option compensates for wear. Clutch discs are balanced when assembled.
They are usually called a basket. The process is considered an inevitable stage of repair in the event of: Exceeding the standard pedal travel, which leads to incomplete disengagement of the clutch. In this case, the driven disk is not completely adjacent to the flywheel with its plane.
When replacing the working cylinder, you need to loosen the hose, remove the working cylinder bracket, remove the pusher and after that, remove the working cylinder itself.
After installing the new one, we bleed the system.
Also, sometimes clutch problems arise due to incorrect settings of the clutch pedal itself. A release spring is used to return the pedal to its original position. The pedal is pivotally connected to a pusher, which fits into the recess of the clutch master cylinder piston.
8.2. Clutch pedal adjustment
The master cylinder is secured in the engine compartment on two studs welded to the pedal assembly bracket. The Chevrolet Niva clutch master cylinder is connected by a steel tube and a reinforced rubber hose to the slave cylinder, mounted on the clutch housing using a bracket.
The working surface of the bearing acting on the pressure spring must be smooth, without cracks, local corrosion or wear. A faulty clutch release bearing can be determined without removing it from the car, for which you need to press the clutch pedal with the engine running.
If there is additional noise when you press the clutch pedal, the clutch release bearing is faulty and needs to be replaced. Apply grease to the contact surfaces of the bearing, cylinder and clutch release fork.
Tools:
Warning When installing the clutch, apply lubricant to all moving parts, but do not use excessive amounts of lubricant, as this may cause the clutch to slip. During disassembly it will become clear what the reason is. When removing air, it is important to add only clean liquid. If it accidentally gets on the car, it must be washed off immediately with water, otherwise it will damage the coating; The following operation can also help adjust the clutch: As a result of all this, it will be possible to remove the clutch cover.
A few more ways to improve clutch performance
If it so happens that this mechanism begins to fail, then there is still no need to rush to replace it. It's better to try several ways to adjust
b, and if this does not work out, then only when resorting to extreme measures. We have looked at several regulation options, and now we will look at three more methods that often help car enthusiasts avoid spending money on purchasing a new clutch. We are talking about the following:
- It happens that problems in the clutch system are associated with the presence of air or a faulty cylinder. In this case, it is necessary to remove the air and disassemble the unit. During disassembly it will become clear what the reason is. When removing air, it is important to add only clean liquid. If it accidentally gets on the car, it must be washed off immediately with water, otherwise it will damage the coating;
- The following operation can also help adjust the clutch: first you need to drain the oil from the gearbox, then remove the gearbox, then install the mandrel 09411-11000 to center the clutch disc and finally loosen the mounting bolts. As a result of all this, it will be possible to remove the clutch cover. It is important to check the rear O-ring and never clean the disc with solvent.
For inexperienced car owners, all of the above operations may seem complicated, although they are indeed not easy. That is why, if you have any problems with the clutch system, it is better to contact specialists who can perform such work at a high level.
vote
Article rating