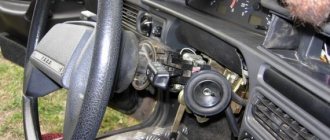
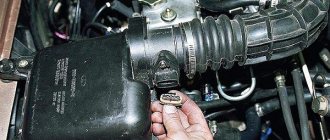
The time has come for another replacement of something, and this “something” this time was the pendulum arm. There was a factory lever on bushings, which traveled almost 90,000 km and over 10 years of operation began to wear out. At first I didn’t notice anything, the car steered normally until recently, it didn’t “run” along the road, but recently I began to hear a “knock-knock” when turning the steering wheel, the knock was especially audible when the car was stationary and at the same time you could rock the steering wheel from side to side. Having driven the car into the pit, I asked my father to see where the knocking was coming from, because at first he himself had sinned on the steering ends and rods. Father immediately pointed his finger at the pendulum arm, since the latter was a little loose. Since the “diagnostics” were carried out in the evening, there was no point in going for a spare part, and I just tightened the lever nut a little. After this, the steering wheel became “heavier” and the lever began to creak. Then I somehow forgot something and skated like that for a couple more weeks. The other day I bought a replacement, a pendulum arm on rolling bearings. Now about the replacement. I expected to replace this lever in two hours, but that was not the case) Everything turned out to be much more interesting!) So, first I needed to open access to the lever, because everything up to the box was closed. I did not remove all the protection, only the last sheet under the box.
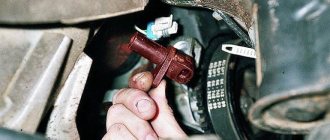
Here it is, the culprit of the tight and creaky steering wheel.
After removing the protection, an awesome problem arose - it was necessary to remove the rods from the pendulum, which were installed 10 years ago at the manufacturer. Everything was complicated by the fact that I didn’t have a 22 mm spanner or socket wrench to tighten the lug nuts, plus it was difficult to access them - the pendulum “looks” exactly into the transverse beam between the side members, which made it extremely difficult to get to these nuts open-end wrench.
I decided to take a slightly different route. I first tried to unscrew the fastening of the pendulum arm so that I could tilt the whole structure down a little, so that I could twist the rods. Again, not everything is so simple - the top bolt is God knows where (neither from above nor from below you can’t get it with a wrench) + the nuts on the outside of the spar under the fender liner were turning (my father said that they were welded on his old seven, which should have been make the task easier). To unscrew the upper bolt of the arm, I used a 17mm socket with an adapter from the kit, by which I held the head with a 13mm wrench; under the fender liner, I unscrewed the nut with a 17mm socket, without removing the fender liner (I was too lazy), simply unscrewing one of the screws and bending the fender liner to the side. There were no problems with the bottom bolt.
While I was fiddling with the lever, I filled the nuts of the rod ends with penetrating lubricant (like WD-shki, only half the price) in order to “revive” them at least a little.
I prepared a puller left over from my father’s seven.
And then the MOST INTERESTING began! I haven’t heard so much swearing from myself for a long time: D At first I behaved calmly: well, the key came off, okay, I’ll try again on the other side, etc. But when, on the next attempt to move the nut from its place, the key came off, licking the edges of the nut and hitting I had my hand on the beam and the back of my head on the edge of the pit, I was blown up!))) Indeed, they rightly say that a mat in the garage works wonders and that without these spells you simply can’t unscrew anything, so while I was cursing at all these elements of the steering mechanism, barbarically , first unscrewed one nut with a gas wrench, and then with some Soviet rusty wrench for 22-24 and the second!:D Then I squeezed out both ends with a puller.
How to check the pendulum on a VAZ 2107
The pendulum lever (also known as the “ pendulum”) on the VAZ 2107 is designed for one simple function - synchronous rotation of the front wheels through the steering mechanism. It is thanks to him that the left and right wheels turn in the direction desired by the driver simultaneously, without delay, when turning the steering wheel. This ensures vehicle stability when cornering.
A malfunction of the VAZ 2107 pendulum worsens the vehicle’s performance when maneuvering and can lead to an accident. Therefore, at the first sign of its malfunction, it is necessary to repair or replace the unit.
↑ The procedure for assembling the pendulum arm bracket is the reverse of disassembly
If axle 9 was replaced, then tighten the self-locking nut 11 securing the lever with a torque wrench. Washer 6 is installed with the extrusions facing up.
After tightening nut 4, the lever in a horizontal position should not rotate under its own weight.
The pendulum lever (also known as the “ pendulum”) on the VAZ 2107 is designed for one simple function - synchronous rotation of the front wheels through the steering mechanism. It is thanks to him that the left and right wheels turn in the direction desired by the driver simultaneously, without delay, when turning the steering wheel. This ensures vehicle stability when cornering.
A malfunction of the VAZ 2107 pendulum worsens the vehicle’s performance when maneuvering and can lead to an accident. Therefore, at the first sign of its malfunction, it is necessary to repair or replace the unit.
Swing arm location
The steering pendulum of the VAZ 2107 is located at the bottom of the engine compartment. You can see it by opening the hood and looking deep down. But optimal visibility and ease of repair are provided from the inspection hole or when using a lift.
The bipod coming from the pendulum controls the rotation of the front wheels of the car when the steering gear rotates.
Note: sometimes “lever” is used instead of the term “bipod”, but only the first definition is correct.
Signs of a malfunction of the VAZ 2107 pendulum
The first sign of a pendulum failure is knocking noises when hitting bumps, falling into holes or hitting a bump. Another sign is a large amount of play in the steering wheel (free play of the steering wheel).
Failure of the pendulum may also be accompanied by a large load when turning the steering wheel.
Important: these signs appear not only when the pendulum arm is faulty, but also when the bolts are loose or the adjusting nut is overtightened. Before repairing or replacing the pendulum, it is worth checking the tightness of the bolts and nuts.
Replacing the pendulum arm (Pendulum) on a VAZ 2101-VAZ 2107
Welcome! Pendulum arm – popularly this unit is simply called “Pendulum”. You need this unit to turn both wheels at the right moment in time. Essentially, due to the “Pendulum Lever”, it creates synchronism when turning the wheels, that is, thanks to it, both wheels turn at the same moment and without delay, respectively.
Note! To replace the pendulum, be sure to stock up on: Two 17" wrenches!
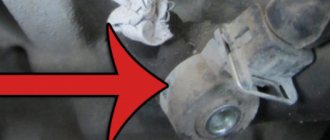
Where is the swing arm located? It is located under the bottom of the car, you can see it by opening the hood of the car and looking at the very bottom of the engine compartment, and the easiest way to look at it is from the bottom of the car, to do this, climb under the car and find the lever there that comes from the pendulum itself, and for clarity, this lever is indicated by an arrow.
Note! In fact, it is incorrect to use the word lever in the pendulum (this was done only for convenience), in fact, no lever comes from the pendulum, but only a bipod, which is indicated by the arrow, comes from it!
When should the swing arm be replaced?
- Basically, after the pendulum arm fails, knocking noises begin to be heard from the lower part where it is located, which will be especially audible when hitting a bump.
- In addition to knocking, the free play of the steering wheel, popularly called play, can also be increased.
- Also, the steering wheel itself may be difficult to turn due to the failure of the pendulum arm.
Note! All these signs relate to a malfunction of the pendulum, but they can also occur when the pendulum bolts are loose or the adjusting nut is too tight, so before replacing the pendulum arm with a new one, check the tightness of the bolts and either loosen or tighten them as necessary!
Repair of the VAZ 2107 pendulum
After removing the unit, you can not replace it, but repair it. Repair of the VAZ 2107 pendulum is carried out as follows:
Note: The presence of defects in the lever is unacceptable. It should not be deformed. The lever axis should not have noticeable wear.
Reassembling the pendulum arm parts is done in the reverse order. Before assembly, it is necessary to lubricate the lever axis and the hole under it with “Lithol” or other grease.
After assembly, it is necessary to adjust the tightening of the lever nut so that the bipod rotates with a force of 1-2 kg*s. This can be checked with a torque wrench.
GAZ 24 Chorny Volkh › Logbook › Trapezoid and modification of the pendulum
In my free time from work, I consistently put the components of my tank in order. Now we've reached the steering linkage.
Unfortunately, the previous owner did not pay attention to car maintenance. Therefore, the anthers on the tips were torn, there was water and sand inside, and the pendulum axis was jammed in the bushings.
But this is the Volga! The safety margin and quality of the metal are simply beyond words. With proper maintenance, this machine will last forever! I disassembled all the trapezoid hinges, washed them, replaced the boots and reassembled them with new lubricant.
Due to the condition of the parts - in the worst case, in a couple of years it will be necessary to replace a couple of pins and hinge bodies.
To remove the trapezoid rods I used this puller:
Excellent thing! Fingers fly out of their nests with a bang. I bought it from an ad for pennies. I was amused that the person who sold it to me later asked: “What is this thing for?” _________________
Well, about the pendulum. Before I took it apart, it rotated with superhuman effort, and not in the bushings, but in the rubber seals.
To avoid such a situation in the future, I decided to slightly modify the factory design and make the pendulum serviceable. I drilled a threaded hole and screwed in the oil nipple:
Replacing the swing arm
If repair is not possible, you can install a new swingarm and secure it. The procedure is the reverse of removing the pendulum from the car body.
Replacing the pendulum on a VAZ 2107 is a fairly simple process. You can make it yourself.
The first signal that needs to be taken into account and the pendulum replaced is a bent bipod of the pendulum arm. It is possible to carry out repairs to replace the pendulum without an overpass. Initially, it is necessary to dismantle the main filter housing so that it does not interfere. Next, you need to unscrew the castle nuts of the tie rods, as well as the ball pin nut. After this, it is necessary to press out the ball pins of both steering rods. To do this, a long steel rod is used, which is struck with a hammer.
Next, you need to remove the samman lever. This procedure is completely simple (you just need to turn two nuts on the lever). This completes the disassembly. Next, you need to replace the pendulum. It is not dismountable, so it must be completely replaced. The parts are assembled in the reverse order. After intervention in the suspension and steering, it is necessary to check the wheel alignment. This completes the replacement of the vehicle's pendulum.
The process of replacing the pendulum is absolutely simple. That is why you don’t have to go to a service station for such “trifles”, but do the repairs yourself. This procedure does not require special devices or tools. To replace the pendulum, you only need a socket wrench and a wrench. For the first time, the process of replacing the pendulum is best carried out under the supervision of an experienced specialist.
More details on how to replace the pendulum on a VAZ 2107 can be found in the following video
.
Rods, bipod, hinges - where is it all?
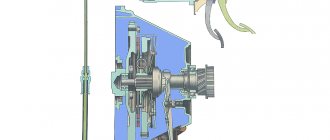
The main parts and steering components of the VAZ-2107 and other rear-wheel drive models are shown in the figure below. To understand what is faulty, let’s remember “who is who”. You also need to remember that breakdowns of steering parts and assemblies are very dangerous and, in most cases, lead to serious accidents! For example, if the steering rod breaks, the front wheels lose contact with the steering wheel and the car flies into a ditch or into oncoming traffic. To prevent this from happening, let's check the condition of the steering of our “classic”.
Steering VAZ-2107
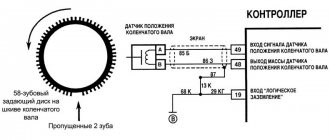
1 – lateral thrust. 2 – bipod. 3 – medium traction. 4 – Pendulum lever. 5 – adjusting clutch. 6- lower ball joint of the front suspension. 7 - right steering knuckle. 8- upper ball joint of the front suspension. 9 - right steering knuckle lever. 10- bracket for the pendulum arm. 11- bearing of the upper steering shaft. 12, 19 - steering shaft mounting bracket. 13- pipe of the steering shaft mounting bracket. 14- Upper steering shaft. 15 - steering gear housing. 16- intermediate shaft. 17- facing casing. 18- steering wheel. 20- fixing plate of the front bracket. Pinch bolt for fastening the universal joint. 22- body spar.
Inspection and testing of the VAZ-2107 steering
You need to check your steering if your car has the following signs: -increased play (free play) of the steering wheel; -knocks in the area of the front wheels; - difficult (tight) rotation of the steering wheel. It is better and more convenient to perform all work in an inspection ditch or on a lift. Be sure to invite an assistant; you can’t handle the check alone. Before work, the car must be thoroughly washed from below. Set the steering wheel to the position for driving in a straight line. Turning the steering wheel left and right, we check one by one: - the play of the steering wheel along the rim is 18 – 20 mm; - there should be no knocking in the hinges and joints; - the fastenings of the steering gear housing and the pendulum lever are not loose; - there is no play in the ball joints of the rods and in the bracket of the pendulum arm, and the bipod does not move in the axial direction; - steering force does not exceed 20 kgf; - the adjusting couplings of the side rods are securely secured with clamps; -all protective caps and rubber covers have no cracks or tears.
Adjusting the pendulum arms
We disconnect the steering rods from the pendulum arm (see Replacing steering rods and their hinges)
Insert the dynamometer hook into the hole under the tie rod pin and pull the dynamometer until the lever rotates on the axis
If the lever rotation force is less than 1 kgf or more than 2.5 kgf, we adjust it.
To do this, use thin pliers to unscrew the lower nut of the lever.
Use a 27 wrench to unscrew or tighten the nut, achieving the required turning force
We fasten the nut and connect the steering rods (see Replacing steering rods and their hinges). We adjust the second pendulum arm in the same way.
We connect the levers with the steering rods.
Lada 2107 MORAY › Logbook › Replacing the pendulum arm
The time has come for another replacement of something, and this “something” this time was the pendulum arm. There was a factory lever on bushings, which traveled almost 90,000 km and over 10 years of operation began to wear out. At first I didn’t notice anything, the car steered normally until recently, it didn’t “run” along the road, but recently I began to hear a “knock-knock” when turning the steering wheel, the knock was especially audible when the car was stationary and at the same time you could rock the steering wheel from side to side. Having driven the car into the pit, I asked my father to see where the knocking was coming from, because at first he himself had sinned on the steering ends and rods. Father immediately pointed his finger at the pendulum arm, since the latter was a little loose. Since the “diagnostics” were carried out in the evening, there was no point in going for a spare part, and I just tightened the lever nut a little. After this, the steering wheel became “heavier” and the lever began to creak. Then I somehow forgot something and skated like that for a couple more weeks. The other day I bought a replacement, a pendulum arm on rolling bearings. Now about the replacement. I expected to replace this lever in two hours, but that was not the case) Everything turned out to be much more interesting!) So, first I needed to open access to the lever, because everything up to the box was closed. I did not remove all the protection, only the last sheet under the box.
Here it is, the culprit of the tight and creaky steering wheel.
After removing the protection, an awesome problem arose - it was necessary to remove the rods from the pendulum, which were installed 10 years ago at the manufacturer. Everything was complicated by the fact that I didn’t have a 22 mm spanner or socket wrench to tighten the lug nuts, plus it was difficult to access them - the pendulum “looks” exactly into the transverse beam between the side members, which made it extremely difficult to get to these nuts open-end wrench.
I decided to take a slightly different route. I first tried to unscrew the fastening of the pendulum arm so that I could tilt the whole structure down a little, so that I could twist the rods. Again, not everything is so simple - the top bolt is God knows where (neither from above nor from below you can’t get it with a wrench) + the nuts on the outside of the spar under the fender liner were turning (my father said that they were welded on his old seven, which should have been make the task easier). To unscrew the upper bolt of the arm, I used a 17mm socket with an adapter from the kit, by which I held the head with a 13mm wrench; under the fender liner, I unscrewed the nut with a 17mm socket, without removing the fender liner (I was too lazy), simply unscrewing one of the screws and bending the fender liner to the side. There were no problems with the bottom bolt.
While I was fiddling with the lever, I filled the nuts of the rod ends with penetrating lubricant (like WD-shki, only half the price) in order to “revive” them at least a little.
Source
Repair of the pendulum arm GAZ 31105
The pendulum arm is disassembled, in most cases, to replace the bushings when there is play that cannot be eliminated by tightening the nut, as well as to repair a ball joint that has play that cannot be eliminated by tightening the threaded plug.
You will need: a 19mm wrench, a screwdriver, and pliers.
1. Clamp the pendulum arm by the bracket lugs in a vice. Remove seal 1 and bushing 2 of the ball joint pins.
2. Turn the swing arm over and remove the plug.
3. Take out the spring 1, the support heel 2, the polyethylene cracker 3 and the pin 4 of the ball joint.
4. Take out the cotter pin 1, unscrew the nut 2 securing the pendulum arm pin in the bracket and remove the support washer 3.
5. Remove pin 2 with pendulum lever 1 and metal-ceramic 5 and protective rubber bushings 4 from both sides of the bracket from bracket 3.
6. Check the condition of the polyethylene block of the ball joint and, if it is worn, be sure to replace it.
7. If you find wear on the support washer more than 0.3 mm from the pin shoulder, replace the washer.
8. Replace defective cermet bushings and protective rubber bushings.
9. Assemble the pendulum arm in the reverse order of disassembly, lubricating all its parts with grease. Tighten the nut securing the pendulum arm pin to a torque of 40–50 N·m (4.0–5.0 kgf·m).
Adjust and fill with grease the ball joint of the pendulum arm installed on the car in the same way as the other ball joints of the steering linkage.
Video about “Repair of the pendulum arm” for GAZ 31105
Volga 3110 how to sort out the pendulum arm part 4 I disassemble the pendulum arm on bearings.
Gas 24. Replacing the pendulum arm. Replacing shock absorbers. Source
Changing the pendulum on a VAZ 2107
A pendulum on cars is a unit that allows both wheels to turn when the need arises. This is a kind of lever that ensures a synchronous change in the angle of both front wheels. When you turn the steering wheel to the left or right, the wheels change direction accordingly. If the pendulum arm were absent, the wheels would change the direction angle asynchronously, which would lead to a number of unpleasant consequences. In this material we will look at how to replace the VAZ 2107 pendulum, where this part is located, and how to determine its malfunction.
How to identify a faulty pendulum
The easiest way to determine if the lever is faulty is to listen for knocking noises while driving on rough roads. You shouldn’t deliberately drive into a hole or run over a bump, so you can pull over to the side of the road and experiment. But this is not the only way to determine the malfunction of such an important part as the pendulum.
The second way to determine whether the VAZ 2107 pendulum arm is faulty is the presence of large play in the steering wheel. This can be determined quite simply by turning the steering wheel in one direction and the other. But the most common case of pendulum failure is the presence of load when turning the steering wheel. But these factors do not always indicate that the pendulum lever is the culprit. Malfunctions with such symptoms may include loosening of the bolts or overtightening of the adjusting nut. Therefore, before you start replacing the device, you should definitely make sure that it is broken. This can be done after dismantling it. The first sign of a part malfunction is the presence of defects on its component elements, so to determine the failure you will need to disassemble the mechanism.
Location of the pendulum on the VAZ 2107
This product is located on a VAZ 2107 car from below the engine compartment. You can see the pendulum when you open the hood and look at the bottom of the car on the passenger side. It is most convenient to dismantle or examine the device from below from an inspection hole or on an overpass.
A bipod extends from the pendulum, which controls the rotation of the front wheels of the VAZ 2107. The photo below shows a view of the pendulum arm on the VAZ 2107.
GAZ 31 Silver: Online stories › Logbook › Reworking the pendulum. Steering completed.
Hurray, if you put the wheels on, you can roll the silver if necessary! But it’s probably not worth it yet, we need to put the brakes on...
I removed the pendulum and compared it with the gearbox. That’s right - my pendulum is of the wrong length and shape(
This is one of the reasons for the neighbor’s dissatisfaction with the Volga taxiing:
Detailed information about the difference between pendulums is in this topic gaz3102.ru/forum/viewtopic.php?f=12&t=3293, note for Volgovo drivers
In short - on a gearbox without power steering (and perhaps on the 100th power steering, not in front of you for comparison), the bipod is shorter and must be paired with a short pendulum one.
On the 31105th Volga on the 103rd power steering, to reduce the steering angle, a long bipod was installed on the gearbox (and to them short bipods on the steering knuckles)
Installing an unsuitable pair together (this is as easy as shelling pears due to ignorance) will result in broken corners when turning the wheels. Diagram from the topic above at the link:
In my case, R1 was greater than R2, but this does not change the essence.
You see, the pendulum is shorter plus a different shape
Compared. A straight short bipod of the gearbox (bottom) should go to this pendulum. The pendulum on 31105 on the 103rd gear should be 2.5 centimeters longer and bent so that the hinge on the pendulum and the hinge on the middle link in the gearbox are in the same plane
Malfunctions of the pendulum of the VAZ 2107
The time has come for another replacement of something, and this “something” this time was the pendulum arm. There was a factory lever on bushings, which traveled almost 90,000 km and over 10 years of operation began to wear out. At first I didn’t notice anything, the car steered normally until recently, it didn’t “run” along the road, but recently I began to hear a “knock-knock” when turning the steering wheel, the knock was especially audible when the car was stationary and at the same time you could rock the steering wheel from side to side. Having driven the car into the pit, I asked my father to see where the knocking was coming from, because at first he himself had sinned on the steering ends and rods. Father immediately pointed his finger at the pendulum arm, since the latter was a little loose. Since the “diagnostics” were carried out in the evening, there was no point in going for a spare part, and I just tightened the lever nut a little. After this, the steering wheel became “heavier” and the lever began to creak. Then I somehow forgot something and skated like that for a couple more weeks. The other day I bought a replacement, a pendulum arm on rolling bearings. Now about the replacement. I expected to replace this lever in two hours, but that was not the case) Everything turned out to be much more interesting!) So, first I needed to open access to the lever, because everything up to the box was closed. I did not remove all the protection, only the last sheet under the box.
Here it is, the culprit of the tight and creaky steering wheel.
After removing the protection, an awesome problem arose - it was necessary to remove the rods from the pendulum, which were installed 10 years ago at the manufacturer. Everything was complicated by the fact that I didn’t have a 22 mm spanner or socket wrench to tighten the lug nuts, plus it was difficult to access them - the pendulum “looks” exactly into the transverse beam between the side members, which made it extremely difficult to get to these nuts open-end wrench.
I decided to take a slightly different route. I first tried to unscrew the fastening of the pendulum arm so that I could tilt the whole structure down a little, so that I could twist the rods. Again, not everything is so simple - the top bolt is God knows where (neither from above nor from below you can’t get it with a wrench) + the nuts on the outside of the spar under the fender liner were turning (my father said that they were welded on his old seven, which should have been make the task easier). To unscrew the upper bolt of the arm, I used a 17mm socket with an adapter from the kit, by which I held the head with a 13mm wrench; under the fender liner, I unscrewed the nut with a 17mm socket, without removing the fender liner (I was too lazy), simply unscrewing one of the screws and bending the fender liner to the side. There were no problems with the bottom bolt.
While I was fiddling with the lever, I filled the nuts of the rod ends with penetrating lubricant (like WD-shki, only half the price) in order to “revive” them at least a little.
I prepared a puller left over from my father’s seven.
And then the MOST INTERESTING began! I haven’t heard so much swearing from myself for a long time: D At first I behaved calmly: well, the key came off, okay, I’ll try again on the other side, etc. But when, on the next attempt to move the nut from its place, the key came off, licking the edges of the nut and hitting I had my hand on the beam and the back of my head on the edge of the pit, I was blown up!))) Indeed, they rightly say that a mat in the garage works wonders and that without these spells you simply can’t unscrew anything, so while I was cursing at all these elements of the steering mechanism, barbarically , first unscrewed one nut with a gas wrench, and then with some Soviet rusty wrench for 22-24 and the second!:D Then I squeezed out both ends with a puller.
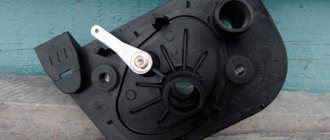
Packaging with new lever on bearings.
The kit even includes a “quality certificate!” The price tag for the lever is 457 rubles.
This is what (bearings) that, according to the passport, should reduce the applied force from 300 N to 160 N. At first impressions, it turns really easily, very easily, compared to the original lever on bushings, which I was not immediately able to turn in my hands.
New and old levers side by side.
When I tried to install a new lever, I could not insert the lower bolt - it turned out that there were casting or stamping flaws - a small edge on top did not allow the bolt to go through. I ground it down with a file.
I installed a new pendulum arm and put back the rods, after filling them with CV joint grease left over after replacing the grenades on my father’s trade wind. The ends on the rods do not dangle, they move with little effort, even a little tight, so I haven’t changed them yet.
Once again I checked the tightness of the bolts and nuts and returned the protection. Afterwards I immediately decided to check what this pendulum produced. This is D-DIVINE! The steering wheel... The steering wheel was simply replaced! After replacing the lever in place on the asphalt, I can turn the steering wheel with one hand: D I can’t imagine what it will be like in winter on winter tires and frozen asphalt, I’ll probably be able to turn it with my finger! Now I’m turning into a turn too sharply, because out of an old habit I’m making more effort than necessary, but you quickly get used to the good stuff, I think) What can I say. If I had known that replacing just one pendulum arm would give such an effect, I would have replaced it even before the factory one wore out. That’s why I highly recommend doing this to those who ride a bushing! Thanks to everyone who stopped by for watching my seven's blog!
GAZ 31 › Logbook › Replacing the pendulum arm
What does the owner of a Volga do on a day off? Of course he goes to the garage. After all, the real one
The owner of a Volga
certainly
has a garage. And in this very garage he always has something to do with his car. For example, you can polish small scratches on the body. Or put soft lighting under your feet when opening the door. Or make the interior light go out quickly with a 5-10 second delay. Just all this self-indulgence and cowardice