2279-4-9a-01
If the engine is hot, you need to let it cool and then relieve excess pressure in the cooling system by unscrewing the expansion tank cap.
If the engine is hot, you need to let it cool and then relieve excess pressure in the cooling system by unscrewing the expansion tank cap.
If the engine is hot, you need to let it cool and then relieve excess pressure in the cooling system by unscrewing the expansion tank cap.
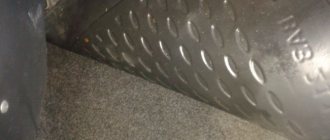
To access the drain holes from below, you must remove the middle mudguard of the engine compartment.
Why does antifreeze change color?
- G 11 is painted blue, green;
- G 12 red, including all accompanying shades (orange...lilac);
- G 13 purple or pink.
- G 11 is painted blue, green;
- G 12 red, including all accompanying shades (orange...lilac);
- G 13 purple or pink.
Let's look at why antifreeze changes color. During operation, additives are produced and a change in coolant color becomes an indicator. For some brands, the indicator is discoloration rather than a change in shade.
Let's look at why antifreeze changes color. During operation, additives are produced and a change in coolant color becomes an indicator. For some brands, the indicator is discoloration rather than a change in shade.
Smooooooooooooooooooooooooooooooooooooooooooooooooooo
Dirt guards of the engine compartment of a car with a manual transmission and their fastening elements (view from below the car): 1 - three screws for the “8” turnkey fastening of the middle shield to the right shield;
2 — right shield; 3 - middle shield; 4 — four self-tapping screws “8” for fastening the middle shield to the lower cross member of the radiator frame; 5 — two self-tapping screws “8” for fastening the middle shield to the left shield; 6 — left shield; 7 — two “10” screws for fastening the middle shield to the body side members. Mud guards of the engine compartment of a car with a manual transmission and their fastening elements (view from below the car): 1 — three “8” screws for fastening the middle shield to the right shield; 2 — right shield; 3 - middle shield; 4 — four self-tapping screws “8” for fastening the middle shield to the lower cross member of the radiator frame; 5 — two self-tapping screws “8” for fastening the middle shield to the left shield; 6 — left shield; 7 - two “10” bolts for fastening the middle shield to the body side members
Dirt guards of the engine compartment of a car with a manual transmission and their fastening elements (view from below the car): 1 - three screws for the “8” turnkey fastening of the middle shield to the right shield; 2 — right shield; 3 - middle shield; 4 — four self-tapping screws “8” for fastening the middle shield to the lower cross member of the radiator frame; 5 — two self-tapping screws “8” for fastening the middle shield to the left shield; 6 — left shield; 7 - two “10” bolts for fastening the middle shield to the body side members
After unscrewing all the indicated bolts and screws, remove the middle mudguard of the engine compartment.
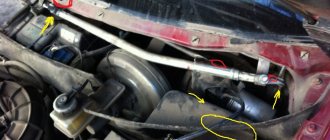
We place a wide container with a volume of at least 6 liters under the drain hole made in the lower part of the right radiator tank. To reduce the intensity of liquid drainage at the initial moment, the cap of the expansion tank should be tightly screwed on.
Checking the radiator for leaks
The diagnostic process is not at all complicated; we carry it out ourselves, and if you don’t have free time, visit a service station to have the work performed by professionals.
Checking the radiator from the engine compartment side
- We place the car within the perimeter of the repair area, on the inspection hole, and open the hood.
- From the engine compartment side, we inspect the surface of the radiator for drips and traces of antifreeze (antifreeze) leakage.
- We carry out similar actions from under the bottom of the car;
- We inspect the antifreeze supply/return lines, upper and lower circuits.
The most common places for depressurization: corners around the perimeter, joints, ties with clamps.
- The hood is open, the car engine has cooled down to a safe temperature so as not to damage the skin.
- We unscrew 6 screws from under the bottom and remove the oil pan protection.
- Unscrew the drain plug in the lower circuit of the radiator.
- At the same time, unscrew the drain plug on the wall of the cylinder block. We substitute the container.
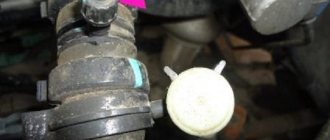
Unscrew the plastic drain plug of the radiator tank
Note to the driver!
In the Lada Granta 16-valve, we first dismantle the starter, since it prevents free access to the plug. If you do not remove the starter, antifreeze will flood the part, temporarily rendering it unusable.
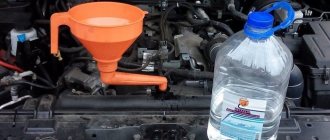
- After the liquid is completely drained from the water jacket, screw in the drain plugs. Fill in new antifreeze in a volume of 7.5 liters to about or 8.0 liters to the recommended average level.
2279-4-9b-03 (Copy)
The connection is sealed with a rubber ring.
The connection is sealed with a rubber ring.
The connection is sealed with a rubber ring.
To drain the coolant from the cooling jacket of an 8-valve engine equipped with a traction drive gearbox, place a container under the drain hole located on the front side of the cylinder block below the ignition coil.
Antifreeze: change or top up?
The additives stop working, the water evaporates, and periodic renewal is needed. If you add only distillate, there will not be enough substances to protect the system.
If the level is low, check the system for leaks. If none is found, it is worth topping up.
Compatibility of compositions of the same color is optional (see above). To choose the right coolant, you need to follow the car manufacturer's recommendations. Different liquids should not be mixed. The reason is that additives can neutralize each other and react. Such a substance will not protect/cool.
2279-4-9a-02
On a vehicle with a 16-valve engine equipped with a cable-driven gearbox, access to the drain hole in the cylinder block is prevented by the starter.
In addition, the leaking liquid will inevitably get inside the starter. On a vehicle with a 16-valve engine equipped with a cable-driven gearbox, access to the drain hole in the cylinder block is prevented by the starter. In addition, the leaking liquid will inevitably get inside the starter.
On a vehicle with a 16-valve engine equipped with a cable-driven gearbox, access to the drain hole in the cylinder block is prevented by the starter. In addition, the leaking liquid will inevitably get inside the starter.
Therefore, the starter needs to be removed. Disconnect the wire terminal from the negative terminal of the battery. By pressing the latch of the wire block, disconnect the block from the traction relay connector. Remove the protective cap from the nut securing the tip of the wire connected to the positive cable of the battery.
Replacing antifreeze on Renault Logan
First, let's place the car on a flat surface with access to the bottom. To replace antifreeze on Renault Logan, you need to remove the crankcase protection. We unscrew the clamp securing the radiator pipe, replacing the container.
Next, unscrew the valve of the fitting located on the air release hose. After draining, we mount the pipe back with a new clamp. Fill with coolant and check the system for leaks by closing the valve plug. Start the car and add the mixture to the required level.
2279-4-9a-02d
We unscrew the plug as shown above and drain the coolant from the cylinder block.
We unscrew the plug as shown above and drain the coolant from the cylinder block.
We unscrew the plug as shown above and drain the coolant from the cylinder block.
We tighten the drain plugs of the radiator and cylinder block. The connection between the plug and the cylinder block uses a conical thread that does not require additional sealing. Tighten the drain plug of the cylinder block to a torque of 25–30 Nm. Pour liquid into the engine cooling system through the expansion tank until it is full. Let's start the engine. With the engine running, vigorously compress all the hoses of the cooling system several times in turn - this will help the fluid fill the system and displace air from it. As the coolant level in the expansion tank drops, bring it to normal and screw on the tank cap. When the engine warms up, the outlet (lower) radiator hose should be cold for some time, and then quickly heat up, which will indicate the beginning of fluid circulation in a large circle. After waiting for the cooling system fan to turn on, stop the engine. After the engine has cooled, check the coolant level again and, if necessary, replenish the system.
[14 Lada Granta maintenance operations that will help you save]
[How to save money on scheduled maintenance of Lada Granta] [Maintenance of Lada Granta at 2.5 thousand km] [Maintenance of Lada Granta at 15,000 and 105,000 km] [Maintenance of Lada Granta at 30,000 and 60,000 km ] [Maintenance of Lada Granta at 45 thousand km] [Maintenance of Lada Granta at 75 thousand km] [Maintenance of Lada Granta at 90 thousand km] [Carrying out maintenance yourself - general recommendations] [Safety rules for doing it yourself carrying out maintenance] [Tools required for maintenance of Lada Granta] [Lamps used in the Lada Granta car]
Replace coolant Lada Granta
How often should I change
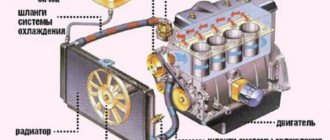
The cooling system is responsible for stable engine operation. Corrosion, scale, and small foreign particles can interfere with the normal functioning of the car. It is important to carry out preventive maintenance, replace and add coolant in a timely manner.
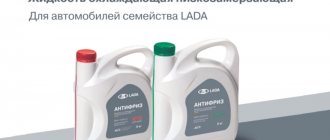
A liquid that is resistant to low temperatures is used to cool the engine. In the CIS countries, the name “antifreeze” has taken root, but it is a separate liquid in the car.
The composition of antifreeze is water with glycerin, alcohol, ethylene glycol or propylene glycol, and various additives. Exposure to high temperatures can change the chemical composition of the mixture. In this regard, it is important to remember after how long to replace the coolant. According to the international classification, there are three types of coolant: G11, G12, G13 (silicate, organic acids or propylene glycol).
In this regard, the question arises, how often to change the coolant? It depends on the type of antifreeze, more on that below. In the meantime, let's consider situations when you need to change antifreeze urgently, without waiting for time to expire:
- significant clouding of the refrigerant, change in its color;
- the appearance of sediment, flakes, mechanical particles in the coolant;
- increased foaming;
- thickening - antifreeze becomes like jelly;
- significant reduction in fluid volumes;
- adding antifreeze of a different standard.
The last point is worth mentioning separately. Mixing incompatible classes of coolant - for example, silicate with carboxylate, can kill all the beneficial properties of these products. Often flakes and sediment form in this mixture, and it can also become very thick. Therefore, only coolants of the same class can be mixed and added.
It is also worth saying that in older cars with high mileage, antifreeze requires more frequent replacement than in new ones. This is due to the fact that corrosion spots inevitably form in the engine over time. Antifreeze tries to neutralize them, absorbing rust particles and losing their beneficial properties. In this case, the need for replacement will be indicated by a rusty tint of the liquid.
Antifreeze manufacturers always indicate on the product packaging the recommended replacement period. Usually, after this period, the first warning signs appear, signaling a deterioration in quality.
These intervals depend on the production technology and the liquid standard (if you use the classification of antifreeze from the Volkswagen concern, borrowed by many manufacturers):
- G11. This standard includes traditional antifreezes. They use inorganic additives - silicates and other substances. Their peculiarity is that they form a physically tangible layer on the inner surface of parts, which prevents the formation of pockets of corrosion. If you do not change such antifreeze on time, this layer begins to precipitate, the protection deteriorates, and the fallen particles clog the system components. This happens faster than with other antifreezes. The recommended replacement interval is 2 years. TOSOL also has similar properties, so its replacement period will be similar.
- G12. This standard is used to designate coolants produced using organic (carboxylic) acid technology. The resulting liquid has excellent heat transfer properties and does not create any layer, like traditional ones. Its corrosion inhibitors act in a targeted manner. They are directed to where pockets of corrosion occur and prevent their further spread. However, over time, carbon fibers lose their grip, corrosion spreads, and the properties of antifreeze deteriorate. It is recommended to change them every 5 years. The same applies to improved carboxylate antifreezes - G12 and hybrid - G12.
- G13. This is the newest generation of coolants called lobrid. The main difference is that it is based on propylene glycol (the rest use ethylene glycol), a more environmentally friendly and more reliable base. Otherwise, they are similar to carboxylate ones. Such fluids have the longest service life - from 5 to 10 years, and some manufacturers recommend not changing the coolant at all throughout the entire service life of the cooling system.
Possibility of mixing different types of liquid
The answer to this question is very simple and short; you cannot mix any antifreeze or different types.
This can result in some hard or jelly-like deposits that can clog the cooling system passages.
In addition, as a result of mixing, foaming of the cooling solution may occur, which can lead to overheating of power units and very serious consequences and expensive repairs.