Coolant temperature sensor TM106
| Purpose: | for monitoring the coolant temperature in the engine cooling system | |
| Sensor type: | analog (thermistor) | |
| Rated voltage, V: | 12 | |
| Operating temperature range, °C: | -40…+130 | |
| Measuring range, °C: | +30…+130 | |
| Electrical connection: | plug 6.35 | |
| Mechanical connection: | 16×1.5 conical | |
| Application: | VAZ 2121/21213/21214 | |
| Temperature, °C | Resistance, Ohm | |
| +30 | 1350…1880 | |
| +40 | 880…1220 | |
| +50 | 585…820 | |
| +60 | 405…560 | |
| +70 | 280…390 | |
| +80 | 214…268 | |
| +90 | 155…196 | |
| +100 | 115…145 | |
| +110 | 87…109 | |
| +120 | 66…84 | |
| +130 | 51…65 | |
Coolant Temperature Sensor (ECM)
| Purpose: | for monitoring the coolant temperature in the engine cooling system with electronic control system | |
| Sensor type: | analog (thermistor) | |
| VAZ designation: | 2112-3851010 | |
| Rated voltage, V: | 3,4±0,3 | |
| Measuring range, °C: | -40…+130 | |
| Mechanical connection: | M3/8″ | |
| Application: | VAZ 21214 | |
| Temperature, °C | Resistance, Ohm | |
| -40 | 100700 | |
| -30 | 52700 | |
| -20 | 28680 | |
| -15 | 21450 | |
| -10 | 16180 | |
| -4 | 12300 | |
| 9420 | ||
| +5 | 7280 | |
| +10 | 5670 | |
| +15 | 4450 | |
| +20 | 3520 | |
| +25 | 2796 | |
| +30 | 2238 | |
| +35 | 1802 | |
| +40 | 1459 | |
| +45 | 1188 | |
| +50 | 973 | |
| +60 | 667 | |
| +70 | 467 | |
| +80 | 332 | |
| +90 | 241 | |
| +100 | 177 | |
| +128 | 76,7…85,1 | |
Oil pressure sensor MM393A
| Purpose: | for monitoring oil pressure in the engine lubrication system | |
| Sensor type: | analog (rheostat) | |
| VAZ designation: | 2103-3810300-01 | |
| Rated voltage, V: | 12 | |
| Measuring range, kgf/cm 2: | 0…8 | |
| Rheostat resistance, Ohm: | 360 | |
| Electrical connection: | plug 6.35 | |
| Mechanical connection: | M14×1.5 | |
| Application: | VAZ 2121 | |
| Non-standard application: | VAZ 21213/21214 (additional indicator) | |
| Pressure, kgf/cm 2 | Resistance, Ohm | |
| 290…320 | ||
| 4 | 103…133 | |
| 6 | 55…80 | |
| 8 | 0…15 |
Emergency oil pressure sensor MM120D
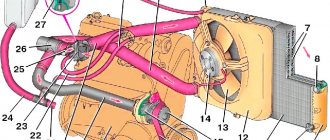
The lifespan of a Niva SUV engine largely depends on how efficiently the VAZ-2121 cooling works. After all, overheating is the first enemy of the power unit, leading to expensive repairs.
This is why the serviceability of the components and elements of the cooling circuit is so important. In order to be able to service them and identify malfunctions, you need to understand what the circuit consists of and how the Niva’s cooling functions.
Characteristics and features of replacing regulators
On products of the domestic automotive industry such as UAZ and Niva, various sensors are needed to transmit information to the dashboard. Also, some of them perform additional functions. And each has its own characteristics of dismantling and installation.
Detonation
The phenomenon of detonation is the explosive combustion of fuel in an engine due to glow ignition. SUVs like the Niva suffer from this problem quite often.
A piezoceramic element is installed in the area of the cylinder block - this is the knock sensor. Its function is to transmit a signal to the controller, which will automatically adjust the ignition timing. Thanks to this, the phenomenon will be eliminated. Also, thanks to the sensor, the controller provides a light indication of an emergency situation on the instrument panel.
The Niva knock sensor can be removed using only a screwdriver and a 13mm wrench. Remove the block by pressing the lock, then unscrew the bolt with a wrench.
Camshaft
This part is required to determine the angular position of the timing mechanism in accordance with the crankshaft. Information from it enters the engine control system. It is used to regulate fuel injection and ignition.
Experts recommend changing this part every 100 thousand km or 5 years. This is due to the fact that it is subject to constant temperature changes, which negatively affects the operation of the sensor. Unfortunately, it is quite difficult to independently determine its malfunction; this requires an oscilloscope and other equipment.
Speeds
The Niva 21214 has an electronic, also known as cableless, speed sensor . Its main function is to transmit information about the vehicle speed to the speedometer. You will find this parameter finder on the gearbox, on the rear transfer case cover.
To replace it, you will need to get to the car from below, using a hole or other method.
- Squeeze out the plastic clip and remove the terminal with wires.
- Then use a wrench to unscrew the device. If it doesn't come off, there's no need to pull. The problem is corrosion; WD-40 solvent will help to cope with it; you need to apply it to the connection and wait.
- Install the new part in the reverse order.
Idle move
The idle speed sensor, also known as the regulator (IAC), is located on the throttle valve.
- A block with wires is connected to it, which is removed by releasing the latch. Then you need to unscrew the two bolts using a Phillips screwdriver.
- Then you can simply pull out the sensor.
- When installing, perform the same steps in reverse order.
Fuel level
This sensor is required to display information about how much gas you have left. In some cases, it becomes unusable and needs to be replaced.
First, you'll need to remove the floor mats and rear seat to gain access to the hatch where the gas tank is hidden. The hatch is a sheet secured with 12 screws. Unscrew them and remove the hatch completely by lifting it up and sliding it forward.
Now you can see the gas tank and fuel pump. Remove the connector from the latter by placing a rag under the draining gasoline. It is better to dismantle by draining 5-7 liters from the tank if it is full.
Possible faults
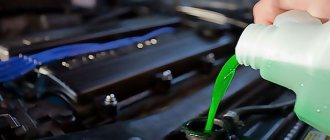
To avoid problems with engine overheating, it is necessary to monitor and maintain the Niva’s cooling system.
You should check the antifreeze level in the expansion tank more often. Due to the reliability of cooling, there are not many malfunctions in it:
- When the car heats up to maximum in any weather, and the main radiator pipes are cold, the thermostat has broken. The element is not repaired, only changed.
- Electric fans turn on at random, including when the engine is cold, but if they overheat, they may not start. This means that the sensor transmitting temperature data to the controller has failed and must be replaced.
- When the indicator on the panel gives inaccurate data or does not show the temperature, you need to change the second sensor located in the cylinder head.
- The fluid level in the tank is constantly decreasing. It is necessary to look for and eliminate leaks in the pipes or in one of the radiators.
It is important to periodically check for play in the water pump shaft. Its appearance indicates wear of the bearing; it is necessary to change the pump as soon as possible.
VAZ-2121, 21213-15, 2129-31 are a famous family of SUVs that have gained enormous popularity from the first day the production model appeared in 1977. The VAZ-2121 Niva is a basic model, which is based on a monocoque three-door station wagon and a transmission with permanent all-wheel drive.
Video “VAZ phase sensor replacement”
This video talks about replacing the phase determiner (the author of the video is Ivan Vasilievich).
So, dear visitors, today we will tell you about the main sensors on the VAZ. Since the operating principle of injection engines in the AvtoVAZ line is the same, in principle we have put together a manual on the sensors that are installed on injection VAZs by the manufacturer, and have prepared a brief description of the operating principles and purpose of each of the sensors below. Indeed, in essence, the very principle of operation of an injection engine is the interconnected work of the “brains” (ECU) and various kinds of sensors; there is a constant exchange of information between them and, depending on the totality of certain indicators of the sensors, the controller prepares the mixture and ensures stable and correct operation of the engine.
So let's start with the crankshaft position sensor DPKV . (pictured above)
Without this extremely important sensor and if it malfunctions, the car simply will not start. DPKV generates signals to the ECU using a special toothed disk, on which, upon careful examination, you can see what appears to be a “missing” tooth; this disk is installed directly on the crankshaft. DPKV on VAZs is located on the oil pump cover. The sensor is quite reliable and its failure is rare. But nevertheless, if it fails, you will have problems. We recommend carrying it with you in the glove compartment just in case.
Let's move on. Another important sensor is the throttle position sensor TPS .
This sensor works in conjunction with the idle air control valve to determine how open the throttle valve is. If this sensor begins to fail or fails altogether, then we will not see a stable idle and the engine speed will live its own life. Dips may also be felt, the engine will pull jerkily, in general it is not pleasant.
Now we are presented with a phase sensor, or camshaft position sensor DPRV .
It determines the position of the camshaft. Not used on 8 valve engines of early injection VAZs. Participates in the formation of phased injection, that is, the desired injector of a particular cylinder works at the right moment. If the sensor is faulty, then the system works as if it were not there, and fuel is supplied in pairs-parallel mode, which leads to excessive consumption of gasoline with all that it entails. That is, you can drive, but it is not necessary; it is better to replace the faulty sensor.
Now let's look at the DD Knock Sensor .
It is installed directly on the engine block between the third and second cylinders. There are two types - resonant and broadband. These two types of sensors are not interchangeable. It corresponds entirely to its name, monitors engine detonation and, depending on the presence and strength of detonation, helps the “brains” adjust the ignition timing (ignition timing). If the sensor fails, the engine will slow down and gas consumption will increase.
Electronic engine control unit (ECU)
An ECU is a kind of computer in a car; it is in this device that the entire operation of the internal combustion engine is corrected. All sensors that are installed in the car transmit readings specifically to this unit, and based on the readings, it makes changes to the operation of the engine, which affects both the engine speed and its consumption.
Symptoms of ECU malfunction:
There can be a huge number of signs of malfunction of this unit, because signs of failure of one sensor may even indicate failure of the unit.
Purpose of the device.
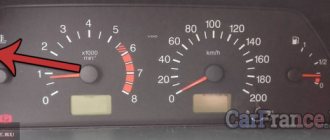
A speedometer is installed on the Niva's instrument panel, which is necessary to display the current speed of the car. In the event of a malfunction, driving becomes difficult as most roads have speed limits that must be followed. In addition, a malfunction of the speedometer can affect the calculation of other data by the on-board computer. Based on the DS data, the required fuel consumption is determined and gasoline savings are ensured while idling.
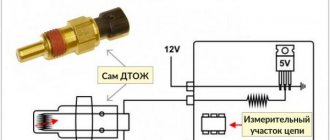
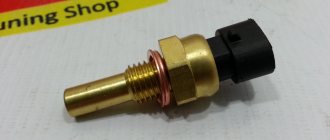
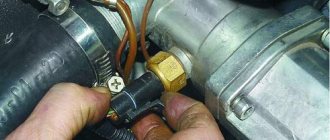
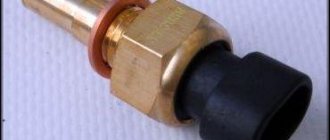
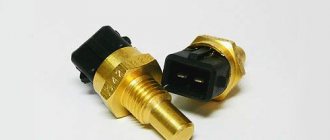
Coolant temperature sensor (DTOZH)
DTOZH on Niva is installed in the cylinder head outlet pipe. The coolant temperature sensor is a fairly simple element in its design. The sensor is based on a thermistor, which changes its resistance as the temperature changes.
One of the functions of the sensor is to start the electric engine cooling fans when the coolant temperature threshold is reached. The sensor is also responsible for starting the engine in cold weather; according to the coolant temperature readings, the electronic control unit forms the fuel mixture necessary for more proper warming up of the car engine. This can be replaced by the presence of high warm-up speeds at the moment of starting the internal combustion engine.
Signs of DTOZh malfunction:
- Cooling fans do not work;
- No warm-up speeds;
- Difficulty starting the internal combustion engine;
- Increased fuel consumption;
Location.
On Niva DS is installed on the gearbox. This allows data to be read only while driving, turning off when the engine is in neutral.
The device itself consists of a plastic case, inside of which electronic components are located. For proper operation, it is placed in close proximity to the shaft. There is a built-in magnetic bar inside the shaft that creates electrical signals when rotated.
The product is quite fragile, so when dismantling or installing you must be extremely careful not to damage its body.
Throttle Position Sensor (TPS)
The TPS is installed on the throttle itself and is a potentiometer. This sensor reads readings from the throttle position and transmits them to the ECU. The damper opens access to air, thereby increasing engine speed. When the damper opens, the sensor sends a signal to the control unit to increase the fuel supply, which is necessary to form a working air-fuel mixture.
The sensor that most often fails is an unreliable element of the system. Subsequently, they abandoned it and switched to an electronic throttle.
Signs of a malfunction of the TPS:
- High speed at start-up;
- Jumps in engine speed;
- Increased fuel consumption;
- Not smooth idle;
Checking the sensors.
In order to check the DC, you need to have a multimeter, then follow a certain procedure:
- Turn off the sensor.
- We connect the red (positive) probe to the DC contact.
- We connect the black (negative) probe to ground.
- We fix a tube of suitable diameter onto the shaft in order to be able to rotate it.
- We switch the multimeter switch to low voltage measurement mode.
- It is necessary to rotate the shaft and observe the readings: as the speed increases, the readings on the multimeter display will increase. If the readings do not change, the sensor is faulty.
Another method does not require removing the sensor. To do this, you need to jack up one wheel so that it is at a distance from the ground and can rotate freely. After this, you need to connect a multimeter to the DC connectors. You need to rotate the wheel and observe the readings of the device. A change in voltage will also indicate performance.
Oxygen sensor (DC, lambda probe)
An oxygen sensor, also known as a lambda probe, is installed in the exhaust system of a car. In some versions of cars, two sensors are installed before the catalyst and after the catalyst. Two sensors are installed in Niva with EURO-4 standards. The sensor captures exhaust gases and transmits readings to the ECU. If there is a large amount of unburned gasoline in the exhaust gases or, on the contrary, a small amount, then the DC makes changes to adjust the fuel mixture.
Signs of DC malfunction:
- Increased fuel consumption;
- Loss of vehicle dynamics;
- Poor engine starting;
Replacement.
To remove the DS, you need to place the car on a level surface. After this, it is best to disconnect the battery terminals to avoid errors in the BC.
Disconnect the wire terminals; to do this, press the plastic lock on the block. After this, use a wrench to unscrew the sensor from its seat. If you cannot unscrew it immediately, it is not recommended to use excessive force. You need to treat the threaded connection with WD-40, wait a few minutes and continue dismantling.
Installation of a new DS is carried out in the reverse order. When purchasing a new part, you need to pay attention to the external condition: the contacts must be treated with a sufficient amount of varnish, as this protects them from moisture. After completing the work, it is necessary to reset the on-board computer errors in order to remove the CHECK ENGINE error.
Ignition module (IZ)
The ignition module is installed on the left side of the engine on a bracket. This sensor is involved in the formation of ignition. It is this that produces the high-voltage voltage necessary to create a spark in the combustion chamber of the internal combustion engine. The module has two coils, they are also autotransformers, which produce a spark in pairs, each coil for two cylinders. If one of the coils fails, two cylinders fail at once.
Signs of malfunction of the MH:
- Troubles the engine;
- Increased fuel consumption;
- Increased engine vibrations;
- Loss of traction and dynamics;
Main aspects of the operation of sensors on the domestic “Six”
To find out the condition of the sensor, you need to check the element. There are several ways to do this. Let's look at them:
- The simplest option is to install a known-good device, which you can borrow, for example, from a friend in the garage. If the problem disappears during the check and the engine starts working without interruptions, you will have to go to the store to purchase a new sensor.
I RECOMMEND TO CARRY WITH YOU AN EMERGENCY IGNITION AZ-1 AND A SPARE SWITCH.
Tuned car VAZ 2106
- the engine becomes difficult to start or does not start at all;
- the car does not work well at neutral speed: jerking may occur periodically, the car stalls;
- when the car picks up speed, the engine may twitch and stall;
- The engine occasionally stalls while driving.
If one of these symptoms is typical for your car, then this, of course, may indicate other malfunctions. However, first of all it is necessary to check the Hall sensor of the VAZ 2106.
Loading …
Before doing this, pay attention to the location of the distributor relative to the body. Remember this position or make notes with chalk so that you don’t have to adjust the ignition later. First of all, the terminal is removed from the battery, then the wires attached to the ignition coil are disconnected, then the central high-voltage wire is disconnected. Using the tenth key, unscrew the bolts and remove the distributor from the VAZ-2107. Finally, remove the cover of the distributor itself.
Also interesting: Fuses Niva 21214 injector
How to make sure the DPRV is working?
The easiest way to check the camshaft sensor is to connect a car scanner or a computer with an installed program corresponding to the make of the car to the diagnostic connector of the car. If the element is faulty, then after starting the engine the device will display the following error codes:
- P0340 – there is no signal from the camshaft position detector;
- P0341 – valve timing does not coincide with the compression/intake strokes of the cylinder-piston group;
- P0342 – the signal level in the electrical circuit of the DPRV is too low;
- P0343 – the signal level from the meter exceeds the norm;
- P0339 – an intermittent signal is received from the sensor.
Of the best options in terms of price-quality ratio, we can recommend the Scan Tool Pro Black Edition auto scanner.
This adapter connects to most cars starting from 1993, is simple and easy to use, and also has rich functionality. Unlike analogues, the device can read all car blocks, and not just the engine.
But since the vast majority of car enthusiasts do not have scanners and laptops with software at their disposal, a more affordable method is used - checking with a digital multimeter. Diagnostics is carried out in 3 stages:
- Visual inspection of the wiring and continuity of the circuit for breaks.
- Measuring the outgoing current at the control contact of the DPRV.
- Testing functionality by approaching a metal object.
At the first stage, you need to ensure the integrity of the wiring and reliable contact of the connecting block. Carefully inspect the supply cables for kinks, cracks and melted insulation. Testing the current-carrying conductors and searching for a break is performed with the same multimeter. Don't forget to clean the connector contacts from oxidation.
After checking the electrical wiring, proceed to diagnosing the camshaft sensor itself. Instead of standard alligator clips on the tester, you need to use wires with needles so that you don’t have to be tricky with connecting to the connecting block. Diagnostic work is carried out in the following order:
- Open the hood and look for the DPRV on the cylinder head. Usually the element is placed on the end of the engine or the side wall of the cylinder head next to it.
- Using the vehicle's electrical diagram or data for a specific sensor model, determine the location of the two power contacts and the third wire going to the controller.
- Turn on the ignition and measure the voltage between the vehicle ground and the control contact of the element (on VAZ cars this is the middle wire, marked “C”). Normal multimeter readings are at least 90% of the supply voltage, that is, 12 * 0.9 = 10.8 V.
- If the obtained values are below normal, the sensor is faulty and must be replaced. Otherwise, perform the third stage of verification.
For final diagnostics, the part will have to be removed from the engine. Typically, the element is inserted into a hole in the cylinder head and secured with one bolt. Unscrew it, remove the DPRV and wipe off the engine oil. Do not disconnect the block with wires.
After connecting the multimeter to the middle contact and ground of the car, turn on the ignition again. Bring a steel object (for example, an open-end wrench) close to the end of the element, monitoring the display readings. A working sensor should respond to the approach of metal with a voltage drop to 0.2–0.4 V.
If checking the camshaft sensor with an iron object does not change the tester readings, the DPRV should definitely be changed. When purchasing a new part, keep one thing in mind: even original spare parts can be sold without a thin O-ring. You will have to find and buy it separately or use an old seal, provided that the material is not cracked or “dull.”
What to do next after this
After we unscrew the cover of the distributor, we will see in it a part popularly called a runner. The correct name for this part is rotor. It is easy to remove - you just need to pull it towards you with a little effort. After the slider is removed, we need to remove the black plastic cover. Now, using a flathead screwdriver, remove the bolt that secures the plug. The bolt securing the blocks with wires on the VAZ-2107 distributor is also removed.
Then, with a little effort, we remove it from the place where it was attached. Next, unscrew the two bolts securing the Hall sensor support plate. Then comes the turn of two more bolts that secure the vacuum manifold. In a small hole there is a ring that serves as a stopper. It needs to be taken out.
Oil pressure sensor Niva 21213
The oil sensor may be clogged.
Question: 1. Should I change it or can I wash it and clean it (how?)? 2. If you change it to a Niva, is it special or will it fit from the classics? Thanks for the answers. Alexander
+++ A simple mechanical pressure gauge is screwed into place of the sensor and the actual oil pressure is checked in different modes. The sensor (same as on 2101, etc.) turns on the light bulb at a pressure below
0.3 - 0.5 atm. If the pressure at XX (when your lamp is on) is more than 0.5, then the sensor is to blame. If it is less and at higher speeds does not rise to 2 - 3 atm - the reason is poor lubrication, the sensor has nothing to do with it, it screams correctly. In this case (one by one, where the problem is solved, stop): 1. Check the oil level, change the filter to a different type, if it doesn’t help, also change the oil to a known correct one; 2. Open the valve cover and look at the condition of the camshaft and the presence of a plug on it; 3. Open the pan and look at the condition of the oil receiver and pump - whether it is clogged with something or broken off; 4. Remove the pump and check whether the splines on the drive are cut off and, in general, its condition; 5. Disassemble further and look for clogged channels, fallen plugs or worn parts (a worn distributor and oil pump drive shaft can cause severe oil leakage from the line and low pressure, not to mention bearings, etc.).
I hope it doesn’t come to a complete disassembly, 18 thousand is not a long time.
Possible reasons: Filter, clogged channels, stuck sensor, crankshaft bearings. They already wrote to the author that changing the filter and oil did not help, it turned out that the filter was crap. I would change the sensor, if that doesn’t help, I would change the filter again.
How to recognize the problem
If you suspect that the Hall controller on a VAZ has begun to malfunction, before replacing it you need to make sure that it is the problem. This is determined by the following criteria:
- the power unit starts with difficulty or does not start at all;
- the engine runs jerkily, the speed is uneven;
Power point
- jerking when driving at high speeds;
- unpredictable engine operation - it can stop at any time.
Additional function of the regulator
An additional function of the device in question is to block the air flow in forced idle mode. This mode is activated when 3 conditions are met:
Under such conditions, it is impractical to supply the air-fuel mixture to the cylinders, since the car moves by inertia. So fuel will be wasted. Therefore, based on the damper and speed sensors, the controller stops the supply of fuel and air, giving the corresponding commands to the injectors and the idle speed controller.