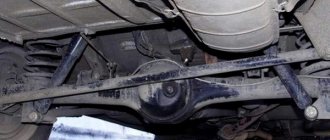
The rear axle is a fairly reliable unit of the VAZ 2107, but despite its massive appearance, the mechanism requires regular maintenance, without which it can fail prematurely. This unit can serve for quite a long time if it is operated correctly and carefully, if possible avoiding extreme driving conditions of the vehicle. Calm and careful driving without sharp pressing of the gas and brake pedal, hard clutch engagement and similar overloads will contribute to the serviceability and durability of the rear axle.
- Specifications
- What is the rear axle made of?
Frame
- Gearbox
- Half shafts
- Grinding noise when moving
- Shank bearing
Video: we measure the shank play ourselves
- Video: changing the oil in the gearbox yourself
Functions of the rear axle VAZ 2107
The seventh VAZ model completes the line of rear-wheel drive cars produced by the Volga Automobile Plant: all subsequent models, starting with the VAZ 2108, were equipped with front-wheel drive or all-wheel drive. Thus, the torque from the “seven” engine is transmitted to the rear wheels through other transmission elements. The rear axle is one of the components of the transmission, including the differential and final drive . The differential serves to distribute torque between the axle shafts of the rear wheels when the car turns or moves on an uneven road. The main gear amplifies the torque, which is transmitted to the axle axle shafts through the clutch, gearbox and cardan shafts. If the resulting torque is taken as 1, then the differential can distribute it between the axle shafts in a ratio of 0.5 to 0.5 or in any other ratio, for example, 0.6 to 0.4 or 0.7 to 0.3. When this ratio is 1 to 0, one wheel does not rotate (for example, it fell into a hole), and the second one slips (on ice or wet grass).
The seventh VAZ model completes the line of rear-wheel drive cars produced by the Volga Automobile Plant
What is the rear axle made of?
The design of the rear axle of the “seven” includes a fairly large number of elements, including:
- Brake drum mounting bolts.
- Guide pins.
- Axle bearing oil deflector.
- Brake drum.
- Drum ring.
- Rear brake cylinder.
- Brake bleeding fitting.
- Axle bearing.
- Bearing lock ring.
- Bridge beam flange.
- Stuffing box.
- Spring support cup.
- Bridge beam.
- Suspension bracket.
- Axle guide.
- Differential bearing nut.
- Differential bearing.
- Differential bearing cover.
- Breather.
- Satellite.
- Driven gear of the main gear.
- Left axle shaft.
- Axle gear.
- Gearbox housing.
- Drive gear adjusting ring.
- Spacer sleeve.
- Drive gear bearing.
- Stuffing box.
- Mud deflector.
- Flange-fork of the cardan joint.
- Screw.
- Oil deflector.
- Main gear drive gear.
- Axle of satellites.
- Axle gear support washer.
- Differential box.
- Right axle shaft.
- Axle shaft brackets.
- Axle bearing thrust plate.
- Rear brake shield.
- Rear brake pad.
- Friction lining.
- Axle shaft flange.
- Locking plate.
- Bearing cover mounting bolts.
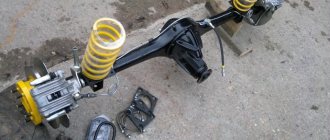
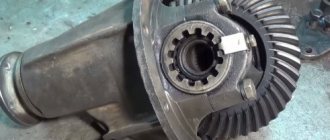
The rear axle consists of the components of axle shafts, gearbox and final drive
Frame
All working mechanisms of the rear axle are located in the beam, as well as in the gearbox housing. The beam is made of two casings connected by longitudinal welding. The bearings and seals of the axle shafts are located in flanges at the ends of the beam. In addition, the suspension fastening elements are welded to the beam body. In the middle the beam is widened and has an opening in which the gearbox housing is fixed. A breather is installed in its upper part, through which the connection between the bridge cavity and the atmosphere is maintained, so that the pressure in the cavity does not rise above the permissible level and dirt does not get inside the part.
All working mechanisms involved in transmitting torque are located in the axle beam and gearbox housing
Gearbox
The main gear consists of drive and driven gears that have hypoid gearing, i.e. the axes of the gears do not intersect, but intersect. Thanks to the specific shape of the teeth, simultaneous engagement of several of them is ensured and, as a result, the load on the teeth is reduced and their durability increases . A two-satellite bevel differential, in addition to the satellites located on a common axis, includes a box and two gears, while the satellites are in constant mesh with the gears.
The rear axle gearbox of the VAZ 2107 contains a differential and final drive
Half shafts
The “Seven” is equipped with so-called semi-balanced axle shafts of the rear axle, which take on bending forces in both the horizontal and vertical planes. The axle shaft, in essence, is a shaft made of 40X steel, with splines on the inner end and a flange on the outer end. The inner end of the axle shaft is connected to the differential gear, the outer end is located in the flange of the beam, to which the brake drum and wheel are attached. The axle shaft is held in place by a thrust plate of the bearing, which is also fixed to the beam.
The VAZ 2107 is equipped with semi-balanced axle shafts of the rear axle, which take on bending forces in both horizontal and vertical planes
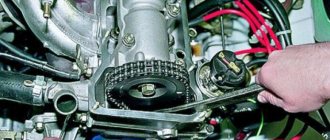
Adjustment and installation of the VAZ 2107 gearbox
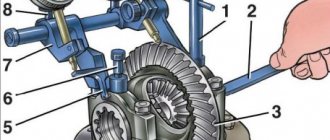
Main pair engagement depth adjustments
In this case, it is necessary to select the thickness of the adjusting washer.
So: Instead of the device, we install the “original” shank and tighten the nut until it stops lightly, leaving a gap. The differential with planetary gear assembly, bearing caps are installed and their mounting bolts are tightened.
When replacing the shank oil seal, a number of incorrect actions are allowed, which ultimately lead to premature failure of the gearbox. Before releasing the shank nut, according to the technology for performing the work of replacing the oil seal, it is necessary to remove the axle shafts (which is almost never done, since the amount of work will increase many times). Although according to the price list, the removal of the axle shafts will most likely be included in the list and a fee will be charged for this, since this is required by the plant’s technology for replacing the oil seal. This is a necessary condition, since the axle shaft will create resistance when tightened and correct adjustment will simply be impossible to achieve.
Before releasing the shank nut, it must be secured against turning and the tightening force of the nut must be checked with a torque wrench, around 12 kgf. Before installing the oil seal, if its outer surface is not rubberized, then you need to use a sealant to guarantee it. Thus, a mark of 0.15 mm on the gearbox stocking will be sufficient to pass oil through the outer surface of the oil seal.
Back to assembly...
The adjusting nuts are installed, and the gap on the main pair is pre-selected (the final working gap is 0.08 to 0.12 mm). Then paint is applied to the teeth of the planetary gear from an aerosol can and, using a shank, it is necessary to make several movements in different directions in order to fix the contact spots in the paint.
Read, it may be useful: Adjusting the steering mechanism of the VAZ-2107
Now, having turned the planet gear back, you can clearly see the contact patch on its teeth with the teeth of the pin. The contact patch (in this case) shows that the adjusting washer on the shank is thicker than the required thickness. We slightly tighten the shank nut, thereby moving its bearing, which makes it possible to move the gear teeth towards each other, that is, as if “reducing” the thickness of the adjusting washer. Using the differential bearing adjusting nuts, we set the approximate gap (reducing it slightly).
Then we again apply paint to the teeth of the planetary gear and again begin to rotate the shank (or gear) in different directions to print the contact patch between the teeth. It can be seen that the contact patch has risen a little, but still not enough and it is necessary to tighten the shank nut a little again. Similar actions with paint and turning the gear must be carried out until the contact patch is located exactly in the middle of the teeth, and the sound of the turning teeth becomes quieter.
After correct (final) adjustment, the sound will be almost inaudible.
Remember to tighten the differential bearing adjusting nuts every time you tighten the shank nut. As a result, the contact patch was located exactly over the entire surface of the teeth. It should be noted that this is the condition for the location of the contact patch for old (working) pairs. For new main pairs, the contact patch, as mentioned above, should be located in the center of the teeth.
Further. The planetary gear mounting covers are released and the differential is removed. The shank nut is unscrewed and removed. Since the shank was installed only with a bearing without an adjusting washer, there was a gap between the bearing and the shank gear where the washer would fit. This gap is measured with a set of feeler gauges, thereby calculating the required thickness of the adjusting washer.
It turns out, as in the case of using instruments and accessories, the size for the required adjusting washer was also 3.36 mm. The shank bearing is removed, an adjusting washer (3.36mm) is installed, the bearing is put in place and the gearbox is assembled. The shank is installed, the shank nut is tightened, min. 12 kgf. The differential with planetary gear is installed, the covers and bolts are tightened, but not completely.
By the way, the lids should not be mixed up. The adjusting nuts of the differential bearings are installed and the gap on the main pair is pre-set. Then the differential cover bolts are finally tightened. The gap in the main pair is finally adjusted and the adjusting nuts are secured.
The gearbox parts are assembled in the reverse order of disassembly. You can press in the bearing rings using a hammer and a special tool (a socket wrench head will do).
Adjusting the VAZ 2107 gearbox
Symptoms of a problem
As soon as the driver notices any changes in the operation of the rear axle (for example, extraneous sounds appear that were not there before), he must respond to these changes as quickly as possible so as not to aggravate the possible malfunction. The most typical sign of such problems may be increased noise levels:
- coming from the rear wheels;
- during operation of the rear axle;
- when accelerating the car;
- when braking with the engine;
- during engine acceleration and braking;
- while the vehicle is turning.
In addition, a knocking sound when the car starts moving and an oil leak may indicate a malfunction of the rear axle.
Oil leakage indicates a malfunction of the rear axle of the VAZ 2107
Grinding noise when moving
The causes of a grinding noise from the rear axle when the vehicle is moving can be:
- wear or destruction of axle or differential bearings;
- deformation of the beam or axle shafts;
- incorrect adjustment, damage or wear of gears or bearings of the gearbox and differential;
- wear of the spline connection with the semi-axial gears;
- incorrect adjustment of the gear teeth of the main gear;
- insufficient amount of oil.
The cardan spins, but the car does not move
If the driveshaft rotates while the vehicle is stationary, the cause may be a failed axle spline or wear on the teeth of the differential or final drive gears. In any case, if the cardan spins, but the car does not move, this indicates a fairly serious breakdown and, most likely, replacement of the axle shafts, bearings or gears will be required.
Oil leakage from the housing and from the shank side
The most likely causes of oil leakage from the rear axle housing:
- wear or damage to the drive gear seal;
- wear of the axle shaft seal, determined by oiling of the brake shields, drums and pads;
- loosening the bolts securing the rear axle gearbox housing;
- damage to sealing gaskets;
- axial play of the shank;
- breather jamming.
Wheels are stuck and won't rotate
If the rear wheels are jammed, but the drum and pads are in order, the cause of this malfunction may be failure of the bearings or the axle shaft itself. Most likely, in this case, the bearings have crumbled or the axle shaft has become deformed (for example, due to an impact) and the parts need to be replaced.
A little leaked oil from the axle through the axle seal + dust from the pads = good “glue”. Bottom line: remove the drum and look. If all the springs are in place and the block is not torn, then take sandpaper and clean the drum and shoes. Pre-wash them with carburetor cleaner or similar liquid. Sold in cylinders.
underwater snake
https://auto.mail.ru/forum/topic/klassika_zaklinilo_zadnee_koleso_odno/
“Quiet, the operation is underway!” or Replacing the rear axle gearbox seal on a VAZ 2107
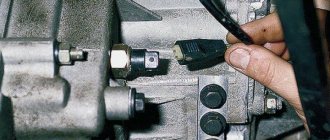
The sequence of work when replacing the gearbox seal is as follows:
- We measure and record the moment of resistance to rotation of the flange (the axle shafts must be removed!).
- Unscrew the flange nut.
- Remove the flange from the shaft splines.
- Using expansion pliers, remove the oil seal. If you don't have pliers, you can pry it off with a screwdriver. Be careful not to damage the surface of the socket.
- We inspect the flange. If its surface has a pronounced groove in the place where the working edge of the oil seal rubbed, then before installing the new oil seal, insert a washer 1 mm thick into the socket. If the flange is damaged on the working surface, replace it with a new one.
- Lubricate the outer surface of the oil seal with lithol and carefully drive it into the crankcase socket using a mandrel of suitable diameter. If there is no mandrel, press in the oil seal by evenly tapping the end along the circumference of the outer diameter. Make sure that there are no distortions - the working edge should be strictly perpendicular to the shaft axis.
- We inspect the lead-in chamfer on the flange. It should not have defects that could damage the working edge. We install the flange, avoiding sudden movements and impacts, so as not to knock the spring off the oil seal. Before installation, you can lubricate the flange chamfer with transmission oil to make the process easier.
- We tighten the nut, periodically checking the moment of resistance to rotation of the flange. Remember that at the end of the tightening the resistance in the bearings increases much more intensely than at the beginning. The moment of resistance to rotation should be 1–2 kgf.cm greater than what we recorded before unscrewing the nut. In any case, if the moment exceeded 9 kgf.cm, and the bearings in the bridge were still old, remove the flange again, take out the inner ring of the bearing and change the spacer sleeve. If the bearings are new (new means they have not traveled a single kilometer, because after a hundred kilometers they can be considered old for adjustment purposes), then the normal moment of resistance to rotation after tightening the nut for them should be in the range of 16–20 kgf. cm. Replacement of the rear bearing affects gear alignment, so please refer to the appropriate instructions for this procedure.
To prevent self-loosening, the flange nut has a special plastic insert, which, when crushed against the thread, creates additional resistance both when screwing and unscrewing. As a rule, such nuts can withstand up to ten unscrewings without losing their locking properties. If in doubt, get a new nut.
We reinstall the axle shafts and brake drums, screw on the driveshaft, and fill in the oil. We make a test drive and if everything is in order, we enjoy life, until we suddenly find a treacherous spot under the bridge again...
Read, it may come in handy: How to replace rear springs on a VAZ-2107
Video: How to carry out work on a VAZ 2107
Checking the oil in the gearbox
For the rear axle gearbox of the “seven”, semi-synthetics with viscosity parameters 75W-90 are suitable, for example:
- CASTROL Syntrans Transaxle 75W-90 API GL-4;
- "Lukoil 80W90 GL-5" and others.
1.35 liters of oil is poured through a special filler hole on the gearbox housing. If you need to drain the used oil, there is a drain hole in the bottom of the gearbox for this purpose. Before draining the old oil, it is recommended to warm up the car, place it on a flat surface and jack up the right side of the car . If there are metal shavings in the waste, you should rinse the gearbox container with a special liquid or spindle oil.
For the rear axle of the VAZ 2107, CASTROL Syntrans Transaxle 75W-90 API GL-4 oil is suitable
It is convenient to fill in new oil using a special syringe, which can be purchased at a car store. Both plugs (drain and filler) should be securely tightened, and then check the condition of the breather, which should move freely. If the breather jams, the contact of the container with the atmosphere will be disrupted, which will lead to an increase in internal pressure, damage to the seals and oil leakage. The oil level in the rear axle gearbox is considered normal when the liquid reaches the lower edge of the filler hole.
Video: changing the oil in the gearbox yourself
Repairing and adjusting the most critical components of the rear axle, as a rule, requires some practice, so it is best to perform it under the guidance of an experienced specialist. If you hear extraneous sounds from the rear axle while driving, you should immediately determine the cause of their occurrence. By ignoring such noises, you can “start” a breakdown and subsequently face complex and expensive repairs. Following simple rules for operating and maintaining the rear axle will extend the life of the vehicle for many years.