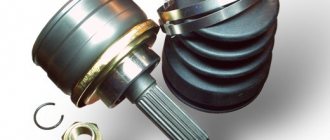
How to replace bearings and seals of the inner CV joint in the front axle of a VAZ-2121
If, when diagnosing the bridge, we find that the radial clearance in the bearings of the internal hinge housing exceeds 0.05 mm, then the bearing must be replaced.
According to the catalog, the right drive oil seal numbers are 21213-2301034; left drive - 21213-2301035.
Inner joint housing bearing numbers - 2107-1701190-01; 2107-1701190-03; 2107-1701190-04; 2107-1701190-05
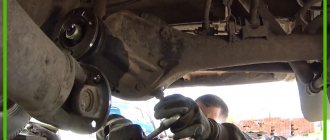
We carry out the work on a lift or inspection pit
Consider replacing the right wheel bearing.
We remove the front wheel drive (For removal and installation of the front wheel drive, see the article - “Removing and installing the front wheel drive”).
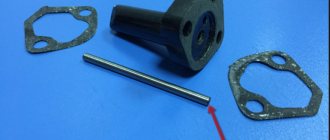
1. Using pliers, remove the retaining ring
2. Remove the spring washer
3. We knock the bearing cap off the shaft, together with the bearing, using a hammer with a plastic striker
4. Remove the inner joint housing bearing
5. Using pliers, remove the installation ring from the groove
6. Remove the bearing cover with oil seal
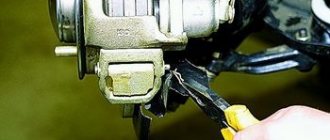
7. If you need to replace the front axle mounting bracket, remove it
8. Use a suitable socket or piece of pipe to knock out the oil seal.
9. Remove the oil seal from the cover
10. Lubricate the surface of the new oil seal and press it into the cover.
Assembling the units is done in the reverse order.
How to replace the drive gear seal of the rear axle VAZ-2121
The cuff can be replaced without removing the gearbox from the car. To do this, after hanging the rear axle, drain the oil from the crankcase, remove the wheels and brake drums, disengage the axle shafts from the differential gears (see the article on removing axle shafts - “Replacing the axle shafts”). We disconnect the driveshaft from the drive gear flange (see the article - “Removing and installing the driveshaft”) and move it to the side.
1. Using a dynamometer, turn the drive gear clockwise by the flange mounting nut and determine the moment of resistance to gear rotation.
2. There is one more way to determine the moment.
We tightly wind a strong thread around the neck of the flange in several turns and attach a dynamometer to it (to put it simply, a hand scale).
The force at which the flange begins to rotate uniformly, multiplied by the journal radius, will give the value of the desired moment. We write down its value.
3. Having inserted two bolts into the holes of the flange and holding it from turning with a mounting blade, use a 24mm wrench to unscrew the nut
4. Remove the flange from the splines of the main gear drive shaft.
5. If the flange sits tightly on the shaft splines, then use a hammer with a plastic striker to knock the flange off the splines.
7. Lubricate the seating surface of the cuff with Litol-24 grease and lightly hit it with a hammer through a piece of pipe of a suitable diameter to press in a new cuff.
8. Install the flange and washer on the drive gear. Holding the flange, we tighten the nut of its fastening to a torque of 118-255 Nm (12-26 kgf.m), periodically checking the moment of resistance to rotation of the drive gear (by turning the gear clockwise with a dynamometer).
If the initially measured moment of resistance to rotation was not lower than 59.0 Nm
(6 kgf m), then the new moment should be 9.8–19.6 Nm (1–2 kgf m) greater than this value. If the initial torque was less than 59.0 Nm (6 kgf.m), then tighten the flange mounting nut until a torque resistance to rotation of 59.0–88.0 Nm (6–9 kgf.m) is reached, without exceeding the tightening torque 118–255 Nm (12–26 kgf.m). If, when tightening the nut, the moment of resistance to rotation of the drive gear exceeds 88.0 Nm (9 kgf m), which indicates an excessive preload of the bearings, replace the gearbox spacer and carry out the adjustment again.
We carry out further assembly and installation of units in the reverse order.
When is replacement required?
The replacement operation is carried out when oil leaks from the axle housing. A clogged breather causes lubricant to squeeze out.
If grease drips immediately after stopping (while the gearbox is hot), and then the flow stops, the breather must be cleaned. When it is clogged with dirt, the heated air is not released outside during movement. Under pressure, the working fluid of the gearbox will be squeezed out even through serviceable gaskets and seals.
If the breather is in order, but oil still leaks, you will have to replace damaged cover gaskets or O-rings. of them in the front axle, and they are different:
Front axle structure.
To replace the oil seal, it is not necessary to dismantle the front axle. When replacing oil seals yourself, it is not recommended to use a lift; it is better to carry out the work on an inspection pit or overpass. The rear wheels must be secured with supports. The gearbox and transfer case levers must be adjusted to the neutral position. When using a jack, it is better to hang the front part on special supports.
First, the replacement area is cleaned of drips and traces of technical fluids. After this, the crankcase plug is unscrewed and the oil in the gearbox is drained into a special container. After this, the plug is installed in place.
To carry out the replacement, you need to stock up on the following set of tools:
Replacing the oil seal sealing the drive gear axis
- We disconnect the driveshaft from the gearbox by unscrewing the bolts securing it to the flange.
- We separate the internal CV joint housings from the drive gears .
- Using a dynamometer, we determine the moment at which the drive gear begins to rotate freely. To do this, turn the flange mounting nut until the gear begins to rotate. We fix the magnitude of the moment.
- We tighten the bolts into two adjacent flange holes (for fixation).
- We insert a mounting spade between the bolts, hold the flange from turning and unscrew the fastening nut.
- Remove the washer and flange from the spline joint. If it is impossible to remove it by hand, use a universal puller.
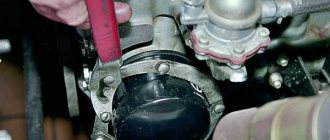
- Remove the oil seal using a flat-head screwdriver.
- We rinse and thoroughly wipe the replacement area.
- Replacement of the front axle drive gear oil seal is carried out only with original Chevrolet spare parts. To facilitate pressing, any grease (litol, grease) is applied to the sealing ring.
- We press the ring using a pipe of a suitable diameter.
- We place the flange on the spline connection and put on the washer.
- Tighten the nut to the torque determined when unscrewing.
- We fasten the cardan shaft.
Replacing the drive gear seal of the rear axle VAZ-2121
The cuff can be replaced without removing the gearbox from the car. To do this, after hanging the rear axle, drain the oil from the crankcase, remove the wheels and brake drums, disengage the axle shafts from the differential gears (see the article on removing axle shafts - “Replacing the axle shafts”). We disconnect the driveshaft from the drive gear flange (see the article - “Removing and installing the driveshaft”) and move it to the side.
1. Using a dynamometer, turn the drive gear clockwise by the flange mounting nut and determine the moment of resistance to gear rotation.
2. There is one more way to determine the moment.
We tightly wind a strong thread around the neck of the flange in several turns and attach a dynamometer to it (to put it simply, a hand scale).
The force at which the flange begins to rotate uniformly, multiplied by the journal radius, will give the value of the desired moment. We write down its value.
3. Having inserted two bolts into the holes of the flange and holding it from turning with a mounting blade, use a 24mm wrench to unscrew the nut
4. Remove the flange from the splines of the main gear drive shaft.
5. If the flange sits tightly on the shaft splines, then use a hammer with a plastic striker to knock the flange off the splines.
6. Using sliding pliers or a powerful screwdriver, remove the cuff.
8. Install the flange and washer on the drive gear. Holding the flange, we tighten the nut of its fastening to a torque of 118-255 Nm (12-26 kgf.m), periodically checking the moment of resistance to rotation of the drive gear (by turning the gear clockwise with a dynamometer).
If the initially measured moment of resistance to rotation was not lower than 59.0 Nm
(6 kgf m), then the new moment should be 9.8–19.6 Nm (1–2 kgf m) greater than this value. If the initial torque was less than 59.0 Nm (6 kgf.m), then tighten the flange mounting nut until a torque resistance to rotation of 59.0–88.0 Nm (6–9 kgf.m) is reached, without exceeding the tightening torque 118–255 Nm (12–26 kgf.m). If, when tightening the nut, the moment of resistance to rotation of the drive gear exceeds 88.0 Nm (9 kgf m), which indicates an excessive preload of the bearings, replace the gearbox spacer and carry out the adjustment again.
This is interesting: When and how to change spark plugs?
We carry out further assembly and installation of units in the reverse order.
The process of replacing the front axle oil seal on a Chevrolet Niva
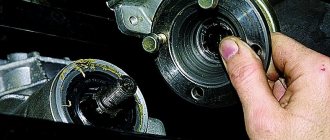
- We remove both drives (or the one that requires replacement).
- Remove the retaining ring and spring washer.
- Using a hammer, carefully knock down the bearing. If removal is difficult, treat with a penetrating lubricant, such as WD-40.
- Remove the bearing cap with the old seal.
- Using a pipe, knock the oil seal out of the cover.
- Lubricate the new spare part with any grease and press the o-ring into the cover.
- We assemble the unit.
Removing the drive
The operation of dismantling the drive elements is possible if you have:
- Jack;
- Churbaka;
- Wheel key;
- Keys for 13, 17 and 23 (the first two varieties in double quantity);
- Slotted screwdrivers;
- Punch;
- A device for removing factory-made clamps or made from adjustable pliers;
- Anthers;
- Clamps;
- Hub nut;
- Grease CV joint-4M;
- A rag for wiping off grease;
- Kerosene.
With the car slightly jacked up, the cap covering the hub is removed, the hub is completely unscrewed and the wheel nuts are loosened.
The wheel is hung up and dismantled.
The lower lever smoothly lowers onto a strong block.
The nuts holding the ball joint are removed (3 pieces). The outer CV joint shaft is carefully removed from the steering knuckle by pulling the latter back and up.
The steering knuckle is secured with a wire to a suitable protrusion. The lower shock absorber mount is released from the lever, after which it is necessary to raise the jack a few more centimeters up.
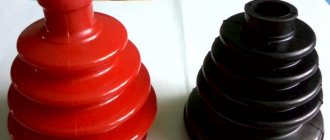
Using pliers and a screwdriver, it is necessary to remove the inner CV joint boot clamps, as well as the boot itself. Then the retaining ring located inside the “grenade” body is removed, and the structure is removed from the car.
Advice on how to remove drives without dismantling the Niva front gearbox
- To dismantle the drives, it is necessary to unscrew the fastenings of the gearbox (in this case, some kind of stop is placed under it).
- Then the steering knuckles are released. To do this, simply unscrew the shock absorber mount from the lower arm and the lower ball joint.
- To relieve the load, jack up the lower suspension arm.
- Unscrew the hub nut and remove the centering ring. The nut is too tight, so we use a wrench extension (for example, a metal pipe).
- We move the steering knuckle to the side. The drive can then move freely.
- To ensure free movement of the drive during removal, the gearbox must be moved back slightly.
- We remove the drive, being careful not to damage the anthers. If the boot is torn, it must be replaced.
- The procedure for removing the right and left CV joint drives is similar.
Before dismantling, it is necessary to mechanically remove dirt from the inside of the steering knuckles and from the bottom of the car above the work area. The best option is to wash the bottom with a high-pressure apparatus one day before carrying out work.
Step-by-step replacement of the internal grenade of a Niva Chevrolet
- Unscrew the 3 nuts securing the bearing housing of the drive's inner CV joint.
- front axle bearing cover to the transverse part of the suspension.
- front axle gearbox mounting bracket .
- Unscrew the nut and remove the fastening of the axle bearing cover to the transverse part of the suspension.
- Using a jack or other device, it is necessary to raise the front axle and secure it in this position.
- Unscrew the hub nut.
- Remove the drive nut and centering sleeve.
- By lifting the lower arm, it is necessary to compress the spring to remove the lower ball joint by unscrewing the 3 bolts from the arm.
- Move the axle aside.
- Unscrew the exhaust pipe from the manifold and the catalyst housing, and then move it closer to the engine. Replacing the boot of the inner CV joint with your own, replacing the stud on the hub of a Gilly Emgrand EC7. Replacing the inner CV joint Niva v video! -. If the left drive is being removed, this operation is not required.
- Move the gearbox back and remove the desired drive from it.
- The axle drive is installed in the reverse order.
NIVA oil seals
1. NIVA gearbox seals:
-Oil seal for the input shaft of the gearbox (gearbox) NIVA-2121, -21213, -21214, -2131, -2123:
Catalogue number: 2101-1701043
oil seal dimensions: 28x47x8mm
- Seal of the secondary shaft of the gearbox (shank) VAZ-2121, -21213, -21214, -2131, -2123:
Catalogue number: 2101-1701210
oil seal dimensions: 32x56x11mm
2 . NIVA front axle oil seals:
-Oil seal for the front axle gearbox NIVA- 2121,-21213,-21214,- 2123,-2120
catalog number: 2121-2302052
Dimensions: 35.8 x 68 x 11mm
-Drive seal -2121,-21213,-21214,-2131,-2123, universal (without direction)
Catalog number: 2123-2303120 / 121 2 pcs.
seal dimensions: 57.15 x 40 x 9mm
But it is better to install seals with a notch (left, right):
Left drive oil seal -2121,-21213,-21214,- 2123
Catalog number: 21213-2301035 1 piece.
Oil seal dimensions: 57.15 x 40 x 9mm
Right drive oil seal -2121,-21213,-21214,-2123
Catalog number: 21213-2301034 1 piece.
Oil seal dimensions: 57.15 x 40 x 9mm
3. Transfer Case Seals 3pcs:
Front axle structure.
To replace the oil seal, it is not necessary to dismantle the front axle. When replacing oil seals yourself, it is not recommended to use a lift; it is better to carry out the work on an inspection pit or overpass. The rear wheels must be secured with supports. The gearbox and transfer case levers must be adjusted to the neutral position. When using a jack, it is better to hang the front part on special supports.
First, the replacement area is cleaned of drips and traces of technical fluids. After this, the crankcase plug is unscrewed and the oil in the gearbox is drained into a special container. After this, the plug is installed in place.
To carry out the replacement, you need to stock up on the following set of tools: