Tips for motorists
The interior heater is an important component of the equipment of any car. It is used almost at any time of the year, and if there is air conditioning, it can be used all year round. Therefore, it is very important to monitor its performance, so as not to encounter a stove failure at the most inopportune moment. We will tell you about the main reasons for the malfunction of the interior heating system and how to eliminate it.
Equipment prevention
It doesn't take much to keep the heater in good condition. Monitor the coolant level, listen to extraneous noises and replace filters on time. Then you will be sure that the stove will not fail while driving, ruining your trip.
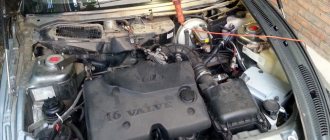
The heating, ventilation and air conditioning systems of the Vesta interior are completely different models compared to similar systems operating in other Lada models. Moreover, both the design itself and the control method in these three systems are strikingly different. To begin with, we will conduct an overview analysis of the design of the Vesta stove, which will allow us to verify its effectiveness. VENTILATION AND HEATING SYSTEM
Barely warm or cold air
During operation in various climatic conditions, all vehicle systems are subject to various types of contamination. Dust accumulates in the stove radiator and impairs its heat transfer. Therefore, over time, the temperature of the output air decreases. As a rule, such a malfunction is eliminated by replacing the heater radiator or by flushing it with a special liquid.
A low level of antifreeze can also cause a malfunction. If the coolant in the tank is less than “MIN”, then air will enter the system, which will create a “plug” in it. To make sure of this, you need to check the pipes in the engine compartment. With the engine fully warmed up, all radiator pipes should be hot. If you find it cold, there is most likely air in the system. To “de-air” you can use a simple method. Using a high jack, lift the part of the car in which the expansion tank is located and let the engine run for 1-2 minutes at high speeds (2-3 thousand). The air lock should come out.
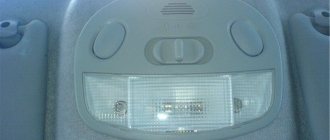
The heater does not turn on
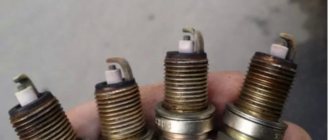
Lack of response to turning on the heater means: failure of the switch, the fan itself, or a blown fuse. First you need to make sure the integrity of the latter. To do this, open the block cover in the lower left part of the panel and find fuse F25 (30A), indicated in the photo:
If it is burned out, replace it with a similar one - 30A. But before this, it is strongly recommended to find out the reason; perhaps the “dying” fan motor was the culprit for the blown fuse.
Also, if the fan operates only in the last, fastest mode, the resistor unit is to blame.
The benefits and design of the Vesta stove
The device is necessary at a time when cold weather sets in, and it is necessary to maintain a comfortable temperature inside the vehicle for the driver and passengers. If you look behind the dashboard of the car, you will find the body of the stove itself, which contains:
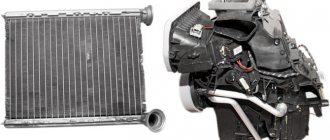
- A heating radiator designed to supply heat to the interior of a vehicle and its occupants. It is located on the left side of the structure. To remove this part, you will need to remove the dashboard surface trim.
- Electric fan - this part of the device blows air masses through an air duct. It is located on the side opposite the radiator. To remove this part, remove the glove compartment.
- An air filter that traps dust particles. Can be found on the passenger side of the heater unit;
The cabin filter is replaced from within the car interior. On previous AvtoVAZ models (Grant, Priora), it had to be removed through the engine compartment.
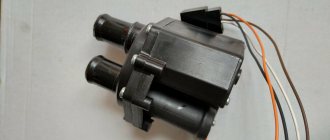
To adjust the temperature of the incoming air, change the speed mode and direction of flow, a control unit is installed in the heater.
Stove Lada Vesta
Design of the LADA Vesta stove
You should start with the fact that the stove body is located under the dashboard frame. What parts does the system consist of?
- Air filter.
- Stove radiator.
- Fan.
- Damper regulating gearbox.
- Additional resistor.
- Air flow distributor.
The radiator of the LADA Vesta heater produces and releases heat into the cabin. The fan is designed to supply air to the vehicle interior. Using a part such as a resistor, the speed is adjusted.
You can work with the stove using the SAUKU or “heater and air conditioning control unit”. The AvtoVAZ company installs three control units on its cars on various trim levels.
The simplest option would be SAUKU without an air conditioning system (“Classic”). Average in cost - with air conditioning (“Comfort”). And the most expensive is SAUKU with a developed climate control system (“Lux”).
How the stove works
Air ducts are directed from the Lada Vesta heater towards the windows, seats and floor. Air adjustment in various directions is carried out by central deflectors. The heat output is controlled by a wheel on the heater.
The Togliatti plant took a new approach to heating the lower part of the car interior. Now the air duct nozzle is located directly above the foot of the right limb, and not to the side, as before.
Depending on the configuration, the procedure for controlling the stove differs.
- For “Classic” (without air conditioning), the left regulator is responsible for the air temperature, and the right one changes the direction.
- The Comfort package has air conditioning. Compared to the basic version, the function of turning on circulation has been added here.
- For “Lux” the developers installed climate control. Using the Defrost MAX mode, the air conditioner turns on automatically. This function also allows you to heat the windows and side mirrors.
Problems
Stove motor During operation, the device may become unusable or reduce its efficiency.
We check the fan at all four speeds:
- if the fan stops rotating, look at the safety element in the control unit;
- if one of the speeds does not work, the reason is a breakdown of the additional resistor or car wiring.
- When the fan operates at low intensity, you need to clean the air intake grille or filter.
Checking the stove fan
The Vesta cabin filter is located above the blades of the unit. The job of the filter element is to collect dust and debris coming from the street. It is possible that these particles may penetrate into the ventilation device. Leaves or pebbles begin to rotate inside the impeller - the fan makes noise.
- To clean it, you need to make access to it free;
- To do this, remove the glove compartment and take out the filter element;
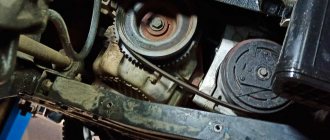
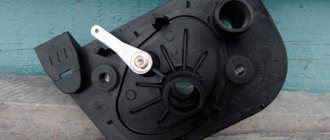
- Now, on the right side of the furnace body we find the mechanism. We clamp the petal located at the top, turn the impeller counterclockwise, and remove the motor;
- We clean the engine with napkins and cotton swabs. One of the reasons for the slowly working mechanism is a dense layer of dust on the walls;
- We install the unit in place and assemble the interior plastic.
There are other typical unit malfunctions. To diagnose them, analyze the operation of the device at different speeds. If one of them does not work, check the wiring and the serviceability of the additional resistor (RFV).
If the Lada fan does not blow at all, the cause may be a blown fuse. Then you don’t need to disassemble anything, just replace the circuit element in the fuse control unit.
Reviews of the Lada Vesta stove
I am pleased with the performance of the heating system; so far it has not let me down and has withstood the winter period.
The only problem that I have already encountered during the entire operation of the Lada Vesta is a clogged cabin filter. The replacement was quick and inexpensive.
I have a luxury model Lada Vesta. The heating functions are satisfactory, since the design and electronics easily and quickly warm the interior, glass and mirrors. Saves time during winter driving hours.
Another video of replacing the heater without removing the panel on Kalina
I ended my December report on Vesta on a minor note: two problems were waiting for a solution at once. Fortunately, both are guaranteed, so they are free for us.
I arrived for replacement only in the second half of January. But they assured me that the problem of leaky LED sections on the new parts has already been solved.
At the same time, he complained about the rear window heating not working. The problem turned out to be a loose “mass” under the rear parcel shelf. So, at the end of winter, the necessary “trick” finally worked. By the way, in the process of independently troubleshooting, I was surprised by the contents of the block under the steering column. The inscriptions on all relays read: Made in Portugal. I, of course, knew about a significant share of imported components in Vesta. But dragging such a cheap and primitive detail to Izhevsk from the far end of Europe is beyond my understanding of common sense. Maybe we are really in vain in demanding high-quality Russian cars from AVTOVAZ and UAZ, if they can’t make relays in our country?
In the operating instructions, data on a throw from zero to 100 km/h appeared only in the seventh edition, published in September 2021. According to them, the “mechanical” Vesta completed the test exercise in 11.2 seconds, and the “robotic” one in as much as 14.1. What a raise! Where does this discrepancy come from if technically the car has not changed?
In the same table in the book, numbers were also indicated for a car with a domestic manual transmission VAZ-21807, which at that time it had already been decided to replace the French unit - 10.2 seconds. That is, the transition to the Russian version promised a noticeable increase in dynamics. But already in the next version of the instructions from December 2021 for modification with mechanics, the same 11.2 seconds remain. Moreover, this absolutely applies to the VAZ box: the imported one has finally been retired.
Sources
- https://carfrance.ru/menyaem-radiator-pechki-bez-snyatiya-paneli-na-lada-kalina-fotootchet-video-cena-radiatora/
- https://www.zr.ru/content/articles/905554-lada-vesta-iz-parka-zr-skolk/
The Lada Vesta car has a stove heater…
...designed to heat the car interior. The stove is also actively used during rain or cold weather.
The heater is also activated if necessary to quickly remove fogging from the windows or warm up passengers. In the “Lux” configuration, the car is additionally equipped with air conditioning, which creates a favorable temperature for a person.
The most common malfunctions of the Lada Vesta heater radiator: leakage, fan noise, engine vibration. The replacement process is not complicated, but requires care on the part of the repairman.
Dismantling
To remove the radiator of the Lada Vesta stove, you first need to prepare the car. It will be more convenient to carry out work in an inspection hole or with a lift. If such an opportunity exists, then you should not miss it. After this, you can proceed to dismantling the radiator mechanism.
- Disconnect the negative terminal from the battery pack.
- We remove the engine protection and the front bumper.
- Now you can move on to the front bumper beam, which also needs to be dismantled.
- We press out the clamps.
- Disconnect the pipe from the air intake from the air deflector.
- We release the clamps and disconnect the temperature sensor from the air deflector mechanism.
- We press out the latches that make it difficult to dismantle the air deflector panel.
- We drain the coolant that fills the heater radiator of the Lada Vesta.
- We open the fastening clamps to be able to disconnect the supply hose from the thermostat pipes and the pipe that supplies the water pump. And it is also worth disconnecting the steam removal hose, which connects to the pipe on the expansion tank. You will need pliers here.
- We cut the clamps that secure the hoses to the upper cross member on the radiator frame.
- Disconnect the connectors on the wire bundle in front from the connectors on the fan, sound and radiator fan relay unit.
- We cut the clamp of the front bundle of wires, which is attached to the fan casing.
- Owners of cars with an air conditioning system should release the locking elements, turn it off and move it to the side. This is the only difference in replacing the radiator of models with air conditioning from conventional cars.
- Rotate the radiator mounting clips, which then need to be removed from the brackets.
- We remove the radiator along with the fan and hoses.
- We press out the clamps that hold the cooling system fan of the power unit.
How the stove works on Lada Vesta. Device
- The heater radiator is connected to the system main via rubber pipes. The heat emitted by the internal combustion engine is transferred to the heating system.
- The heating system radiator distributes heat throughout the car interior using an electric fan.
- A preset resistor online regulates the fan rotation speed.
- The air flow is circulated and cleaned by a mesh and cabin filter (see diagram).
- With the help of installed dampers, the driver and passengers regulate the air flow flowing to them.
- The gearmotor rotates the damper based on the readings of the regulator and heater sensors.
WHY DO GLASSES FOG?
The car windows should not fog up while the heater is operating If this happens, then the cause may be:
- heater core leaking
- cabin filter is clogged
- The electric recirculation air damper actuator is faulty
No matter what AVTOVAZ PR people say, the LADA Vesta, in accordance with the traditions of the Soviet automobile industry of the last century, turned out to be a “crude” car - with a lot of design flaws and quality defects. One of the global “jambs” that causes a lot of complaints - the clutch and manual gearbox - AVTOVAZ has already begun to change it to “more different ones”. It is not yet known whether this step will remove the claims of car owners about their reliability and smooth operation. It’s good that the company, although a year late, is trying to make its car better.
Typical stove malfunctions
The most common problems with the stove on Lada Vesta are the following:
- the actual temperature does not correspond to the set one - low level of antifreeze (antifreeze), clogged radiator pipes or the formation of an air lock, which causes cold air to blow;
- vibration appears during operation - the electric motor is loose;
- insufficient air flow from the deflectors - clogging of channels and air ducts;
- the heater is inactive when it is activated on the dashboard - failure of the fuse (No. 14) of the mounting block.
Checking the stove fan
During the circulation of the air flow, dust particles settle on the surface of the impeller, as a result of which it begins to make noise and extraneous sounds appear.
To clear the fan blades of debris, it is necessary to provide access to the unit.
- Unsnap the glove box.
- Remove the filter element.
- On the right is the furnace mechanism. We press the plastic clips and turn the impeller counterclockwise.
- We remove the motor.
- We wipe the drive with a rag.
- Install the parts in reverse order.
Basic steps
What to do if the gas water heater whistles? The first step is to calculate the source of the sound. Turn off the gas. Open the mixer in the hot water position. If the problem is not serious, the gas unit immediately stops whistling.
If the whistling gets worse, pay special attention to the water path. Study its components: pipes and maintenance, and its components. They could get clogged
A particularly common situation is the accumulation of scale on them.
They could get clogged. A particularly common situation is the accumulation of scale on them.
And scale often accumulates if the set water temperature parameters constantly exceed 60 degrees.
The measures here are simple - thoroughly clean these components. How to do this effectively? Start the reverse flow of water. It will remove all the blockage from the pipes.
Back pressure should only be applied after turning off the gas and water. You also need to unscrew the liner at the inlet section.
The easiest way to carry out this operation is to use a faucet in the bathroom. The shower switch must be set to the neutral position. The taps should be opened slightly.
To remove lime deposits, use a descaling agent. You can also work with folk remedies: acetic or citric acid. They are diluted in the correct proportions. The resulting composition is poured slowly into the water path. It is added according to the degree of sound attenuation. Then repeat this procedure three more times.
This is a good method when the gas water heater whistles due to a clogged duct.
And when you open the tap and there is no whistle, the problem could be hidden in the gas path. This means that there is possible damage to the valve for adjusting the flame power.
This is the most common answer why the unit does not stop whistling. The problem is especially pronounced when achieving the optimal ratio of gas flow dynamics and valve clearance width. This ratio may have different values in different columns.
If the gas water heater whistles when operating in high power mode, you need to adjust the regulator until the annoying sound disappears completely. Turn it smoothly, now in one direction, then in the other. The dynamics of the gas flow will decrease. It is not enough to produce sound. If it is increased, the valve clearance will expand, and the unit may start whistling again.
If these measures do not give the desired effect, it means that the gas path is clogged. The device will whistle even louder. It urgently needs to be disassembled, the problem area identified and thoroughly cleaned.
If your geyser is still under warranty, contact service immediately. You will have to contact them if the warranty period has expired and you cannot solve the problem on your own.
Solving the dilemma on your own is possible when you have the necessary knowledge and skills. The task comes down to cleaning this tract. Scale or winding elements could be stuck in it. If this is the case, the speaker will begin to whistle very powerfully.
Replacing a stove radiator with your own hands on a Lada Vesta
Preparation of the workplace, necessary tools:
- rags;
- Phillips head screwdriver;
- flashlight to increase visibility;
- new radiator.
How to remove a radiator. Replacement sequence:
- We turn off the engine, turn off the ignition, and squeeze the parking brake.
- Open the hood and remove the terminal from the battery.
- We grind off the antifreeze from the system. The plug is located at the bottom point of the radiator (key 17).
- We remove the decorative trim on the instrument panel.
- Remove the top decorative trim above the glove box. Let's take it out.
- We dismantle the metal dashboard support on the driver's side.
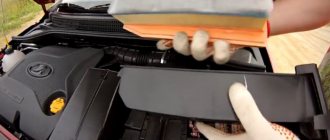
- Remove the air pipe.
- Open the stove lid.
- We remove the heater.
- We install a new heater radiator.
- We assemble the structure in reverse order.
Review of Manufacturer Prices
Dimensions: 184x133.5x26 mm.
| Serial number/item | Price in rubles |
| LUZAR 271153553R (original) | From 5000 |
| STELLOX 10-35126-SX | From 4500 – 4700 |
| FENOX RO0004C3 | From 4500 – 4700 |
| RO0003O7 | From 4500 – 4700 |
| AVA QUALITY COOLING RTA6398 | From 4500 – 4700 |
| VALEO 812374 | From 4500 – 4700 |
| NISSENS 76512 | From 4500 – 4700 |
| MAGNETI MARELLI 350218221003 | From 4500 – 4700 |
| *prices are as of May 2021 | |