Novice car enthusiasts cannot immediately master all the nuances of their vehicle. Therefore, as soon as breakdowns and malfunctions occur in the car, its owners panic and try to fix everything on their own using books and step-by-step guides. This article provides instructions for checking the serviceability of the VAZ-2115 thermostat.
Replacing the thermostat
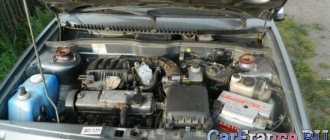
Suddenly the engine began to heat up, and the fan did not work; at a temperature of 110 degrees, I touched the radiator pipe, but it was cold! The thermostat is stuck on the small circle. I bought a new one from Luzar; my friends who used it on the Internet did not praise it, but unfortunately there were no others in the store.
By chance, the opportunity arose to change it in a garage, with a pit and all the amenities (thanks to friends), otherwise I didn’t want to mess around outside in the cold, and it’s not aesthetically pleasing to pour antifreeze down a tray)))
Here is a list of tools and spare parts needed for the job:
1. Ratchet 2. Heads for 10, 17 and 19 3. Curved screwdriver 4. New thermostat 5. Empty container for draining coolant
We put the car in a pit to drain the antifreeze (although you can drain the coolant on the ground, but I liked the option with a pit much better, my pan is dirty, and the coolant does not drain evenly from the radiator along it, just have time to catch it) .
Using sockets 19 and 17 we unscrew the 2 bolts and 2 nuts securing the engine oil pan, and also with a socket 10 we unscrew the crankshaft pulley protection
Here is the plug in the radiator for draining antifreeze, unscrew it
We place a board across the pit and place a cut container under the radiator cap, in my case it was a 5 liter bottle
Now we slowly unscrew the cap of the coolant expansion tank until antifreeze runs out of the radiator, adjust the pressure force as necessary and wait until the coolant is drained into the container, tighten the radiator cap.
After draining the antifreeze, you can begin dismantling the faulty thermostat. For ease of dismantling, we need to remove the air filter, just unscrew the two bolts securing the filter to the car frame, loosen both clamps on the pipe, disconnecting it from the filter and move the filter itself to the right as shown in the figure below. , not forgetting to disconnect the connector of the mass air flow sensor,
We also disconnect the connector of the phase sensor and coolant temperature sensor, move the wiring to the side, here it is our old and faulty thermostat
(came a little out of focus)
Based on numerous tips, I decided to coat the flanges of the new thermostat with lithol instead of applying sealant, I don’t know if this is correct or not, I just decided to try
When installing a new thermostat, we replace the old and hard pipes and clamps with new ones, I replaced only one, a short one, since it was in poor condition, I left the old clamps (because I forgot to buy new ones)))))
The thermostat is installed, the pipes are dressed and tightly tightened with clamps, do not forget to connect all the disconnected connectors to the sensors, put the air filter in place and tighten the clamps on the pipe, now you can fill in antifreeze, to do this, loosen the clamp on the throttle hose and start pouring antifreeze until it comes out of the hose coolant will flow (this is done to keep the system from airing).
After this, we put the hose on the throttle and tighten the clamp, adding coolant to the required level.
You can check, we start the car and wait until it warms up, in my case the thermostat worked almost exactly as it says on the package, a large circle opens up the radiator pipe is hot, everything worked out, now my temperature does not exceed 90 degrees and the antifreeze does not squeeze out from the expansion tank.
I wish you all successful and smooth roads, without breakdowns!
Which thermostat to install
Original number 21082-1306010.
- Luzar LT 010892 — 519 rub.
- Master-sport 21082-S-PCS-MS — 706 rub.
- Kraft KT 019510 — 713 rub.
Before removing the thermostat, you need to drain the coolant, so first we find the drain valve at the bottom of the radiator and place a container under it.
To allow fluid to drain out of the radiator faster, open the cap of the expansion tank.
Sweat antifreeze or antifreeze drains..
you need to clear access to the thermostat. And to do this you will have to unscrew the bolts, remove the clamp and the chip from the mass air flow sensor in order to move the air filter box to the side.
To remove the thermostat on a VAZ 2114 or 2115 with a 1.6 liter engine, you need to remove two clamps and unscrew the three fastening bolts with a hexagon (on a 1.5 liter engine, a key is not required).
By unscrewing the bolts and pulling off the pipes, you can remove the thermostat.
We install the new thermostat in the reverse order, only before installing it we clean the seat, install a gasket or coat it with a thin layer of sealant.
We put all the pipes back.
Before pouring coolant into the expansion tank, remove the pipe that is located on the heating of the throttle assembly (needed to expel the air lock).
Fill the expansion barrel with new coolant (the level should be slightly higher than the mark on the barrel).
In the indicated places we will press the pipes with our hands in order to expel the air from the system.
Placing a container under the hose from the throttle heating, close the tube with one hand and press the pipes with the other. Coolant and air will splash from the hose. We do this several times...
Features of the VAZ-2115 thermostat and its operating principle
The thermostat is an essential element in a vehicle's cooling system. A new domestically produced part can withstand from 80,000 kilometers to 100,000 kilometers, and an imported one - about 120,000 kilometers. It is very important that the thermostat is of high quality, so it is necessary to purchase it for replacement in specialized auto stores.
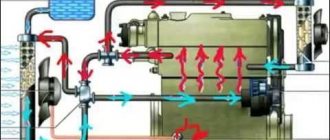
A car thermostat controls the temperature of the coolant (for example, antifreeze), and distributes it among circulation circles - small and large. If the vehicle engine and cooling fluid are cold, the thermostat valve will be closed, allowing the small circulation circle to operate.
As soon as the optimal temperature regime of the cooling liquid is reached, the thermostatic valve will operate, that is, it will open and a large circulation circle will come into effect.
The flow of coolant will enter the radiator, and the temperature will stop increasing, and its level will stabilize - optimally 90 degrees. This is the principle of operation of the thermostat element in good condition.
The device and principle of operation of the thermostat
The thermostat is one of the main components of the cooling system. It allows you to quickly warm up the car engine to an operating temperature of 90 degrees and significantly reduce its wear.
Typically, the thermostat is installed between the radiator and the engine and consists of a set of valves and springs and a temperature-sensitive solid filler.
The pipe system is connected in such a way that there are two circles for cooling: the first goes around the radiator, and the second goes around the engine. After the engine starts, the coolant moves through the engine, warming up from its heat and thereby making it warm up much faster. As soon as the temperature of the antifreeze reaches 90 degrees, the temperature-sensitive element acts on the valve and it opens. The coolant begins to move through the radiator, thus improving cooling and the warmed-up engine no longer gains temperature so quickly.
Factory thermostats on Samaras are not of high quality, which is why many drivers try to replace them with foreign analogues at the first opportunity. If you also support this opinion, then under no circumstances purchase Chinese thermostats. Such a mechanism becomes unusable quite quickly, and very soon it will need urgent replacement.
When does a thermostat need to be replaced?
For proper operation of a vehicle, it is important that the temperature of its engine is within the same limits. This can be achieved through the use of coolant - antifreeze or antifreeze - and the proper operation of the entire cooling system of the car. As soon as the temperature begins to exceed the required limits (most often it is 90 degrees), you should check the car thermostat for serviceability. If it turns out that this part is out of order, then there will be a need to replace it with a new one.
How to choose a quality thermostat?
All thermostats manufactured in China have a metal body that closely resembles stainless steel. In fact, this is only an external resemblance and very soon such metal is affected by corrosion, which will quickly damage the product.
Another thing is thermostats from trusted manufacturers, which are made of brass or stainless steel. Unfortunately, there are no more criteria for choosing a quality thermostat. The presence of all kinds of stickers does not indicate anything meaningful about the quality of the element.
You can test the thermostat at home by placing it in a pan of water. Place the pan on the stove and heat it up. When the water reaches a temperature of 90 degrees, the valve should open. If this happens, then the thermostat is selected correctly and its installation on the car is permitted.
We replace the thermostat on a VAZ-2115 ourselves
According to experts, the procedure for replacing a thermostat takes about an hour if tools and consumables are available. Therefore, you should take care of this before carrying out this operation. You will need the following:
- Tools:
- standard car mechanic kit (screwdrivers of various sizes and configurations);
- capacity of more than 7 liters for draining liquid waste.
- Materials:
- new thermostat;
- heat-resistant sealant;
- set of gaskets for repair;
- antifreeze or antifreeze (as a coolant).
Now you can begin the procedure for replacing the failed thermostat element, which consists of the following steps.
- Preliminary – stage of preparing the vehicle for the repair procedure:
- the car is installed on an inspection hole or on a flat surface;
- the engine is turned off;
- put on the handbrake;
- the engine is cold.
- Removing the old thermostat element:
- unscrew the expansion tank cap;
- open the radiator tap to drain the coolant from it;
- drain the coolant into a prepared container;
- remove the air filter (at the same time carry out a visual inspection for any malfunctions of this part);
- loosen the clamps of the radiator pipes;
- disconnect the hoses from the radiator and from the thermostat element;
- unscrew the fastening bolts (4 pieces);
- remove the thermostat (it is removed together with the seal ring).
- Installation of a new thermostat:
- lubricate the perimeter of the circuit with heat-resistant sealant;
- install a new sealing ring;
- put a new gasket;
- install a new thermostat;
- connect all hoses;
- tighten the clamps tightly;
- screw the plug on the drain valve at the bottom of the radiator;
- fill with coolant.
- Verification stage:
- start the vehicle;
- check for possible leaks;
- warm up the car to the optimal temperature - more than 90 degrees (this operation is necessary for the large circle of the cooling system to start);
- We check all hoses and pipes in operating mode - they should be hot.
A nuance of a working thermostat on a VAZ-2115: when starting a still cold engine, the lower pipe on the radiator will begin to heat up already at 85 degrees of coolant.
This can be determined by touch. To fully ensure that the newly installed thermostat element is functioning at the proper level, you should also turn on the heating element - the stove. If there are no failures or leaks in this mode, then the thermostat is installed correctly and without errors.
If you are not confident in your abilities, then to replace this part you should seek help from qualified specialists, that is, to the nearest car service center.
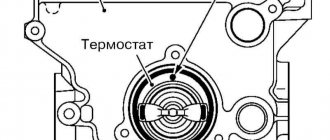
Thermostat installation location
The device is attached directly to the cooling jacket of the engine block. Moreover, regardless of whether the engine is carburetor or injection. The first VAZ-2115 cars were equipped with engines with carburetor injection. But very soon they were completely replaced by injectors, which are more modern and efficient.
The easiest way is to replace the VAZ-2115 thermostat if you have a carburetor engine. This applies to the first modifications of “Samar” - “nines” and “eights”. On injection engines, you will have to completely remove the air filter housing. Otherwise, you won’t be able to remove the thermostat to replace it. The device is secured using clamps. Newer modifications of cars are equipped with modern designs. And there is no need to change the entire assembly; it is enough to install a new sensitive element with a valve.
The operating principle of the thermostat VAZ 2115, 2114, 2113, 2109
What does a thermostat consist of? Let's get a look!
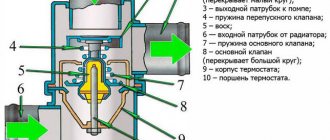
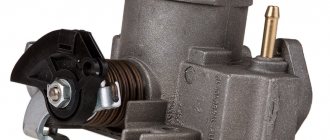
The thermostat consists of a housing, a bypass valve, a main valve, a temperature sensing element (usually located near the main valve) and a spring.
How does the thermostat work on VAZ 2115, 2114, 2113, 2109
When the car is not warmed up, the thermostat valve is closed, as in the photo. In this case, the coolant moves in a small circle, as in the photo below.
When the machine warms up to operating temperature (87-90 degrees), the temperature-sensitive element slowly begins to heat up, as a result of which the spring compresses, the main valve opens and the liquid flows in a large circle.
Main malfunctions of the VAZ 2114 thermostat
The main element of the thermostat is the valve. It is this that can become the main source of problems for a car enthusiast. There are often situations when the valve sticks in a closed, open or intermediate state.
Moreover, each of these situations is dangerous. For example, jamming in a closed state will lead to rapid heating of the engine (especially in summer) due to circulation exclusively in a small circle.
If the valve remains open, heating the power unit will be a big problem. Often, with such a breakdown, the engine does not warm up at all. This is not surprising, because the coolant constantly circulates in a large circle and does not have time to gain temperature.
Periodic “hanging” of the valve in one of the states will lead to unstable engine operation. In any case, diagnostics and testing are necessary, and in case of malfunction, replacement of the VAZ 2114 thermostat.
How to understand that the thermostat of the VAZ 2115, 2114, 2113, 2109 is faulty?
There are two reasons why you can understand that the thermostat on the VAZ 2115, 2114, 2113, 2109 is faulty:
- The car does not warm up.
- The car overheats and boils.
There are also two ways to check the thermostat:
- Check the removed thermostat for functionality.
- Check the thermostat without removing it from the car.
Let's take a closer look at each of the options.
How to check the removed thermostat of a VAZ 2115, 2114, 2113, 2109 for functionality?
In theory, everything is simple. Take a pan with cold water, a thermometer up to at least one hundred degrees and a thermostat. We put it all on the tile to warm up and wait... We wait until the water temperature reaches 85 degrees, at which point we begin to look at the main thermostat valve. At 87 degrees it should open. If it does not open or opened earlier, then the thermostat is faulty.
How to check the thermostat of VAZ 2115, 2114, 2113, 2109 without removing it from the car?
A prerequisite in this case is that the car must be cold. After starting the engine, grab the lower pipe coming from the radiator with your hands. Until the temperature reaches 80 degrees it should be completely cold. When it reaches 85 degrees, the tube should begin to warm up slowly. And when 90 degrees is reached, full circulation of hot coolant should begin (i.e. the valve is completely open). The lower tube should be hot.
It happens that immediately after starting the engine, when it has warmed up only 50 degrees, warm liquid begins to flow through the lower tube. This shouldn't happen either!!! This means that the valve is constantly open.
I hope my article helped you solve your problem. If you have any questions, leave them in the comments and I will definitely answer them.
How to check the thermostat
It is very easy to check the operation of the thermostat without removing it from the car. It is enough to start the cooled engine and check the temperature of the radiator pipes. In normal mode, when the engine is running, for some time after starting, only the upper radiator pipe will heat up slightly, and when the threshold value is reached, the lower pipe will also heat up sharply. This is evidence of normal valve operation. If heating of both radiator pipes begins simultaneously, this indicates that it is not functioning properly; most likely, the valve is constantly open.
The constantly open thermostat valve allows you to easily reach the nearest service station or spare parts store. It is much worse if the thermostat gets stuck closed, as there is a serious risk of engine overheating. Sometimes tapping on the thermostat body helps for a short time, but if the valve cannot budge, it should be removed or bent with a screwdriver. The thermostat must be replaced in the nearest locality.
Replacing the thermostat on VAZ 2113, VAZ 2114, VAZ 2115
Thermostat is an element of the cooling system that supplies coolant to a large circle at a certain temperature. The thermostat ensures that the engine runs correctly and does not get too hot. It is also responsible for warming up: if the thermostat is worn out and the fluid immediately comes out in a large circle, then the car takes a very long time to heat up (especially in winter), which means the car’s fuel consumption increases. Over time, a lot more problems will emerge, because running the engine for a long time on a cold engine is very destructive, and driving on a cold engine is even worse. There is a lot of load on the engine, lubricant does not reach all parts well, etc. If possible, in very cold weather (-25 and above, although -20 is already enough), we recommend not using the car at all if you want the engine to live a long enough life and not require major repairs in the near future.
Note! You will need the following tools: a couple of screwdrivers of different lengths with different heads (it is most convenient to use a short screwdriver), a large wide container with a capacity of approximately 10 liters, a small saucepan (fill with water and immerse the thermostat).
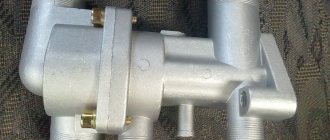
Thermostat location
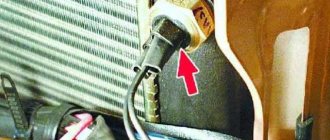
On injection cars it is located under the air filter housing, on carburetor cars (the first VAZ 2115 were produced in a carburetor version for a couple of years) it is located in the same place, but the housing is moved to a slightly different place, so on the carburetor you don’t need to bother and remove the housing, but simply throw off the high-voltage wires and get started to work. In any case, do not be alarmed, the housing can be removed quickly and easily, read the article: “Replacing the air filter housing on VAZ cars.” After removing the housing, you will see the thermostat with the naked eye (indicated by a red arrow in the photo below), and next to it there is a battery (indicated by a blue arrow). We hope we have clearly explained the location of the thermostat and you can easily find it.
When is it necessary to change the thermostat?
Over time, it wears out and the valve begins to work incorrectly (usually it freezes in one position). The engine temperature will depend on the stuck position. There are two such provisions:
- The first is a fully open valve. Symptoms: the fluid comes out in a large circle, causing the car to heat up too much, which is not very noticeable in the summer, but noticeable in the winter, because The car doesn't really warm up.
- The second is a completely closed valve. Symptoms: the fluid runs in a small circle, the car gets very hot and when parked for a long time with the engine running, its temperature reaches the red mark.
A rare case - the valve is in the middle. Symptoms: the car does not warm up for too long, but it is noticeable over time even when parked for a long time with the engine running in the summer. It gradually overheats and the engine temperature slowly reaches the red mark. It happens that the cooling fan does not work and the thermostat does not come to a wide circle - be careful, the engine will overheat in a short period. Please note that 10 minutes of engine operation in the red zone leads to cylinder head failure. Longer load on the engine will lead to the need for a cap. repair.
Note! There is a method for checking the thermostat without removing it. Warm up the car to a temperature of 87-92 °C (and while the engine is cold, touch the lower pipe coming from the thermostat (photo below, indicated by number 6, it should always be cold until the engine reaches 87-92 °C). On a warm engine the lower hose should warm up.If the hose begins to warm up ahead of time or does not become warm at all, even at engine operating temperature, then the thermostat is faulty and needs to be replaced.
Replacing the thermostat on a VAZ 2113-VAZ 2115
Note! The main thing is safety: do not work on a hot engine to avoid burns. Work only with a cold unit, especially when working with engine oil and coolant.
Removal
1) The first step is to drain the coolant from the cooling system. The engine cooling jacket does not need to be touched, and the liquid must only be drained from the radiator. We described detailed instructions in the article: “Replacing coolant on a VAZ 2114”). Unscrew the cap on the expansion tank (small photo), then cover the generator with something (indicated by the blue arrow) to prevent antifreeze from getting in. Contact with antifreeze can result in a short circuit. By the way, for safety reasons, disconnect the battery by disconnecting the terminals). Remove the engine protection, if equipped. Place an empty container under the front part (the location of the drain plug near the radiator, indicated by a red pointer). Unscrew the plug, the coolant will begin to flow into the empty container. After emptying the tank, screw the plug back into place and begin replacing the thermostat.
Note! If you have a new coolant (for example, they just changed it a month ago), then you can only drain it into a clean container and then pour it back into the car engine, nothing bad will happen from this, but if the fluid is already bad, then be sure to change it to new, don’t skimp on it, it protects the engine from overheating, as well as from corrosion (special additives are present in the fluid)!
2) Unscrew the screws holding the hoses with clamps (marked in red). Pay attention to the hose, the fastening screw of which is indicated by a blue arrow. It is removed together with the thermostat, so unscrew the screw securing it to the pipe (small photo) and remove the thermostat along with this short hose. Now unscrew the screw securing the hose to the thermostat and separate them from each other.
Installation
The thermostat is installed in the reverse order of removal. Cracked hoses are replaced with new ones, otherwise they may leak. Before installation, the thermostat is checked for serviceability (we strongly recommend this procedure). Water is poured into the pan and heated to a temperature of 78-80 °C (measured with a thermometer). Then the thermostat is immersed and when the temperature reaches 87+2 °C, it must begin to open, or rather its valve. We have indicated the details with arrows in the photographs.
Sources
- vaz-russia.com/remont-vaz-2113/zamena-termostata-na-vaz-2113-vaz-2114-vaz-2115.html
- vaz-zona.ru/kak-proverit-termostat-na-vaz-2115-2114-2113-2109/
- ladaautos.ru/vaz-2115/kak-proisxodit-zamena-termostata-vaz-2115.html
- drive2.ru/l/9032036/
- drive2.ru/l/4918112/