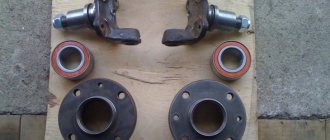
FRONT HUB AND ITS PURPOSE
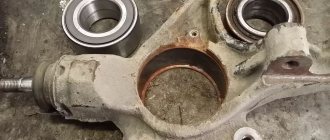
The front hub on the VAZ 2107 is a massive steel disc with a hole in the middle. This hole contains a large bushing in which the wheel bearing is mounted. Along the perimeter of the hub disk there are holes for fastening the wheel. And on the reverse side the hub is connected to the steering knuckle.
The front hub of the “seven” is a massive steel disc with a bushing and bearing in the middle
That is, the hub is an intermediate link between the moving wheel and the stationary part of the suspension. It ensures not only normal rotation of the front wheel, but also its normal turning. Therefore, any malfunction of the hub can have very sad consequences for the driver and his passengers. For example, if the wheel bearing becomes completely unusable, the wheel may jam or simply come off while driving, if the speed is high. It's not hard to guess where this will lead. That is why experienced drivers check the condition of the front hub at least once a month by grasping the top of the wheel and slightly rocking it away from and towards themselves. If even a slight play is felt when rocking, you should not drive such a car.
Communities › VAZ: Repair and Modification › Blog › Non-adjustable front hubs from 2108 to classics.
The topic is hackneyed, but still.
After buying the car, my original hubs were humming, but at some point things started to get rough, and it even became a little scary to drive. So I started asking friends and acquaintances how their renovations were done there. After the words lubricate, tighten, gaps, just don’t overtighten, etc... I realized what kind of hemorrhoids it was, why it couldn’t be done like a human being (I’m sure every Lada owner has uttered this phrase a thousand times), I actually didn’t want to take on this matter.
But as always, after surfing Drive, I found a great option, these are rear hubs from 08
.
But I already understood then that the rear cast-iron hub (factory ones seem to be like this) is in no way designed to withstand the loads of the front swivel wheel, which could burst at the most inconvenient moment. There are craftsmen on Drive who make chic versions of steel hubs with a FRONT bearing
and steering knuckles for them, but the price was prohibitive for a student. I thought so, I wasn’t planning to take part in a rally, so I’ll order a ready-made set of hubs and adapter bushings for the Stinger. The website states that they are made of steel. I also bought new hub nuts there.
You can also buy separately hubs, bearings of your choice, retaining rings, and have adapter bushings machined from a turner; there are a ton of drawings on Drive.
There were no problems with the installation. I took off the old hubs (don’t forget that the hub nuts on both sides are unscrewed in different directions), wiped everything off, and tried it on. Next, I used a grinder to saw off the ears of the bolts that secure the brake disc bracket so that the hub does not touch them. I pressed the bushings in like this: the bushing itself into a snowdrift, and left the hub near the heat gun, after which they went in normally.
But then a small incident arose: the brake disc did not want to stand in the center of the caliper, it just barely touched. I left it like that, because I’m going to change the entire brake system to a ventilated one, as soon as I install it, I’ll continue to solve the problem, in case it goes away. Some people had much more serious situations that really hurt them. The problem was solved this way: simply take it to a turner and remove 2-2.5 mm from the hub.
ROUNDED FIST
The steering knuckle, mentioned above, is another important element of the VAZ 2107 suspension. Its purpose is easy to guess from the name. This part ensures smooth turning of the car's front wheels. The knuckle has two eyes with which it is attached to the paired suspension arms. On the reverse side of the knuckle there is a kingpin onto which the hub is placed along with the wheel bearing.
The steering knuckles on the "sevens" have a long kingpin for attaching the hub
The hub, placed on the knuckle pin, is secured with a nut. It should be said here that turning the wheels is not the only thing the fist is responsible for. It also has an additional function: it limits wheel rotation. For this purpose, special protrusions are provided on the fists of the “seven”. When turning too sharply, the suspension arms hit these ridges and the driver can no longer turn the steering wheel. The knuckle must have a huge margin of safety, since it bears most of the shock loads that occur when the car is moving, especially on uneven roads. However, sometimes the fist becomes deformed (as a rule, this happens after the front wheels fall into a very deep hole or after an accident). Here are the main signs that something is wrong with your fist:
- when driving, the car pulls strongly to the side, and this becomes more pronounced with increasing speed;
- the driver suddenly notices that the turning radius has become smaller, and it has become more difficult to “fit” into very sharp turns. This indicates a decrease in the angle of rotation of the wheels. And this phenomenon occurs after a serious deformation of one fist;
- turning the wheel out. There are situations when one of the knuckle eyes breaks. This is very rare, but it cannot be ignored. So, when the eye breaks, the wheel turns out almost at a right angle to the body of the “seven”. If this happens while driving, the car instantly loses control.
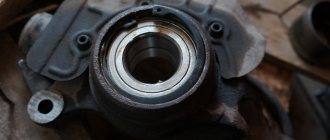
FRONT WHEEL BEARING
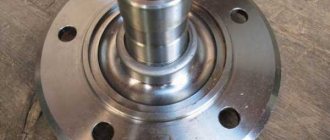
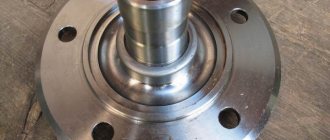
To ensure uniform rotation of the front wheels, special bearings are installed in their hubs. These are double-row roller bearings that do not require regular maintenance or lubrication.
The front hubs of the “seven” are equipped with tapered roller bearings
The reason is simple: they are pressed into the hub, so they can be destroyed when you try to remove them. Therefore, the driver removes the wheel bearings only when he decides to change them. Here are the main signs of wheel bearing failure:
- the front wheels rotate with a characteristic low hum. This indicates wear of one or more rollers in the wheel bearing. Worn rollers dangle inside the separator, and when the hub rotates, a characteristic hum occurs, which becomes louder with increasing wheel speed;
- a crackling or squeaking sound coming from behind the wheel. The driver usually hears this sound when turning. He says that one of the wheel bearing rings has collapsed. As a rule, the inner ring of the bearing breaks, and it usually breaks in two places at once. When turning, the hub carries a huge load, as does the bearing in it. At such moments, the fragments of the inner ring begin to rub against each other at the fracture points, resulting in a characteristic cracking or squeaking sound.
In all of the above cases, there is only one solution: replacing the wheel bearing.
CHECKING THE WHEEL BEARING
At the slightest suspicion of a bearing malfunction, the driver is obliged to check it, especially since there is nothing complicated about it.
- The wheel, from which characteristic sounds are heard, is jacked up. Then the driver manually spins the wheel so that it rotates as quickly as possible and listens. If the bearing is worn out, a characteristic hum will be clearly audible to anyone who does not have hearing problems. In some cases, bearing noise cannot be detected when the wheel is spinning too quickly. Then you need to spin the wheel as slowly as possible. If at least one roller in the bearing is worn out, the wheel will definitely hum.
- If manual rotation of the wheel does not reveal the problem, then you should pull the wheel without removing the car from the jack. To do this, the driver grabs the top and bottom of the tire and pulls the wheel several times, first away from himself, then toward himself. If the bearing rings are broken, then a slight play will be clearly felt on the wheel.
- If the play was not detected by pulling the wheel, then the wheel should be rocked. The driver grabs the top of the tire and begins to swing it away from him and towards him. Then he does the same with the bottom of the tire. Backlash, if any, is almost always detected. Either when the bottom of the tire rocks, or when the top rocks.
To identify play, the wheel must be rocked away from you and towards you.
ADJUSTING THE WHEEL BEARING
Once play is identified, the wheel bearing is carefully inspected. If the play is insignificant, and no signs of wear or damage were found on the bearing, then this indicates a weakening of the bearing fasteners. In this case, the driver will not have to change the bearing; it will be enough to simply adjust it.
- Using a screwdriver, remove the protective plug from the wheel bearing.
- After this, the adjusting nut located above the bearing is tightened so that the wheel cannot be turned by hand.
Sometimes, to eliminate wheel play, it is enough to adjust the hub nut - This nut is then gradually loosened two to three turns. After each loosening, the wheel is turned and checked for play. It is necessary to achieve a situation where the wheel rotates freely, but no play is observed.
- When the desired position is found, the adjusting nut should be locked in this position. Drivers usually do this with a simple chisel: hitting the side of the nut with a chisel slightly bends it, and it no longer unscrews.
Communities › VAZ: Repair and Modification › Forum › Non-adjustable wheel bearing for classics
Greetings to all! A question arose about replacing the bearings from the rear axle of a VAZ 2108 with a VAZ classic. 1. Where can I order adapters? 2. Is the brake system replaced or can I leave the old one? 3. Your comment about the replacement. Thank you.
look for a turner! and the drawings are here! It’s better to immediately convert the brakes to a 14″ caliper.
Thank you. I would like to leave the brakes stock. Do you still need to change it or can you leave it as is?
Everything is still the same. But it’s still better to change the brackets to 14″. The wheels are 260mm, the brakes will be better
What need forces you to do this? What is installed at the factory has some kind of engineering work behind it, guaranteeing reliability and safety, and what you can count on, just like that, by simply changing one thing for another. Think about it, is it worth it?
Yes, I still don’t know if it’s worth it. But it seems that further easy operation, very good rolling, resulting in small savings in gasoline, less friction and less noise. Well, it seems something like this.
The roll will not change. For example, if you tighten a standard hub a little, you won’t even feel any resistance to movement, but the bearing will overheat and fall apart. And this is all because of the energy that it takes from movement, the loss of which you will not even notice. In short, this is all nonsense. There is no more noise from these bearings, there is no friction in them, otherwise they would constantly get red hot.
At the disassembly site, buy rotary knuckles. I have a dismantling shop in St. Petersburg, I sell a set of fists for 500-700 rubles. despite the fact that the bearing costs 500. and you'll have a hard time setting it up. and the stock calipers on the classics are crappy - when replacing the pads, the piston ears break off. body inserter, block guide
One of my ears is broken off.
Ball bearings hold axial load better, unlike tapered roller bearings, and therefore wear out less. I don’t see much point in such a hassle - and the original bearings work well if they are of high quality. If you install it, then it’s better to stick a caliper from 2108 in order to reduce the unsprung mass by a couple of kilograms. Well, don’t even think about installing rear hubs, they are designed for less load. Only the front ones.
www.drive2.ru/b/30656/ You can order it here if he is still manufacturing it.
Thank you. But on 08, do they come with ball-shaped ones, and not cylindrical shapes?
source
REAR HUB
The rear hub of the VAZ 2107 differs from the front hub both in design and purpose. There are no steering knuckles or additional suspension arms attached to the rear hub.
The rear hub of the "seven" is not as massive as the front
Because the main task of this hub is to ensure uniform rotation of the wheel, and that’s all. It does not require a huge margin of strength and resistance to mechanical loads, since it does not participate in turning the wheels, like the front hub.
The rear hub is simpler than the front, as it does not experience huge loads
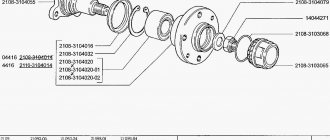
The rear hub is equipped with a rolling bearing, which is covered with a special cap. On the other hand, a dirt-proof inner ring is installed in the hub to prevent clogging of the bearing. This entire structure is put on the rear axle shaft of the “seven” and secured with a 30 wheel nut.
Communities › VAZ: Repair and Modification › Forum › Non-adjustable wheel bearing for classics
Greetings to all! A question arose about replacing the bearings from the rear axle of a VAZ 2108 with a VAZ classic. 1. Where can I order adapters? 2. Is the brake system replaced or can I leave the old one? 3. Your comment about the replacement. Thank you.
look for a turner! and the drawings are here! It’s better to immediately convert the brakes to a 14″ caliper.
Thank you. I would like to leave the brakes stock. Do you still need to change it or can you leave it as is?
Everything is still the same. But it’s still better to change the brackets to 14″. The wheels are 260mm, the brakes will be better
What need forces you to do this? What is installed at the factory has some kind of engineering work behind it, guaranteeing reliability and safety, and what you can count on, just like that, by simply changing one thing for another. Think about it, is it worth it?
Yes, I still don’t know if it’s worth it. But it seems that further easy operation, very good rolling, resulting in small savings in gasoline, less friction and less noise. Well, it seems something like this.
The roll will not change. For example, if you tighten a standard hub a little, you won’t even feel any resistance to movement, but the bearing will overheat and fall apart. And this is all because of the energy that it takes from movement, the loss of which you will not even notice. In short, this is all nonsense. There is no more noise from these bearings, there is no friction in them, otherwise they would constantly get red hot.
At the disassembly site, buy rotary knuckles. I have a dismantling shop in St. Petersburg, I sell a set of fists for 500-700 rubles. despite the fact that the bearing costs 500. and you'll have a hard time setting it up. and the stock calipers on the classics are crappy - when replacing the pads, the piston ears break off. body inserter, block guide
One of my ears is broken off.
Ball bearings hold axial load better, unlike tapered roller bearings, and therefore wear out less. I don’t see much point in such a hassle - and the original bearings work well if they are of high quality. If you install it, then it’s better to stick a caliper from 2108 in order to reduce the unsprung mass by a couple of kilograms. Well, don’t even think about installing rear hubs, they are designed for less load. Only the front ones.
Front hub VAZ 2107
Hi all!
One day I tightened the wheel bolts so much that one bolt decided never to be tightened again.
Nothing to do at all - there are exactly four ways out: 1) leave it on three bolts and pray; 2) tap the thread and hope; 3) weld cylinder head studs instead of bolts and be proud; 4) change the hub and calm down.
I chose the fourth option. I bought a hub assembly with bearings and boot. I decided to leave the old nut and support washer.
So let's get started. In fact, the task is not a tricky one. Let's jack it up, prop it up, remove the wheel and see what we have there. And there we have a brake disc, which is held by a caliper. Then we unscrew it by loosening the cotter washers. We don’t confuse anything and put the bolts aside with these washers.
Replacing the VAZ 2107 hub
We put the caliper on top or somewhere else so that it does not fall and the brake hose is relaxed.
Then I saw how the disk was knocked off the hub, but it was somehow inconvenient. Personally, I removed the hub from the axle, unscrewed the soldiers and knocked it out of the disk by placing two planks. In my opinion, it couldn't be simpler. The main thing is not to stain the disc.
Ready. We clean the whole thing and start assembling it, wearing cleaner gloves.
The secret to the long service life of such units is cleanliness during assembly and plenty of lubrication.
Therefore, we add as much lubricant as possible at each stage. A new boot is also needed. Don't skimp on such little things.
Once the hub with generously lubricated bearings is in place, install the support washer and tighten the nut. Personally, I tighten the nut like this: I tighten it until there is a noticeable heaviness of rotation, and then I release the nut to a sector equal to one edge. Then there remains a barely noticeable rolling resistance, and after a few meters the wheel will rotate without resistance at all, but also without the slightest play. Maybe the technology is not correct, but personally, I adjust the tapered bearings once every 30 thousand and I have never had any play or hum in any car.
That's it. We put on the brake disc. He dresses very hard. It would be nice not to skew it. To do this I use the wheel bolts as guides. I tighten the disc with bolts and lightly tap it with a hammer.
That's all. We install the caliper. We cotter its bolts. We check everything. We put the wheel on and off we go. Finally a repair without welding, chisels and grinders. I wish it would be like this more often.
Thanks everyone for your attention! I wish you limitless good luck and good health! See you on the track!
VAZ 2107
VAZ 2108 hub and bearing - self-replacement
- Preparing to replace the hub or bearing
- Changing the wheel bearing "eight"
- Hub installation and assembly
Replacing the wheel bearing or the wheel itself is inevitable. The reason is simple - these are parts that wear out over time, no matter how carefully you operate the car. The VAZ 2108 hub is less subject to wear than the bearing, but it does not last forever. To replace one or another element, you can contact a service station, but the process is not so complicated, if you follow the technology described below, you can do everything yourself. In essence, changing the 2108 hub bearing is somewhat easier than replacing the complete hub itself, but the technology is practically the same.
Preparing to replace the hub or bearing
Replacing the front bearing on a VAZ 2108
Any technological process of car repair begins with diagnosing and identifying the fault, studying the manual, preparing spare parts and tools for repair. The first thing you need are the following tools:
- jack;
- pullers or pieces of metal pipe with a diameter of 3 and 6 cm;
- pliers;
- wrenches 12 and 30.
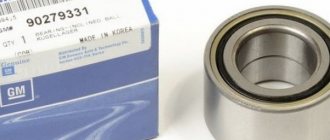
Please note that the bearing, the dimensions of which should be: outer and inner diameters of 60 and 30 mm, height - 37 mm, must be of high quality, since there is a lot of Asian consumer goods on the market. You need to approach the choice of the hub itself in the same way - it is better to purchase a high-quality part once, and subsequently permanently lay the car down.
Step-by-step procedure for removing the hub
- We get to the hub - fix the car with the handbrake (parking brake), put shoes under the wheels and loosen the wheel bolts.
- Then we jack up the side where we will do the work, completely unscrew and remove the wheel.
- If you change the bearing or hub of the rear wheel of a VAZ 2108, you will need to remove the drum.
- If the front one is a brake disc.
- To do this, unscrew the guides and try to remove them. If this doesn’t work, you’ll have to shoot it down.
- To remove the drum, you need a wooden spacer (any piece of block or board will do) with which you need to tap it from the inside.
- If the work is carried out on the front wheels, changing the bearing of the front hub 2108 or the front wheel hub itself of the VAZ 2108, first remove the caliper and hang it to the lever using ordinary wire.
- When there is access to the hub, remove it. If you have a puller, this is not difficult to do, but if you don’t have one, you will have to do it the old-fashioned way. We screw the wheel with its outer side to the hub (otherwise it will not fit into the wheel arch) and pull it towards ourselves several times.
- When it is removed, a new front or rear hub of the VAZ 2108 is installed, and if necessary, the bearing is changed.
Changing the wheel bearing "eight"
Replacing the VAZ CV joint and wheel bearing
After the hub is removed, you need to:
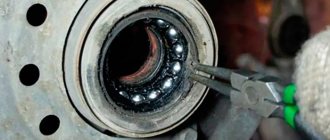
- press out or knock out the bearing. It doesn’t matter whether you are changing the rear wheel bearing of a VAZ 2108 or the front one - the process is the same. You need to remove the stopper and boot from it using pliers, and then carefully knock out or press out (which is preferable) the bearing.
- treat the seat on the hub with lubricant,
- then install a new bearing. If it is not possible to press it in, you will have to hammer it with a pipe with a diameter of 6 cm, along the diameter of the outer ring.
- then install the boot and stopper (preferably new ones).
When the bearing is tightly seated, we proceed to install the hub back.
Hub installation and assembly
To install the hub, you need to fill the bearing using a spacer or a pipe with a diameter of 3 cm, along the diameter of the inner race. Then, when the hub is completely seated on the steering knuckle, we install a new (mostly) lock nut and bend the petals. Then we do everything in reverse order - if the rear hub 2108 or its bearing was replaced, we install the drum in place and fix it.
Do-it-yourself adjustment of the clearance in the VAZ-2107 wheel bearing
Spring has arrived, and with it it’s time to change to summer tires. At the same time, it is necessary to check the clearance in the tapered bearings of the front wheel hubs and adjust it. Since a large gap leads to a decrease in the service life of both the bearings themselves and the tire tread, vibration may occur and deterioration of vehicle controllability at speeds.
So, we need:
- new hub nuts – left and right
- torque wrench (you can do without it)
- wheel wrench
- 27mm socket or open-end wrench
- hammer, flat screwdriver
- some new bearing grease
To begin, remove the wheel, decorative cap and hub cap to provide access to the nut.
Checking the presence of grease in the cap
We put the wheel back, but without the caps, fasten it with at least two bolts diagonally and hang it on a jack. Don't forget to put chocks under the wheels and put the car in gear.
Now, sharply shaking the wheel by the rim in a vertical plane with one hand (to eliminate play in the steering linkage), we apply a finger to the washer and hub with the other finger and determine the presence of noticeable axial play.
If this is inconvenient, then you can simply pump the wheel with both hands by the upper and lower rims with sharp movements, visually by the nut and by ear determining the play. It should be no more than 0.02-0.08 mm. In my case, it felt like it was about half a millimeter.
To exclude the influence of other gaps, for example, in the silent blocks of the levers, ball joints and steering linkage, you can ask an assistant to press the brake pedal. In this way we will fix the bearing and hub - and the play should disappear. If it does not disappear, then its source is not in the bearing.
Once you are convinced of the opposite, you can begin adjusting the gap: use a socket or a 27 wrench to unlock and remove the old nut and put on a new one. But, for prevention, before tightening the new nut, let's inspect the outer bearing, to which we have free access - carefully remove the washer and take it out. We wipe off the old grease and carefully inspect - pitting, visible wear of the separators, cavities and chips on the rollers and rings are not allowed. In our case everything is fine.
Now we fill the hub cavity with new grease, lubricate the bearing and put it back, then the washer and tighten the new nut by hand. The nuts on the left and right sides of the car are different - the nut on the right side has marks on the edge, the one on the left does not.
We take a torque wrench and tighten the nut with a torque of 19.6 N m (2 kgf m), while simultaneously rotating the wheel in both directions so that the bearings self-align.
Then we loosen the nut back and tighten it with a torque of 6.8 N m (0.7 kgf m). And after that we once again finally weaken it by 25°. We check for any play - it should be almost invisible.
If this method did not help us and the play is still significant, then we can use the old “old-fashioned” method - we tighten the nut until the gap completely disappears and gradually unscrew it until a very slight one appears, accordingly also rotating the wheel so that the bearings fit into their places.
We make sure that the adjustment is correct - the wheel should rotate freely, without “biting”; for a more accurate determination, you can press it with a screwdriver or remove the brake pads. That's it, lock the nut, jamming its shoulder into 2 grooves on the trunnion, using a handy tool (screwdriver, bit).
We fill the hub cap with fresh grease and hammer it into place, tighten the remaining wheel bolts. We do the same on the other side.
We carry out the final check of the correctness of the adjustment on the road, driving about 1-2 km and trying not to use the brakes. We check the heating of the hub bearings by hand - it should tolerate it. If the heating is significant and the hand can no longer tolerate it, then it is necessary to carry out the adjustment again or replace the bearings.
Lada 2106 Akkerman71 › Logbook › Front suspension 2. Fixed hubs
Hi all. Today there will be a little more letters) there is a little free time, you can press buttons). For the upcoming complete overhaul of the front suspension, I am collecting the necessary parts. One of the upgrades that the “patient” will undergo is non-adjustable hubs with one double-row bearing,
instead of two classic bearings, which from time to time need adjustment, without which wheel play appears and, as a result, control suffers, the wheels “walk” a little to the sides because of this, you have to steer the steering wheel, and they also absorb all these unnecessary beats ball joints and steering rods; excess loads damage them faster. There is a lot of information on the Internet about this and about installing non-adjustable bearings from a front-wheel drive family using adapter bushings on classic knuckles. The most common option is to install a 2108 rear hub with bearing dimensions of 60x30. Many people install and drive, but personally I don’t like this option. The bearing is not designed for heavy loads, since the main load comes from the engine and from the turning front wheels, so on the back of the 08 they made them smaller in size, so I didn’t consider this option at all. This whole thing is serious and I want to be completely calm and confident in the durability and, most importantly, the safety of all components and assemblies)). In second place is the installation of IZH Oda front hubs; a large front bearing 2108 with dimensions 64x37 is already installed in them. This option is already acceptable, in my opinion. The bearing is designed for installation “under the motor” and will run for a long time, which you won’t have to worry about. IzhOda hubs are installed either through adapter bushings, which is much simpler, or on modified classic knuckles, which is much more difficult to perform, since you still need to find a very good turner who will take on this and will not spoil anything the first time)) and with this they are just big problems)) I also refused this option, firstly, IzhOda is already a big rarity in our area, it takes a long time to look for hubs from them and used ones are used, this is not a new part, production will be present in any case. Therefore, I chose for myself the most reinforced third option with the largest possible size bearing and custom-made metal hubs. Bearing dimensions 72x37
installed on Moskvich 2141 and Renault Logan, compared to the front 2108 it is larger and looks preferable. The matter remained with the manufacture of hubs. From all the large factories with good machines, in our city (as elsewhere) only memories remain), everything was closed a long time ago, the equipment was cut into scrap metal, so I spent a long time looking for who and where to make it. As they say, “he who searches for a long time will always find”) I found someone who makes such hubs, even with adapter bushings,
source
Self-replacement of front bearings on VAZ cars
Hubs are an important element of a car's front suspension. When the wheel bearings malfunction, the first thing that appears is a hum, and sometimes a grinding sound, in the front wheels of the car. The hub begins to heat up, which can cause problems with the brakes. Play in the front suspension hubs leads to damage to the brake discs. There is an imbalance in the suspension, resulting in increased tire wear.
In order not to bring the suspension components to such a state, it is necessary to periodically carry out technical inspection of the front hubs. If such symptoms appear, it is necessary to replace the wheel bearings on the VAZ-2107 as soon as possible.
Replacing the front wheel bearing
To replace the front wheel bearing on the “seven” you will need the following tools:
- jack;
- set of socket heads and wrenches;
- screwdriver;
- set of open-end wrenches;
- new front wheel bearing.
Sequencing
Before starting work, one of the front wheels is jacked up and removed. In this case, the rear wheels of the car must be secured with shoes.
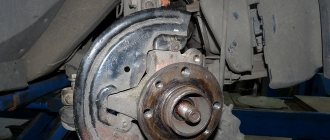
- The front wheel is removed. This gives access to the brake caliper and hub. The brake caliper is also removable.
- Now remove the protective plug located above the wheel bearing. To pry it off, you can use a thin chisel or a flat-head screwdriver.
Video: changing the front wheel bearing on a “classic”
Caliper
When talking about a car's suspension, one cannot fail to mention the caliper. Only the front wheels of the VAZ 2107 are equipped with this device. The reason is simple: without a caliper, the normal functioning of disc brakes is impossible. Structurally, the caliper is a monolithic steel body that houses the brake disc and pads.
There are several holes in the caliper. They are necessary for attaching the caliper to the suspension and for installing the brake cylinders. The caliper ensures the required level of pad pressure on the brake disc and their uniform wear. If the caliper is deformed (for example, as a result of an impact), then the normal wear of the pads is disrupted, and their service life is reduced several times. But mechanical damage is not the only trouble that can happen to a caliper. Here's what else could happen:
- oxidation of moving parts. This is especially true for brake cylinders installed in the caliper. Over time, these cylinders become covered not only with an oxide film, but also with dirt. As a result, their rods stop moving normally, and this immediately affects the braking efficiency;
- occurrence of cracks in the caliper. In parts subjected to cyclic alternating loads, fatigue stresses arise, which sooner or later lead to the appearance of fatigue cracks. Once they occur, the caliper must be urgently replaced. “Tired” parts cannot be restored.
Checking the hub
Set the car to the handbrake and lift it with a jack, grab the top and bottom of the wheel, and rock it in different directions. There should be no backlash or knocking.
Spin the wheel; no extraneous sounds should be heard during free rotation. The wheel should rotate smoothly without difficulty. If play, knocking or irregular rotation accompanied by a crunching sound is detected, it is necessary to replace the bearings.
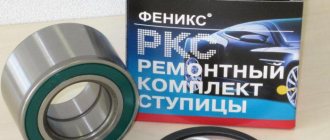
Before proceeding with the replacement, you need to purchase in advance the spare parts that will be needed during the repair:
- bearings, internal and external;
- stuffing box;
- new lubricant;
Causes of failure and replacement of the hub
A broken hub can cause the brake system to malfunction. If a part breakdown is detected and repaired in time, you can avoid serious accidents and costs for more complex repairs. The reasons for the failure of a bearing part can be: aggressive and careless driving, “drifting”, rubbing the belly of the car with gravel, sand or mud slurry on the roads, regularly getting wheels into holes and bumps, overload. In some cases, a spare part may fail due to an initial defect during assembly at the factory. Among the main signs of failure of a spare part are weak shocks, an unpleasant sound, a feeling of body vibration, and motion sickness.
Knocking and hearing will help determine if the hub is broken.
— The first way is to knock on the wheel with your foot. Tires should neither wobble nor play from light impacts. If you feel wobbly or notice a gap between the parts when tapping, then this is a signal of a breakdown.
— Another option is to listen while driving. If an unpleasant cutting sound or any other extraneous rustle is heard from under the wheels, the wheel part should be replaced immediately.
On the front and rear wheels, a spare part malfunction is determined differently. This is easier to do on the front tires. You need to accelerate the car to a speed of 60 km/h or higher and swerve along the road in different directions. If the left bearing is broken, the sound will increase when turning left, and if the right one - accordingly, when turning right. Faulty hubs on the rear wheels behave differently. It is difficult to determine which one is broken. It happens that an unpleasant sound comes from the right, but the left part is broken. Experienced motorists advise lifting the rear of the car and then turning the wheel in different directions. One and the other. Where you hear a crunching sound, an extraneous sound, or find play, repair or replacement of the part is needed.
Instructions for replacing the wheel bearing on a VAZ-2107 with your own hands
Removal
Put the car on the handbrake. Place a shoe under the wheel to prevent the machine from rolling away. Loosen the front wheel nuts.
Raise the car and place a support under the body. Remove the wheel. Unscrew the caliper mounting bolts located on the inside and remove the caliper. To avoid damaging the brake hose, it is better to tie up the caliper.
Using a screwdriver, pry up and remove the hub cap. Unscrew the hub nut. After removing the nut and washer, pull out the outer separator. Pull the brake disc towards you and remove it together with the hub. After unscrewing the two guide pins, remove the brake disc from the hub.
Using a screwdriver, pull out the oil seal and separator, and then the spacer ring. Now you need to knock out the clips. Using a mandrel of the required diameter or a drift, knock out both clips with a hammer.
DIY rear wheel hub replacement
You can also replace the rear wheel hub yourself. You will need standard tools - wrenches, a small screwdriver, a jack, and so on. The installation algorithm is as follows:
- Take a wrench and loosen the nuts.
- Use a jack to raise the car.
- Take the wrench again, unscrew the nuts completely and remove the flywheel.
- Have someone hold down the brake pedal or place something heavy on the brake to hold the pedal in place.
- Carefully unscrew the nut and remove the brake cylinder and caliper.
- If the car has an ABS/VDC sensor, then take a 10mm socket and unscrew the bolt. Don't forget to clean the sensor from dirt.
- Remove the car from the brake, and then turn the flywheel so that the rubber cap is on the bottom. Put the car on the brakes again.
- Remove the cap, insert a small screwdriver into the hole and turn the gear wheel up until it stops.
- Remove the brake disc.
- If necessary, remove the parking brake pads.
- Find the 4 bolts on the back of the hub unit and unscrew them.
- Carefully remove the hub part (do not damage the rear wheel hub axle).
- Dismantling is complete. To install a new part, you need to perform the same steps, but in reverse order.
- In case of replacement, you can also use a hammer and a wheel nut to knock out 4 or 5 studs from the old part - the studs are quite expensive and they break relatively often, so it won't hurt to remove them.
Replacing the hub on VAZ 2110, 2112 and 2114. Video
Instructions for replacing the rear wheel bearing
There are cases when the wheel system becomes unusable due to a faulty wheel bearing. Therefore, during the inspection, it is recommended to remove and check the bearings, and if necessary, replace them. Replacement of the rear wheel hub bearing is carried out as follows:
- Take the main part and using a small screwdriver, carefully remove the first rear wheel hub bearing .
- Now you will see the oil seal - take a screwdriver and remove it.
- Carefully remove the washer located under the oil seal.
- After removing the washer, you will find another rear wheel hub bearing - remove it carefully with a screwdriver.
- Quite often, bearings are attached using outer wheels - in this case, take a hammer and chisel, and then carefully remove the outer wheels.
- Rear wheel bearing replacement is complete. To install new bearings, you need to use the same instructions, but in reverse order.
Replacing the stud on the rear wheel hub
If after dismantling you find that the studs on the hub (bent, rusted, etc.), then they need to be replaced. Replacing the stud looks like this:
- Take a hammer and drive the pin in and then pull it out. If the rear wheel hub stud is severely bent, then in this case it is recommended to also cut the rod at the bend using a grinder.
- Take a new pin and insert it into the hole. Put on the nut (the size of the nut should be slightly larger than the size of the stud on the wheel). Screw another wheel nut on top to secure it in place.
- Reinstall the rear wheel hub and carefully remove the car from the handbrake. Make sure the pin is securely seated in the hole. If necessary, tighten the bolt further to improve retention.