Instrument cluster icons Lada Largus
1 - ABS indicator. Lights up when the engine starts and goes out. Lights up when there are problems with the anti-lock braking system.
2 - Front airbag. Lights up when a malfunction occurs, you should contact a specialist.
3 - Seat belt reminder. Lights up when you start the engine and lights up if you are not wearing a seat belt.
4 — Signal lamp for disabling the front passenger airbag
5 - Heated rear window. Lights up when the rear window heating is turned on.
6 - Low beam. Lights up when low beam mode is turned on.
7 - High beam. Lights up when high beam mode is turned on.
8 — Rear fog lights. Lights up when the rear fog lights are turned on.
9 — Fog lights. Lights up when the fog lights are turned on.
10 — Designation electric amplifier. Lights up when there are problems or the electric amplifier is turned off.
11 - Warning lamp for door(s) not closed.
- Fuel level warning lamp. Lights up when the fuel level is low
- Turn signal indicators. They light up when they are turned on.
- Engine coolant temperature indicator. Lights up when overheated.
- Engine oil pressure and level. Lights up at low level, pressure
- Warning light for the electronic engine immobilizer system.
- Indicator for preheating system (glow plugs). Lights up when there is a fault.
- Battery warning lamp. Lights up when the battery charge is low.
9. Parking brake warning light and brake system fault warning light.
10. “CHECK ENGINE” indicator - check the engine. Lights up when there is a malfunction in the engine management system. You should contact specialists.
- Fuel level indicator.
- Dashboard firmware version
- Coolant level indicator.
- Clock and time
Engine electrical diagram
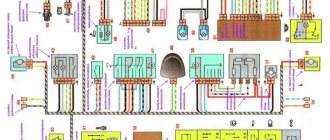
To understand the structure of electrical equipment, it is worth considering its connection diagrams, as well as interpretation of indicators.
Fig 1. Electrical diagram of the engine management system of the Lada Largus 1.6 l 16 valve (K4M)
1 - injection system relay, 2 - passenger compartment fuse box, 3 - fuel pump relay, 4 - top dead center sensor, 5 - air conditioning system control unit, 6,7,9,12,16 - instrument cluster, 8, 10 - interior electrical control unit, 11 - diagnostic connector, 13 - speed sensor, 14,15,18,21 - ignition coils, 17 - relay and fuse box in the engine compartment, 19 - coolant temperature sensor, 20,23 - system electric fan relay cooling, 22 - engine control unit, 24 - air conditioning compressor relay, 25 - knock sensor, 26 - refrigerant pressure sensor, 27 - throttle position sensor, 28 - intake air temperature sensor, 29 - electric throttle valve, 30 - concentration sensor oxygen, 31 - pressure sensor in the intake pipe, 32,33,34,35 - injectors, 36 - canister purge valve, 37 - control oxygen sensor, 38 - pressure sensor in the power steering system.
Rice. 2. Electrical diagram of the engine management system Lada Largus 1.6 l 8 valve (K7M)
1 - injection system relay, 2 - relay and fuse box in the engine compartment, 3 - fuse box in the passenger compartment, 4,5 - fuel pump relay, 6 - top dead center sensor, 7 - air conditioning system control unit, 8,10,15 — instrument cluster, 9, 11 — interior electrical control unit, 12 — diagnostic connector, 13 — coolant temperature sensor, 14 — speed sensor, 16, 19 — cooling system electric fan relay, 17 — ignition module, 18 — engine control unit, 20 - air conditioning compressor relay, 21 - refrigerant pressure sensor, 22 - knock sensor, 23 - throttle position sensor, 24 - intake air temperature sensor, 25 - electric throttle valve, 26 - pressure sensor in the intake pipe, 27 - pressure sensor in the hydraulic booster system, 28, 29,30,31 - injectors, 32 - canister purge valve, 33 - control oxygen sensor.
Wiring diagram LADA Largus
All units, including the K4M and K7M engine control circuit, battery charging circuit, low beam headlights and fog lights, turn signals and hazard warning lights, fuel pump and fuel level sensor, horn and sound system speaker connections, windshield cleaners and washers glass and rear door glass, electric front and rear door lifts, central door locking system and interior heating and ventilation system, other modules.
How to improve
It is proposed to put thermal insulation on the tubes going from the compressor to the air conditioner evaporator, for example, K-FLEX (after cutting it lengthwise). As a result, it is possible to increase the performance of the air conditioner by reducing cold losses. After modification, not just cold, but icy air should come out of the air ducts.
Reference
: K-FLEX is used in refrigeration equipment, air conditioning and ventilation systems, and energy. This universal thermal insulation is designed to protect industrial pipelines, heating systems, petrochemical facilities, and refrigeration units from heat losses.
This is interesting: Wiring diagram for switching on the generator, power steering Lada Largus
Largus dashboard
The Largus instrument panel, which you can buy in our showroom with delivery in Moscow and the region, looks great, the plastic is pleasant to the touch, and the dials of electrical appliances look respectable. However, the steering wheel installed on the vehicle is very reliable and beautiful. The audio system is also excellent, it not only gives good sound, but also makes it possible to connect a mobile phone and talk on it without holding it in your hands. Largus has a climate system and on-board computer equipment, which displays all the data important to the car owner:
- Amount of gasoline.
- Motor rally.
- Speed mode.
- Gasoline consumption is average.
By the way, the average consumption per 100 km is approximately 11 liters of fuel. On the road, the Largus car behaves confidently and overcomes bumps excellently. Moves calmly at 100 km/h. Thanks to the instrumentation, the driver can monitor the condition of the car.
Air conditioning in hot weather and in traffic jams
It is believed that almost all budget cars are equipped with air conditioners, which practically do not cool the air, especially in hot conditions and traffic jams. It turns out that manufacturers really save on the air conditioning system. Lada Largus also has similar devices in many trim levels. The system was tested and we will now describe its results in detail.
Air conditioning operation in the cabin
To check the operation of the air conditioner, it was decided to go out onto the city streets in the extreme heat. It was noon and the thermometer showed +32 degrees Celsius. The trip lasted about 1.5 hours. And all this time it was quite comfortable in the car. Of course, on the last, third row of seats there were no such flows of cool air as in front, but still it was not hot. It is worth noting that if the rear half is tinted according to GOST, it will probably be even better.
On video - testing the air conditioner in Lada Largus
The air flow regulating “rounds” are quite convenient to use. They rotate easily and direct jets of cool air to the desired location. Checking the temperature control of the air conditioner was also pleasing. When switching the temperature from maximum cool to medium, the cabin actually became a little warmer.
You can also adjust the fan speed. It is most comfortable when it is exposed to o. You can, of course, set it to high speed, but then it’s too windy.
If you want to cool the car interior as much as possible, then you should set the air intake switch to the internal circulation position. In this case, the air intake from outside will be blocked and it will actually be cooler.
In general, the air conditioning in Largus works fine. The only noticeable disadvantage is a slight decrease in engine power and an increase in fuel consumption. Under hot conditions and stuck in serious traffic jams, the gasoline consumption was 13.2 liters.
Air conditioning in Lada Largus
Instrument clusters for popular models VAZ 2110, VAZ 2114, Lada Kalina, Lada Priora
Today, tuning the instrument cluster can be done on all VAZ models. All devices differ from each other in the presence of certain functions, the use of the latest technologies, modern design and ease of operation. At the same time, much attention was paid to driver safety when developing the instrument cluster. Suffice it to say that thanks to such a device you will always be aware of all current parameters, airbags, power steering, ABS, and you can also diagnose all these parameters, which means you can prevent a malfunction in a timely manner.
Some devices are equipped with “auto light” functions, which allow you to automatically switch the lights to day or night mode, as well as traffic alerts with the handbrake active or low beam headlights turned off. These are just some of the functions that modern VAZ instrument clusters have.
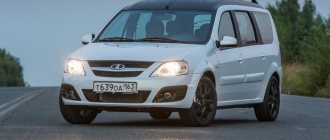
Exterior of Lada Largus
As already mentioned, the appearance of the Lada Largus is an almost complete copy of Logan with some small touches from AvtoVAZ. The car’s belonging to Tolyatti manufacturers is most clearly visible from the front, by the characteristic emblem on the radiator grille. The headlights look rather modest; the picture is completed by a bumper with smooth outlines and a large air intake mouth.
When viewed from other sides, Lada Largus looks like an ordinary station wagon from any manufacturer. All similar models are characterized by a sloping hood, a flat roof, and side glazing that takes up a large area. At the rear, judging by the photo, you can see two asymmetrical doors, a non-bulky bumper and vertically oriented optics on the sides.
The center console of the instrument panel is orange on the Lada Largus Cross
Cross instrument panel console trim with red trim for Largus cars.
Designed for 1DIN radio.
Applicability:
- Lada Largus 5 seats
- Lada Largus 7 seats
- Lada Largus van
- Lada Largus Cross
Payment to VISA card “Sberbank”
The most convenient and profitable payment method for you. Payment can be made through the Sberbank Online system, through a payment terminal (Sberbank ATM), provided that you have a card from this bank. If you are not a client of this bank and you do not have a card, then you can top up your balance at any bank branch through an operator; they will accept cash payment and top up your balance. Commission from 0 to 1%
Payment to Alfa-Bank card
Payment to Tinkoff card
Payment to VTB card
Cash on delivery (payment upon receipt)
Payment for the order will be made at the post office upon receipt of the goods. For cash on delivery services, Russian Post takes an additional commission - approximately 4% of the cost of the order (parcel) upon receipt.
The postal commission based on the amount of “Cash on Delivery” for your parcel is described below, i.e. In addition to the delivery cost, the post office will also charge you a commission for the “cash on delivery” service.
Postal commission for cash on delivery service:
· up to 1,000 rub. inclusive – 80 rub. + 5% of the amount
· over 1,000 to 5,000 rubles. inclusive – 90 rub. + 4%
· over 5,000 rub. up to 20,000 rub. inclusive -190 rub. + 2%
· over 20,000 rub. up to 500,000 rub. inclusive – 290 rub. + 1.5%
Attention! Advance payment for delivery 100% (via Sberbank payment). This is included in our “Cash on Delivery” terms and conditions.
Check with the manager for additional information.
Yandex money.
This payment method involves issuing an invoice in the Yandex.Money system.
You will be able to pay from your Yandex.Money wallet. ATTENTION
! There are restrictions on the payment amount: anonymous wallet 15,000 rubles, registered wallet 60,000 rubles, identified wallet 250,000 rubles. After payment you will receive an electronic cash receipt.
Transfer via Western Union
QIWI Wallet.
This payment method involves issuing an invoice in the QIWI system.
You will be able to pay from your QIWI wallet. ATTENTION
! There are restrictions on the payment amount: RUB 250,000. After payment you will receive an electronic cash receipt.
Payment to a bank account for legal entities and individual entrepreneurs (excluding VAT).
This payment method is intended only for legal entities and individual entrepreneurs. After placing your order, send your organization details to [email protected] In the subject line of the email, please include your order number.
After this, the manager will send an invoice via email in the prescribed form. We work without VAT. Payment method commission – 6%
.
Attention! Regardless of which delivery method you choose, check the integrity of the goods and packaging upon receipt of the cargo (parcel).
After submitting your order to the terminal of the transport company/Russian post office, a track number will be sent to the phone number and email specified in the order, if available, to track the parcel.
100% Prepayment of ORDER+DELIVERY.
The delivery cost will be announced by the manager when confirming the order.
Delivery terms
5-21 days depending on the distance of your locality from Togliatti,
cost
from 250 rubles.
depending on the weight, distance and declared value of the parcel (order). 100% prepayment of delivery in advance excludes commissions charged by the post office for cash on delivery.
Official delivery website: https://www.pochta.ru/
1st class parcel
- this is a shipment with a commodity enclosure, sent primarily by air transport with improved deadlines. Up to 2.5 kg.
Geography: the entire territory of the Russian Federation.
Delivery terms
5-21 days depending on the distance of your locality from Togliatti
100% Advance payment of ORDER + DELIVERY
.
cost
will be announced by the manager when confirming the order. Official delivery website: https://www.pochta.ru/
Payment for the order will be made in cash upon receipt at the post office. ADVANCE PAYMENT FOR DELIVERY IS MADE 100%. The delivery cost will be announced by the manager when confirming the order.
Delivery terms
5-21 days depending on the distance of your locality from Tolyatti
Cost
from 250 rubles. depending on the weight, distance and declared value of the parcel (order). Official delivery website: https://www.pochta.ru/
EMS company
is a division of Russian Post, part of the global EMS (Express Mail Service) system.
Express delivery worldwide.
Delivery terms
from 3-7 days.
Cost
from 550 rubles. Official delivery website: https://www.pochta.ru/emspost/
Electrical equipment in a Largus car
The electrical circuit in a car provides for the presence of two global categories of devices: consumers of supply voltage and devices that generate current. These nodes are connected via cable lines comprising a single on-board network. The network in LADA Largus operates according to this principle. By the way, in this car there are no negative wires (to the edge of the battery), and the role of the negative contact is performed by the body itself.
Interior of Lada Largus
The interior of the car, as can be seen from the photo, is practically indistinguishable from the same Logan and is just as ascetic and unremarkable. In the arrangement of instruments and other elements, you can notice the same ergonomic errors that were characteristic of Logan. The set of instruments is laconic, the two-color screen of the course computer and instrument dials are surrounded by chrome trim. The information content of the devices is quite good. The steering wheel is large, mounted on three spokes and has the AvtoVAZ logo in the center.
The number of controls on the central panel is minimal. In the maximum configuration you can find a radio with AUX and USB connectors; in the initial and middle configurations there is a plastic plug instead of a radio. Nearby are the controls for ventilation and heating (air conditioning and stove). Between them there are also buttons for the electric windows of the front windows, the rear door lock, the heated rear window and the hazard warning lights.
All upholstery is made of hard plastic and fabric, and the comfort provided by the seats is minimal. The front seats are quite flat, lateral support is minimal, but the range of adjustment is quite wide. In the luxury version, the driver's seat even has lumbar support and seat height adjustment.
There is also more than enough space for passengers in the second and third rows; the roof does not create an oppressive impression, however, climbing into the third row is not very convenient. However, the car was created to transport goods and passengers on a budget basis. It doesn’t have to be very comfortable, but it copes with its main tasks perfectly well. Despite the cheapness of the interior and upholstery, everything is made quite well and firmly; unnecessary noise or squeaks from poorly secured elements are not annoying, as in other similar cars of this class.
When is pinout required (device chips) and how to do it
All car parts fail sooner or later. There are times when they need to not only be repaired, but replaced. The instrument panel may also break, causing it to be removed and a new one installed in its place. This work is easy to do with your own hands if you have at least the slightest knowledge of mechanics. If you are well versed in your Priora (sedan), then you need to perform the pinout in this way:
- First, the dial hands are removed using a regular knife.
- Next, the gasket in the speedometer is scraped out to replace the backlight.
- If there is no need to change the sensors, you can simply remove them and clean them.
Very often, motorists cover the panel with a special LED strip to achieve even lighting. You can also use CMD diodes, which can be easily fused into glass with a soldering iron. To do this, you need to disassemble the dial and solder diodes directly under the base of the hands.
If you understand the purpose of all the contacts, and also know the purpose of a particular connector on the panel, then you can easily do the pinout yourself. The main thing is to carry out everything strictly according to the instructions so that the connection is successful and the panel continues to function efficiently. If you know which is better to install a tidy: with a canbus or a regular one, then it’s better to ask professionals who understand this. If you have no experience in such work, and you do not understand the purpose of certain wires, then the technical service will help you improve the operation of the instrument panel. Of course, you will have to pay for this, but you will not waste your time, and the work will be done efficiently.
Fan replacement
If the stove fan stops working, or it makes strange sounds, then it is necessary to dismantle it, clean it or replace it. However, you should not rush to replace it; first you need to make sure that the brushes of the mechanism are intact, in which case replacement will not be required. Getting to this part is not so easy, but for cars with the Lada “tenth” family design, there is a time-tested reliable way to get to the fan:
- Release the right side of the instrument panel by unscrewing the eight screws, then the panel must be lifted.
- Afterwards it is necessary to remove the standard sound insulation of the engine shield.
- Next, you will need to take a position in the cabin so that your shoulders rest on the mat; this is the easiest way to reach the fan.
Removing the fan is quite simple. All you need is the necessary tools and a little time. By unscrewing the three screws of the casing cover and removing the frame of the radiator pipe seal, you can remove the device. But before changing a part, you need to determine whether it works or not.
After all, it often happens that a dismantled fan spins and functions normally, but as soon as it is put back in place, it immediately ceases to fulfill its direct duties. The reason for this is most often accumulated small particles that prevent normal contact in the mechanism.
Largus car dashboard
The showroom of such a popular car as the Lada Largus is almost completely similar to the Renault Logan showroom. Almost the same central car panel, round air ducts and buttons. The Largus instrument panel has only slightly changed, the buttons on the console in the center have been updated, and the insert is varnished. The scales themselves now have a silver edging. The Largus instrument panel itself, which can be ordered with delivery in Moscow and the region, is assembled, consists of a frame and a decorative car panel. Steel frame. It is to this that the system units and electrical wiring harnesses of the car equipment are attached, as well as all the steering elements. The frame itself is attached to the front shield, front pillars and the body base.
It is an integral element of the power structure of the car body. As for the decor, the element is made of plastic, which is attached to the frame with screws. The controls for the car as a whole and the climate system are attached to it. There are also control devices and linings that cover the units. The catalog on the website presents a large assortment of auto parts, parts, components, consumables and additional equipment for VAZ and Renault cars. Choosing what you need is not difficult. However, if you have problems with the choice, contact the company manager by contacting him in any available way.
The manager will help you navigate the assortment, tell you about the terms of cooperation, payment, delivery, and, if possible, offer a discount. We will be glad to new cooperation, our prices are low, guarantees from the manufacturer are provided.
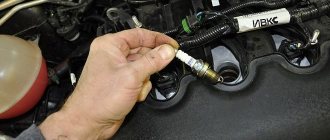
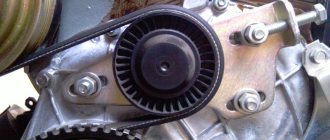
Ignition system in Largus
Now the “switching baton” is passed to the ignition coil. This element directs high voltage power to the spark plugs and does this according to a specific algorithm. Plugs are necessary to create a spark inside the combustion chambers, which leads to ignition of the mixture. To make the combustion process possible and occur with sufficient efficiency, the coil generates a voltage reaching 30,000 V. The coil is powered from a standard 12-volt network.
Download books on Lada Largus
You can download repair and maintenance manuals and collections of electrical circuits for free and without registration. All albums are in PDF format.
- Operating manual for various car modifications
- Repair manual and instructions for Largus
- Catalog of car parts and assembly units
- Book on repair and maintenance of Lada Largus
- Download album of circuit diagrams
Lada Largus 2013, l. With. - with your own hands
Saint Petersburg
Lada Largus, 2020
675 900 ₽
Permian
Lada Largus, 2016
490 000 ₽
Kemerovo
Lada Largus, 2016
559 000 ₽
Kemerovo
Lada Largus, 2017
440 000 ₽
See more cars on Drome
Participate in the discussion can only registered users.
Login Register
Methods for connecting to the main electrical wiring of Lada Largus
Regarding the issue of electrical commutation, the more relevant discussion will be not how to connect the wires, but with what. Almost everyone has enough skills to connect a couple of conductors. Now you need to be able to connect them efficiently or reliably. We will also discuss with you the best way to insert into the existing electrical wiring and how to do it.
Connecting wires to standard wiring
The easiest way, of course, is to make the connection using regular twisting. But this kind of method “is not comme il faut.” Contact will be lost sooner or later. In general, it cannot be called reliable. But this is really the simplest and enough to first test the switching made.
If you have soldering skills, tinning and soldering conductors will be a simple and reliable way. This kind of connection will never oxidize over time, and its strength will be comparable to the strength of the conductor itself. That's why soldering is good.
But it’s not soldering alone that can help you out in the matter of connecting rear lights to the Lada Largus. A cheap and practical way would be to use the most common screw terminal blocks. They cost pennies and are sold in almost any electrical goods store. To avoid cutting the main wiring, bend it at the connection point and thus clamp it with a screw contact.
Well, the most optimal would be to use special terminal blocks, known as clamp couplers. They are specifically designed to connect to live electrical wiring without twisting, soldering or cutting. Perhaps this method can be considered a priority. We will finally move on to the connection process itself.
Electrical connection diagram, how to connect the wires correctly
Let's take in our hands a working electrical plug that is connected to the main lights of the Lada Largus. It comes with wires of five different colors, including:
- common wire, also known as “plus”;
- power supply for direction indicators;
- for fog lights;
- in reverse;
- on the brake, as well as the clearance.
Among all this not very tricky interweaving of multi-colored conductors, we are interested in the following colors:
- black - common wire;
- orange - responsible for the brake light;
- blue - responsible for dimensions.
This is exactly the connection scheme that is allowed on the Lada Largus. Rear lights installed instead of trims, of course, can be connected to any other wires in the plug, but this will contradict the technical regulations of AvtoVAZ, therefore we will not invent anything of our own and will not teach you anything bad. Additional lighting conductors have the following insulation colors:
- black - common “positive” conductor;
- red - to be connected to the orange on the plug, it is responsible for the brake light;
- yellow - to be connected to the blue one on the plug, it is responsible for the dimensions.
The electrical connection has no other nuances. Before final assembly of the casing, it is recommended, however, to test the correct functioning of the additional lights. This will help you avoid a “bad job” if you make a mistake. In general, there should be no problems, everything is extremely simple, and soon you will be able to independently drive along the roads in an updated and tuned Lada Largus, to the envy of everyone.
Some technical characteristics and general description
In order not to buy a pig in a poke, having decided to stylishly tune your car, it is advisable to familiarize yourself with the proposed description of the technical characteristics of the product. What material is the additional lighting made of, how long will it last, and how justified is such a purchase? Let's figure it out together. A meager description on the packaging is one thing, and an objective view from the outside is another.
Let’s say right away that such lights shine really well on Largus. It is also noteworthy that this illumination is practically indistinguishable from the illumination of the main lights and is, in fact, its logical continuation. This will definitely emphasize the individuality of your car and will be a simple, but at the same time effective visual tuning.
When it comes to light source technology, LED lighting is currently the most technologically advanced. It is capable of providing high-quality light for tens of thousands of hours and for at least ten years. Such lamps are also not afraid of low temperatures, are economical and shock-resistant. They do not heat up the lamp body like outdated halogen samples. In general, it’s a pleasure.
Attaching new skin
Installation of all working parts and components is carried out in the reverse order of removal. Rubbing parts are lubricated, sliding surfaces in the door lock, stops, hinges, and rod hinges too. Before installing the upholstery, be sure to connect the ground wire terminal to the battery, check the operation of the door lock, and if necessary, adjust it. To check the operation of the window regulator, raise the lowered window. You can also restore or replace the seal-sealant at the end of the upholstery, if necessary.
| See all advertisements in the archive |
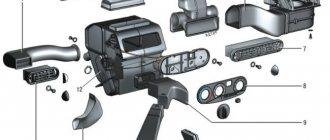
Disassembling the heater
Remove the heating, air conditioning and ventilation control unit by disconnecting the damper drive rods from the heater unit.
Remove the foam rubber seals 2, Figure 7.
Using a Torx T20 head, unscrew two screws 3 and remove the pipe bracket 1.
Using a Torx T20 socket, unscrew screw 4 and remove the inlet 7 and outlet pipes 8 of the heater radiator 6.
Using a Torx T20 socket, unscrew two screws 5, unscrew the three fasteners, remove the radiator 6 from the heater body and drain the remaining coolant (replaceable Torx T20 head, knob).
Unscrew six screws 1, Figure 8, and separate the heater unit into two parts.
Remove evaporator 1, Figure 9, from the heater block.
Assembly
Reassemble the heater unit in the reverse order, in this case:
— install new foam rubber seals;
— install new sealing rings on the heating system pipes.