We continue, together with Magazin4x4, to improve the UAZ-2206 car.
Back in winter, we purchased a high-power heater from the NAMI Microclimate Laboratory. Today this is the best heater for the UAZ Bukhanka, which replaces the standard stove without significant modifications. A review of the NAMI heater for the UAZ Bukhanka was published earlier.
The NAMI microclimate laboratory has been developing heating and ventilation systems for cars for a long time. The laboratory has a small production facility where heaters are manufactured in small batches. You can order a NAMI oven by calling the phone number listed on the website. Since the production is small-scale, it is likely that the order will have to wait for some time.
Why do you need to change the heater? There are several reasons for this: Firstly, the new heater is more efficient: 8 kW instead of 4 kW for the standard one; Secondly, the maximum air flow through the heater is three times higher, 450 m3 per hour instead of 150; Thirdly, the new heater has a cabin filter ; Fourthly, the noise level of the new heater significantly lower than the standard one. And lastly, the new stove has recirculation mode .
Therefore, we boldly change it!
First, let’s study the terse instructions:
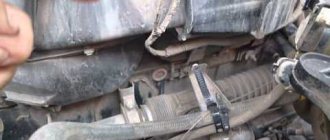
Let's get to work. We remove the old stove. But first we drain the antifreeze from the stove. To do this, unscrew the plug at the lowest point of the bracket for attaching the supply hoses to the stove.
Drain the remaining coolant (Coolant) from the cooling system.
On those radiators that are supplied now (2015-2016), there is no longer a separate valve for draining, and we drain the coolant by disconnecting the lower radiator pipe.
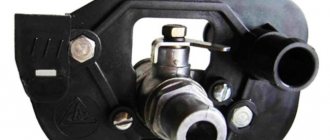
The standard heater is secured using 4 M6 bolts (10 wrench)
Unscrewing the heater mounting bolts alone is not an easy task. The plant, with manic persistence, saves on cage nuts. You will have to hold one side and unscrew the other.
Therefore, we either do it with an assistant, or we need to somehow secure the bolt from turning.
Unscrewed the fastening bolts
We remove the buttons on the additional panel and remove the panel itself.
Otherwise, it will interfere when manipulating the stove
Disconnect the power connector from the heater. We remove the additional resistance; we will no longer need it. Disconnect the coolant pipes and take out the old heater.
Just for fun, we weighed how much it weighs. It turned out to be 5.85kg .
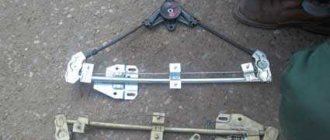
Now we dismantle the air intake control device.
We also remove the damper. Despite the total anticorrosion, rust has already formed on it
The old heater, together with the damper control system, weighs 8.2 kg
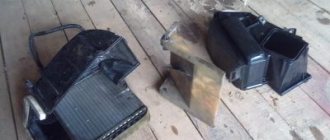
Initially, they wanted to replace the cabin heater with a more compact and quiet one. However, later, the global modernization was postponed and the cabin heater was returned to its place.
But now we know that he weighs 5.65 kg
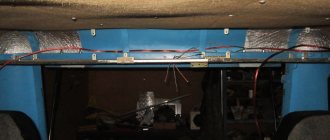
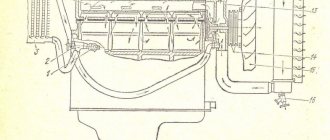
The entire heating system of Bukhanka
The new NAMI heater weighs 7.65 kg. Since the body is plastic, the entire weight falls on the radiator and motor.
On the new stove the seal is made of foam rubber. A very short-lived product, and besides, it quickly takes on water. We decided to replace it with more technologically advanced polyurethane foam, which was left in abundance from the old sound insulation.
Removing the old seal
Based on it, we cut out a new one and glue it.
When I first tried it on, it seemed that one layer was not enough. The second layer of sealant was glued on.
However, during the final fitting it turned out that such a thick sealant was not needed, even one layer was enough.
It is very strange that the Bukhanka heater does not have a drainage hole to drain any water that gets into it. After all, water will get into the stove anyway. And if there is no drainage hole, then the water will remain in the front cavity, saturate the filter and will dry out for a long time and painfully, while spraying the car interior with aromas.
After consulting with the stove manufacturer, we decided to make the drainage ourselves. There are even unused holes in the heater housing for this purpose.
We plugged the hole located on the right (near the cabin filter). For this we used a simple automotive sealant. We use the left hole for drainage. Its diameter allows you to pass the windshield washer tube through it.
We install the new heater in place. If drainage is not done, then you must first install the air intake flap. It is easier to screw it on when the stove is removed. But we are not looking for easy ways