The cabin is equipped with supply and exhaust ventilation systems.
With natural ventilation, air enters the vehicle interior through lowered door windows and exits through the cracks in the interior panels of the front doors, the sunroof, as well as ventilation windows on the rear side pillars and rear windows of buses.
With forced ventilation, the windows and sunroof are closed, the outside air, without heating, is forced into the cabin by the heater fan.
Passing through the heater body and bypassing its radiator, the air enters the cabin.
To do this, move the lower handle on the control panel to the extreme left position and turn on the electric fan.
The direction of air flow through the cabin is controlled by rotating nozzles.
Forced ventilation should be used in hot weather at low speeds and in parking lots.
At speeds above 50 km/h, the interior is ventilated with the electric fan turned off, only due to the high-speed air pressure.
The cabin (salon) is heated with hot air.
Passing through a heated heater radiator (included in the engine cooling system parallel to the main radiator), the air is heated and supplied to the passenger compartment.
When outside air is taken in, it passes through a grille located between the windshield and the hood, abruptly changes direction and is separated from rainwater, which is drained onto the road through a plastic groove located in the engine compartment.
Next, the air passes through the air intake duct, the heater itself and (depending on the location of the dampers) is supplied to the windshield, door windows, and also to the driver’s and passengers’ foot area.
The heater consists of a plastic casing in which a radiator, two fans mounted on the electric motor shaft, upper, central and lower dampers and a control panel with three levers and switches are installed.
An additional resistor is installed on the left side of the heater, providing reduced rotation speeds of the electric fan.
The inlet and outlet rubber hoses are suitable for the heater radiator.
When the heater tap is open, fluid is drawn into the radiator from the cylinder head, and discharged into the engine cooling system pump.
To heat the cabin, by moving the right upper and lower levers of the control panel, open the heater tap, and by moving the dampers we direct the incoming air through the heater radiator.
When the car is moving, air will flow into the cabin even when the fan is turned off.
If there is a lack of warm air, as well as in parking lots, we turn on the electric fan.
By turning the switch clockwise, we select one of three operating modes of the electric fan.
To increase heating efficiency and, especially, speed up the warm-up of the cabin in the cold season, cabin air is recirculated through the heater radiator.
When the upper left lever of the heater control panel is moved to the extreme right position, the upper flap blocks the flow of outside air into the heater and opens the air intake window from the passenger compartment.
The constant circulation of “cabin” air through the heater radiator contributes to its intensive heating.
The redistribution of air flows in the cabin is carried out by the lower lever of the heater control panel.
When the handle is in the extreme left position, the air supply to the heater radiator is blocked and only the interior is ventilated.
In the middle position, air is supplied to heat the windshield and door windows.
When on the far right, the air is distributed in the same way as the middle position of the handle, plus it additionally flows to the foot area of the driver and passengers.
The upper right lever of the heater control panel is connected to the heater valve and controls the amount of fluid entering the heater core. When the lever is in the extreme right position, the valve is fully open.
Additional heater
An additional heater is installed in the heating system of vehicles with two rows of seats, buses and emergency vehicles.
When the electric fan is turned on, the interior air circulates through the auxiliary heater radiator.
This ensures high intensity heating of the cabin (interior).
The auxiliary heater fan has a minimum and maximum rotation speed.
The auxiliary heater radiator is connected to the main heater radiator by hoses. They are laid on the floor and protected by a plastic casing.
The second radiator causes a decrease in the rate of fluid circulation in the heating system.
Therefore, an electric pump is installed together with the additional heater.
It increases the fluid flow in the system, which improves the heating of the air passing through the heater radiators.
The electric pump is included in the drain line of the heating system and is installed in the engine compartment on the right side member.
It is recommended to use the electric pump when parked and at low crankshaft speed (travel speed up to 50 km/h).
At high speeds, the engine cooling system pump develops sufficient capacity to circulate fluid through the auxiliary heater.
The additional heater is installed in buses (with a capacity of up to 9 seats), vans with two rows of seats and in the GAZ-32214 car - on the floor, behind the passenger seat of the cabin, and in buses with 12 (13) seats - on the floor, in the front part of the passenger compartment .
To heat the interior of minibuses of medical modifications, an independent flame-type heater is additionally installed, running on gasoline supplied from the vehicle tank.
The heater can operate while stationary or in motion, regardless of engine operation.
Tools and materials
Set of heater pipes for VAZ-2110.
- Antifreeze for topping up.
- New pipes.
- Screwdriver.
- Clamps.
Replacement process
To carry out the work, you will need to drain all the antifreeze from the system.
The red arrow indicates the direction where the stove pipes are located.
- Next, you need to find the place where the pipe has broken and replace it.
To get to the pipes, you need to remove the trim and the heater fan.
It is recommended to change all heating system pipes at once.
Design of the cooling system for UMZ-4213 and UMZ-4216 engines on UAZ and GAZelle vehicles.
To increase energy performance, improve fuel economy, reduce toxicity and noise, models with an integrated microprocessor fuel injection and ignition control system were developed on the basis of the UMZ-421 carburetor engine: UMZ-4213 engine for UAZ cars and UMZ-4216 for GAZelle cars. The design of the cooling system on the UMZ-4213 and UMZ-4216 is somewhat different, since it has differences in the connection diagram of the expansion tanks and heating radiators.
General design of the cooling system of UMZ-4213 and UMZ-4216 engines on UAZ and GAZelle vehicles.
The cooling system is liquid, closed, with forced-type liquid circulation and an expansion tank, with liquid supply to the cylinder block. It includes a water pump, a thermostat, water jackets in the cylinder block and cylinder head, a heater, an expansion tank, a fan, connecting pipe sections, and also body heating batteries.
For proper operation of the UMZ-4213 and UMZ-4216 engines, the coolant temperature must be maintained within the range of plus 80-90 degrees. Short-term operation of the engine is allowed at a coolant temperature of 105 degrees. This mode may appear during the heat of the year when the car is driving with a full load on long climbs or in city driving conditions with frequent accelerations and stops.
Design of the UMZ-4213 engine cooling system on a UAZ vehicle.
Design of the UMZ-4216 engine cooling system on a GAZelle car.
Operation of the cooling system of UMZ-4213 and UMZ-4216 engines on UAZ and GAZelle vehicles.
Maintaining normal coolant temperature is done using a two-valve thermostat TS-107-01 with solid filling. When the engine warms up, when the coolant temperature is below 80 degrees, a small circle of coolant circulation operates. The upper valve of the thermostat is closed, the lower valve is open.
The coolant is pumped into the cooling jacket of the cylinder block by a water pump, from where, through holes in the upper plate of the block and the lower plane of the cylinder head, the liquid penetrates into the cooling jacket of the head, further into the thermostat housing and through the lower valve of the thermostat and the connecting pipe section - to the pump inlet for water. The heating device is disconnected from the main coolant flow.
For better operation of the interior heating system when circulating liquid in a small circle, and such a situation can be maintained for a very long time at low sub-zero ambient temperatures, there is a throttle hole with a diameter of 9 mm in the liquid outlet channel through the lower valve of the thermostat. Such throttling leads to an increase in the pressure drop at the inlet and outlet of the heating radiator and a more saturated circulation of liquid through this heating device.
Moreover, throttling the valve at the liquid outlet through the lower valve of the thermostat reduces the likelihood of emergency overheating of the motor in the absence of a thermostat, since the shunting effect of the small circle of liquid circulation is significantly weakened, due to which most of the liquid will flow through the cooling radiator.
Additionally, to maintain the normal operating temperature of the coolant during the cold season, UAZ vehicles may have blinds in front of the heater, thanks to which you can adjust the amount of air passing through the heater.
As soon as the temperature of the liquid increases to 80 degrees or more, the upper valve of the thermostat opens and the lower valve closes. The coolant circulates in a large circle through the heater.
To function well, the cooling system must be completely filled with liquid. When the engine warms up, the volume of liquid increases, the excess is pushed out due to increased pressure from the closed circulation volume into the expansion tank. When the temperature of the liquid decreases, for example, after stopping the engine, the liquid from the expansion tank, under the influence of the resulting vacuum, flows back into the closed volume.
On UAZ vehicles with a UMZ-4213 engine, the expansion tank is specifically connected to the atmosphere. The control of fluid exchange between the tank and the closed volume of the cooling system is changed by 2 valves, inlet and outlet, located in the plug of the heater.
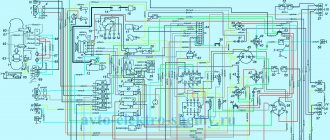
Gazelle stove diagram
How the stove works in Gazelle Business
For correct diagnosis and repair, it is important to know the structure and operating principle of the heater, so that at the first sign of a breakdown, you can identify the problem or make repairs, preventing failure of the entire unit as a whole. Most breakdowns can be predicted by subtle signs and their progression can be prevented. To do this, you need to know and understand what any of the components is responsible for and what the meaning of its work is.
Car cooling system
In Gazelle Business, the stove is considered an important part of the engine cooling system. During engine operation, a lot of heat is generated that needs to be removed. Heat is released due to fuel combustion and from rubbing surfaces. If the heat is not removed, the motor will quickly heat up and break down. The cooling system has 2 circuits (small and large circle), they are divided by a thermostat. When the liquid is cool, it moves in a small circle, and when it warms up, it moves in a large circle. This makes it possible to quickly reach operating temperature and not get too hot. In the warm season, heat is released into the atmosphere, and when cool weather sets in, part of the heat is spent on heating the cabin.
Once we understand how the cooling system does not stop working, we can move on to heating the cabin. The heater circuit on a Gazelle car is similar to the heaters of other cars that have a liquid-cooled engine. Liquid can circulate through the heat exchanger of the heater no matter whether the thermostat is open or not. For better heat supply, the fluid for the stove comes from the hottest part of the engine (from the cylinder head). Thanks to this, on an engine that has not yet reached operating temperature, pleasant air still comes out of the deflectors. The heater has a valve in its design that either allows liquid to flow into the heating device or discharges it back. And the temperature of the environment leaving the deflectors depends on how much it is open. The valve position is adjusted from the heater control panel. The faucet is equipped with an electric drive that changes the position of the valve. It is also possible to change the blowing intensity and direction from the control panel. The intensity is controlled by a motor with an impeller, the rotation speed of which changes the intensity of the airflow.
Changing the position of the dampers changes the direction of the airflow (to the face, to the legs, to the chest, to the glass). The heated coolant from the engine penetrates through the line into the heater of the stove, causing it to heat up. At this time, air blown by a fan passes through it. Then it passes through air channels, the dampers of which are open. Then the hot air enters the car interior and warms it up. For repair work or diagnostics of breakdowns of this equipment, there is an electrical diagram on which all components of electrical devices are indicated. And in case of breakdowns or incorrect operation of devices, you need to read it in detail in order to understand where it is powered from and how the failed device changes.
When you know the working principle and device, it is much easier to navigate in case of breakdowns. After all, to successfully carry out a repair, it is necessary to understand the cause of the breakdown, otherwise the repair will not be completed successfully. For correct diagnosis, it is also necessary to understand the method of action of the entire mechanism in general. Nowadays, a driver does not have to know how to repair a car; there are service stations that deal with repairs of varying complexity. But it happens that a problem catches you on the road, and there is no opportunity to use the services of professionals. This is when knowledge of the automotive device and its mechanisms comes in handy. When you know how the Gazelle stove works, then if a breakdown occurs on another car, it will be easier to navigate when carrying out repairs or diagnostics, since in all cars they are almost equal, except for small invisible moments. And you can easily determine the breakdown.
How to repair the heater dampers on a Gazelle
The stove is an integral element of almost any car. If you live in a region where there is such a thing as winter or just cold, then it will be impossible to drive a car without a heater.
GAZelle cars are widely used in Russia, due to their low cost and ease of maintenance. It is quite possible to carry out a lot of repair and restoration work with your own hands, without turning to specialists for help.
One of the common problems is a malfunction of the stove. And there could be many reasons. One of them is problems with the dampers.
Symptoms of malfunction
To restore or reset the damper, returning it to a working state, you must first make sure that the fault lies in these elements of the heating system of the GAZelle car.
With the onset of cold weather, many GAZelle car owners note this situation. Staying in place with the heater on, the interior warms up quite well and the car is warm inside. But as soon as the car starts moving and starts driving, all the accumulated heat is gradually blown out, the cabin becomes cold, and the working stove cannot restore the previous temperature.
At the same time, everything works fine, there are no complaints about the electric fan of the furnace equipment, the regulators also work properly.
In a situation like this, when the heater is functioning, but the heat still disappears from the car while driving, there is a high probability that the heater is working, but the damper needs to be repaired or replaced. The repair itself cannot be called complicated, but for comfortable work it is recommended to remove the old or new type of heater casing on which the dampers are located, and replace them under more convenient conditions.
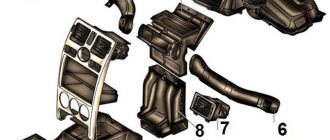
Heating system elements
The stove diagram clearly shows the location of its main functional elements. It should be noted that the design of the stove on the VAZ-2108, 2109 and 21099 models is the same. Many car owners know that the heater in these models is not fully developed. As a result, the interior is not heated properly, so a decision is made to modify the stove with your own hands. Just in this case, it is important to know the design of the heater so as not to confuse anything.
The design of the stove of the VAZ-2109 car, whether it is a high panel or a low one, is absolutely identical. Therefore, the information presented will be useful to owners of this model with any instrument console.
Knowing the main points and what is located where, you can already try to independently deal with the problems that arise and fix the malfunctions that appear, while saving money and time on trips to the service station.
Where are the dampers located?
If the problem situation is related to the dampers of the GAZelle stove, they will need to be dismantled or repaired. In most cases, when it comes to mechanical malfunctions and breakdown of the unit, replacement is provided. It's not difficult to carry it out.
It is not difficult to understand the peculiarities of the operation of the stove dampers on a GAZelle. But they can be the main reason for the poor operation of the heating system if the electric fan and other main components, including the stove radiator, are working properly.
The dampers are located directly inside the heater. If you are from the driver's seat, the flaps can be seen on the right side of the electric fan housing. To get to it you will need to remove the large glove box on the passenger side. But this does not guarantee full access to the node.
To carry out more serious repair and restoration work, it is better to get to the electric fans of the heating system and carry out the repair in comfortable conditions.
Maintenance and repair of the VAZ 2110 stove
Caring for the heating system in the warm season has specific features. Since during the operation of the equipment a lot of scale accumulates inside the radiators, the efficiency of the entire unit is reduced. To clean the ballast elements, the car owner will need a pair of worm bars, a pair of rubber seals, keys, a cooler and a reservoir for collecting used antifreeze.
Initially, turn off the electric motor and allow it to cool. A rag must be placed at the bottom of each pipe. Next, the hose clamps are loosened, through which the coolant is directed into the engine compartment. Then they remove the rubber connectors from the tap and pipes, unscrew the screws of the fasteners on the seal, and disconnect the drive rod on the tap with the fan housing.
The radiator pipes are removed from the hole located in the damper of the engine compartment. When removing the tap, clean the pipes and the tap. To accurately diagnose a breakdown of the heater switch on a VAZ 2110, it is necessary to analyze the voltage on the contacts when changing the position of the assembly handle. If there is no change in voltage, it should be replaced.
The flap may also become deformed and jam in some positions. Nowadays you can purchase a steel damper and replace a deformed one made of plastic, but this is a rather labor-intensive undertaking. You can quickly force the VAZ heater to pump in warm air in this way. First you need to turn off the controller.
When 12 V power is supplied, the damper will open/close in accordance with the polarity. The controller is not able to provide the necessary current to move a jammed or deformed valve, and feeding directly from the batteries will allow you to forcefully act on it, changing the polarity. After this, you need to set the heater regulator on the VAZ 2110 to the maximum position, put the heater controller back and do not change the position of the regulator until spring.
When it warms up, it will be possible to disassemble the stove and figure out the cause of the jam.
How it works
On the side of the electric fan unit there are 2 dampers on GAZelle cars. Between these dampers there is a special jumper, which changes its position depending on the operation of a special regulator located on the front panel. As you know, the furnace equipment control unit is located on the center console.
Both dampers close and open synchronously. They are driven by a special drive connected to an external regulator on the control unit. When air is taken in through the engine compartment, depending on the position of the dampers, it can pass through the heater radiator or bypass it. This directly affects whether cold or hot air will enter the cabin.
But if the dampers do not move synchronously, the stove will not work normally. In this situation, mandatory repairs are required.
Radiator replacement
Sometimes a clogged or damaged radiator causes the heater to not work properly. If this happens, you should replace it with a new, similar one.
Heater radiator VAZ 2114
It is done as follows (without dismantling the panel):
- Place the car in a pit and drain the coolant (the same as when replacing a valve).
- To quickly and more completely drain the coolant, unscrew the cap of the expansion tank.
- After draining, screw the plug-bolt into place.
- From inside, close the tap by moving its lever to the left position.
- Move the passenger seat back as far as possible.
- Remove the plug in the center of the panel and unscrew the screw underneath it.
- Unscrew the 4 screws securing the left panel cover.
- Unscrew 6 screws (3 on top and bottom) on the steering column casing, and then remove the casing.
- Disconnect the radio and cigarette lighter connectors.
- Remove the plastic covers on the stove adjustment levers.
- Unscrew a couple of screws in the upper part of the center console, and then remove the latter.
- Unscrew the diagnostic connector mounting bolts.
- Disconnect all remaining electrical connectors in the console.
- Remove the console completely.
- Unscrew the screws securing the panel base to the body.
- Remove the 4 screws securing the panel from the side.
- Unscrew the panel screws in the center.
- Remove the ECU.
- Lift and secure the panel.
- Loosen the pipe clamps and remove them.
- Drain the leaking liquid.
- Unscrew the bolts securing the radiator (4 pieces).
- Remove the old radiator.
- Install a new radiator.
Reassembly is carried out in the same sequence, but in reverse order.
Causes of malfunctions
If the car owner has no complaints about the performance of other components of the heating system on a GAZelle, but while driving the air into the cabin is cold in the winter, or blows hot in the summer, despite moving the dampers to the appropriate position, then it’s probably all about the dampers.
There can be several situations in case of breakdown or malfunction of the dampers:
- The air passes through the radiator, while it is required to bypass it without preheating, which is important in the warm season.
- Due to faulty dampers, air bypasses the heater radiator, although the driver has switched the heater to heating mode.
- The flaps are stuck in an intermediate position. This does not allow you to get the necessary amount of heat in winter. The heater works, but it's still cold in the cabin.
A pair of dampers whose synchronous operation is disrupted cannot, in the event of a malfunction, supply outside air through the radiator or directly into the cabin without preheating for two main reasons:
- The drive is broken. It is mechanical and rarely fails. The drive is connected to the regulator on the front panel on the right side of the heater control unit, and goes to the dampers. The likelihood of it breaking is extremely low. Checking the work is quite simple. You need to visually reach the dampers and turn the regulator, changing the position of the elements. If they do not move, there is a possibility that the drive has broken. This problem is more relevant for heavily worn GAZelles with high mileage. To repair it, it will need to be disconnected or adjusted if the drive is stretched or weakened.
- The jumper is broken. There is a special jumper between the dampers. In fact, it is this that is driven by a special drive, and with the help of this jumper the dampers change their position. The breakage of the jumper occurs quite often, which is why car owners have to contact a car service center or repair the unit on their own.
When faced with such a malfunction, it makes sense to try to repair it yourself. No special skills or special tools are required here. The procedure is carried out in a garage with a minimum basic set of tools and materials.
Useful video
You can glean additional useful information from the video below:
Hello everyone, does anyone know that the heater radiator is filled with antifreeze from the bottom up? or vice versa? should the feed be supplied in the lower tube? and the return from above. or not?
Comments 28
Chewed mole, is the truth buried?
I have an entrance from above.
The entrance to the stove is always on the lower pipe of the stove radiator, the exit is from the top, the antifreeze lingers in the stove a little longer and warms up the radiator better. I've always done this on all my cars and the heat is good.
And it’s even better to change these hoses at least once a season - the radiator will not become clogged with dirt longer. And in order to expel the air, when filling the system, the upper hose must be removed, the air will come out, and as soon as liquid appears, immediately put it on.
I drove up the hill with my face up and gasped and the air came out))).
We take a hose from the head that goes onto the stove, put it on the upper fitting of the stove, and if I’m not mistaken, throw it directly into the pump. If you put it the other way around, the heating will be worse.
The factory has an entrance from the bottom. I connected it this way and that way, I didn’t notice any difference
There is a difference and it’s huge, I don’t know how it came from the factory, but it should be done as I described. The first thing that heats up is the head of the block; from it, hot liquid (whether it’s water or antifreeze) enters the stove in the upper fitting and from the lower one it pulls with a pump, so the whole area heats up and gives off heat faster than when connected the other way around.
I have the 406th, it comes from the block, on the 402 we tried entering from the top, it heats worse.
I don't know why you have . Right now the gazelle costs 406, feed to the top, bottom to the pump, everything is in agony
On a gazelle, the radiator is horizontal and there is no point in talking about supply from above.
The factory has an entrance from the bottom. I connected it this way and that way, I didn’t notice any difference
Tested on many machines.
If the car runs on water, then the supply is from above, if it runs on antifreeze, then from below.
What is the reason for this difference? Or is this just a series of tips to let him suffer?
As far as I remember, the bottom feed allows you to fill the system without airing (any heating systems are filled exclusively at the bottom point, so that the rising liquid displaces the air), and the top feed allows you to drain the liquid from the radiator without any residue, which is important in the case of water in winter.
Maybe you’ll understand that I’m crooked, but I can fill the system without air))
Congratulations. The question is not at all about who is how crooked, but about doing it correctly, according to the laws of physics.
The supply is from the bottom and the return is from the top, so the air must come out on its own since the stove is slightly tilted. It itself is lower than the height of the radiator.
There is no such difference, but it is better from top to bottom.
Where does the air go then?
Evo will be squeezed out by pressure
Should the air go to the top? Right? And when you connect, where does the air plug go?
Do you really think that there will be air left in the radiator? Then tell me which ones have a radiator in a horizontal position, what should they do? The air plug goes away immediately if the circulation in the pipes occurs under pressure, and even if a bubble remains after a couple of warm-ups, the pressure increases when it cools down, it contracts, which means where there is air there is a vacuum and this vacuum is filled with antifreeze, but for this the plug must work correctly, because of the plug many people gasp for air and then pour out the antifreeze
There is no such difference, but it is better from top to bottom.
I think so too, especially if there is an additional pump for the stove - as in my case... Tashkent in winter, even if you drive in a T-shirt)))