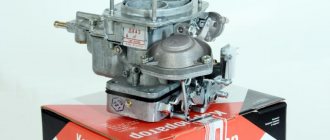
Cars of models 2108-09 are truly legendary developments of the Volga Automobile Plant; it was with them that the production of front-wheel drive passenger cars began in the USSR. Also for these cars, a VAZ-2109 Solex carburetor was created and put into production, providing economical fuel consumption and excellent dynamic characteristics.
The carburetor unit (CU) is quite simple to set up and has a generally simple design compared to other similar devices, but it has its own characteristics and characteristic “diseases”. Here we will look at the structure of the carburetor, its dismantling and installation, the specifics of adjustment, adjusting the gasoline level, and debugging the starting mechanism.
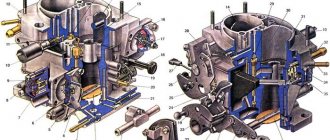
General structure of the part:
- Camera;
- Butterfly valves;
- Primary camera;
- Secondary camera;
- Diffusers;
- Float chamber;
- Case cover;
- The body itself.
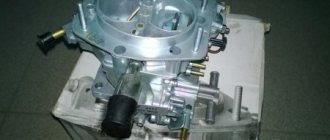
The carburetor consists of a housing cover with a flange. There are studs on the body through which the air filter and fuel fittings are attached. The lower part of the housing contains diffusers, throttle valves and a float chamber. The throttle valve drive system is also located there. The cover is secured with screws (maybe 5). For sealing, there is a thin katon gasket between the cover and the body.
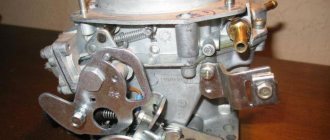
The part also has two dosing systems, one transition system and an idle system. The idle design includes an electromagnetic shut-off valve for the 1st chamber. In addition, there is a power mode economizer, a 2nd chamber transition system, an accelerator pump with a diaphragm, an econostat and a starting device with a diaphragm.
The forced idle economizer consists of:
- Solenoid shut-off valve;
- Adjustment screw limit switch;
- Electronic control unit.
All this is connected to each other by electrical wires.
This is interesting: What is a mass air flow sensor in a car?
Solex design
The carburetor mechanism of all modifications on the VAZ 2108/2109 is emulsion and consists of two internal combustion chambers. At the top of the carburetor there is a cover that prevents dirt from entering the cavity of the device, and fittings - fuel lines are supplied to them. The middle part is the body itself, into which diffusers and cameras are mounted. At the bottom of the carburetor are the float chamber and throttle valves.
The key elements of the system are:
- accelerator pump;
- float;
- throttle thrust;
- forced idle economizer;
- main dosing system;
- trigger mechanism;
- econostat;
- vehicle idle system.
The principle of operation of the Solex carburetor is that gasoline is supplied through the inlet valve in the fitting. The fuel is directed directly into the float chamber. The fuel level in the cavity must always be at a certain level to avoid dips and jerks in engine operation. Level control is carried out through the movements of a needle valve mechanism.
After the chamber, gasoline is sent to emulsion wells, where it is supplied in strictly limited quantities through fuel nozzles. It is in the wells that air flows break up large drops of gasoline, forming a single air-fuel mixture with it.
The mixture is supplied to diffusers, and through them to the power unit device. Thus, the main task of the carburetor is to form the air-fuel mixture in the desired consistency and direct it to the engine.
The interaction of many elements ensures smooth operation of the motor
Classic tuning
VAZ 21093 carburetor tuning
To tune a Solex carburetor, you need to carry out the following operations:
- Remove the carburetor itself from the car;
- It is good to clean it from dirt;
- Remove the jets and throttle valves (this is done to bore the diffusers);
- Both chambers must be enlarged in size using a special machine;
- Grind the carburetor to reduce incoming air resistance;
- We select the ones needed for the now modernized carburetor.
Selection of jets
VAZ 21093 carburetor tuning
Selecting jets is the most difficult process. They must be selected taking into account not only coincidence, but also high accuracy. Thus, the VJ must be selected so as to allow a certain amount of air to pass through, which would be equal to the amount of fuel passed through the TJ. Otherwise, the fuel mixture will not be properly balanced, which will inevitably lead to poor acceleration and other problems. In addition, the jets must be properly balanced. This issue must be approached with all responsibility, understanding that instability of the fuel level will lead to a lean mixture.
Carburetor jets
Note. As you know, the ideal level is 1 mm. Other levels lead to malfunctions and loss of power.
In the process of tuning the carburetor, it is also recommended by experts to install a rubber shut-off needle, which ensures a more reliable level during heavy loads. In addition, such a needle is durable and can eliminate freezes when the accelerator pedal is pressed sharply.
Rubber locking needle
Removing and installing the carburetor
Installation and dismantling is carried out in case of repair of this unit, its complete replacement, as well as for thorough washing and cleaning. The AHU can become clogged if the car is driven on dusty roads, as well as as a result of untimely replacement of the air filter element.
Removing and installing a VAZ-2109 carburetor is very simple; even with the initial skills of a car mechanic, almost any driver (car owner) can do such work with his own hands. We perform the dismantling operation as follows:
- turn off the ignition, open the hood, remove the top cover, the filter element, then unscrew the four nuts securing the air filter housing (AFC);
- loosening the clamps, disconnect the fuel hoses, unscrew the two fastenings of the choke cable, move the cable to the side, disconnect the wire chips of the solenoid valve and the throttle valve closing sensor;
- We also disconnect the throttle cable, having previously removed the return spring, the ignition angle advance hose, and unscrew the nuts securing the carburetor itself (also 4 pieces);
- in order not to lose antifreeze and not to disconnect the coolant pipes, it is easier to unscrew the screw securing the heating unit, but it is located at the back of the housing, not in the most accessible place;
- in this case, lift up the unscrewed carburetor, move it forward, find a position in which it would be convenient to dismantle this fastener;
- Now nothing prevents you from removing the entire assembly.
If the KU is thoroughly stuck to the studs and does not pull off, you can gently tap it at the base with a small hammer and shake it with your hands from side to side. As a rule, after several attempts the device gives in; after removing it, you can begin further planned operations; installation of the unit is carried out in the reverse order.
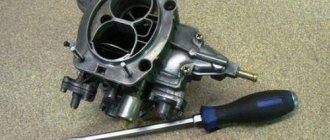
Dismantling, disassembling and cleaning the carburetor
In order to restore the functionality of the Solex carburetor, you must:
- remove the device from the engine;
- take it apart;
- clean and rinse;
- replace faulty elements;
- assemble and install on the engine;
- make adjustments.
We recommend: What to do if the instrument panel on a VAZ 2109 does not light up
Removing the Solex carburetor from the engine
Required tools:
- slotted and Phillips screwdrivers;
- keys for 7, 8 (2 pieces), 10, 13 (preferably a cap).
Execution order:
- Raise the hood.
- Using a 10mm wrench, unscrew the air filter cover fixing nut.
- We snap off the latches (4 pcs).
To remove the filter, you need to unscrew the nut and press the latches
- Remove the air filter from the “pan”.
- Using a size 8 wrench, unscrew the nuts securing the air filter housing.
- Using a 7 key, loosen the clamp screw on the gas exhaust hose. Let's remove this hose.
- Remove the filter housing.
To remove the filter housing you need to unscrew 4 nuts
- Disconnect the wires from the terminal of the EPHH valve and from the contact of the quantity adjustment bolt.
Disconnect the wire tips from the valve and from the quantity screw contact
- Disconnect the vacuum hose from the fitting.
Disconnect the vacuum hose from the fitting
- Using a 7 key, loosen the clamps on the fuel supply hose and on the return hose. Let's take them off.
Disconnect the fuel hoses
- Remove the crankcase ventilation hose.
Disconnect the crankcase ventilation hose
- Using two 8 keys, release the air damper rod screw. Disconnect the drive cable.
Remove the air damper drive rod
- Remove the spring from the damper drive.
Remove the spring
- In the damper drive sector, disengage the cable tip. Disconnect the cable.
Disconnect the throttle valve cable
- Using a 13mm wrench, unscrew the nuts securing the carburetor body (4 pcs).
- Using a screwdriver, unscrew the screw securing the heating module.
- We dismantle the carburetor. If it cannot be removed, pry out its body with a slotted screwdriver.
Remove the carburetor from the studs
There should be three gaskets under the carburetor: top (thickest), middle (heat insulating) and bottom (sealing).
Disassembling the Solex carburetor
Required tools:
- crosshead screwdriver;
- hammer;
- drill (knitting needle) with a diameter of 2.5 mm;
- keys for 11, 13, 14;
- tweezers;
- awl;
- toothpicks.
Execution order:
- Unscrew the five screws securing the cover with a Phillips screwdriver. Disconnect the cover.
Unscrew 5 screws
- Using a drill (knitting needle) and a hammer, remove the float axis. We dismantle the floats.
Disconnect the float axis
- Carefully remove the cardboard gasket from the sealing surface of the lid.
Carefully remove the cardboard spacer
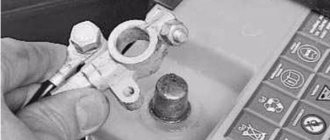
- Using a 11mm wrench, unscrew the needle valve. Let's take it off.
Unscrew the needle valve
- Using a 13mm wrench, unscrew the solenoid valve. We remove the seal, cup, and jet from it.
We unscrew the valve, remove the jet, seal, cup from it
- Use the same tool to unscrew the filter plug. Remove the filter.
Unscrew the plug and remove the filter
- Without changing the tool, unscrew the fuel fitting. We take it out together with the sealing ring.
- Using a 14mm wrench, unscrew the bolt securing the air damper lever. We remove it, trying not to lose the fixing ball and pressure spring located under it.
Remove the lever
- Using a Phillips screwdriver, unscrew the 4 screws on the starter cover. We remove it with the diaphragm and spring.
Removing and disassembling the starting device
- Using the same tool, unscrew the 2 screws securing the air damper. We remove its axis from the carburetor cover.
Removing the air damper
- Remove the rubber seal on the idle air passage tube.
Remove the seal on the fuel channel tube
- Using a slotted screwdriver, unscrew the choke rod holder screw. Let's take it off.
Removing the bracket
- We also unscrew and remove the air jets of the dosing systems.
Unscrew the air jets
- We remove the sprayer by prying it with a screwdriver at the top “spout”.
We remove the sprayer by prying it with a screwdriver
- Use a screwdriver to unscrew the fuel nozzles. If they do not shake out of the channels, we take them out with a toothpick.
We unscrew the fuel nozzles (if necessary or, for example, in order to reduce fuel consumption, they can be replaced later)
- Using pliers, carefully remove the diffusers from both chambers.
We remove the diffusers using pliers
- Using a Phillips screwdriver, unscrew the 4 screws securing the accelerator pump cover.
Disassembling the accelerator pump
- Remove the cover with the diaphragm and spring.
- Using a Phillips screwdriver, unscrew the 3 screws of the power mode economizer cover. We remove it with the diaphragm and spring.
We disassemble the economizer of power modes
- Using a slotted screwdriver, unscrew the economizer nozzle. Let's take it out.
- Disconnect the wire contact from the quantity adjustment screw.
- Using a slotted screwdriver, unscrew the screw of the wire holder. We remove the wire.
Disconnect the tip of the screw wire, then unscrew the screw itself
- Unscrew and remove the quantity screw.
- Using a Phillips screwdriver, unscrew the screw securing the throttle valve drive. Remove the mount.
Removing the throttle control sector
- Using a slotted screwdriver, unscrew the quality screw.
- We remove it using tweezers.
- If the screw comes out without a rubber seal, remove it using an awl.
- Using a size 11 wrench, unscrew the nut securing the accelerator pump drive cam. We remove the cam along with the washer that is located under it.
Remove the accelerator pump drive cam
- Using a Phillips screwdriver, unscrew the screws securing both dampers. We remove the flaps.
- Remove the spring and plastic sleeve from the damper axis of the first chamber.
- Remove the axis of the first camera.
- Using a slotted screwdriver, pry up and remove the lock washer of the shutter axis of the second chamber. Remove the axle.
We disconnect and remove the throttle valves - the carburetor is completely disassembled. Assembly is carried out in reverse order
Important: do not disconnect the dampers or remove their axles unless necessary! If installed incorrectly, they may become skewed, which will lead to incomplete opening or closing!
Cleaning and flushing the Solex carburetor
Required tools:
- a compressor or pump with a tapered fitting at the end of the hose;
- carburetor cleaning liquid in an aerosol can or acetone;
- toothbrush (preferably a children's one);
- thin wooden spatula;
- toothpicks;
- clean rag.
Before washing the carburetor, it is recommended to soak the disconnected elements in a special washing liquid for 8–10 hours. This does not apply to rubber and plastic products!
If you don't have that much time, spray the parts on the outside and inside with carburetor cleaner and wait 30 minutes.
Carburetor cleaning fluid
The most convenient way to remove external stains is with a toothbrush. Dirt deposits on the inner surface of the carburetor cover and body are removed using a thin wooden spatula wrapped in a clean rag.
After washing, parts with internal openings (nozzles, diffusers, tubes, and internal channels of the carburetor cover and body) must be blown with a stream of compressed air (preferably at least 6 atmospheres).
Replacement of faulty elements and assembly of the Solex carburetor
When completely disassembling the carburetor, it is recommended to replace all its elements that show signs of damage or deformation. The best solution when repairing a device yourself is to purchase a repair kit, which includes all the parts that may need to be replaced:
- jets;
- springs;
- seals;
- diaphragms;
- gaskets (carburetor covers and housings);
- needle valve;
- filter;
- screws (quality, quantity);
- repair studs, etc.
Assembly/cleaning or other actions with the carburetor are carried out using the Solex carburetor repair kit.
Having replaced the rejected elements, we proceed to assembling the carburetor. We produce it in the reverse order to that described above. We do not screw the carburetor cover to the body!
How to remove the carburetor assembly from a VAZ 2108/2109
Dismantling the carburetor is necessary in almost all cases of repair work. It is recommended to remove the device when the engine is cool, since all work is carried out in the immediate vicinity of the intake manifold and its pipes, on which you can easily get burned.
Video: DIY carburetor dismantling on a VAZ
To make work easier, it is best to immediately unscrew the screws securing the air filter box, as it will interfere with dismantling and prevent direct access:
- After this, you will need to disconnect two drives from the carburetor body (one goes to the air damper, the other goes to the throttle). In addition, it is immediately recommended to disconnect the return spring and its retainer from the drive.
- Next, the wire is disconnected from the forced idle economizer screw.
- After loosening the clamps, you will need to remove the fuel supply pipe and the hose that works “for return”.
- The screw securing the heating block is unscrewed and the block is removed.
- The ventilation hose and vacuum hose are disconnected from the fitting at the top of the carburetor.
- After disconnecting all lines, it is possible to dismantle the carburetor assembly itself. To do this, you will need to unscrew the four nuts that secure the carburetor with studs to the intake manifold. The device is pulled out along with the gasket.
It is recommended to close the resulting hole with a plug or a clean cloth while working to prevent dirt and dust from getting inside the motor.
Carburetor 2109. Air leak from the fuel pump side
Carburetor 2109. Air leak from the fuel pump side
Andrey21 » December 14, 2015, 20:31
Re: Carburetor 2109. Air leak from the fuel pump side
Artisan » December 14, 2015, 10:23 pm
Re: Carburetor 2109. Air leak from the fuel pump side
TRV » Dec 15, 2015, 01:02
Re: Carburetor 2109. Air leak from the fuel pump side
Andrey21 » Dec 15, 2015, 03:07
And so it was. But this leakage is too obvious. Smoke was coming from the bottom of the fuel pump where the pump lever was. I don’t know how this affects mid-speed and higher speeds, but it affected the idle speed; extraneous air flowed through the closed dampers. He just stopped by in the evening, he said the XX became smooth and the tachometer needle stopped twitching. Let him take the rest to a good carburetor specialist.
On occasion I will smoke a similar machine. I think that there will be some smoke passing through, but not to the same extent.
Re: Carburetor 2109. Air leak from the fuel pump side
Deniska » Dec 15, 2015, 05:29
Re: Carburetor 2109. Air leak from the fuel pump side
Andrey21 » December 16, 2015, 00:32
I apologize in advance that the photos are not mine. But I tried to explain everything on my fingers with pictures from the Internet))
At that moment, when I was looking for why my swallow was sneezing, as I wrote earlier, I got into the carburetor... But the way I got into it, after watching enough videos on YouTube about carburetor settings, I decided to see the whole thing through to the end.
As for the tools, I bought a very short (-) screwdriver to get to the idle heater. -A very thin (-) and long screwdriver to get to the lower (fuel) jets.
I had already purchased the repair kit, I had already changed the sprayers (aka elephants/proboscis) 2 to 2. And I decided to set them up too...
- Unscrew and remove the lid of the pan - Using a size 8 wrench, unscrew the 4 nuts on the studs, at the bottom of the pan, above the head, there is a breathing pipe (ventilation) of crankcase gases from the head, unscrew the clamp - remove the pan.
(The screws and nuts can be put in a pan so they don’t get lost.) — We remove all the contacts from the idle speed magnetic valve and the gas contact at the back. — Pump up the fuel with a hand pump, unscrew the 2 clamps and remove the fuel supply and return hoses. — at the back right of the carburetor, unscrew the carburetor ventilation clamp and pull out the vacuum tube from the back that goes to the distributor. — We unscrew the choke (the key is on and loosen the screw securing the cable with a flat screwdriver. — The throttle cable can be removed by pulling it towards you and holding the “shell” to release the cable. There is no need to unscrew the cable jacket from the bracket.
— At the back of the carburetor, use a very short screwdriver to unscrew the fuel heating hose...
___________________In front of us is a bare carburetor__________________ - Using a figured (+) screwdriver, we unscrew 5 bolts, removing the carburetor cover, because it is very difficult to get to the nuts that hold the carburetor to the intake manifold. If you have a good set of tools, then this action is not necessary. But you still have to take it apart. You can also immediately check the float chamber and possible valve incontinence and overflow...
You can easily check the valve. 1) Or try to inflate with your mouth 2) Having screwed on the fuel supply, without the carburetor (when removing), pump the pump, holding the carburetor cover in your hands, so that the floats hang down under their weight. If fuel does not flow, it is better not to touch this valve! (I remember from motorcycles that it’s not easy to display them.)
The hardest part was removing the carburetor. That is, it didn’t stick to the gasket, but it sat very tightly on the bolts. That I had to resort to using a pry bar. Just be careful if you don’t have a gasket for the manifold)) Or run to the store)) Of course, if you are not outside in the rain or snow, then there is no need to remove the carburetor. Everything can be done while standing over the engine)) BUT it’s more comfortable for me to smell like gasoline at home in the kitchen))
Having removed the carburetor, and before bringing it home, I tried to “squeeze full throttle” on the carburetor (for this I pumped up gasoline so that it was in the float chamber) by turning the throttle to see where the nozzles were pointing. They hit the walls clearly, and this is not correct. They must be directed towards the opening damper . That is, the jet must hit the slightly open dampers! But not on the walls!
How to flush a carburetor assembly without disassembling it
Flushing the Solex carburetor is recommended by the manufacturer in cases where there are clearly any problems with its operation: increased gasoline consumption, jerks and jolts when driving, unstable idle speed, problems with starting.
The traditional method of washing carburetors is to completely disassemble them into individual components, which is not always possible for an inexperienced VAZ owner to do. To simplify the procedure, a technique was created for washing and cleaning the carburetor without disassembling it into components. This technique is based on the use of special aerosols in cans. The most affordable carburetor cleaners are considered to be aerosols produced by ABRO and Mannol - they can be bought at any auto store for 100–150 rubles.
These cleaners do an excellent job of cleaning carburetor mechanisms, and they are also very easy to use. To flush the Solex carburetor, it is recommended to turn off the engine, let it cool and begin the procedure:
- Remove the air filter box from the car and place it to the side.
- Unscrew the solenoid valve from the carburetor body.
- Place a special narrow nozzle on the aerosol can and spray the liquid on the nozzle channels, the first and second chambers, dampers and all visible elements of the carburetor.
- After this, spray the aerosol on the external parts of the mechanism.
- Wait 5–8 minutes (depending on the aerosol manufacturer’s recommendations). During this time, the liquid will be able to corrode accumulations of soot and dirt.
- Next, you can start the engine so that it removes all remaining dirt.
- If during one procedure the carburetor did not have time to be properly cleaned, then you can treat it again with the same aerosol.
After such cleaning, the VAZ 2108/2109 will significantly increase its dynamic characteristics, since the accumulation of dirt will not interfere with the normal operation of all parts of the carburetor.
Video: how to clean the carburetor on a VAZ with your own hands and without removing it from the car
How to replace carburetor parts
Replacing the float, accelerator pump diaphragm, and seals is not particularly difficult. Most often, during repairs, repair kits selected for the type of carburetor are used, which include everything necessary to replace the elements.
The replacement procedure is not regulated in any way: it is enough to remove the damaged part and install a new one in its place. The main criterion: the identity of the elements when replaced.
This is interesting: Repairing motorcycle shock absorbers - when you get tired of every bump!
Replacing the thermostat on VAZ 2108, VAZ 2109, VAZ 21099
Welcome! Today you will learn from this article how to correctly replace the air filter housing thermostat on cars of the Samara family.
Operating principle of a car thermostat: • It is designed to regulate the air supplied to the car engine. Due to this thing, your car will heat up faster in summer evening conditions, that is, at a temperature just below “+25°C”, the thermostat closes the cold air supply pipe with a damper located in it and therefore the car warms up faster.
• And at an ambient temperature slightly above “+35°C”, the same damper that is located in the thermostat closes the warm air supply pipe and, therefore, exclusively cold air begins to flow into the engine.
Where is the thermostat located? The location of the thermostat is very simple, but why? Yes, because it is located at the very tip of the air intake, and the tip of the air intake is the main part of the air filter housing. Below is a photo indicating the location of the thermostat:
When should you change the thermostat? It must be replaced when:
- His deformations.
- And also if the damper, which is located in the inside of the thermostat, is not working properly. (You will find information about how to check the damper for functionality just below in the same article under the heading: “Checking the thermostat for functionality”)
- Even if the thermostat is faulty, the car’s engine can begin to heat up very quickly to high temperatures.
- And also the engine may practically stop heating altogether, that is, it will still heat up, but it will do so very slowly.
How to adjust Solex DAAZ 2108–1107–10
It is advisable to start the process of setting up and adjusting the performance of the carburetor mechanism from the float compartment. This is due to the fact that there is fuel here, the level of which must be strictly fixed. If the gasoline level is below or above normal, then adjusting other components becomes pointless.
Float adjustment
The adjustment procedure includes several steps:
- First start the engine and let it run for 3 minutes, then turn it off.
- Remove the air filter box and put it aside, as it prevents free access to the carburetor.
- The first step is to disconnect the pipe through which gasoline is supplied from the Solex body.
- Use a flathead screwdriver to unscrew the five screws on the cover to remove it.
- Measure the distance from the edge of the float chamber to the fuel level. It should be equal to 25.5 mm. If there are differences, you will need to set the desired parameter by bending the float bracket.
- You will also need to set the axis of the float so that it can move freely.
- The adjustment of the float chamber and float is now considered complete.
Adjusting the starter
You can adjust the carburetor on the VAZ 2108 and 2109, as well as repair it yourself. This work should be performed on the carburetor, which has been removed from the engine and installed on a flat surface. If the trigger diaphragm was damaged, then it is necessary to initially replace it and only then begin adjustment work:
- Turn the air damper adjustment lever and close it completely.
- Lower the trigger rod with the blade of a screwdriver and hold it in this position.
- Measure the width of the gap between the damper and the chamber wall. The existing indicator should be 1 mm. If this is not the case, then adjustments will be required.
- You will need to loosen the lock nut, which is located on the surface of the accelerator pump, and at the same time turn the quality screw with a screwdriver. If you turn the screw in one direction, the gap will increase, and if you turn it in the other direction, it will decrease.
- Measure the gap thickness again.
- The air damper on the second chamber is adjusted using the same principle.
You can measure the gap width using a drill with a diameter of 1 mm
How to adjust idle speed
This procedure can only be carried out on a carburetor installed in the car, after the engine has warmed up well. In this case, the air filter will no longer impede access, so it remains in its place under the hood:
- Turn off the engine.
- Tighten the air-fuel mixture quality screw all the way, and then unscrew it no more than four turns.
- Start the engine again, simultaneously turn on all the lighting, acoustics and heater to increase energy consumption.
- Working with the quantity screw, you need to set the number of revolutions of the running motor to 750–800 per minute.
- The quality screw sets the maximum idle speed - 900 rpm (in winter, this parameter can be increased to 1000 rpm).
- After this, you will need to tighten the quality screw back until interruptions in engine operation are felt. At this moment you will need to stop and make one revolution back.
Adjusting the idle speed on the VAZ 2108/2109 is necessary to ensure that the car exhibits stable operation in the set mode without high consumption of the air-fuel mixture.
Setting up the carburetor VAZ 2109.
Tuning the carburetor usually begins with adjusting the position of the float.
Procedure:
- Start the engine and let it idle for about 3 minutes.
- Open the hood and remove the air purification filter
- Disconnect the hose that supplies fuel to the carburetor.
- Unscrew all the bolts that secure the top of the carburetor and carefully remove it.
- Now take a caliper and measure the height of the fuel level in the float chamber. It should be approximately 25.5 mm. If the level is not at the normal level, then you need to adjust the metal float by applying pressure to the tongue of a special bracket.
- Reassemble all components in the reverse order and repeat the process until the level returns to normal.
The launcher is now configured All actions are performed with the carburetor removed.
Procedure:
- Close the air supply damper by turning the special lever
- Using a screwdriver, you need to recess the trigger rod
- Now measure the gap that appears between the chamber wall and the opened damper, compare it with the tabular data for your carburetor model and, if necessary, adjust it. To do this, loosen the special nut located on the accelerator pump and use a screwdriver to unscrew or tighten the adjusting screw. When unscrewing it, the gap increases, and when tightening it, it should decrease.
- Now measure the gap formed by the damper of the first chamber (necessarily with the air chamber closed). The measurements must correspond to the tabulated data. If the measurement results do not correspond to the standards, then adjustment is made by rotating the throttle position adjustment screw.
Lastly, the idle speed is adjusted. When setting up, you will need a tachometer.
Procedure:
- It is necessary to tighten the screw responsible for the quality of the mixture until it fully stops. Then unscrew it 3.5 turns, start the engine and turn on the fan and high beams. Attention! The choke must be removed and the engine warmed up to nominal values!
- Using the screw, which is designed to adjust the amount of mixture, set the speed to 750-800 rpm.
- Using the mixture quality adjustment screw, set the maximum possible speed.
- Now you need to use the quantity screw to create 900 rpm.
- At the same time, tighten the quality screw until the speed drops to 800 rpm. Then tighten until the motor shows signs of unstable operation, and unscrew the screw half a turn.
- Then set the number of revolutions with the screw:
- In summer, the speed should always be maintained in the range of 800-900
- In winter, the speed should be 900-1000
This completes the carburetor adjustment. A properly configured carburetor should achieve the most stable engine operation with the lowest fuel consumption.
Reassembling the Solex in reverse order
Installation of the carburetor mechanism on the intake manifold is possible after washing and repair, as well as some adjustment steps. It is important to connect all fuel and other hoses correctly so that there are no problems with engine operation. The DAAZ 2108–1107–10 carburetor is assembled in the following order:
- A gasket is applied to the installation site. It serves to reliably connect two units - the carburetor and the intake manifold.
- After this, the carburetor itself is threaded onto the studs and secured with four nuts.
- After the assembly has been carefully attached, hoses can be connected. The first step is to connect the vacuum and ventilation hoses.
- Next, the heating block is screwed to the carburetor.
- On one side, the fuel supply pipe is connected, on the other, the return hose for supplying excess fuel.
- The EPHH drive wire is connected to the corresponding screw.
- To complete the work, you can screw two wires (air and throttle valves) to the screws.
The strict connection sequence is due to the design features of the carburetor
After installing the carburetor, it is recommended to turn on the ignition and check the performance of the engine unit. If oil or fuel leaks occur at the hose connections, turn off the ignition and carefully check all connections.
All work that a car owner performs to maintain his car must be conscious. There is no need to disassemble the carburetor and replace its parts unless there are obvious signs of malfunction. In addition, when self-adjusting, it is necessary to adhere to clear rules of action. Both poor-quality repairs and incorrect adjustments can seriously affect the performance of the carburetor.
Air leak in the intake manifold
If air enters the engine, which is not “seen” by the air mass meter or absolute pressure sensor, a too lean mixture of fuel and air will be formed. This problem is caused by air leaks in the intake tract.
- overheating of the motor (affects the condition of the gaskets);
- external intervention;
- Damage to gaskets as a result of improper use of carb cleaner.
Very often, difficulties can arise if the seal between the intake manifold and the cylinder head is damaged, since such a leak is not easy to detect visually.
Search for suction in the manifold
On gasoline engines, excess air may end up in the manifold due to depressurization of the air ducts, wear of the rubber seals of the fuel injectors, or damage to the hoses leading to the vacuum brake booster.
In order to find air leaks, different methods are used:
- Shutting off the air supply. It is necessary to disconnect the pipe from the filter housing and start the engine. After this, cover the pipe with your hand - if there is no suction, the engine will stall. If the engine continues to run and you hear a hissing sound, there is definitely a leak.
- Clamping of hoses. You need to start the engine and after a certain time try to hear a hissing sound. If it was not possible to detect the location of the damage to the seal, you need to pinch the hoses connected to the receiver one by one. If you have pinched and released a hose and this has affected the operation of the power unit, look for a problem in this area.
- Compressed air. The intake system of an idle engine must be treated with a soap solution, then shut off the air supply from the filter and pump air through one of the tubes.
- Spraying with a flammable mixture. To find where air is leaking into the engine, use products such as gasoline, WD-40, or carburetor cleaner. Using the selected product, it is necessary to spray all joints. When the fluid appears at the leak point, you will notice changes in engine operation (the speed should rise or fall). It is better to use a medical syringe for spraying.
Using this method, check the following places: the pipe between the valve cover and the idle air control, the pipe between the mass air flow sensor and the IAC, the connection between the intake manifold and the throttle valve, the connection between the manifold and the cylinder head, the injector seals, all hoses in the areas where the clamps are attached.
- Smoke generator. Not all motorists have such a device, which is why it is usually used in auto repair shops. You can buy a ready-made solution or make it yourself (there are plenty of instructions and videos on the Internet). The bottom line is that it is necessary to ensure that smoke is supplied through any hose into the intake manifold. Smoke will seep out in problem areas.
Unit setup and repair
The carburetor on the VAZ 2109 Solex is quite easy to repair due to the fact that the manufacturer has released ready-made repair kits for replacing parts of the unit. In the kit you will find fuel and air jets for both chambers. There are also kits with diffusers. You will have to buy other parts separately, for example, if you need to replace the VAZ choke cable.
Solex has several adjustment modes that allow you to adjust the fuel level in the chamber, the minimum idle speed, and the composition of the air-fuel mixture. The adjustment is carried out as follows:
- To set the fuel level in the carburetor, you will need to remove the top cover by unscrewing several screws.
- Next, remove the air filter, disconnect the wiring of the solenoid valves and the cable of the air intake system.
- Remove the clamps and pull the pipes off the carburetor cover.
- After removing the cover, turn it over, place it horizontally in front of you and inspect it.
- There should be a small gap between the floats and the surface of the cover - no more than 1.5 mm. This gap can be adjusted by bending the plate that holds the floats.
- Remember to align the floats after completing the adjustment.
By the way, as the work progresses, inspect the suction cable. The choke cable on a VAZ 2109 is replaced if the engine does not start the first time without warming up. Motorists often make a mistake when securing this small part. The air damper should be closed using a cable. If this does not happen when the choke is turned on, it is worth securing the cable in a different position. Change the position of the cable until the damper closes normally at the right time.
Return to contents
Do-it-yourself installation algorithm
VAZ 21093 carburetor tuning
Here's what to do:
- Take two Solex carburetors;
- Bring them into proper condition and equip them with a repair kit;
- Purchase two manifolds from the Oka car, which will serve as the basis for the intake tract (you also need to make an adapter manifold yourself).
Note. You can install two carburetors on the “nine” without installing an adapter, but then you will have to cut a lot, connect, etc.
- Next, you need to synchronize the operation of the carburetors by opening the dampers on both of them.
Advice. It is advisable to use rods from Ozone as a drive for the dampers, but not cables from Tavria, which stretch.
- After installing the carburetors, we connect the fuel hoses and two return lines through tees;
- Be sure to plug the fitting on one of the collectors;
- We start the car (half a turn) and check everything.
The best tuning of the Solex carburetor for VAZ 21093
Pros and cons of a double carburetor on the “nine”
| Instant effect | High price for both carburetors and associated components |
| Increased acceleration from standstill to 100 km/h | Risk of engine damage (applies mainly to older VAZ 2109 models) |
| Stable operation at high and low speeds | |
| Increasing the maximum speed to 160 km/h (read more about increasing the maximum speed in the article on our website) |
Tuning carburetors on a VAZ 2109 is a responsible but entertaining process. Before carrying out it, it is recommended to study useful photos - materials, diagrams and drawings, watch a video review, and leaf through the instructions. As a result, we carry out modernization with our own hands, which will definitely come in handy.
Basic faults
Any malfunctions of the 2109 carburetor affect the performance of the engine: the engine may stall when the speed is reduced, run intermittently, not develop power, and consume gasoline beyond the norm. There are many reasons for problems with this unit, but the most typical of them are:
- clogging of the HDS and idle jets, both air and fuel, and in the solenoid valve (EMV);
- rupture (defect) of the accelerator pump diaphragm;
- failure of the EMG itself;
- loose fit of the locking mechanism needle to the seat;
- air leakage through the junction of the body and the cover;
- leakage of the float in the float chamber;
- clogging of the accelerator pump nozzle with dirt;
- misadjustment of screws XX.
Of course, various types of malfunctions can occur not only due to the carburetor, the engine itself is often faulty, and the ignition may also be set incorrectly, especially if the installation was carried out by an inexperienced technician without a strobe light. Problems with idle speed can occur due to a lack of power to the solenoid valve, so before disassembling the HRV, you should first check for voltage on this wiring.
Adjusting the ignition angle
Sluggish acceleration of the car and instability of the idle speed are also often associated with incorrectly set ignition; this procedure is mainly carried out in car repair shops using special equipment. But if you wish, it’s easy to make the adjustment yourself, and without a strobe, and quite accurately:
- with the engine stopped, loosen the three nuts securing the distributor (the third fastening is located at the bottom, it is not visible from above);
- we start the car, turn the distributor-distributor clockwise (to “+”), and if the ignition was late, the idle speed will increase noticeably;
- we select the optimal position of the distributor (the operation of the internal combustion engine should be smooth, without failures), reduce the speed using the quantity screw, turn off the engine, fix the distributor-distributor with one nut for now, and check the results of the ignition adjustment on the fly.
We recommend: Advantages and disadvantages of all-season tires
If, under heavy load and sharp acceleration, your fingers begin to noticeably “knock” (engine detonation appears), you should move the distributor a little to “minus”, then check the car again while driving. This way you can set the ignition quite accurately, and sometimes even better than with a strobe light.
Adjusting the fuel level in the float chamber
Maintaining a normal level of gasoline in the float chamber is an important condition; if it is not met, malfunctions in the operation of the car occur:
- if the level is below normal, the engine does not have enough speed, power decreases, and gasoline consumption increases;
- if it is higher than required, fuel consumption also increases, and even more.
Setting the fuel level for the VAZ-2108-09-099 is quite simple, and in this case it is not at all necessary to remove the carburetor. The procedure for adjusting the position of the floats is as follows:
- remove the KVF assembly with the filter element;
- disconnect the choke cable, fuel hoses, EMG power cable;
- unscrew the five screws securing the carburetor cover;
- turn the lid over, take a drill with a thickness of 1 to 2 mm and take a measurement between the gasket and the lower surface of the floats - this distance should be exactly within these limits, and the same.
You can also measure the fuel level, but before carrying out such a procedure, it is necessary for the engine to idle for several minutes. The distance from the upper edge of the housing to the surface of the gasoline is measured; according to factory conditions, it should be 25-26 mm. Another way is to measure the distance from the gasket to the top edge of the floats with a caliper; it is 34 mm (with the cover upside down).
Another measurement method is using a specially made template.
Important conditions when setting the level:
If the floats inside the chamber are installed skewed or not strictly vertical, they may rub against the walls of the housing, causing gasoline to overflow as a result of sticking.
Two carburetors instead of one
This approach is also considered as effective tuning. This idea has quite sound grounds. It would seem why the engineers themselves didn’t think of this at the design stage of the VAZ 2109, but that’s another conversation.
Note. One of the main reasons for installing two carburetors instead of one, experts and tuners see, is that due to design oddities on the Nine’s power unit, the manifold pipes have different lengths. Because of this not entirely clear situation, more fuel gets into the chambers of the 1st and 4th cylinders of the engine, and less into the others.
This error can, of course, be corrected by polishing the collectors and both chambers from the inside. This procedure will allow more mixture to enter the chambers, as a result of which the flow resistance will drop, the quality will improve and everything will become much more efficient. But, still, this is not an ideal option - installing two carburetors instead of one looks much more attractive.
Important points
Here are the important points to consider during installation:
- Both carburetors must be the same model (in this case Solex);
- You also need to install two filters and prepare the appropriate number of fasteners, tees, hoses, and so on;
- After installation, which in itself is not so complicated, you need to start tuning both carburetors, which is considered a more difficult operation.
Note. Carburetor adjustment can be carried out using a vacuum gauge bar or an IKS-1 mixture quality sensor, screwed into place of the spark plug. So, for the adjustment to be correct, you need to observe the color of the mixture at idle and ensure that it turns light blue.
Idle speed adjustment
The most common problem with a Solex carburetor is the disappearance of normal idle speed; the engine begins to operate intermittently at low speeds. Very often, the cause of such a malfunction is either a clogged EMG jet or the solenoid valve itself. It is very easy to check this - while the engine is running at idle, we disconnect the wiring from the EMG; if the nature of the internal combustion engine does not change at all, and when the valve is unscrewed, the speed increases noticeably, then the defect is present.
You can try to restore normal operation of the XX without removing the entire assembly, and this procedure is quite simple:
- With the engine off, remove the air filter with housing:
- disconnect the EMG wire, unscrew the valve itself;
- we start the engine, plugging the “idle” channel with a finger, “accelerate” several times;
- we stop the engine, do not forget to blow out the EMG and its nozzle using a compressor or hand pump, separating these parts from each other;
- we put the parts in place, do a test start of the internal combustion engine: if the idle speed has stabilized, and when the wiring was removed, the speed changed, it means that the reason was precisely the blockage, and now the idle speed has “returned to normal.”
But it is not always possible to clean the channel in this way; specks may get stuck in the area of the quality screw. Here you already need to remove and disassemble the carburetor, dismantle the screw, which in general is not very difficult, since it is located deep in the channel and is held there by a rubber sealing ring.
What to do if the spark is lost?
The peculiarities of our climate and roads provoke a situation where the spark is lost and the engine does not start.
The reasons why the spark is lost are usually the following:
- The switch is not working properly;
- The Hall sensor is not functioning correctly;
- The ignition coil has failed;
- Contacts are oxidized or dirty;
- There was a breakdown of the high-voltage wire;
- The ignition switch is not working properly and needs repair.
There is another reason, the consequence of which is that the spark has disappeared - the spark plugs, or rather the contacts, have become black from soot. The spark may be lost if the ignition timing of the carburetor is set incorrectly. There may be more reasons why the spark disappears and the engine does not start; you need to check the carburetor for malfunctions and, if necessary, carry out repairs.
Why are the candles flooded?
This is the next common question that car enthusiasts face. Fills spark plugs on both carburetor and injection cars. Most often, candles are filled in during the winter. Causes of the malfunction:
- In order to mix the working mixture in winter, more effort is required, however, in new cars, spark plugs are usually not filled. A fully charged battery of appropriate power, a working starter, and high-quality oil will help reduce the likelihood that the spark plugs will be flooded;
- Engine wear;
- The spark plugs themselves with spark plug wires must be of high quality.
Spark plugs for VAZ 2109
Why do the revs fluctuate?
This is also a common problem that begins to appear in a car after a significant mileage. To check, turn on the idle speed of the car, and then turn on the various mechanisms in turn. If you see that the speed is floating, it means that the problem needs to be solved. One of the causes of the malfunction may be a short circuit.
Another problem is that the idle speed has disappeared. As a rule, there are three reasons for this - clogged nozzle, burnt out or lack of power to the solenoid valve. If the idle speed disappears, check this first.
Setting up and adjusting the VAZ 2109 carburetor is quite easy and solves many of the above problems, including reducing fuel consumption, but if you go to a car repair shop it will cost a significant amount of money. It is more convenient to carry out the work with an assistant, this will reduce the time spent. No special tools or equipment are required. If repairs are required, it is better not to do them yourself, but to contact specialists.
In order for carburetor repairs to be required as rarely as possible, you need to use high-quality fuel for the car.
Regularly lubricate quality screws and choke cables. The cables still need regular replacement.
Features and malfunctions of the starting device
With the onset of frost, many owners of “nines” are faced with the problem of poor cold starting of the engine, and the cause of the malfunction is often the starting device (PU), which is designed to enrich the fuel mixture in a certain proportion. When the choke cable is pulled, the air damper closes, but under the influence of vacuum it changes its position, opening slightly and to some extent allowing air to pass into the carburetor. The position of the air intake is also adjusted using a diaphragm device, which is mechanically connected to the damper by a system of rods.
Of course, a cold engine may not start in cold weather due to a weak battery, a bad starter, or because of the engine itself, if it is already worn out, but the carburetor unit is also often the culprit of the problem. The causes of the malfunction in this case:
- the air damper opening screw on the diaphragm device is incorrectly adjusted;
- the diaphragm itself is torn or has lost elasticity (there may also be an air leak);
- the choke cable is poorly secured or incorrectly installed;
- the return spring is missing or stretched;
- another spring, which is located inside the diaphragm mechanism, is incorrectly selected.
In order for the engine to start smoothly at low temperatures, it is important to adjust the starting gap (the angle of the air intake during startup). We perform the adjustment as follows:
- fully extend the choke cable;
- using a screwdriver, pressing the rod, forcefully open the air intake;
- loosen the lock nut on the diaphragm mechanism, use the adjusting screw to adjust the damper so that it is installed in the position with the specified starting gap (2.5-3 mm depending on the modification of the KU);
- tighten the locknut, use the throttle valve opening screw to increase the number of revolutions;
- pumping the gas pedal twice so that gasoline enters the carburetor, we try to start the engine;
- after starting, use the opening screw to reduce the speed, bringing it to the desired level (for the winter period - approximately 2700-3000 rpm);
- If the air damper is closed too tightly, and the engine twitches, by adjusting the engine while the engine is running, we again adjust the thermal gap.
Having achieved the desired result, tighten the locknut, do a second cold start, this time the car should start almost immediately.
Nuances to consider during setup
Before starting work directly, you need to clean the VAZ 2109 carburetor.
To do this, use compressed air, gasoline, and special cleaning products. Preliminary ignition adjustment is required. If early or late ignition is installed, there is no point in adjusting the carburetor.
All work must be carried out only when the engine has reached operating temperature; to do this, it starts and idles for some time. Remove the link from the gas pedal from the throttle valve. Disconnect the crankcase ventilation. Check that there is no vacuum in the timing adjuster tube. The presence of a vacuum is a sign that something was done incorrectly. Adjust the quality screws.
Which thermostat to install for the winter on a VAZ 2109
If the thermostat fails, the engine will take a very long time to heat up to the required operating temperature, and while driving, the engine temperature will drop sharply. This is especially felt in winter due to a poorly heating stove.
To quickly check the condition of the thermostat, it is not necessary to remove it. To do this, start the cold engine and touch the lower radiator hose. In the normal state of the element, it will first be cold for a short time, but then quickly begin to heat up. This indicates that the coolant is moving along a large contour.
Appearance of the device