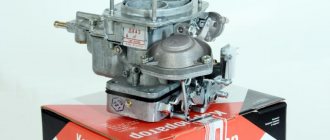
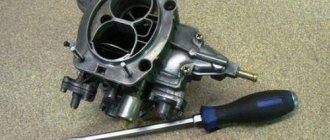
Carburetor and its components
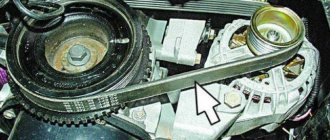
Experienced auto mechanics know how to adjust the carburetor on a VAZ. When turning the damper lever counterclockwise, the last element closes. If this does not happen, it is necessary to find out and eliminate the cause of the spring sticking.
To do this, you will need to press the VAZ 2105 carburetor rod all the way. The damper will open 3 mm. The gap is adjusted using a screw. If the damper is open, then a similar throttle element of the 1st chamber should be slightly open by 1.1 mm.
The idle speed of the VAZ 21053 carburetor is adjusted using screws. The first is related to the amount of the mixture, the second - to its composition. The last element is closed with a plug. The VAZ 2105 1107010 20 carburetor can be adjusted on an engine heated to a temperature of 90-95°C. Also checked:
- correct adjustment of the gas distribution unit,
- degree of opening of the air damper,
- ignition system advance angle.
You need to start adjusting the VAZ 21053 carburetor by setting the engine crankshaft speed, taking into account the tachometer readings at 750-800 rpm. Using the second screw, which is responsible for the composition of the mixture, you need to obtain an appropriate concentration of carbon monoxide in the exhaust gases, equal to 0.05.Jan.2%.
Basic mechanisms and systems
To perform its functions, the carburetor has the following systems and mechanisms:
- System for maintaining the required fuel level;
- System for starting and warming up a cold engine;
- Idle system;
- Main dosing system;
- Acceleration pump;
- Econostat system.
Good old VAZ: love for life The three systems listed first in the list are subject to configuration. The VAZ 2105 carburetor in question can be adjusted without removing it from the car. Since the units of cars of models 2105 and 2107 are identical in structure and differ only in the diameters of the holes of the fuel and air nozzles, in the same way it will not be difficult to make a similar adjustment for the VAZ 2107.
VAZ 2105 | No idle speed
Cars of the VAZ-2109 family use Solex-type carburetors from the Dimitrovgrad Automotive Unit Plant.
| Automobile model | Engine displacement, cm3 | Carburetor model |
| 2109 | 1295 | DAAZ–2108 |
| 21091 | 1100 | DAAZ–21081 |
| 21093 | 1499 | DAAZ–21083 |
There are three most common causes of idle speed disappearance:
— clogging of the EMC idle jet; — EMC burnout; — lack of power supply to the EMC.
For work you need: wrenches “8”, “10”, “12”, “13”, “14”, a 12 V probe or test lamp with wires, a piece of wire with stripped ends, a compressor or air pump.
| All of the listed carburetors have an electromagnetic valve (EMV) with an idle jet in the idle system. The valve is controlled by the electronic forced idle unit. |
| EXECUTION ORDER automn.ru |
How to adjust carburetor idle speed?
Idle speed is adjusted on a warm engine according to the following scheme:
- bring the internal combustion engine to 850 rpm using the quantity screw;
- then set the speed to maximum using the quality screw;
- reduce the speed to the previous level (up to 850) and raise it again to the maximum;
- turn the quality regulator at 850 rpm to the “motor shaking” position.
After all these operations, the quality screw is slowly unscrewed until the internal combustion engine operates stable.
If all the settings are made correctly, the “five” will not “eat” more than 9 liters of fuel when driving around the city, and on country highways the fuel consumption will be about 7.5 liters.
VAZ 2105 | No idle speed
5.1.3. No idle speed
| GENERAL INFORMATION |
Cars of the VAZ-2108 family use Solex-type carburetors from the Dimitrovgrad Automotive Unit Plant.
| Automobile model | Engine displacement, cm3 | Carburetor model |
| 2108 | 1295 | DAAZ–2108 |
| 21081 | 1100 | DAAZ–21081 |
| 21083 | 1499 | DAAZ–21083 |
There are three most common causes of idle speed disappearance:
— clogging of the EMC idle jet; — EMC burnout; — lack of power supply to the EMC.
For work you need: wrenches “8”, “10”, “12”, “13”, “14”, a 12 V probe or test lamp with wires, a piece of wire with stripped ends, a compressor or air pump.
| All of the listed carburetors have an electromagnetic valve (EMV) with an idle jet in the idle system. The valve is controlled by the electronic forced idle unit. |
| EXECUTION ORDER automn.ru |
Do-it-yourself idle speed adjustment on a VAZ
The main task is to tune the engine for minimal gasoline consumption and CO2 emissions, while maintaining its stable operation.
We heat the engine to operating temperature , set the lowest value for idle speed - 900 minutes. -1 (quality screw), listening carefully to how the car behaves.
After this, adjusting the quantity screw, add idle about 100-150 rpm. in a minute. Again, turning the quality screw, we reduce them by the same amount, determining what number of revolutions is optimal for it and deciding that everything is enough, we finish the operation of adjusting the idle speed.
There can be many models of carburetors on a VAZ and they can be in different conditions , but when tuning, the most important thing is to listen to the car. How smoothly the engine runs is a much more significant indicator than strictly following the instructions when adjusting.
Author: Denis Kirsanov - Auto Redemption Specialist with 10 years of experience!
Content
Hide
Because of this, engine speed can spontaneously change (or float). The operation of the IAC idle speed controller is disrupted.
Problems with the mass air flow sensor (mass air flow sensor)
Air leaks through cracks in hoses and seals
Other reasons
What is an idle air control valve? Which one should I buy as a replacement?
Regulator replacement procedure
Post-installation setup
Because of what the engine speed can spontaneously change (or float)
There may be several reasons for this unpleasant problem:
The IAC idle speed controller is malfunctioning
The idle speed of the engine changes by itself and it may even stop; often the engine does not want to start without pressing the gas pedal. And the “Check Engine” lamp may not light up. At medium and high speeds, the engine keeps its speed evenly, and no loss of power is noticeable.
Problems with the mass air flow sensor (mass air flow sensor)
If the mass air flow sensor is faulty, the speed may change not only at idle speed, but also at any other throttle opening, even when driving under load. A car can put its owner in a very dangerous situation by suddenly losing traction while overtaking. The check engine light is usually on. If you notice these signs, you will need to replace the faulty sensor. Read how to do this here
Air leaks through cracks in hoses and seals
Excess air that enters the engine intake tract bypassing the mass air flow sensor depletes the combustible mixture. The speed and power of the motor changes, the controller tries to correct this. As a result, the speed and “traction” change. But unlike the case with a faulty mass air flow sensor, this does not happen so abruptly. The Check Engine light does not come on.
Carefully inspect all tubes and hoses that extend from the throttle body, gaskets, the throttle body itself, and the intake manifold for cracks. Pay special attention to the hose going to the vacuum brake booster, as it often cracks. It also happens that the vacuum booster itself begins to “poison” the air and then when you press the brake pedal, the engine speed will change. Eliminate all these faults and the engine will start running smoothly again.
Other reasons
A car is a very complex system and it is simply impossible to describe the incredible variety of possible combinations of breakdowns. The engine may “jerk” when driving and change speed due to a malfunction of the ignition system, injectors, bad gasoline, water getting into the tank, dirty filters, etc. In each specific case, you need to carefully analyze all the signs and draw conclusions. If all else fails, you can always undergo verification diagnostics with a motor tester.
Read, it may be useful: Electrical diagram of the VAZ-2107 generator set (carburetor and injection)
What is idle air control
When we release the gas pedal, the throttle valve closes completely, blocking the path of air into the intake manifold. In this case, engine operation is ensured by a small cross-section bypass channel, through which air flows for idle operation. A device is installed in the channel that has the ability to change its flow area and even completely block it. This mechanism is the idle speed regulator. With its help, the ECU controller can maintain and change engine speed at idle. For what? For example, when we start a cold engine and it runs unsteadily, when we turn on the heating or air conditioning, thereby adding to the load. Having received information from the crankshaft speed sensors, throttle position, speed sensor, and temperature, the controller processes it and sends a command to the idle speed controller - “add air” or “reduce air.” As a result, we have stable and smooth engine operation when the gas pedal is released.
How he does it? A stepper motor is hidden inside the housing. Short pulses are applied alternately to its two stator windings and the rotor shaft rotates to a certain angle. A screw connected to the rotor acts on the throttling element (needle), pushing it out or pushing it into the hole. The flow area of the channel changes, and the idle speed changes accordingly.
Idle air control - device, connection, general view
The regulator may stop working for various reasons. Most often, the mechanical part fails - the needle drive parts break or jam. Idle air regulators bought in stores “on the cheap” are especially prone to this because of their low quality. Failures of the electrical part occur less frequently - burnout of windings, wire breaks, wear or corrosion of the contact block.
Before replacing the regulator, we need to make sure that the reason is in it, and not in the power supply wires and connectors. To do this, turn on the multimeter in the mode up to 20 volts, check the voltage at contacts “B” “D” with the ignition on. It should be about +12 volts. If the voltage = 0 or is much lower, then the cause of the malfunction is somewhere else. It is necessary to check all circuits from the controller to the regulator and the controller itself.
Which one should I buy as a replacement?
A regulator from VAZ injection models is suitable, for example this one 2112-1148300-02 from the twelfth model. When choosing, pay attention to the build quality and packaging. It is better to buy products from large, well-known manufacturers. And it doesn’t hurt to ask the seller which ones they take more often.
Regulator replacement procedure
Disconnect the negative and positive terminals from the battery.
Disconnect the battery terminals
Disconnect the throttle cable. Loosen the clamps and unhook the hoses and pipe from the air filter.
Loosen the pipe clamp and remove it
Unscrew the throttle body mounting nuts and slide it off the studs. Remove the washers and finally remove the housing. Disconnect the throttle position sensor and idle air control connectors. Unscrew the screws securing the idle air regulator and remove it. Install the O-ring on the new regulator and reassemble everything in reverse order.
Don't forget to install a new O-ring
Some craftsmen replace the regulator without removing the throttle body, some remove the body and turn it without disconnecting the hoses. You can act in the way that is most convenient for you, the main thing is not to confuse anything.
Read, it may come in handy: The sound signal does not work on the VAZ 7 model: diagram, repair, how to make a pneumatic horn
Post-installation setup
After replacing the regulator, you need to give the computer a chance to configure it. To do this, you need to turn on the ignition and wait for about ten seconds without starting the engine. Then turn off the ignition and wait at least three seconds. Turn the ignition back on and start the engine. Drive a few meters forward or backward. The adjustment is complete, the computer has received all the necessary data and calibrated the idle air control.
Main parts
To perform its tasks, the VAZ 2105 carburetor consists of the following mechanisms and systems:
- Engine starting and warming up system.
- System for maintaining the required fuel level.
- System XX (idle);
- Econostat system.
- Acceleration pump.
- Main dosing system.
There are three systems that can be configured - they are first on the list. The VAZ 2105 carburetor can be adjusted without removing the device from the car. Due to the fact that the carburetors of the fifth and seventh models are identical in structure and differ only in the diameters of the holes of the air and fuel jets, since the carburetor on a VAZ 2107 can be adjusted using the same method.
The third stage is checking the technical condition of the VAZ-2105 carburetor device
After the carburetor has been removed and disassembled successfully, diagnostics should be carried out for faults. Diagnostic procedure:
- checking the condition of the fuel filter (washing and blowing with compressed air);
- checking the float mechanism (washing all its parts in acetone, visual inspection for damage);
- checking the carburetor cap (rinsing in acetone, blowing with compressed air, visual inspection of sealing parts);
- checking the starter (all actions are similar to the previous step);
- checking emulsion tubes and jets;
- checking the housing (cleaning and visual inspection for damage);
- checking the accelerator pump and pneumatic throttle actuator.
If during the diagnostic process the listed parts are found to be in a faulty condition, they are simply replaced with serviceable ones.
Experts emphasize: do not use metal tools to clean the jets, do not wipe with cloth so that the lint does not get into the fuel-emulsion path
We learn to adjust the carburetor VAZ 2103, 2105, 2106, 2107 independently
- We learn to adjust the carburetor VAZ 2103, 2105, 2106, 2107 independently
- How does a VAZ 2107 carburetor work?
- Carburetor components
- Carburetor systems
- How to set up a carburetor
- Checking the condition of the mesh filter
- Setting up the float chamber
- Adjusting the starting system
- Adjusting the idle speed of the VAZ carburetor
Owners of VAZ 2103, 2105, 2106, 2107 cars have probably encountered the need to adjust the carburetor. The first desire that arises in your mind is to stop by the service station and solve all your problems. But there is no need to rush to the experts, because you can do the adjustment of the VAZ 2107 carburetor yourself. You will need time, patience and some knowledge of the design and operation of this unit.
- How does a VAZ 2107 carburetor work? Carburetor components
- Carburetor systems
- Checking the condition of the mesh filter
How does a VAZ 2107 carburetor work?
To independently adjust the carburetor, it is useful to know what components and systems it consists of. To provide the engine with high-quality fuel, the carburetor systems must work “like a clock.”
Carburetor components
The components of the VAZ 2107 carburetor are:
• Float chamber.
• Idle air valve.
• Crankcase gas exhaust compartment.
• Air and fuel jets.
Carburetor systems
For high-quality operation of the car engine, you will need flawless operation of the carburetor systems:
1. Engine starting and warming up system.
2. Idle system.
3. Constant fuel level monitoring system.
4. Acceleration pump (to guarantee acceleration of the car).
5. Large diffuser in the carburetor body, VTS sprayer, air and fuel jets, emulsion tube and emulsion well. Their location is the main dosing chamber.
6. Econostat system. This is an enrichment device in the second internal combustion chamber of the engine.
How to set up a carburetor
To adjust the carburetor, you need calibration data, which describes all the necessary values for adjusting the VAZ 2107 carburetor. Having started adjusting the carburetor, you need to check the operation of all components and systems that control the operation of the carburetor. To do this, the check must begin with external control elements. Check the throttle valve actuator for full travel of the throttle valve actuator lever. When the gas pedal is released, the throttle valves in both mixing chambers must be completely closed. The gas pedal is depressed to make sure that the throttle valves operate smoothly and without jerking, sequentially (first in the primary chamber, and then in the secondary chamber, they fully open and become vertical, opening the throat completely).
How to properly adjust the carburetor on a VAZ 2105: detailed instructions
A correctly configured carburetor very accurately doses the combustible mixture. For example, the difference between the fuel-air mixture intended for idling the engine and the fuel for cold starting of the internal combustion engine is almost 20 points. Therefore, adjustment of the DAAZ 2105 carburetor or its Zhiguli analogue must be carried out and done skillfully as soon as high fuel consumption or unstable engine operation is detected.
In principle, the process of setting up a VAZ 2105 carburetor is not that complicated. Even a beginner can handle the job, but he has studied the device and the sequence of necessary operations. Before making adjustments, it is extremely important to make sure that the OZ is set correctly. It is necessary to check the condition of the distributor cover, breaker contacts, spark plugs and high-voltage wires.
Idle adjustment
If the idle speed is not adjusted correctly, the engine will suddenly stall, stall, “fail” during acceleration, and consume a lot of fuel. It is advisable for beginners to use the tachometer data; experienced carburetor operators determine incorrect speeds by ear. You will also need a 3mm slotted screwdriver.
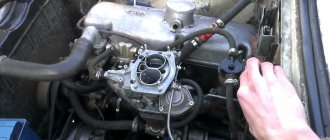
Adjustment of the VAZ 2105 carburetor in neutral mode is carried out with the engine running and warmed up to operating condition. First you need to make sure that the main dosing system is not working (it should not be activated in this mode). Look from above, through the throttle holes - fuel is pouring or the chambers are dry. If fuel is supplied, then the XX system requires proper configuration.
Further actions:
- use a screwdriver to increase/decrease the speed of the adjusting screw;
- if the system does not respond to the screw, unscrew the idle jet a few turns, creating a vacuum and thereby clearing this very channel from blockages;
- then adjust the fuel quality screw - as you tighten it, the speed drops and vice versa (the notorious “slide”);
- Now adjust the mixture quantity screw.
As a rule, these actions are enough to normalize the operation of the idle system. The jet can become clogged, and the technique of creating an air vacuum without completely unscrewing the element will help clean it.
“Hump” is a normal condition of the carburetor, in which fully tightening the mixture quality screw leads to the engine stopping or reducing the speed to an unacceptably low level. And with the maximum enrichment of the mixture with the emulsion - unscrewing the nozzle, a decrease in speed should also occur, but for other reasons. In this case, the mixture becomes excessively rich and burns worse. There may even be black smoke coming from the muffler. Thus, checking the carburetor “slide” allows you not only to determine the quality of the mixture, but also at the same time to test the compliance of the fuel nozzle of the XX system with the condition of the carburetor and engine.
Now let's talk more about calibration. On a carburetor that has lost its settings, it is customary to first set the original speed values. To do this, tighten both screws (quality and quantity of the mixture) until they stop. Then lower the quality screw by 3 turns, and the quantity screw by 4 turns.
- increase the gasoline supply by rotating the quality screw counterclockwise;
- increase the total amount of fuel mixture by unscrewing the amount screw;
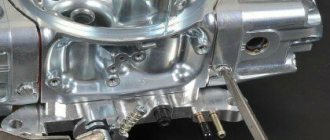
- check with the mixture quality screw whether the set XX speed is correct - when turning the quality screw, the engine speed should rise to 850-900 per minute, which is the ideal idle value.
1 — throttle screw; 2 — adjusting screws for mixture quality; 3 - screwdriver
The correct RPM mark should be exactly between the zones when the engine stalls when tightening and unscrewing the mixture quality screw. You can find it this way: tighten the screw in one direction until the motor starts to stall. Mark the position on the screwdriver shaft - for example, with red paint. Then turn the screw back, counting the number of revolutions until the engine starts to stall again. Align the screw in the middle: if, for example, there were 8 total turns from edge to edge, then the middle will be 4 turns.
If the idle speed cannot be adjusted using the steps described above, one of the following reasons is likely:
- the fuel and air channels of the main carburetor system are clogged;
- the camera jets are swapped;
- the needle valve is faulty;
- tubes have come off the pneumatic valve (“Ozone”);
- The oil seal of the mixture quality screw has dried out.
Eliminating failures in engine operation during acceleration
“Failure” in this case - the Zhiguli car first bites the front end, and only then begins to gain momentum. There may be several reasons: the “fan” or “beak” is clogged, the accelerator pump system is incorrectly configured.
As a rule, any theorist will start checking with the accelerator pump system, especially on Ozone models, since it is responsible for stabilizing the engine during acceleration. In practice, carburetor technicians who have deep knowledge in this area can check other points first (so as not to remove the device again). However, this is not the point, and the acceleration system must be checked and adjusted in case of problems.
The integrity of the acceleration system is tested with the carburetor removed. Here are the elements that need to be checked carefully:
- clogging of the bypass and inlet holes of the float chamber - the accelerator pump comes into contact with it;
- condition of the bypass nozzle;
- integrity of the diaphragm, its reliable and tight fastening;
- free play of the diaphragm spring;
- tightness of the connection between the cover and the body of the carburetor starting device;
- pump valve performance;
- condition of the sprayer, correctness of the spray jet.
One of the signs of a system malfunction, specifically a broken diaphragm, is gasoline leaking through the accelerator cap. This symptom can be detected even on the car, with the carburetor installed and the fuel system connected to it.
A smooth and good stream of gasoline is the key to trouble-free operation of the carburetor acceleration system. Spraying in this mode must have a strictly correct direction - exactly between the wall of the diffuser and the body of the “helicopter” (on Ozons this is extremely difficult to achieve due to the cast, inactive nose). The mixture should not touch anything, otherwise it will not be enriched, and this is a prerequisite for dynamic acceleration of the car. Also, all connections of the metering device must be sealed, without any leakage of fuel.
Also, the cause of failure is incorrect adjustment of the bolt of the second carb chamber.
Here's what to do:
- Use tongs or pliers to tighten this bolt, closing the secondary chamber of the carburetor;
- start the engine;
- press the gas pedal all the way - dips will be clearly noticeable in idle mode;
- unscrew the adjusting bolt until the neutral speed starts to rise;
- adjust the XX system with screws for the quality and quantity of the mixture;
- check for failures - repeat the procedure if necessary.
On Solex carburetors, the cause of failures during acceleration can be simple clogging. Here's what to do:
- remove the top of the carburetor;
- unscrew both emulsion tubes;
- blow out the jets installed inside the channels with a cleaner, as well as all visible overflow holes;
- also blow out the accelerator nozzle;
- adjust the rise of the floats;
- replace the carburetor top cover gasket;
- Remove and clean the coarse filters.
If the candles flood
It happens that DAAZ and Solex carburetors flood the spark plugs when starting a cold engine. The engine does not start or stalls after a while. This indicates an overly rich mixture, which may be caused by a faulty accelerator diaphragm. And it is precisely responsible for the reliable start-up of a cold internal combustion engine, providing a flow of air into the chamber.
It is advisable, before checking the carburetor directly, to exclude all other causes of flooding of spark plugs. And this can happen due to faulty spark plugs or a fuel pump (pumping) and severe frost, which affects poor fuel volatility.
There are several types of damage to the diaphragm:
- crackling;
- delamination;
- the appearance of scuffs and holes.
It is clear that to correct the situation it is necessary to replace the diaphragm:
- Unscrew the 4 cover bolts with a screwdriver;
- Unscrew the middle bolt with a size 8 wrench;
- separate the lid;
- pull out the spring, then the diaphragm with the rod;
- install a new part;
- assemble everything in reverse order;
- adjust the carburetor starter.
In addition to the diaphragm mechanism, at the same time it is necessary to check the housing of the starting device for leaks. Clogging of the air jets of the main dosing system is no exception.
It is also recommended to check the condition of the float chamber needle valve. It may be worn out or deformed, and thus lead to an over-rich fuel mixture. In this case, spark plugs will also be poured onto a hot engine.
Checking the shut-off needle valve on Solex carburetors should be carried out with the fuel supply fitting closed and the metering device cover in a strictly horizontal position.
If there is a smell of gasoline in the car interior
One of the reasons for the strong smell of gasoline in the car interior may be a faulty or incorrectly adjusted carburetor. This happens due to leaky connections. For example, leaky economizer and accelerator diaphragms, loosely tightened caps, or poorly secured parts of the metering device often leak fuel. Typically, a fuel leak can be easily determined visually. Another reason is play in the fuel supply and return passage fittings.
As for incorrect adjustment, it may be due to the needle valve that pours gasoline into the float chamber. As a result, the fuel level rises, the float touches the walls and fuel begins to flow out from under the lid or the gas pump nozzles in the diffusers.
All the “culprits” for the appearance of the smell of gasoline in the car interior are shown in the photo.
The car suddenly loses speed
This is the same failure discussed above. It is customary to distinguish several types of this unpleasant symptom. More details in the table below.
We clean the jets
Clogged jets are a common problem that leads to a car losing traction and its original technical characteristics. This is the reason for increased fuel consumption and other unpleasant issues.
The performance of these carburetor elements directly depends on the size of the hole and the length of the channel. But that's not all. It turns out that the roughness of the inner surface of the tube, as well as the change in pressure at the inlet and outlet, is also of great importance. Any unevenness will noticeably worsen the throughput, but it will be extremely difficult to determine the degree of smoothness by eye.
Thus, clogged channels reduce their performance. Therefore, any owner of a carburetor car should have a can of cleaning spray or carb cleaner on hand. You also need to have a convenient tool for removing jets and tubes, since by removing them you can carry out cleaning much more efficiently.
Carbcleaner liquid acts no earlier than 5 minutes after application. During this time, the composition will react with contaminants, soften them and wash them away. After this, you can start the engine to check, preferably using a choke. If the jets have not been cleaned for a long time, the cleaning procedure must be repeated several times.
In severe cases, when surface cleaning does not help, it is recommended to dismantle the carburetor. Before this, you can make preparations: swap the two high-voltage spark plug wires and start the engine. It will start to work terribly “sneezing” and “shooting”, which will help to automatically clean out deposits from the canals. After this, the dosing device is removed, the channels and chambers are thoroughly cleaned with carb cleaner or other means. In particularly difficult situations, the channels are drilled out and then washed.
Maintain your car's carburetor regularly. The cleaned jets will “revive” the dosing device, and the machine will start running like a clock.
Table: types of failures and solutions
| Type of failure | Recommended Actions |
| The failure is short-term (1-2 seconds), occurring when the accelerator is smoothly applied during the start of the car or at idle. Acceleration and dynamics of the car are normal. | Clean the output channels of the carb transition system or check the operation of the accelerator. |
| A series of failures with a possible engine stop, occurring at low and medium speeds. And when accelerating, the twitching disappears. | Clean the fuel jet of the main metering system; tighten the fuel nozzle of the main metering system of the first carburetor chamber a few turns; blow out the channels, the emulsion well with the emulsion tube of the main metering system of the first carburetor chamber; replace the fuel nozzle of the main metering system of the first chamber if its marking does not correspond to the required one; check the fuel level in the carburetor float chamber, exclude unauthorized air entry into the carburetor, check the operation of the choke; replace or clean the strainer at the carburetor inlet. |
| Failure or rocking (a series of failures) combined with unstable engine idle. | Clean the fuel nozzle of the idle system and the channels of the idle system; replace the solenoid valve or check the EPH system; replace the solenoid valve O-ring; Tighten the idle air system fuel nozzle holder more tightly. |
| Failure or swaying under high load conditions when driving with the throttle valves of both chambers open, combined with loss of power and throttle response. | Check the carburetor econostat and power mode economizer; clean the channels, jets, emulsion well with the emulsion tube of the main metering system of the second chamber of the carburetor; check the opening of the throttle valve of the second chamber of the carburetor; Check the fuel supply to the carburetor. |
| Failure when you sharply press the gas pedal at idle, when starting from a stop, accelerating and moving the car at different speeds. | Replace the accelerator pump, check the fuel level in the carburetor float chamber. |
If you have any questions, leave them in the comments below the article. We or our visitors will be happy to answer them