In the VAZ Six, as in other cars, comfort and safety are ensured by car windows. As the vehicle is used, they are exposed to negative environmental factors, which leads to gradual damage to the surface. Ultimately, one glass or another has to be replaced. This procedure is simple and can be done by every Zhiguli owner.
- Windshield
How to remove glass - How to install glass
Video: how to replace the windshield on classic Zhiguli cars
- How to remove glass
Video: installing a grille on the rear window
- How to remove glass
Video: removing the window on a “classic”
- How to remove glass
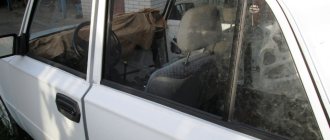
How to replace the rear side glass on a VAZ 2101-VAZ 2107?
Removal: 1) At the beginning of the operation itself, you will need to get to the window lifter mechanism, because in order to remove
the glass itself is from the car, you first need to loosen the window lift cable and
remove
the glass groove, but in order to loosen the cable and
remove
the groove, you first need to get to them by removing the trim from the car door on which you are replacing the glass.
(For information on how to remove
the trim from the door, see the article using the example of removing the trim from the front door; you can see this example in the article called: “Replacing the front glass on a car”, see points 1-4)
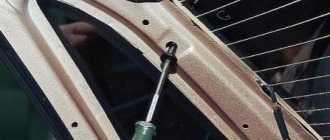
Note! Before you start removing the trim, unscrew the button that locks the door of the car by hand or using a screwdriver (see photo 1), and when the button is unscrewed and removed, unscrew the screw that secures the LADA window sill in its front part (see photo 2 ) if you have it of course!
2) Then, when the trim is removed from the door, you will need to remove the protective film, which you may or may not have at all, this film covers the entire window lifter mechanism from dirt getting on it, and this protective film is attached to the adhesive tape by peeling it off , you can easily remove the film from the car door.
3) Now proceed to removing the window sill, there are only four plastic holders that secure it, disconnect all these holders from the door using a screwdriver and then you can remove the LADA window sill from the car door.
4) Next you will need to remove the rear
glass groove, to do this, first disconnect the plastic clamp from it (It fits into the hole) that attaches the rod to the groove and after the clamp is disconnected (see photo 1), pick up a wrench and use it to completely unscrew the nut and bolt that secures the rear channel to the car door and then remove it (see photo 2).
5) After removing the groove, insert a handle with which you can lower and raise the window of the car, but only the trim and rosette of this handle do not need to be installed, just put one handle in its place and, holding the glass with your hand, lower it to the very bottom until it stops .
6) Next, unscrew the two screws that secure the pressure plate (Indicated by the red arrow), which in turn firmly fixes the cable and does not allow it to go anywhere.
7) When the screws securing the plate are unscrewed and the plate itself is removed, use a wrench to slightly loosen the nut that secures the tension roller (see photo 1), and after loosening the roller will move and thereby the cable itself will weaken a little; after the cable has loosened, you will need to remove it from the tension roller and from the lower roller which is indicated by the red arrow.
Installation
Installation of the rear door glass is performed in the reverse order, following the previously marked mark on the cable.
Removing front and rear windshields on a VAZ car 2106
are produced when replacing them with new ones, during body work, for example, when painting a car or for tinting them. To remove the glass, we will need the help of an assistant, as well as a blanket or something like that, a screwdriver, and a piece of cord with a diameter of about 4-6 mm. and about 5 meters long.
If everything is there, then you can start repairing:
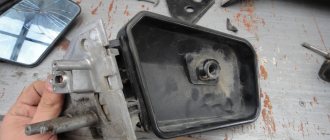
- The first step in the car interior is to remove
all the decorative interior parts that will interfere with us.
First of all, these are decorative covers for the front side pillars, remove the interior rear view mirror (see Replacing rear view mirrors on a VAZ 2106
), remove the sun visors, remove the top decorative cover for the ceiling.
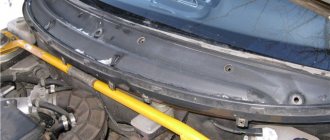
- Now, starting from the upper right corner (if it’s convenient for you, you can do both at once), use a screwdriver to pry the edge of the seal and slide it behind the body flange and then manually press the seal while simultaneously pressing on the glass. When performing this operation, it is necessary to remove the upper corner of the glass together with the seal from the body opening and press the corner of the glass from the body from the inside.
- From outside the car, pry the windshield frame (lock) with a screwdriver and remove it from the seal. Next, having previously bent the windshield wipers, you need to move the top and sides of the glass away from the body and remove
the glass, placing it on the hood, with a blanket or any other material laid in advance.
Now that we have removed the front windshield, we need to:
- Remove
the rubber seal from it, starting from the middle. Check the seal for mechanical damage and, if necessary, replace it with a new one. Hardening of the rubber seal is also not allowed. We clean the seal and the edge of the glass from dirt and rust. - Check and, if necessary, clean the seal grooves from dirt, sealant and other debris.
- Locate and clean drainage holes in the seal.
Installing a new windshield on a VAZ car 2106
. Follow the steps below:
- Install the seal onto the new glass, starting from the bottom corners.
- Next, take the previously prepared cord and insert it into the groove of the seal, which fits onto the flange in the body opening. By placing the cord in a circle, ensure that it overlaps with the opposite end by about 20 cm.
- Dilute the soap solution and use a brush to generously coat the seal and the internal opening of the body where the glass will sit.
- Together with a partner, install the glass back into the opening so that the seal groove at the point where the cord exits sits on the flange of the opening and the ends of the cord are located in the car interior.
- Now one person remains in the cabin and slowly begins to pull the cord so that the edge of the seal goes beyond the flange of the opening; if the edge does not go, then pry it up with a screwdriver, and an assistant, outside the car, lightly taps on the glass in the place where you pull the cord , puts a little pressure on the glass, thereby setting it in place.
After installing the front windshield in place, install all removed parts in the reverse order of removal.
The rear windshield is replaced in the same way, with the exception of some features:
- The glass must be removed starting from the bottom corners.
- Before removing the glass, in the lower corner, outside the car, you need to remove
the LADA trim by prying it off with a screwdriver.
Replacing the Rear Window of a VAZ 2106
replacement
wind and wind
rear windshield
glass vases
2106
-2103
Removing front and front rear
windshield on station wagon
2106
if replaced with new ones, they are created during body work, for example, when painting a car or for tinting them. To remove the glasses, we need the help of an assistant, as well as a blanket or something similar, a screwdriver, and a piece of cord 4-6 mm in diameter. and about 5 meters in length.
If that's all, then you can start repairing:
- Firstly, in the car interior it is necessary to remove all interior parts that will interfere with us. Firstly, this is the decorative trim of the front side pillars, remove the interior rear view mirror (see replacing
rear mirror type VAZ 2106
), remove the sun visors, remove the ceiling lining.
- Now, starting from the top right corner (which is convenient for you, you can do both at the same time), bend the edges of the sealant using a screwdriver and push it through the housing flange, then manually press the sealant out using pressure on the glass. When performing this operation, the top corner of the glass along with the seal from the body opening and press the corner of the glass
inside the body.
- From the outside of the machine, use a screwdriver to squeeze out the fringed glasses (lock) and remove it from the seal. In addition, after bending the wipers, you need to rotate the top and sides of the housing. glass
and remove the glass by placing a blanket, blanket or any other material over the lid.
Installation of rear and windshield Installation of rear windshield and vase.
Rear installation
or windshield
glass vases
A very simple operation that anyone can do even at home.
replacing glass on vase 2106
Easy and quick to change rear windows
to the classics.
Now that we have removed the windshield, we need:
- Remove the rubber seal from it, start removing it from the middle. Check the seal for mechanical damage and replace it with a new one if necessary. Hardening of rubber sealant is also not allowed. We clean the seal and edge of the glass from dirt and rust.
- Check and, if necessary, clean the seals of dirt, seals and other debris.
- Locate and clean the drain holes in the seal.
Install a new windshield on a VAZ 2106 . Follow the procedure below:
- Install the seal onto the new glass, starting from the bottom corners.
- Then take the pre-prepared cord and insert it into the seal groove that fits onto the flange in the housing opening. Lay the cord in a circle, making sure it overlaps the opposite end by about 20cm.
- Wash down the soapy water with a brush and generously coat the seals and the inside of the case where the glass will sit.
- With a partner, insert the glass back into the hole so that the sealing groove at the cord exit point is on the flanges of the hole and the ends of the cord are in the cabin.
- Now one person remains in the cabin and slowly begins to pull the cord so that the edge of the seal protrudes beyond the flange of the hole; lightly tapping the glass, thereby pushing it into place.
After installing the windshield glass, replace all removed parts in the reverse order.
back the windshield was replaced in the same way, with the exception of some functions:
- The glass should be removed from the lower corners.
- Before removing the glass
, in the lower corner, outside the car, remove the decorative strip using a screwdriver.
Removal
We prepare the car for work (see “Preparing the car for maintenance and repair”).
Set the glass to the bottom position.
We remove the rear door trim in the same way as removing the front door (see “Front door trim - removal and installation”).
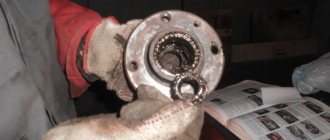
Using a Phillips screwdriver, unscrew the self-tapping screw securing the rear upper guide of the sliding window.
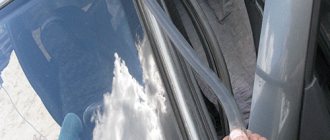
Remove the seal from the top of the door frame.
Using an 8 mm socket or socket wrench, unscrew bolt A and nut B securing the rear guide.
Remove the upper part of the guide from the fixed glass seal.
By tilting the upper part of the fixed glass forward, we remove it.
Remove the seal from the fixed glass.
Attention! Before performing the following operation, it is recommended to note the position of the cable relative to the pressure plate.
Using a Phillips screwdriver, unscrew the two screws securing the cable pressure plate to the glass bracket.
Remove the plate and lower the glass all the way.
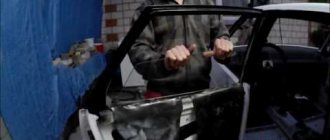
How I Remove the Rear or Windshield on a VAZ Classic, a little collective farm style
Remove the LADA door trim and two chrome trims (see “Front door glass - removal and installation”).
Lifting the sliding glass with its bracket and tilting it inward, we remove it from the door.
Safely Remove VAZ Glass
How to make rear window heating on a VAZ-2106
However, it is quite possible to correct the situation on your own. Let's look at how you can install rear window heating on the “six” if it is not available here. There is probably no need to look for too complicated ways. It is best to immediately purchase suitable glass with heater filaments. On the secondary market it is quite possible to find a normal option at an affordable price. Rear windows break quite rarely, so there should not be any special problems here. Of course, you can supply the threads yourself by purchasing a kit from Niva. However, there is a very high risk of running into a low-quality product.
The consequences of such an installation can be very serious.
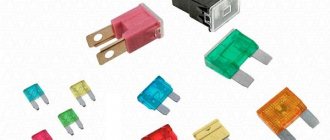
- terminals are wide and bolt-on;
- circuit breakers;
- wires;
- relay (PC527 or analogue) and a block for it;
- screw;
- rubber tubes;
- on/off button.
Regarding the latter, I would like to add one piece of advice. The button must be purchased with an indicator. Do not forget that heating consumes electricity very seriously, draining the battery. Accordingly, the glowing indicator will remind you to turn it off in a timely manner.
Before starting work, you should remove
negative terminal from the ignition. After this, you can remove the instrument panel and embed a button there. In principle, it is possible to place it in another place, but this is the most optimal option. Moreover, there is enough space there, and the procedure for removing the shield will not take much time.
Next, install the relay and you can start laying the wiring. As experienced craftsmen advise, when calculating the length, add a small reserve, as they say, just in case. Please note that it is necessary to connect only through a relay. Power supply will directly result in extremely undesirable consequences - burnt out contacts and a melted button.
Now we take the hanging fuse and cut the looped wire, stepping back from the edge by about 6 centimeters. Next you need to do one simple manipulation. We crimp the ends of the wire with wide terminals and connect them to the fuse (short end) and to the relay (long).
You can move on to the next stage. We pull 2 wires from the heating switch. The ideal option is a section of 1.5 square millimeters. You attach one of them to the fuse (behind it), the second should be attached to the relay block. Now we remove the left thresholds - front and rear
– and pull the wires to the rear window. That's practically all - all that remains is to combine our heating system into one whole. To do this, you need to connect the wire to the glass and to ground.
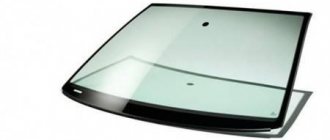
Purpose of the windshield and rear window of a car
A trivial question: “Is it possible to drive a car without a windshield or rear window?” The answer is very simple: “Of course you can.” But in this case you will get maximum discomfort inside the car. Wind, dust, and any precipitation will be directed into the cabin, and the air temperature in it will be the same as outside. In addition, various insects and even birds will fly into the cabin, as well as stones from under the wheels of the vehicle in front. And we can’t even talk about what a car looks like without glass. Protecting the driver of the car and his passengers from external physical and weather factors, this is precisely the main purpose of the windshield and rear window.
Rear window
The rear window has the same protective function as the windshield from external influences: air flow, dirt and small particles from the road surface. The dimensions of the rear window in the “seven” are 1360 * 512 mm.
How to replace
Removing and installing the rear window in the “seven” is practically no different from similar actions with the front glass, but there are some features:
- In the lower corner of the rear window, you need to remove the trim and remove the corner element, do the same on the second lower corner;
- We begin removal from the lower corners, having first removed the edging from the seal.
Heated rear window
Initially, the “seven” released from the factory was equipped with a heated rear window. This function is needed to ensure that the rear window does not become covered with moisture and does not freeze in the cold season.
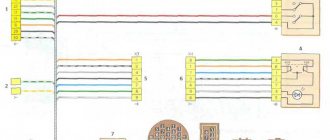
Often the heating mechanism fails and requires repair. To make repairs, you need to know the electrical circuit of the heating device (see figure below).
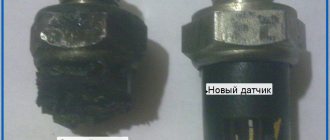
Frequent breakdowns
- The fuse has failed;
- The condition of the heater terminals is broken;
- Failure in the connector leading to the control unit;
- Damage to the heating element itself. You can check it with a multimeter; it should show a resistance of about 1 ohm on working filaments.
Rear window grille
This car tuning element gives the car a sporty look. At the same time, the grille serves as protection from sunlight and car headlights on the road, and protects the glass from rain.
Checking and replacing the VAZ 2107 relay
Let's look at the replacement process using the rear window heating system relay as an example. This element is located in the mounting block. You can find out the exact installation location by looking at the diagram printed on the back of the protective cover:
- Turn off the ignition and open the fuse box.
- Find the relay that needs to be tested and replaced.
- Remove it using pliers located in the unit body.
- Install another device that is known to work instead of the removed device. You can use a relay from the headlight or headlight cleaning system.
- If diagnostics show that the removed relay has failed, install a new one in its place.
The inspection and replacement process is the same for all devices. The only difference is their location:
- the main relays are installed in a fuse box;
- the device that ensures the operation of the ignition, as well as light alarms and turn signals, is located in the vehicle interior, on the front panel behind the instrument cluster;
- the starter activation relay is installed in the engine compartment, on the right mudguard;
- The windshield cleaning device is located under the instrument cluster on the driver's seat side; it is fixed to the car body with two bolts.
Things to remember to avoid poor quality work:
- The driver should immediately refuse to save money, and this applies to the glass itself and the cost of its installation. The cheaper the procedure, the poorer the quality it will be, which will soon force you to contact the service again. Before agreeing to a replacement, you need to find out exactly what is included in the price, so that there is nothing superfluous or, on the contrary, something tedious is not removed.
- Before installing the glass itself (regardless of whether the driver bought it himself or the glass is provided during the replacement process), it must be checked for integrity, especially around the edges. There should be no chips, unevenness or other defects. Of course, after installation they will be closed with a seal, but when the machine moves, they can cause it to break or cause new defects, which is unsafe.
- The driver must make sure in advance that all the components necessary for attaching the glass are available. Moreover, its correct installation should not affect the operation of wipers, sensors and other elements that are close to the windshield or interact with it.
Sources:
https://litezona.ru/kak-ustanovit-zadnee-steklo-vaz-2106/ https://auto-park24.ru/uhod/kak-snyat-zadnee-steklo-na-vaz-2107.html
Why do you need glass on a VAZ 2106?
At the beginning of the advent of such means of transportation as cars, their speed was barely faster than that of a person. The driver and passengers did not experience any discomfort and did not need any additional protection. But as speeds increased over time, the need arose to protect the people in the car both from the oncoming air flow and from dust, dirt, stones and precipitation. Automotive glass began to be used as such protective elements. They simultaneously play the role of a kind of shield, and also provide the necessary comfort in the vehicle interior. The main requirements that auto glass meets include high strength, safety and reliability during operation.
How to install glass
Installing new glass will require the preparation of the following materials:
- glass degreaser;
- clean rags;
- a rope with a diameter of 4–5 millimeters and a length of at least 5 meters;
- molding.
- We spread a soft cloth on the table to avoid scratches on the glass. KLADA has new glass on it.
- We stretch the seal in the corners and then along all sides of the glass.
installing grille on rear window
How to remove glass
To remove the glass, you will need a slotted and Phillips screwdriver, as well as an open-end wrench for 8 and 10. The dismantling process itself is carried out in the following sequence:
- Remove the plastic plugs from the door armrest by prying them off with a flat-head screwdriver.
In the VAZ Six, as in other cars, comfort and safety are ensured by car windows. As the vehicle is used, they are exposed to negative environmental factors, which leads to gradual damage to the surface. Ultimately, one glass or another has to be replaced. This procedure is simple and can be done by everyone at LADA Zhiguli.