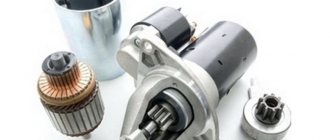
Starter
In order for your car to start moving, there is a device for starting the engine - a starter. At its core, this device is a DC motor. Despite the small volume, the starter plays a big role. It provides the action from which the subsequent rotation of the flywheel and piston group of the motor begins. The VAZ 2110 starter is a four-pole brush motor, the basis of which is direct current, activated by analog magnets with a planetary gearbox and an electromagnetic, two-winding traction relay.
Starter device
Content
A starter was previously installed on the VAZ 2110, which was presented in the form of an electric motor to generate direct current. It consists of a traction relay and a planetary gearbox, there is also an armature and a stator. The anchor is used here to rotate the metal inserts, and this rotation must be transmitted to the gearbox and drive of the device.
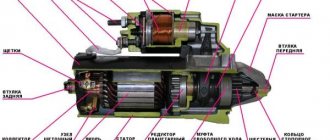
VAZ 2110 starter device: 1 - rear cover fastening nuts; 2 — back cover; 3 — screws for fastening the brush assembly; 4 — brush springs; 5 — brush assembly; 6 — stator (with magnets); 7 - anchor; 8 — thrust washer; 9 — armature shaft support; 10 — central gear of the gearbox; 11 — planetary (satellite) gears of the reducer; 12 — drive shaft; 13 — external gear of the gearbox with internal teeth; 14 - sealing ring; 15 — drive shaft support; 16 — thrust washer; 17 — drive shaft retaining ring; 18 — retaining ring of the drive lever clutch; 19 — washer; 20 — drive lever coupling; 21 — drive lever support; 22 — drive lever; 23 - drive; 24 — drive stroke limitation ring; 25 — locking ring of the limiter; 26 — starter traction relay; 27 — screws for fastening the traction relay; 28 — return spring; 29 — traction relay core; 30 — front cover; 31 - tie rods.
The starter for the VAZ 2110 has four stripes and four brushes on an electric motor with direct current, and the device also contains magnets that contribute to the formation of this current. But still, the main part in the starter is the retractor relay, because during operation, the drive with the gear engages with the flywheel and it, in turn, drives the electric motor of the device.
Where is the starter located on the VAZ 2110
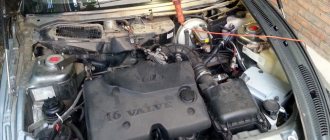
If you have a question, where is the starter on a VAZ 2110, see the photo below.
Starter repair
The VAZ 2110 starter is a completely reliable mechanism and can serve you faithfully for a long time. But nothing lasts forever. Over time, even the most durable parts can become weak. If you need to correct any aspects of the operating process of this device, you need to know the following information! Repair of the VAZ 2110 starter depends on the nature of the breakdown. Therefore, the sequence of actions and the scale of repair actions may vary. First, you need to know where the VAZ 2110 starter is located. It is located under the hood. Look to the right in front of the engine. There is a retractor on it, and two marks that will need to be closed. The most common damage:
- Burnout of the winding or burning of the contact bolts and contact plate in the traction relay. To eliminate these damages, you need to change the traction relay. This is done very simply, without removing the starter;
- Drive overrunning clutch malfunction. To eliminate this breakdown, you will have to disassemble the starter and change the drive;
- Worn starter brushes. It is necessary to remove the starter, replace the brush assembly and clean the commutator. When replacing the brush assembly, there is no need to remove the starter drive and traction relay.
In any case, it will be necessary to remove the starter and put it in place.
To do this, you will find the Starter Connection Diagram useful.
1 – rechargeable battery; 2 – generator; 3 – starter; 4 – switch. The switch is related to the ignition. If you plan to do everything personally, it is most convenient to do this using an inspection hole on a lift. Don't forget to remove the engine splash guard.
Starter malfunctions
Of course, the mechanism may stop working, and therefore experts identify several malfunctions here:
| The car battery is discharged. That is, before sinning on the starter, you should check the battery charge and that it is in good condition. |
| It is also worth checking the wires and its terminals for oxidation. If it is detected, then the current will not flow to other mechanisms. Of course, this can also include poor wiring. In order to fix all this, it is necessary to clean the contacts and terminals; during cleaning, you may find that the elements are loose and it is best to securely fasten them. |
| Do not forget that the traction relay may also fail, and the device will close; all these faults will lead to the device being inoperable. |
| If the starter winding is faulty, there will also be short circuits in the system. |
| The ignition contact part may also fail, but it cannot be fixed or repaired, so it will have to be replaced. |
| Also, the armature in the device may fail; this will become apparent if malfunctions occur during the operation of the device. To identify this malfunction, it is necessary to diagnose the starter. |
Solenoid relay
A relay is an electromagnetic element, which structurally consists of:
- anchors;
- winding located in the housing;
- two contacts and a plate designed to close them;
- the housing in which the device is enclosed (the author of the video is San Sanych Elisov).
Two wires are connected to this component element - from the battery and the lock. When the key is released in the lock, the voltage disappears, and when it appears again, the relay, the winding of which is energized, comes into operation. As a result, the anchor, which is located inside the housing, is attracted and acts on the rod located below the electromagnetic element.
The rod itself is connected to a jumper, which is used to close the contacts when voltage appears in the system. During the closure, the gear begins to work and move relative to the pulley. The current is then transmitted to the motor windings, which causes the flywheel to turn and rotate, resulting in the engine crankshaft rotating.
How to check the performance of the starter on a VAZ 2110
Of course, you will always have time to disassemble the device, but you should check why the device does not work.
And this check can be done:
- It is necessary to turn the gear in the same direction as the armature of the device turns, and try in the opposite direction, and this should not happen. And if it scrolls in the opposite direction, then this is already a malfunction.
- It is also worth checking the movement of the coupling along the shaft; use a screwdriver for this. If the device is functioning normally, the coupling should turn easily and without snagging.
- To check the serviceability of the starter, you need to connect the wires from the battery. If the device is working properly, then the clutch will have a characteristic click when it extends, and if it does not turn on at all, then you will need to disassemble the starter and find out the reason.
- If the starter stops turning at all, you need to check the armature, that is, remove the cable and connect it to the bolt with contacts. If the armature is working properly, then it will rotate very quickly, but there are cases when the movement is too small, in which case the armature is not working properly.
And now it’s worth talking about how to properly repair a starter on a VAZ 2110 with your own hands. And it’s immediately worth noting that without removing the starter from the car, it is impossible to check its performance and not even carry out repair work.
What is a relay for?
The traction relay ensures that the drive gear starts. Starting occurs in clutch with the gear mechanism of the crankshaft flywheel. It also provides power to the starter motor. When the starter is turned on, energy begins to be transferred from the battery. The energy path passes through the ignition switch.
In this way, power is supplied to each winding of the traction relay. Windings have two types:
- Pull-in winding.
- Holding winding.
As soon as the process of closing the relay contacts takes place, the retractor winding is turned off. A working relay has a voltage limit that should not exceed 8 V. The temperature during this process should not exceed 25 degrees Celsius. If the voltage when starting the relay exceeds this indicator, then you should pay attention to the drive and the traction relay itself. They may become damaged or stop working. The traction relay can be visually examined. Perhaps the breakdown can be seen with the naked eye, but the starter will have to be dismantled and disassembled.
Instructions for repairing and replacing the starter on a VAZ 2110
All repairs to the device are carried out according to specific instructions:
- First of all, you need to disconnect the battery, disconnect the wire from the starter and remove it altogether.
- The starter is disconnected from the engine, and after that the nuts are unscrewed and secured.
- If an old device is replaced with a new one, then it is simply replaced.
- After the nut on the traction element is unscrewed, immediately remove the relay and unscrew all the fixing bolts.
- After this, it is necessary to dismantle the anchor, and to do this, you need to lift it up a little.
- Then the pins are removed and the starter cover can now be removed. First, it is removed along with the drive, and then the brushes are removed.
- Now you need to remove the gear from the anchor, and then remove the anchor itself, but this happens after removing the gearbox. And now you can see all the malfunctions of the device.
- After this, you can remove the gear mechanism and you can inspect all the necessary faults.
- To dismantle the restrictive ring, which is located above the locking ring, it is necessary to use a mandrel. All elements in the device can be replaced with new ones if necessary.
- When the brushes are removed from the device, they need to be checked. If there is wear on the unit, they should be replaced with new ones. Reassemble the device in the reverse order.
Device repair for VAZ 2110
To carry out repair work on the device, you first need to prepare the necessary tools. And of course, you can’t do without a set of keys; you should have pliers and screwdrivers on hand. This set of tools will depend on what will change in the device.
Now it’s worth figuring out how to repair the starter on a VAZ 2110. Any driver will immediately understand what the problem is, since the car will stop starting or start poorly. All this will indicate problems with the starter, but problems with the ignition switch may also arise, that is, problems may not always indicate a failure of the starter. And here are some tips on how to recognize the problem if, when you turn the ignition key, something starts to click, but the starter turns at least a little. Then the battery may be dead; after charging it, you should repeat the procedure. It happens that when you turn the ignition key, you may hear extraneous sounds, for example, grinding on metal, then in this case it is better not to use the car, otherwise you will need to replace the flywheel on the car.
Typical starter malfunctions and their causes
If the engine refuses to start, then it is quite possible that the reason lies in the performance of the starter device, but this will need to be clarified. Turn the ignition key all the way, then listen to the operation of the unit. If you hear that the electric motor is cranking and the relay is clicking, then most likely the reason lies in a malfunction of the clutch or gear unit. In practice, the clutch is often the cause of the malfunction; if this is the case, then, most likely, the bendix will have to be changed (the author of the video is the Sibiryak54 channel).
The reason may also be the gears, in particular their wear. Wear can be determined after dismantling and disassembling the mechanism - teeth on worn gears may be knocked off. If the starter unit refuses to click when you try to start the engine, then most likely the reason lies in the lack of voltage on the relay or this element has failed. To verify that the problem is with the relay, put the car on the parking brake, disconnect the wire from the relay, and connect another wire connected directly to the battery. If as a result of these manipulations the relay works, then check the switch itself, that is, the lock, connection wiring, and safety devices.
If, when trying to start the engine, the unit turns very slowly or does not turn at all, then troubleshooting is carried out as follows:
- If there is voltage in the circuit, then most likely the brushes or windings have failed.
- If there is no voltage, then perhaps the contact of the relay with the electrical circuit is poor. It is necessary to check the quality of the connection; there is a possibility that the contacts are simply dirty and will need to be cleaned. For cleaning, use a steel brush or fine-grained sandpaper.
Photo gallery “Starter malfunctions 2110”
2. Damaged relay
How to repair a starter on a VAZ 2110
Before starting to repair the starter, it must be removed from the car and its performance checked.
- First, unscrew the nut and carefully remove the wire, and after that you can remove the solenoid relay, and nothing will interfere here. After this, the nuts are unscrewed again to remove the tie rods that secure the stator, and then it can be removed from the front cover.
- Then you can remove the planetary gears that are on the gearbox and remove it from the starter. But there can be a different number of gears, three or four. If there are 4 of them, then you need to remove the central one at the very beginning, and after that all the others can be easily removed. Do not forget that they also need to be carefully inspected so that there are no gaps, rust, otherwise they
- will need to be replaced.
- If we talk about the solenoid relay, then there are several bolts on it, and if it is necessary to remove them, you need to unscrew them, and then remove it from the starter with special care. Of course, they carry out a test, it can be done by connecting an ohmmeter to the traction relay, but before that you need to completely sink the armature. During this check, if the device shows zero, then the relay is working properly, and the cause of the breakdown is not in it.
- After this, using a hammer and a wrench, the restrictive ring is carefully knocked off, but you need to put something under it to prevent deformation. Then use a screwdriver to remove the retaining ring and another restrictive ring, which is responsible for the movement of the shaft. Thus, the entire drive is disassembled and all parts must be checked for wear; if something is wrong, they need to be replaced.
- Then, using a screwdriver, pry the front cover off the stator, and if there is a gear there, then remove it too.
- And at the final stage, you need to unscrew the two bolts from the stator cover and remove it. And here a view of the starter brush assembly opens up, but to get them you need to remove the front support and thrust washer, but there are special magnets here. Having unclenched them, it will be possible to pull the armature out of the stator, after which the commutator and windings are inspected; there should be no deformations or burnt parts. If all these damages exist, then it is best to replace the anchor with a new one, and if everything is fine, then you can simply clean it. This can be done using sanding paper or water and detergent. After this, the anchor is dried using compressed air to remove any remaining dirt and water.
- It’s worth telling a little about the brushes of the device; a special brush holder is provided for them. It should be without visible damage, if there is none, then you can put it back together, and if there is, it is better to replace it.
Now you can begin assembling the device, but before that you should lubricate all parts of the device with lubricant, and it is best to completely immerse the drive in engine oil. But after this it is necessary to drain the oil and check all the parts for rotation. If the brushes were removed and changed, they are inserted back using a special mandrel. But if it is not there, then you can do it differently. There are two screws in the device, and this is where you need to secure the brushes, and then lubricate the armature with oil and put all four brushes in place. But here there is no need to install special springs under the brushes, and then they put the armatures on the commutator, and only after that the brush springs are installed. And now you can install the remaining starter parts in the reverse order.
Wear of the VAZ 2110 starter armature commutator
All modern cars use an electric engine start system, which is based on an electric starter - a specially designed DC electric motor that rotates the engine crankshaft and its main systems. As with any electric motor, the starter has a stationary part - the stator, and a moving part - the rotor, which, according to a long-established tradition, is called the armature. The stator is a multi-turn winding (called the field winding) located on the wall of the starter housing, and the armature is a more complex and functional part.
The starter armature performs several functions:
- Creation of a magnetic field, which, when interacting with the magnetic field of the stator (field winding), causes the armature to rotate;
- Transmission of torque to the engine crankshaft;
- Combining all components - windings, commutators, drive parts - into a single structure.
Despite the variety of starters existing today, they have fundamentally the same armatures, and the design of the armature has not undergone fundamental changes over the past half century.
Structurally, the starter armature consists of four main parts:
- Armature shaft;
- Core;
- Winding;
- Collector unit;
The armature shaft is the load-bearing element of the armature. It is made of steel, at two or three points there are seats for bearings (these can be plain bearings - bushings, or rolling bearings). On the elongated side of the shaft there are splines to transmit torque to the starter drive; these splines, depending on the type of drive, can be straight or helical (spiral-shaped).
The core is assembled from a package of metal plates rigidly mounted on the shaft. The core has a cylindrical shape; on its outer surface there are grooves for laying winding turns. The core is mounted on splines made on the shaft, this provides the structure with the necessary rigidity and prevents the core from rotating on the shaft under heavy loads.
The winding is made of thick copper wire of large cross-section, and two options are possible: uninsulated rectangular wire and insulated round wire. Rectangular wire is used in the armatures of high-power starters, since currents of 600-800 amperes or more can flow through them during engine starting. Insulated wire is used in the windings of low-power starters. In armatures with a winding made of rectangular wire, the insulation is made of flexible sheet material, which is used to wrap the conductors in the grooves of the core. The winding is single-turn, since it consists of a certain number of conductors (usually no more than 12-15), laid in loops in the core, each such loop is one turn. The parts of the winding extending beyond the core (from the collector side and from the reverse side) are fixed with bandages - rings made of insulating material impregnated with resins, staples, etc.
This is what the flywheel crown of a VAZ 2110 looks like in perfect condition
The collector unit serves to supply current to the turns of the winding in such an order that a magnetic field of a certain shape appears around the winding. The collector consists of a series of copper plates to which the ends of the winding turns are connected (the connection is made by soldering). Between the armature plates there are gaps filled with insulating material with a high dielectric constant. Copper contacts have low electrical resistance, so they transmit current well to the winding, and they also have good contact with copper-graphite brushes.
There are currently two types of collectors:
- Cylindrical - the collector is made in the form of a cylinder, on the outer surface of which contact pads are located;
- End - the collector is made in the form of a circle, the segments of which are contact pads.
Accordingly, in a starter with a cylindrical commutator the brushes have a radial arrangement (they rest against the commutator along the radii), in a starter with an end armature the brushes are located along the axis of the armature. A cylindrical commutator is more reliable, but an end-mounted commutator saves space and allows the size of the starter to be reduced.
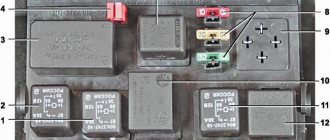
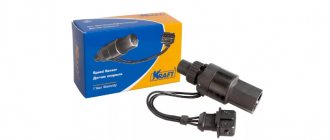
VAZ 2110 starter retractor relays in a box
The armature assembly is installed in the starter housing, it is held by two or three bearings - two bearings at the ends of the shaft (in the rear wall of the starter housing and in the front cover of the starter drive), another bearing is used as an intermediate support for armatures of increased length. Sliding bearings (bushings) are usually used because they are simpler, more reliable and can easily withstand significant loads. Some starters use rolling bearings - roller or ball.
Replacing the starter on a VAZ 2110
If there is a malfunction of the VAZ 2110 starter or its retractor, then in any case the part is removed from the car and diagnostic work is carried out. In any case, repairing the device has already been considered, so now it is worth considering such a step as replacing the starter on a VAZ 2110.
To carry out such work, you should prepare the necessary tools in advance:
- open-end wrench number 13;
- head;
- The socket head is also 13.
Before you begin removing the starter, you first need to remove the air filter, and after that, remove the negative terminal and the starter feed wire from the battery. But to remove the wires, you need to use a 13mm wrench and remove the rubber cap in advance. After this, you can unscrew the nuts securing the device, and usually it is attached to the VAZ 2110 with two bolts and several studs. Now the starter is moved to the side with special care and, lifting it up, is removed from the car. If the starter has already been purchased, then a new one can be installed in place of the old device. All work on installing a new starter is carried out in the reverse order as it was removed, and after that you can check the car for starting. Of course, the old device can be disassembled and repaired, and left as an additional one.
In conclusion, we can say that there are many reasons that indicate a malfunction in the ignition system, but not in all cases the starter is to blame. Therefore, before you start disassembling the device, you should check its functionality. All these procedures are very simple; you need to check the solenoid relay and the voltage at the terminals of the part.
Breakdown or wear of the mechanical part of the VAZ 2110 starter
The first category of starter malfunctions is mechanical in nature. The following signs indicate such breakdowns: the starter works, but the engine does not start, and the crankshaft does not rotate.
The first thing you should pay attention to when troubleshooting is the overrunning clutch ring and lever, the flywheel crown, and the buffer spring.
If the starter rotates, but the engine does not start, there may be many reasons:
- Clutch slippage.
- Failure, or jumping off the axis, of the shutdown lever.
- Breakage of the buffer spring, which does not perform its intended tasks.
- Severe wear on the drive ring.
If a grinding noise is heard when the engine starts, this may indicate wear on the flywheel ring teeth. To solve the problem, make sure the gear travel is adjusted correctly and inspect the buffer spring.
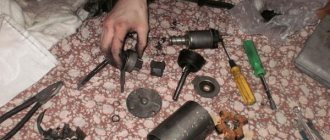
Starter VAZ 2110 disassembled
Starter malfunctions are often associated with suspicious noise while the device is operating. In such a situation, inspect the engine compartment, from above or below. The following causes of failure are possible:
- Damage to teeth.
- Loosening the starter mounting bolts.
- Worn bearing bushings and journals on the anchor shaft.
- Loosening of the pole fastening inside the starter. Therefore, the armature touches the starter part.
Starter malfunctions can occur not only at the time of starting, but also after it. One of the common cases is when the device does not turn off and continues to rotate.
There may be several reasons for such a breakdown:
- Worn freewheel spring.
- The contacts of the traction relay are stuck.
- The traction relay is stuck and does not work.
- The drive is jammed on the shaft or the drive lever.
- The return spring of the ignition switch is worn out.
If there are such starter malfunctions, it is recommended to immediately remove the terminal from the device and begin searching for the problem.