Replacing the manifold gasket Lada Kalina
Engine intake and exhaust manifold gaskets play an important role in engine performance. Like any gaskets, they provide sealing of joints.
They are installed between the intake manifold and the cylinder head and between the cylinder head and the exhaust manifold. The Lada Kalina intake manifold gasket must be replaced when characteristic popping and whistling noises are heard. Also, if the engine begins to work unstably, it does not reach full power because the traction has disappeared.
Since fuel is supplied through the intake manifold, gasoline consumption will increase due to its leakage. Jerking and vibrations at idle, the sound of suction will tell you the same thing. It’s time to replace the exhaust manifold gasket on your Lada Kalina if you hear the smell of exhaust gases and a characteristic chirping sound from under the hood.
The engine will start poorly and run unstably.
In this case, soot stains can be found under the hood in places where the seal has broken down, and the CHECK lamp will light up on the instrument panel.
More precisely, they will tell you when diagnosing your car at a service station Type of work: Price Replacement of the intake manifold gasket from 1,500 rubles. Replacement of the exhaust manifold gasket from 2,500 rubles. Replacement of Lada Kalina manifold gaskets is carried out when the gaskets burn out or deform, or fatigue wear. When an engine crashes, manifold gaskets are often damaged.
They are also changed during engine overhauls. Often, the intake and exhaust manifold gaskets are replaced at the same time. Since the result of the replacement depends, among other things, on the quality of the gaskets, we recommend purchasing these parts from our spare parts store.
In our services you can replace the Lada Kalina manifold gasket, both intake and exhaust. During the work, our specialists will diagnose the landing pins and bolts and, if necessary, replace them. Replacing manifold gaskets is a fairly responsible and complex procedure that requires certain knowledge and skills. To remove and reinstall the collectors, you will have to remove a lot of additional equipment.
Therefore, without the necessary experience, we do not recommend doing this yourself. Trust our specialists. We also do not recommend delaying the replacement of manifold gaskets.
Delay may result in more expensive repairs.
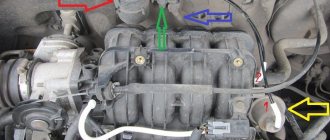
What kind of manifold gasket is installed on Kalina
But their fixation areas are the same. They are removed according to the same scheme, illustrated using the example of a VAZ-21126 engine. Info The difference is the presence of wires and pipelines.
1. Remove the negative terminal wire from the battery.
2. Important Unscrew the ignition coils.
3. Remove the throttle assembly from the inlet pipe.
4. Loosen the tie that holds the exhaust breather of the crankcase ventilation structure to the cylinder head cover pipe, 5. disconnect the breather from the pipe. 6.
But if you follow the instructions, everything will work out.
Well, if you can’t do it, then go directly to a car service center.
Particular attention should be paid to the quality of the product so that you do not have to change the part after several thousand kilometers.
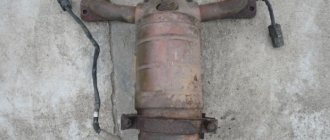
carfrance.ru The Lada Kalina, equipped with an injection engine, cannot be called expensive or difficult to maintain. If problems arise, for example, with the exhaust manifold, then everything can be solved on your own. The exhaust pipe is necessary to collect and redirect exhaust gases to a special exhaust pipe of the muffler.
You can replace the Kalina exhaust manifold at home. The exhaust manifold is made of cast iron, which is very resistant to temperatures.
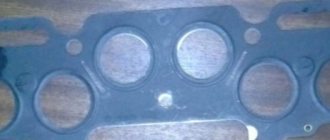
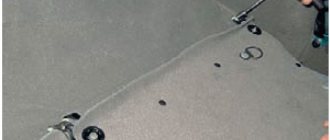
Remove the old gaskets and wipe the seats from oil and dirt.
You also need to wipe the seat on the engine. The manifold has special grooves for guides on the gaskets. The gaskets must be installed with the higher side in the plastic manifold.
It is the guide that will prevent you from making mistakes. I additionally coated the areas near the guides with sealant on the outside of the gasket.
How to install a 4-2-1 spider in place of the standard converter on a Lada Kalina 8V
When the internal combustion engine is turned off, in any case, the valve gas distribution system remains open in one of the cylinders. The excess pressure that should have escaped into the exhaust pipe throws ceramic particles back into the combustion chamber.
At the next start, the dust will mix with the oil and turn into an abrasive paste, which can lead to complete failure of the internal combustion engine. Before replacing a faulty Kalina car catalyst with 8 valves, you need to decide on the vehicle’s toxicity standards - Euro 2 or higher. On VAZ models, this is not difficult to find out - in the Euro 2 system, the oxygen controller is installed before the catalytic collector.
Starting from the third generation of environmental standards, the diagnostic probe is also located after the neutralizer. It signals the efficiency of the device. Since 2008, all VAZ cars meet Euro 3 standards and have two oxygen controllers.
Before getting rid of the converter, you need to consider some details: The unit is made with the exhaust manifold as one unit. All sorts of solutions that boil down to removing the insides of the catalytic collector not only lead to a deterioration in acoustic comfort.
Moreover, an empty housing creates an exhaust section with a large cross-section, which will lead to resonance of the exhaust system. So everything is in favor of using insertion. In the case of Euro 2, when installing the spider, an oxygen sensor wire extension is required, and the resonator-manifold connection unit must also be redone.
In the case of Euro 3, the program in the ECU is installed or changed in place of the second controller.
We recommend reading: Calculate interest on a Sberbank credit card online calculator
Replacing the exhaust manifold on Kalina
And asbestos allows you to coordinate the difference in thermal expansion.
The main threat to the gasket is constant exposure to high temperatures. There are a number of symptoms that will tell you that you need to replace the exhaust manifold of your Lada Kalina:
- In any operating mode, the engine makes an unpleasant characteristic sound; Exhaust gases enter under the hood or even into the interior of your car; The engine loses power due to a mismatch between the BC head and the manifold.
The list of what is needed is, in principle, standard: a standard set of tools, an extension cord with various heads, WD-40 or other similar lubricant.
If you know that the problem is broken studs, then a stud extractor, taps, drill and drill bits will be added to the above list.
In addition, a bucket or basin, possibly an old canister, should be at hand. Advice! A few days before replacing the exhaust manifold, you can begin to lubricate all fasteners in the system. Can be lubricated several times a day.
This will greatly simplify the task and make replacement quick. There is only one difficulty in this process - the inaccessibility of some fasteners. It is best to carry out this “operation” in a viewing hole or on a lift.
Of course, this is not necessary, but it is much more convenient. First you need to remove the negative terminal from the battery or turn off the mains switch. Next, it is recommended to drain all the antifreeze into a container prepared in advance.
Next, you need to disconnect the fuel pipes. If the coolant is not drained, at this stage it will go into the cylinders.
Replacement of the gasket of the intake manifold and catalytic collector of VAZ 11183, VAZ 21116 and VAZ 11186 Lada Granta engines
2. Disconnect the wire from the negative terminal of the battery. 3. Disconnect the wire connector and air supply hose from the throttle assembly as described.
4. Loosen the clamp securing the hose to the vacuum brake booster and remove the hose from the intake module. 5. Disconnect the hoses of the small branch of the crankcase ventilation and canister purge system from the intake module. 6. Using a 13 mm high socket, unscrew the rear nut securing the intake module.
7. Using the same tool, unscrew the front and three lower (not visible in the photo, since they are located at the bottom of the intake module) nuts securing the intake module. 8. Remove the intake module and throttle assembly from the intake manifold studs.
9. Remove the sealing gaskets of the intake module pipes and install new gaskets in the grooves of the pipes. Note: Before installing the intake module, clean the mating surface of the intake manifold from gasket residues and dirt. 10. Disconnect the connectors of the injector wires and the engine harness and disconnect the fuel supply hose from the fuel rail tube as described.
11. To do this, unscrew the nuts securing the muffler exhaust pipe flange to the exhaust manifold flange, disconnect the suspension cushions from the muffler brackets and remove the muffler exhaust pipe flange from the exhaust manifold flange studs. 12. Disconnect the wiring harness of the control and diagnostic oxygen concentration sensors from the engine control wiring harness, and also remove the wire clamps for these sensors from the steering gear thermal shield.
How to do this, see (control sensor) and (diagnostic sensor).
Replacing the expander barrel plug. The final battle with the cooling system.
Hi all!
And so, after replacing the stove radiator for the second time in a year and a half of ownership, I considered it necessary to bring the solution to the problem with the current stove radiator to its logical conclusion.
A little theory.
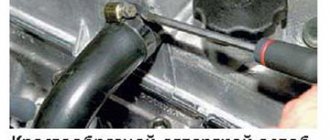
The expansion tank plug performs two functions - releasing and building up pressure in the cooling system, i.e. the car heats up, the antifreeze expands, excess pressure arises, and the plug releases it. And the opposite situation - the car cools down, the antifreeze pressure drops, the pressure in the system drops, the plug lets air into the expansion tank.
The cooling system in Kalina consists of a main radiator, a heater radiator, pipes, cooling channels in the engine, a thermostat, an expansion tank and a plug for this barrel (maybe I forgot something else, but in this story it’s not important).
If the cheapest component in this system, namely the expansion tank plug, dies, problems begin with the entire cooling system. The two most common problems caused by traffic jams
1) The plug does not hold pressure. The system begins to air out, which leads to engine overheating.
2) The plug holds more pressure than required. It’s worth mentioning here that, to be honest, the cooling system on a viburnum will work well with a pressure from 0.5 atm to 1.5, everything that is not within these limits causes problems. If the pressure is lower, look at point one; if the pressure is higher, then we are approaching the critical operating pressure of the stove radiator. The heater radiator is designed by the manufacturer to work with a pressure of up to 2 atm, however, given the winters in Siberia, I would talk about even less pressure, because within 20 minutes the temperature from -35 in the radiator becomes +80-90. And these are very harsh conditions with a large difference in the temperature expansion of such a trio of materials: plastic, sealant, aluminum.
Here is the previous paragraph, point 2, that happened to me for the second time, the radiator was replaced at a service center and, in order to get away from the problem with the “Russian original caps,” I bought a cap from VW, bought a cap from Lada and replaced the pressure relief valve. It’s just not possible to screw on the VW cover, because its thread pitch is different.
After assembling the hybrid, I checked the pressure release - it occurs at 1.4 atm, which is within our limits.
The check can be done using the following method: remove the upper pipe from the expansion barrel and plug it with a bolt, now with the plug screwed on, pump it through the fitting with a pump with a CORRECTLY WORKING MONOMETER at 0.2 atm and listen when the plug starts to bleed air. If the pump is manual, then you can see on the pressure gauge that the pressure has stopped rising. Pump up to NO MORE than 1.5 atm. Otherwise it would be a shame to tear apart a new radiator if the plug is not working))
PS One cannot underestimate the unpredictability of stupidity, so I do not claim the unconditional truth of my writing.)
Exhaust manifold gasket Kalina 8 valve
I will not remove the throttle and its heating.
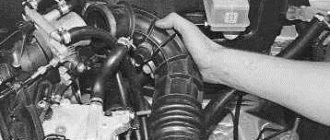
The intake manifold is attached to 5 studs - one in the center, two on the sides. To unscrew them you will need a 13mm socket.
After unscrewing the nuts, you need to remove the receiver itself from the studs and move it to the side.
Remove the old gaskets and wipe the seats from oil and dirt.
You also need to wipe the seat on the engine.
The manifold has special grooves for guides on the gaskets.
The gaskets must be installed with the higher side in the plastic manifold.
It is the guide that will prevent you from making mistakes.
I additionally coated the areas near the guides with sealant on the outside of the gasket. Because it felt like that was where the ring entered the groove the deepest.
In addition, there was a place for air leaks on the old gaskets. After all procedures, the intake manifold can be installed back. I couldn't find any information on how tightly to tighten the mounting nuts.
How to replace the Lada-Kalina muffler with your own hands
You can replace the “glushak” in two ways: contact a service center or do everything yourself. In the first case, you will have to do practically nothing: you will only need to take the car to a service station and pay a certain amount for repairs. If we consider the second option, then we will need to take care of preparing the tools that will be needed during work.
Video: replacing the muffler using the example of a Lada-Kalina hatchback
Tools and materials
To carry out repairs you will need:
- WD-40 type lubricant;
- wrenches 13 (socket, socket);
- hammer or flat screwdriver;
- new muffler.
Choosing a muffler and its cost
Finding a new part is not so easy. Despite all the variety of elements that the modern automotive market offers, it is quite difficult to buy a truly high-quality product. There is a high probability of purchasing a part that was made in an unknown location or manner. The only advantage of such a muffler is its low cost, but the service life compared to the factory product will be much shorter. Therefore, in order to buy a good quality element, you need to know what parameters to rely on when choosing.
First, attention is paid to the material of manufacture. The factory muffler is made of stainless steel or aluminum. The first option is quite difficult to find, but it is quite possible to make it to order. Any other material in this case will last less. An important parameter is cost. A high-quality part cannot cost less than 1 thousand rubles. Although you can find a price of 5 thousand rubles, which is clearly overpriced. The price of an outright fake will fluctuate around 500 rubles.
To ensure that the muffler lasts as long as possible, when purchasing, you should choose a part made of stainless steel or aluminum
In addition to cost and material, attention should be paid to the weight of the muffler. A worthy part must be massive, which is due to the presence of compacted walls and noise-absorbing material inside. If your goal is to purchase a good quality muffler, then it will be difficult to find one in the car market. It is better to contact a service center or a store with original spare parts to purchase.
How to remove the resonator and muffler
Dismantling the muffler and resonator can be considered the most labor-intensive stage of the entire process of replacing the exhaust system. The bottom line is the difficulty of separating the elements due to their burning to each other.
We remove the components in the following sequence:
- We drive the car into a pit, overpass, or use a jack.
To remove the muffler and resonator, the car is driven into a pit, overpass or jacked up
The clamp secures the resonator to the muffler through an O-ring. To loosen the nuts, moisten the fasteners with penetrating lubricant.
After wetting the clamp nuts with grease, unscrew them with a wrench or a 13mm socket.
After removing the clamp, disconnect the resonator and muffler and remove the O-ring. Light blows with a hammer may be necessary
The muffler is attached to the body using two elastic bands.
replacing the exhaust manifold gasket Kalina
12. Using the same equipment, we unscrew two nuts A for the joint fastening of the intake manifold of the pipeline with the exhaust manifold and nut B for fastening the exhaust manifold.
13. On the VAZ 2107 car engine, unscrew the exhaust pipe clamp to the bracket and remove the exhaust pipe from the exhaust manifold studs (see “Muffler exhaust pipe - removal and installation”). 14. Using a 13 mm socket wrench with a deep head, unscrew the nut of the front fastening of the exhaust manifold.
16. Remove the washers from the studs. Under the nuts of the joint fastening of the intake manifold of the pipeline and the exhaust manifold, washers of increased thickness are installed. 17. Moving the exhaust manifold away from the cylinder head, remove the intake manifold pipeline from the studs.
18. Remove the sealing gasket of the intake manifold of the pipeline and the exhaust manifold. We replace the manifold gasket with a new one. We install all the removed parts on the injection engine of the VAZ 2107 car in the reverse order. And we fill the cooling system of the VAZ 2107 car with coolant.
Replacement of the intake pipe gasket and catalytic collector
The intake pipe and catalytic collector are connected to the cylinder head through a common sealing gasket. The gasket also covers two channels of the cylinder head cooling jacket, which extend into the plane of the junction of the head with the intake pipe and catalytic collector. We carry out the work on an inspection ditch or overpass. Drain the coolant from the engine (see “Checking the level and replacing the coolant”). We remove the receiver (see “Removing the receiver”) and the fuel rail with injectors (see “Checking the injectors, removing the fuel rail and injectors”). Disconnect the engine management system wiring harness block from the oxygen concentration sensor wiring harness block (see “Removing the control oxygen concentration sensor”). Having unscrewed the three nuts securing the pipe flange of the additional muffler to the flange of the catalytic collector, we disconnect the additional muffler from the catalytic collector (see “Removing the additional muffler”).
Using a 13mm socket, unscrew the two nuts of the bracket securing the catenary collector.
. and remove the bracket from the bracket studs.
Using a 13mm wrench, unscrew the two bolts securing the catalytic converter bracket to the cylinder block.
. and remove the bracket.
Using a “13” wrench, unscrew the nut of the upper fastening of the right support bracket of the intake pipe. Remove the ground wire tip from the intake pipe stud.
Using a 13mm socket, unscrew the bolt of the lower fastening of the right support bracket of the intake pipe.
. and remove the bracket.
Remove the spacer bushing from the intake pipe stud.
Using a 19mm wrench, unscrew the nut securing the clutch housing to the cylinder block, which also secures the lower end of the left support bracket of the intake pipe.
Using a 17mm wrench, unscrew the nut of the upper fastening of the left support bracket of the intake pipe.
. and remove the bracket. On the left rear side of the engine...
. Using the “13” head, loosen the tightening of nut 1 securing the coolant pump pipe bracket, unscrew nut 2 securing the catalytic collector and nut 3 of the general fastening of the catalytic collector and intake pipe to the cylinder head (for clarity, shown on a dismantled engine).
Move the coolant pump pipe bracket aside.
Remove the heat shield from the cylinder head studs and the washer from the top stud. On the right rear side of the engine.
. Using the “13” head, unscrew the two nuts securing the heat shield and the eye.
Remove the heat shield and ring from the cylinder head studs. ..using the “13” head, unscrew the nut for fastening the catalytic collector and the nut for the general fastening of the catalytic collector and inlet pipe, located on the same studs. Remove the washers from the studs.
Using a “13” socket, unscrew two nuts 1 of the upper fastening of the intake pipe and one nut 2 of the upper fastening of the catalytic collector. Remove the washers from the studs.
Using a “13” socket, unscrew the two nuts of the common lower fastening of the catalytic collector and the intake pipe to the cylinder head. Remove the washers from the studs.
Remove the inlet pipe.
Remove the sealing gasket of the intake pipe and catalytic collector.
After each removal of the intake pipe or catalytic collector, the gasket must be replaced with a new one. Before installation, we clean the mating surfaces of the cylinder head, intake pipe and cathode from remnants of the old gasket and carbon deposits. Apply graphite lubricant to the cylinder head studs. We carry out assembly in reverse order. At the four common fastening points of the intake pipe and the catalytic converter (their joints), it is necessary to install thick washers with a large outer diameter on the studs.
Common mounting points for the intake pipe and catalytic collector (shown on a dismantled engine for clarity).
Replacing the manifold gasket on a viburnum
We treat all threaded connections with penetrating lubricant.
4. Disconnect the additional muffler from the catalytic manifold. 5. Disconnect the oxygen concentration sensor connectors from the engine compartment wiring harness connectors and remove the upper oxygen concentration sensor.
6. Using a 13 mm socket wrench, unscrew the two bolts securing the catalytic manifold to the bracket. 7. Using a 13 mm spanner, unscrew nuts 1 of the upper bracket fastening, and then loosen the tightening of nut 2 of the lower fastening.
We move the bracket to the side (the photo shows a view from the partition of the engine compartment). 8. Using a 13 mm wrench, unscrew the eight nuts securing the catalytic manifold. 9. Remove the catalytic manifold.
10. Remove the sealing gasket from the cylinder head studs. 11. Using a 22 mm wrench, unscrew the lower oxygen concentration sensor. On a car that has been in use for a long time, as a rule, it is not possible to unscrew the bolt heads securing the catalytic manifold to the bracket without breaking off. The bracket itself is also damaged by corrosion.
In these cases, the faulty parts should be replaced along with the manifold. 12. Using a 10 mm socket wrench, unscrew nut 1 securing the protective screen and using a 13 mm wrench, unscrew two bolts 2 securing the upper part of the bracket.
Remove part of the bracket. 13. If due to corrosion it is not possible to unscrew the bolts, use a 10 mm socket wrench to unscrew the two bolts 1 securing the protective screen to the gearbox and, using a 13 mm socket wrench, unscrew the two bolts 2 securing the catalytic manifold bracket to the cylinder block.
Exhaust system "Lada-Kalina"
Owners of a Lada-Kalina car sooner or later have to deal with the repair or replacement of a muffler. This unit is one of the problematic ones, which is associated with factory defects. Despite the fact that the design is made in the form of a solid and sealed body without welds, after a run of 40 thousand km the system wears out: the integrity of the body is compromised, the sound becomes louder. The muffler can be repaired by installing a patch on the burnt area using welding. However, such a measure will only temporarily eliminate the problem. Therefore, it is recommended to replace the element with a new one. The exhaust system is designed in such a way that even an inexperienced motorist can diagnose and replace it with his own hands.
The part differs depending on the modification of the car. Thus, for sedan and station wagon bodies a model with a curved pipe is used, and for a hatchback - with straight inlet and outlet pipes. The part numbers are as follows:
- 1118–1200010 main muffler for Lada-Kalina sedan and station wagon;
- 1119–1200010 main muffler for Lada-Kalina hatchback.
What does the Lada-Kalina muffler consist of?
The main purpose of the exhaust system is to absorb noise from engine exhaust gases. On the Lada Kalina, the unit consists of a resonator and a muffler. The parts are connected to each other with a clamp and an o-ring. The muffler is a one-piece structure, and the resonator consists of several closed chambers. The chambers are connected by small tubes with holes. This design ensures smoothing of sound vibrations by the resonator. In the latest versions of the car, the joints are additionally laid with noise-absorbing material.
Exhaust system: 1-gasket; 2-catalytic converter; 3-sealing gasket; 4-metal compensator; 5-additional muffler; 7-catalytic manifold bracket; 8-receiving pipe; 8, 10 - muffler suspension cushions; 9-metal O-ring; 11-main muffler; 12-bracket clamp
Restoring the tightness of the intake system on the editorial Kalina
There is nothing criminal about this.
Over time, the tightness of its joints is broken and liquid can seep out. In addition to the aesthetic aspect, this is also reflected in the operation of the motor. Through the cracks not only oil presses, but also air leaks.
Most often, this leads to uneven engine operation (slight tripping) at idle speed. Intake manifold
The tightness of the intake system is very important for the proper operation of the engine. The tightness of the intake system is very important for the proper operation of the engine. Oil traces at the manifold joints are visible to the naked eye, and air leaks can be calculated using a simple technique.
While the engine is running, spray any suspicious areas with brake system or carburetor cleaner.
If after some time the engine speed “floats” or it begins to choke altogether, then there is a significant suction in these places.
The purifier, as a flammable substance, entering the intake, enriches the air-fuel mixture, which causes the engine speed to fluctuate. The intake of additional air, not taken into account by the sensors on the intake side, causes a constant leaning of the mixture. The control system tries to adjust the fuel supply based on the output readings of the front lambda probe.