We install the VAZ 2110 car on an inspection ditch or a lift. Removing the parking brake cable is shown using the example of the right cable.
Lower the parking brake lever to its lowest position.
We remove the manual brake pad drive lever from the cable end of the VAZ 2110 (see Replacing rear brake pads).
Using a 10mm wrench, unscrew the nut of the bracket securing the cable sheath to the rear suspension beam.
Remove the cable fastening bracket.
We remove the cable sheath from the holder.
Using a screwdriver, bend the three brackets securing the cable sheath to the body of the VAZ 2111.
We remove the cable from the brake shield of the VAZ 2111.
Using a wrench and a high 13mm socket, unscrew the locknut and the rod adjusting nut.
We remove the cable tip from the equalizer slot.
Remove the end of the cable sheath from the bracket.
In a similar way, we remove the left parking brake cable of the VAZ 2112. Its dismantling (unlike the right cable) is hindered by the exhaust system.
We remove the cable and equalizer.
To remove the parking brake drive lever and the adjusting rod, unscrew the two nuts from the rod and remove the equalizer (do not dismantle the cables).
Remove the cover and housing of the floor tunnel lining (see Removing the VAZ 2112 instrument panel and heater air ducts).
Using a 10mm socket, unscrew the four bolts securing the lever bracket to the floor.
Using a Phillips screwdriver, unscrew the two self-tapping screws securing the parking brake warning lamp switch bracket...
...and remove the bracket with the switch.
Move the lever forward and remove it.
Unsplint the axis of the adjusting rod.
Having taken out the axle, we disconnect the adjusting rod and the lever of the VAZ 2110.
We assemble and install parts and components of the VAZ 2111 parking brake system in the reverse order.
We adjust the parking brake system of the VAZ 2112.
- – loosen the locknut of the tensioning device;
- – rotating the adjusting nut, tighten the cable;
- – the full stroke of the parking brake drive lever should be 3-5 teeth per sector;
- – when the lever is completely released, the wheels should rotate freely, without jamming; tighten the locknut.
A properly adjusted parking brake system should hold the vehicle on a 23% grade.
Handbrake
If the handbrake malfunctions, it is recommended to perform an adjustment . And if it does not help, then repairs are carried out by replacing the faulty cable. On a car like the VAZ 2110, adjusting the cable is as simple as replacing it. If this malfunction is ignored, the car may move on its own, or you, on the contrary, will not be able to move.
You don’t have to go to a car service center to solve your problem. If you have some experience, understand the essence of the handbrake, and also apply the data from the repair and operation manual for the VAZ 2110, you can do everything yourself.
Diagnostics and testing of the handbrake on a VAZ-2110
According to the regulations, adjustment of the hand brake is carried out once every 30 thousand km.
However, there are situations when adjustments cannot save the situation. In cases where the handbrake cable is stretched to the limit or when the rear pads and brake drum are worn out, adjustment will not give any results.
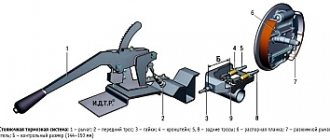
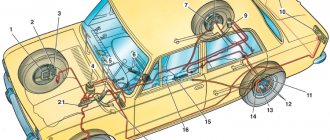
The design of the parking brake system of the VAZ-2110 car.
Terms and Conditions
The factory says that under normal operating conditions, the handbrake lever should make 2-4 clicks before the rear wheels are completely locked.
It’s easy to check - find a slope of about 20-25% , tighten the handbrake all the way ( there should be no more than 7-8 clicks ), put the car in neutral. If a car with a normal load holds well on a slope, the system is in good working order, and you can continue to operate. Otherwise, adjustment is necessary.
The exception is those cases when the handbrake cable is torn, soured in the casings or stretched . Then, first, we buy a new cable, and after replacing it and diagnosing the condition of the brake drums and rear pads, we will make adjustments.
REPLACING THE HANDBRAKE ROD VAZ 2110 2111 2112
HANDBRAKE ADJUSTMENT VAZ 2110
2111 2112.
In fact, this stage can be called halfway through. The car owner should now install the new handbrake cable using the above steps (you need to do it in reverse).
The main design feature of the VAZ 2110 is that the cables in the bracket are installed crosswise.
See:
In addition, after installing the product in place and reassembling the VAZ 2110 in the reverse order, the parking brake system will need adjustment to restore traction. This is important for the further comfortable operation of the machine.
Adjusting the hand brake
Adjustment is also necessary in cases where the handbrake operates before the lever makes a second click.
This means that when fully loaded, the rear brakes will slow down the wheels , the drums will overheat, fuel consumption will increase, and the pads will wear out intensively. To adjust, we will need to get two 13mm wrenches, pliers and, just in case, find a penetrating lubricant like WD-40 .
It will be needed to remove rusted, possibly adjusting or locking nuts. Further work is carried out in this order:
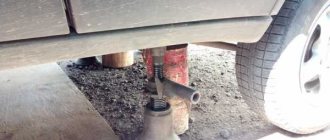
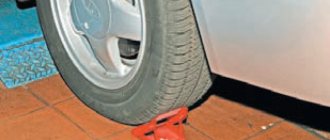
- We place the car on an overpass or inspection hole, since with the wheels hanging out we will not be able to accurately adjust the handbrake.
If there is no hole nearby, you can drive the car onto such a mini overpass.
Lower the lever all the way.
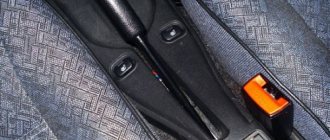
In the arch behind the muffler we find the adjustment unit and clean it of dirt.
1 – lock nut, 2 – adjusting nut, 3 – rod, 4 – equalizer.
If the nuts are hard to move, spray more lubricant.
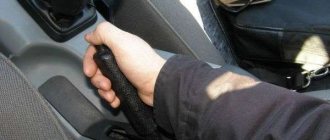
We go into the salon, pull the lever and count the clicks.
If during adjustment we were unable to reduce the number of clicks to four, feel free to change the handbrake cable or check the condition of the brake pads and drums. Good luck to everyone and strong brakes!
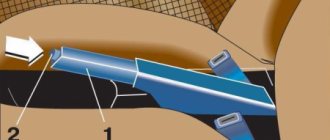
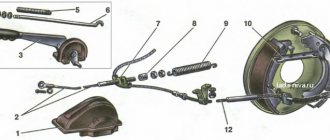
Handbrake diagram for VAZ-2112
For clarity, here is a diagram of a hand brake
1 - button that fixes the handbrake lever; 2 — hand brake lever; 3 — protective cover; 4 — handbrake rod; 5 — cable equalizer; 6 — adjusting nut; 7 - lock nut; 8 - cable; 9 — protective sheath of the cable.
In this circuit we need element number 6 . It is he, and only him!
What is required for adjustment?
In order to adjust the handbrake you need a platform or lift. If there are no such devices, then you can simply hang the rear wheels on the “goats”. They can be installed under the car using a jack. It’s also worth taking two “13” keys and pliers.
- The car is installed on an overpass or “goats”.
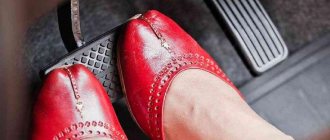
We put the handbrake at the very bottom. Do not pay attention to the scuffs of the console; we conducted an experiment with non-standard armrests. The iron fastenings of the armrest are visible. The photo shows the editorial car
Tighten the adjusting nut
Everything is rusty, we changed the adjustment mechanism
If you cannot tighten the cable, then it should be replaced with a new one.
Adjusting the handbrake after tensioning
After adjusting the brakes, you need to check them again. To do this, the car should be placed on a road with a slope of at least 23% . The car should be in neutral gear in this area and with the handbrake pulled up. If the handbrake brakes hold the car in this area, then the handbrake is adjusted correctly.
What to do when adjustment does not work
There are also cases when the above actions are not enough to adjust the handbrake. This can happen, for example, when the handbrake cable is broken. This happens on the VAZ-2112, although rarely. In such situations, the cable must be replaced. The cable also needs to be replaced when:
- The tips are loose.
- The cable itself begins to stretch, which will lead to its breakage during operation.
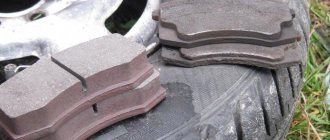
HAIKU! The old cable is very worn out! For comparison, old and new handbrake cables
Heavy wear on the handbrake cable
This replacement procedure does not require contacting a service station. Although this will require some time and skills from the driver, such work can be done independently.
It should also be remembered that when replacing the cable, certain conditions must be observed. To do this, the driver will need an assistant who will pull the cable.
Why do you tighten the handbrake?
The cable acts here as a drive. If the driver pulls the handbrake lever, then at the same time he uses the cable, which spreads the pads in the rear wheel.
If the handbrake is faulty, you just need to tighten the cable or replace it with a new one. On a VAZ-2112 it’s quite easy to do this with your own hands.
Need for adjustment
You can determine that the parking brake needs adjustment when checking. It is recommended to do it every 30,000 kilometers. This procedure should be done even if the handbrake seems to be working well.
The device must also be checked in cases where it does not work. For example, a car moves when the brake lever is applied.
Video about restoring the hand brake in a VAZ-2110
Parking brake VAZ 2110
The principle of operation of such an element of the VAZ 2110 car as the hand (also known as parking) brake is quite simple. A special cable is used as a mechanical drive for the device. By pulling the handbrake handle, the driver simultaneously provides tension on the cable, which occurs evenly on the brake pads of each wheel. If the parking brake is faulty, you should carry out work such as VAZ 2110 adjusting the handbrake, or repair it by replacing the cable. It is noteworthy that it is easy and simple on the VAZ 2110 to both tighten the handbrake and replace it. If the handbrake malfunctions, the driver runs the risk that the car will move on its own or, conversely, will not be able to continue driving after stopping on an uphill slope. That is why you will have to adjust the handbrake in any case - and this can be done without necessarily going to a car service center. An experienced car enthusiast is able to adjust the parking handbrake of a domestic car on his own.
Video of replacing the handbrake cable
As can be seen from this description, performing the specified work is simple and accessible to almost any driver who, without going to a service station and saving a significant amount on this, wants to install a new handbrake cable or adjust the parking brake efficiently and with his own hands.
EXECUTION ORDER
...and remove the bracket with the switch.
|
| « previous page 15.12. Removing the rear brake pressure regulator | to contents | next page » 16. Electrical equipment |
Copyright © 2007-2019 All rights reserved. All trademarks are property of their respective owners.
How to find out if adjustment is needed
VAZ 2110 how to tighten the handbrake
You can determine that the parking brake requires adjustment by doing a little checking. It should be carried out without fail at least every 30 thousand km of vehicle mileage, even if, at first glance, the handbrake works quite normally. It is also recommended to check the device if it does not work - for example, if the car moves spontaneously, the brakes have already been applied. This problem can be solved by replacing the handbrake rod, but most often adjustment is sufficient.
VAZ 2110 does not release the handbrake
What is needed to adjust the handbrake
To adjust the parking brake, you will need one of the following tools:
In the absence of all these conditions, which any ordinary driver is unlikely to be able to provide, you can get by with support “goats”, which are installed under the rear of the body after it has been raised with a jack. It is also worth considering the presence of two “13” keys and pliers in the set.
Where to start adjusting
VAZ 2110 handbrake does not work
The parking brake adjustment process is as follows:
- the car is placed on an overpass (or a ditch, or generally raised with a jack);
- the position of the brake lever is checked - it should be the lowest;
- Using the first key, the lock nut is loosened, while at the same time holding the adjusting nut with the second key.
- The adjusting nut is tightened until the handbrake cable is tensioned.
Note. When tightening the adjusting nut, the rod must be held with pliers.
VAZ 2110 tighten the handbrake
- Now you should make sure that the full stroke of the lever is from 2 to 4 clicks;
- After the stroke has been checked, the equalizer locknut should be tightened while holding the adjusting nut with a wrench.
- The handbrake lever goes down, after which the rear wheels are turned by hand. Their rotation should occur evenly and without jamming.
Note. If the handbrake drive cable cannot be tensioned during the adjustment process, this part should be replaced.
VAZ 2110 handbrake adjustment
Step-by-step instructions that allow you to independently tighten the handbrake on a VAZ-2110 car
If the car owner does not know how to tighten the handbrake on a VAZ-2110, he should familiarize himself with the recommendations below, and, first of all, it will be necessary to drive onto a viewing hole, lift or overpass, in other words, you need to position the car so that the owner can easily get to the necessary mechanisms and components.
List of actions by which the VAZ-2110 handbrake will be adjusted:
- the car is positioned in a way that is convenient for the owner (placed on an overpass, raised with a jack or driven into a ditch);
- the handbrake lever is placed in the lowest position;
- the lock nut is loosened using one wrench, when a second standard tool tightens the adjusting nut at the same time (it should be tightened until the car owner is confident that the handbrake cable is properly tightened). As practice shows, pliers can help the vehicle owner cope with the task, which are convenient for supporting the rod while tightening the adjusting nut;
- those adjusting the lever must check its full stroke, which should be about 2–4 clicks;
- then the equalizer locknut is tightened (do not forget that the second adjusting nut must be supported at all times by a second tool);
- the handbrake goes down, and the rear wheels, using the power of human hands, turn in the desired direction. If everything is done correctly, the wheels will “walk” without jamming.
The adjustment of the handbrake is considered a very simple and quick procedure; the only thing you should pay due attention to is the handbrake drive cable. If during the process it was not possible to tighten it properly, this element should be completely replaced in the near future.
After the adjustment of the VAZ-2110 handbrake is completed, it is necessary to again check the quality of the functioning system. It is preferable to park the car on a section of the road where there is a slope of at least 25%, then put the car on the handbrake in the “neutral” position. With reliable fixation (correctly adjusted lever), the car will remain in place, which will be direct evidence of a job well done by the car owner.
Where to start replacing
Replacing the handbrake of a VAZ 2110
First of all, replacing the cable begins with the following operations:
- lowering the handbrake lever all the way down;
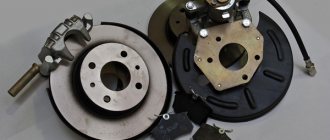
- removing the brake disc of the wheel on which the replacement is being made;
- removing the muffler from the suspension cushions, and the resonator from the rear suspension;
- lowering the exhaust system;
- unscrewing the locknut and adjusting nut;
- removing the equalizer from the rod.
- remove the end of the cable being replaced from the equalizer;
- remove the tip of its shell from the bracket located on the car body;
- bend the cable fastening brackets;
- remove the rear brake pad and disconnect the cable end from the lever;
- loosen the nut that secures the cable holder to the rear axle;
- remove the cable first from the holder, then from the bracket, and finally from the brake cleat.
The work ends with the new cable being installed in place in the reverse order to its removal. In this case, it is worth paying attention to the location of the cables in the bracket - it should be crosswise. After installing the part, be sure to adjust the handbrake. Now, knowing how to adjust the handbrake of his car and replace its cable with his own hands, the car enthusiast can avoid contacting a service station, and thus save his money, since the cost of repairs is not low. If instructions for performing all this work are not enough, it is quite easy to find on the Internet both photos and videos showing these processes in great detail.
Parking brake VAZ 2110
The principle of operation of such an element of the VAZ 2110 car as the hand (also known as parking) brake is quite simple. A special cable is used as a mechanical drive for the device.
By pulling the handbrake handle, the driver simultaneously provides tension on the cable, which occurs evenly on the brake pads of each wheel. If the parking brake is faulty, you should carry out work such as VAZ 2110 adjusting the handbrake, or repair it by replacing the cable.
It is noteworthy that it is easy and simple on the VAZ 2110 to both tighten the handbrake and replace it. If the handbrake malfunctions, the driver runs the risk that the car will move on its own or, conversely, will not be able to continue driving after stopping on an uphill slope.
That is why you will have to adjust the handbrake in any case - and this can be done without necessarily going to a car service center. An experienced car enthusiast is able to adjust the parking handbrake of a domestic car on his own.
If the handbrake cable breaks
There are cases when adjusting the parking brake alone is not enough. This happens quite rarely and mainly on older cars - the handbrake cable breaks. The cable wears out over time and is no longer able to withstand the load of the car, and at some point breaks. Sometimes a break occurs on new cars that are subjected to too intense use, for which their braking system is not designed. Most often, the cables simply jump off or the cable ends secured in the drums are chafed by the wheel bolts; this also happens simply due to wear of the rear drum brakes.
The cable should be changed not only as a last resort when it breaks, but also as a preventive measure for its subsequent breakage in the following cases:
- the handbrake cable moves with difficulty in the sheath even after it is lubricated;
- the cable ends are loose (you have to regularly tighten the cable);
- the cable threads began to stretch, which will ultimately lead to its breakage.
Replacing the cable. Step-by-step instruction
The operation of replacing the handbrake cable, as well as adjusting the handbrake, can be performed independently. Replacement is more difficult, but no professional skills, tools or equipment are required. We must not forget about the assistant, who in this case is necessary for the driver to forcefully pull the cable for the correct installation of the equalizer.
Replacing the parking brake cable consists of the following operations:
1. Lower the handbrake lever all the way down;
2. Remove the brake disc of the wheel from which the cable is being replaced;
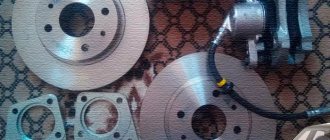
Removing the wheel brake drum
3. Remove the muffler from its suspension cushions, as well as the resonator from the rear suspension;
How to find out if adjustment is needed
VAZ 2110 how to tighten the handbrake
You can determine that the parking brake requires adjustment by doing a little checking. It should be carried out without fail at least every 30 thousand km of vehicle mileage, even if, at first glance, the handbrake works quite normally.
It is also recommended to check the device if it does not work - for example, if the car moves spontaneously, the brakes have already been applied. This problem can be solved by replacing the handbrake rod, but most often adjustment is sufficient.
VAZ 2110 does not release the handbrake
Is adjustment necessary?
First you need to determine whether the adjustment will really solve the problem of the handbrake malfunction.
Adjusting the parking brake
To do this, a small test is carried out. Moreover, it is recommended to do a similar procedure after every 30 thousand kilometers, even if you are sure that the parking brake works well.
Drive your vehicle to an area where there is a slight slope. Place the car on it, turn on the handbrake and shift to neutral. If the car starts to roll down, everything is obvious - the handbrake needs repair.
What is needed to adjust the handbrake
To adjust the parking brake, you will need one of the following tools:
In the absence of all these conditions, which any ordinary driver is unlikely to be able to provide, you can get by with support “goats”, which are installed under the rear of the body after it has been raised with a jack. It is also worth considering the presence of two “13” keys and pliers in the set.
Where to start adjusting
VAZ 2110 handbrake does not work
The parking brake adjustment process is as follows:
- the car is placed on an overpass (or a ditch, or generally raised with a jack);
- the position of the brake lever is checked - it should be the lowest;
- Using the first key, the lock nut is loosened, while at the same time holding the adjusting nut with the second key.
- The adjusting nut is tightened until the handbrake cable is tensioned.
Where to start replacing
Replacing the handbrake of a VAZ 2110
First of all, replacing the cable begins with the following operations:
- lowering the handbrake lever all the way down;
- removing the brake disc of the wheel on which the replacement is being made;
- removing the muffler from the suspension cushions, and the resonator from the rear suspension;
- lowering the exhaust system;
- unscrewing the locknut and adjusting nut;
- removing the equalizer from the rod.
- remove the end of the cable being replaced from the equalizer;
- remove the tip of its shell from the bracket located on the car body;
- bend the cable fastening brackets;
- remove the rear brake pad and disconnect the cable end from the lever;
- loosen the nut that secures the cable holder to the rear axle;
- remove the cable first from the holder, then from the bracket, and finally from the brake cleat.
The work ends with the new cable being installed in place in the reverse order to its removal. In this case, it is worth paying attention to the location of the cables in the bracket - it should be crosswise.
After installing the part, be sure to adjust the handbrake. Now, knowing how to adjust the handbrake of his car and replace its cable with his own hands, the car enthusiast can avoid contacting a service station, and thus save his money, since the cost of repairs is not low.
If instructions for performing all this work are not enough, it is quite easy to find on the Internet both photos and videos showing these processes in great detail.
At the same time, problems with the handbrake can lead to serious trouble if an uncontrolled car crashes into some obstacle or, even worse, into another car. Let's look at problems with the handbrake and how to fix them yourself without contacting specialists at a service station.
Advice! If the cable tension on the handbrake is insufficient, in addition to the handbrake, the car must be left “at speed”, this will protect you in case of unforeseen circumstances.
When the linings on the rear brake pads wear out and the drive cables are pulled out, a problem often arises in adjusting the handbrake stroke (parking handbrake). The examples that will be described in the article will help to cope with this problem not only for the VAZ-2110, but also for other domestically produced cars.
If the problem cannot be resolved by adjusting and tightening the handbrake, you must immediately replace the faulty part with a new one; there is no need to take unnecessary risks. If the handbrake malfunctions, the car can move on its own, and this is an important factor that this mechanism must be checked regularly and, if necessary, the handbrake must be tightened. It will not be difficult for you to replace the handbrake at home, and you do not need to take the car to a service center.
You should not ignore the condition of the handbrake and periodically check the cable tension; it is recommended to do this after every 30 thousand km. It is quite easy to identify problems with the handbrake; you need to put the car on an incline and put the handbrake on.
If the car rolls down, the parking brake does not work. This problem can be solved by replacing the handbrake, but in most cases simply adjusting or tightening the handbrake is sufficient.
The easiest way to fix problems with the handbrake is to pull it out of the cabin. To do this, you need to remove the protective cover that covers the handbrake, after which we will need a 10mm wrench, which should be used to tighten the tension bolt. This adjustment will allow you to slightly tighten the cable, which is convenient for slight loosening. If such manipulations do not give the desired result, it is necessary to resort to other methods of adjustment.