What to do if the brake lights on a VAZ-2110 do not light up
Let's consider the causes and possible ways to eliminate problems with brake lights in a VAZ-2110 car. It is worth noting that solving this problem will only require knowledge, time and a little experience, so before contacting a service station, you can try to solve everything on your own.
Advantages of brake lights VAZ-2110
Unlike old VAZ models, where the sensor that turned on the brakes was closed from pressure, liquid or gas directly when the brake pads were activated, on the 2110 model the sensor is located on the brake pedal, and thus the lights come on at the slightest press on the pedal even before braking, giving road users a little advance warning.
Common problems with brake lights
There may be several reasons:
- blown fuse;
- faulty sensor;
- frayed or broken power cord.
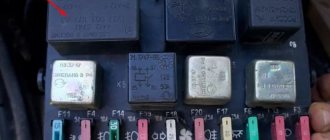
The most common cause is a blown fuse responsible for protecting the signal light circuit. This fuse is located on a block built to the left of the steering column. This capacitor can withstand a current of 7.5 amperes, as evidenced by the inscription on it. It is located in the bottom row, fourth from the right edge.
If after replacing this circuit element the problem has not been resolved, other possible causes of failure should be considered.
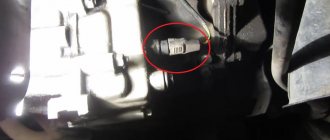
The next troubleshooting point is to check the brake light sensor. To do this, you need to check whether voltage is entering and exiting the sensor. In this case, you need to use a control lamp. If the lamp does not light up when connected in front of the sensor, then the problem may be in the wires going to the sensor. If the lamp works before the sensor, but not after, then the problem lies in this part. You can also simply disconnect the input and output of the sensor and close it “directly” using a copper wire; if after these manipulations the lights in the brake lights light up, then the reason is precisely in the sensor. The sensor cannot be repaired, and the only way out is to replace this part with a new one.
Damaged wires may also be the cause, this will be especially noticeable if the just replaced fuse blows out - this means that the wire is frayed and there is a contact to ground. If the fuse blows without pressing the brake pedal, the wire before the sensor is damaged, and if it blows after pressing, the wire after the sensor is damaged. If there is no voltage, perhaps the wire is simply broken and does not short to ground. When troubleshooting, you should pay special attention to bends and possible areas of damage to the wires.
The next cause of problems is burnt-out LEDs in the brake light; there have been cases when both burned out at once. To replace the light bulbs, you need to remove the flashlight board by squeezing it from the sides and pulling it slightly towards you. Next, you should visually inspect the light bulbs; perhaps a visual inspection will already answer the question about the reason for the non-working brake light. After this, you should replace the old lamps with new ones.
How to remove the mounting block - all steps in one video
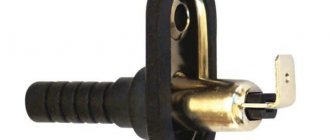
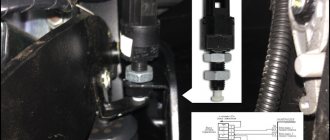
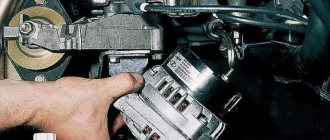
Left: If the turn signals work properly but the hazard warning lights do not turn on, the cause is usually a faulty hazard warning light switch. If you press the switch firmly several times, most often it will start working normally. If this does not happen, then remove the switch (2), squeezing its locking tabs and removing it from the groove, check the contacts of the pin connection (1). Right: When installing the brake light switch (2), it must be pressed against the pedal support (3) so that the switch pin also presses the switch when the pedal (4) is released. For perfect operation, the pin block (1) must be correctly connected.
Why do the brake lights on the VAZ-2112 not light up or work, what should I do?
On all cars of the Tenth Family, the power lines for the lights contain many elements. There are lamp health relays, switches and fuses. Therefore, if the brake lights on a VAZ-2112 do not light up, you need to check the entire chain. But the reason may look simple: sometimes the lamps do not turn on because the socket does not contact ground. Circuits are easy to analyze, but finding the cause of a breakdown is difficult. Let's look into the details.
If one of the lamps does not light, it is simply replaced. See the example in the video - you need a P21 W
Standard version of the brake light operating diagram
Power is supplied to fuse F17 from the battery, then the current goes to limit switch contact 11, and then, if the limit switch is closed, a circuit is formed with the filament of lamps 7. But note: part of the circuit is relay K1, more precisely, its contacts 5 and 4.
Basic network diagram
If the brake lights do not light up, on the VAZ-2112, as on all Tens, check one fuse. It is called F17 and is located in the mounting block to the left of the driver.
Main mounting block
It is important to know: voltage is always present at one of the fuse terminals. Check it out!
A few words about the “serviceability relay”
The lamp health relay is called K1, and it is the largest in the mounting block. If you remove this relay, then when you press the pedal you can dial the voltage at terminal 5 (but not 4). Look at the diagram again, and it will become clear what we are talking about.
The largest relay in the block
All relay contacts are numbered. Check the voltage at the block terminals:
- 6 – “mass” potential;
- 2 – voltage “+12”, but only after turning on the ignition;
- 5 – “+12” by pressing the pedal;
- 4 – the terminal rings like a ground tap.
If the potential “0” is not generated at terminal “4,” it means that the lamp filaments are burnt out or there is a break in the wiring. Now consider something else: the ground potential has been detected, but the lamps do not light. This is where suspicions of a short circuit arise.
We turn on the brake lights forcibly
Relay K1 is successfully replaced with a pad with jumpers. In Fig. 1 just shows its diagram. If there is no such platform, you can temporarily close contacts 4-5. First, check everything mentioned above.
Have an observer watch what happens to the lamps. Press the pedal with one touch and release it. If the lamps do not turn on, check that the fuse is working properly. It's burned out, which means you're looking for a short circuit.
How to and how not to check the “0 Volt” potential
Let’s agree right away that we only work with a voltmeter. Voltage “+12” is caused by connecting one probe to ground. The presence of potential “zero” is checked differently: any of the probes is connected to a terminal with positive voltage, and then the second probe is connected to the wire being tested.
How to connect a voltmeter
Consider the error: one probe is connected to ground, the second to the terminal being tested, and vol. Here they conclude that there is a “mass” potential, but this is wrong! If the contact with ground is broken, the device will also show “0”. That is, the number “0” does not contain information.
Wiring test for non-working brake lights (ground test)
Let's look at the basic diagram: the brake lights and the reversing lamps have a common ground pin. If contact with this pin is broken, the reverse lamps will not turn on. Well, brake lights too.
Connector for connecting “internal” lights
On the left side there is a connector through which the wiring goes to the fifth door. The connector has black and red wires. Check the voltages on them. Most often the ground on the black wire does not ring. But maybe the connector itself needs to be cleaned.
Usually, if the ground breaks, another pin is used - the one that is connected to the glass heating coil.
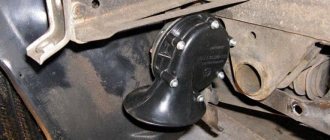
If the “plus” does not come to the red wire, we check the “frog”. It's simple here:
- Disconnect the connector with two wires from the limit switch;
- Using 17mm wrenches, loosen the two nuts: holding the lower nut, rotate the upper one;
Removing the frog brake
By the way, one of the connector terminals receives a voltage of “12 Volts”. Check it!
If all the steps do not lead to results, there is only one thing left: contact a qualified electrician. We wish you success.
Standard version of the brake light operating diagram
Power is supplied to fuse F17 from the battery, then the current goes to limit switch contact 11, and then, if the limit switch is closed, a circuit is formed with the filament of lamps 7. But note: part of the circuit is relay K1, more precisely, its contacts 5 and 4.
Basic network diagram
If the brake lights do not light up, on the VAZ-2112, as on all Tens, check one fuse. It is called F17 and is located in the mounting block to the left of the driver.
VAZ 2110 brake lights do not light up
On the VAZ 2110, as on other car models, brake lights play an important function in warning other road users about braking or reducing speed. If the brake lights on a VAZ 2110 are not lit, this reduces the safety of using the car and can lead to an emergency. In this case, you should not immediately take the car to a workshop, because most often you can find the cause of such a breakdown and fix it yourself. To cope with such a problem on your own, it is important to understand how the brake lights on the VAZ 2110 work.
Scheme of operation of stop lights
The stops on VAZ cars work according to the same, fairly simple scheme. The main element of this unit is the sensor responsible for turning on the brake light. When the sensor is triggered, the brake lights in the rear of the car light up. When braking stops, the lamp stops lighting. If the brake lights on a VAZ 2110 do not light up, the first thing you need to do is make sure that the lamps have not burned out. The brake light circuit works as follows: voltage from the battery is sent to the brake switch, which, when closed, allows current to flow through the filament of the lamps connected to each other. Voltage is then sent to the negative of the battery, allowing the lights to light up.
On most older VAZ cars, the brake light sensor is located in the area of the brake system line. In this case, the process of closing the contacts was carried out by increasing the air or liquid pressure in the system. The main disadvantage of this connection was that the brake lights came on along with the brake pads when the car began to slow down. On modern models, such as the VAZ 2110, the stop sensor is connected to the brake pedal. This made it possible to turn on the lamp exactly at the moment the driver presses the brake. This design connects the brake lights at the moment the brake pedal free travel is selected, before deceleration begins.
Reasons for a non-working brake light
If the brake light on a VAZ 2110 does not light up, the first thing you need to do is check whether the fuse responsible for protecting the signal lamp circuit has blown. Then we take a test lamp and check whether there is power to the stop sensor. If during such a test the indicator lamp does not light up, it means that the fuse has failed or the wire leading to the brake light switch from the fuse has broken. When performing this test, it is important to ensure that power is being supplied to and routed from the fuse. If necessary, we replace broken or burnt wires and eliminate broken contacts in the connecting circuit leading to the sensor or fuse. If power is present at one of the terminals, you can remove both wires and connect them with copper wire. In this case, the warning lights will light up.
If the lamps light up during the test, then we can talk about a sensor malfunction. This spare part cannot be repaired, so it must be replaced. If it turns out that the sensor is working, then you need to look for a break in the wiring or a malfunction of the lamps. At the same time, we take a test lamp and check whether there is power at the plug responsible for the operation of the rear lights. If power is supplied, it is most likely that the brake lights on the VAZ 2110 do not work due to faulty lamps. If there is no power, you need to find an open circuit or poor contact in the system between the stop switch and the warning light. It happens that a new fuse is installed, but it immediately blows. In this case, we can talk about the presence of a short circuit that needs to be found and eliminated.
The light in the VAZ-2110 interior does not work
Many owners of "ten" are faced with the fact that the interior lighting stops working. How to find a fault and return the light to the car?
To narrow down your search, let's divide the symptoms into several categories.
The interior light does not work when one door is opened
When the interior light does not respond to opening, say, the driver's door, try opening other doors. If there is no response to only one door, it is worth checking the limit switch installed on the rack. This is a button that is pressed when the door is closed, and when opened, it is pressed out and supplies “mass” to the lampshade. Limit switches, as such buttons are also called, often oxidize and may stop passing current. Another factor indicating a faulty limit switch is the absence of a sound signal from the on-board control system display unit. He “sees” open doors through the same limit switches.
Limit switch VAZ-2110.
To remove the limit switch from the rack, you need to remove the negative terminal from the battery, unscrew the screw that secures the limit switch in the rack and pull it out. It is necessary to disconnect the battery, because there is voltage at the end switch, and it is almost impossible to pull it out without hitting the body. Touching the body in this case is a short circuit.
After removing the limit switch from the stand, inspect its rear part where the moving contacts adjoin the body. The contact point is very small and over time becomes covered with a dark coating of oxides. Remove it with fine sandpaper and install the limit switch back. The light must appear.
If the light does not appear, then you should make sure there is voltage at the limit switch. This can be done with a multimeter or a test light. The current comes to the limit switch from the lampshade, and if there is no voltage, then there is a break between the limit switch and the lampshade. Another reason is a malfunction of the “mass” contact in the lamp itself.
In the case when voltage does arrive at the limit switch and its clean contacts are reliably closed, you need to check its seat on the rack. The “mass” is formed by a self-tapping screw that connects the end switch to the metal of the rack. If the screw or the hole for it is very rusty, then they should also be cleaned with improvised means. As an option, screw in a self-tapping screw with a slightly larger diameter.
The interior light does not respond to any door
When the interior light does not turn on when any door is opened, most often the problem is not in the limit switches, but in the power supply to the lamp. However, if the car is unfamiliar (for example, recently purchased), it is still necessary to check the limit switches on all racks. The previous owner could have started them so much that all four limit switches failed.
To remove the diffuser from the lampshade, you need to pry it off with a screwdriver.
The main reason for the lack of light in the cabin with such symptoms is the lamp itself and its power supply. Remove the lamp diffuser by carefully prying it from the side with a thin screwdriver. The plastic diffuser is held in place by two pins, one of which needs to be disengaged.
First of all, we check the light bulb - it may simply burn out. If the lamp is intact, close all the doors and check for voltage at all lamp contacts. One of them should have +12 Volts - this is the power line for the lampshade from the fuse box. When there is no voltage on any contact, check the fuse.
On the VAZ-2110, fuse F17 is responsible for the interior lighting. The same fuse protects the navigation light, the ignition switch illumination, and even the brake lights! Accordingly, if the navigation lighting was working for you, but now suddenly stopped along with the main lamp, it means that the fuse can be immediately replaced with a new one of the established rating. Fuses, as a rule, burn out for a reason, but due to the presence of a short circuit in the protected circuit. If the new fuse also blows soon after installation, then you need to contact an auto electrician or try to find the short circuit yourself.
Problems with interior lighting on a VAZ-2110 can also arise due to the BSK unit, which is connected to this system. The unit contains electronic components, so not everyone can diagnose it, and it rarely fails. However, if a malfunction is not found in other places, then it is worth checking this unit. It is also better to entrust this work to a specialist.
The interior light does not turn on permanently
To simply turn on the interior lighting in the “ten”, you need to press the diffuser of the lampshade, as if tilting it lengthwise. In this case, a moving contact moves inside the lampshade and comes into contact with another contact, which has a constant “mass”. Due to this, the light bulb begins to glow regardless of whether the doors are open or not.
The point of contact between these contacts is negligible and, over time, carbon deposits form on it. As a result, the lamp cannot be switched on in permanent mode. Remove carbon deposits with a thin screwdriver or your fingers. To access this contact, it is enough to also remove the lamp diffuser.
These are the most common reasons why the interior light on a VAZ-2110 may not work. In addition to them, there may be others, for example, broken wires or complex abnormal short circuits in the wiring. If it was not possible to return the light in the cabin using the above methods, it is still better to take the car to a specialist. Deeper work on troubleshooting interior lighting will require serious disassembly of the interior and strong knowledge of automotive electrics.
The brake lights on the VAZ-2112 do not light up or work, why?
On all cars of the Tenth Family, the power lines for the lights contain many elements. There are lamp health relays, switches and fuses. Therefore, if the brake lights on a VAZ-2112 do not light up, you need to check the entire chain.
But the reason may look simple: sometimes the lamps do not turn on because the socket does not contact ground. Circuits are easy to analyze, but finding the cause of a breakdown is difficult. Let's look into the details.
If the lamps do not light, it is simply replaced.
Standard version of the brake light operating diagram
Power is supplied to fuse F17 from the battery, then the current goes to limit switch contact 11, and then, if the limit switch is closed, a circuit is formed with the filament of lamps 7. But note: part of the circuit is relay K1, more precisely, its contacts 5 and 4.
If the brake lights do not light up, on the VAZ-2112, as on all Tens, check one fuse. It is called F17 and is located in the mounting block to the left of the driver.
It is important to know: voltage is always present at one of the fuse terminals. Check it out!
A few words about the “serviceability relay”
The lamp health relay is called K1, and it is the largest in the mounting block. If you remove this relay, then when you press the pedal you can dial the voltage at terminal 5 (but not 4). Look at the diagram again, and it will become clear what we are talking about.
The largest relay in the block. All relay contacts are numbered. Check the voltage at the block terminals:
- – “mass” potential;
- – voltage “+12”, but only after turning on the ignition;
- – “+12” by pressing the pedal;
- – the terminal rings like a ground tap.
If the potential “0” is not generated at terminal “4,” it means that the lamp filaments are burnt out or there is a break in the wiring. Now consider something else: the ground potential has been detected, but the lamps do not light. This is where suspicions of a short circuit arise.
We turn on the brake lights forcibly
Relay K1 is successfully replaced with a pad with jumpers. In Fig. 1 just shows its diagram.
If there is no such platform, you can temporarily close contacts 4-5. First, check everything mentioned above.
How to and how not to check potential
Let’s agree right away that we only work with a voltmeter. Voltage “+12” is caused by connecting one probe to ground. The presence of potential “zero” is checked differently: any of the probes is connected to a terminal with positive voltage, and then the second probe is connected to the wire being tested.
Consider the error: one probe is connected to ground, the second to the terminal being tested, and vol. Here they conclude that there is a “mass” potential, but this is wrong! If the contact with ground is broken, the device will also show “0”. That is, the number “0” does not contain information.
Wiring test on non-working brake lights
Let's look at the basic diagram: the brake lights and the reversing lamps have a common ground pin. If contact with this pin is broken, the reverse lamps will not turn on. Well, brake lights too.
Connector for connecting “internal” lights. On the left side there is a connector through which the wiring goes to the fifth door. The connector has black and red wires. Check the voltages on them. Most often the ground on the black wire does not ring. But maybe the connector itself needs to be cleaned.
Usually, if the ground breaks, another pin is used - the one that is connected to the glass heating coil. If the “plus” does not come to the red wire, we check the “frog”. It's simple here:
- Disconnect the connector with two wires from the limit switch;
- Using 17mm wrenches, loosen the two nuts: holding the lower nut, rotate the upper one;
- The end switch is removed as an assembly and checked with an ohmmeter.
By the way, one of the connector terminals receives a voltage of “12 Volts”. Check it!
If all the steps do not lead to results, there is only one thing left: contact a qualified electrician. We wish you success.
How to remove the mounting block - all steps in one video
Let's consider the causes and possible ways to eliminate problems with brake lights in a VAZ-2110 car. It is worth noting that solving this problem will only require knowledge, time and a little experience, so before contacting a service station, you can try to solve everything on your own.
Advantages of brake lights 2110
Unlike old VAZ models, where the sensor that turned on the brakes was closed from pressure, liquid or gas directly when the brake pads were activated, on the 2110 model the sensor is located on the brake pedal, and thus the lights come on at the slightest press on the pedal even before braking, giving road users a little advance warning.
Common problems with brake lights
There may be several reasons:
- blown fuse;
- faulty sensor;
- frayed or broken power cord.
The most common cause is a blown fuse responsible for protecting the signal light circuit. This fuse is located on a block built to the left of the steering column. This capacitor can withstand a current of 7.5 amperes, as evidenced by the inscription on it. It is located in the bottom row, fourth from the right edge.
The next troubleshooting point is to check the brake light sensor. To do this, you need to check whether voltage is entering and exiting the sensor. In this case, you need to use a control lamp.
If the lamp does not light up when connected in front of the sensor, then the problem may be in the wires going to the sensor. If the lamp works before the sensor, but not after, then the problem lies in this part. You can also simply disconnect the input and output of the sensor and close it “directly” using a copper wire; if after these manipulations the lights in the brake lights light up, then the reason is precisely in the sensor.
We turn on the brake lights forcibly
Relay K1 is successfully replaced with a pad with jumpers. In Fig. 1 just shows its diagram. If there is no such platform, you can temporarily close contacts 4-5. First, check everything mentioned above.
Have an observer watch what happens to the lamps. Press the pedal with one touch and release it. If the lamps do not turn on, check that the fuse is working properly. It's burned out, which means you're looking for a short circuit.
How to and how not to check the “0 Volt” potential
Let’s agree right away that we only work with a voltmeter. Voltage “+12” is caused by connecting one probe to ground. The presence of potential “zero” is checked differently: any of the probes is connected to a terminal with positive voltage, and then the second probe is connected to the wire being tested.
How to connect a voltmeter
Consider the error: one probe is connected to ground, the second to the terminal being tested, and vol. Here they conclude that there is a “mass” potential, but this is wrong! If the contact with ground is broken, the device will also show “0”. That is, the number “0” does not contain information.
The brake lights on the VAZ 2111 do not light up: reasons
WHY ARE THE STOP LIGHTS NOT GOING ON?
The brake light indication is one of the most important signals indicating driver actions. Therefore, it is impossible to postpone repairs if the brake lights are not on. If you notice a malfunction along the way and you are unable to eliminate the cause of the breakdown, turn on the hazard lights and drive at low speed to the nearest service station or a place suitable for DIY repairs.
SEARCH PRINCIPLE
To find a fault in any vehicle on-board network system, you should use the method of sequential elimination of elements. The point is to consistently check electrical appliances and sections of the circuit, excluding elements from the list of reasons that could cause a breakdown. To do this, you need to clearly understand the design and operating principle of the system. When troubleshooting, you need to move from the components that require the least effort to check, to the most difficult to diagnose elements.
ELECTRICAL DIAGRAM
We immediately emphasize that the pinout of connectors and color markings of wires may differ not only between different models of the same automaker, but also among one model of different years of manufacture. Before you start searching for the cause of the breakdown, you need to find an electrical diagram specifically for your car model.
We will consider the principle of operation of brake lights and the troubleshooting algorithm using the example of the VAZ 2101-2102 circuit. The photo shows the general diagram of the vehicle's lighting and light signaling. We need to isolate the components involved in the operation of brake lights.
- 6 – mounting fuse block;
- 13 – brake light switch. It is a non-locking button (returns to its original position after removing the force). Located directly next to the brake pedal. When the brake pedal is released, the contacts of the limit switch are open, no current passes through it. Accordingly, when pressed, the contacts close, allowing flow through the lamps;
- 19 – lamps that light up when you press the brake pedal.
We do not have a diagram of the mounting block, but we know in advance that the brake lights only work when the ignition is on. There is a wire from the mounting block to the brake light limit switch, on which there is a constant + after the ignition is turned on. As soon as the limit switch contacts close, + goes to the brake light bulbs, which are connected in parallel. The “ground” of the rear lights is common and consists of a wire screwed to the car body.
In the diagram we presented, the elements are depicted as close as possible to how they look in reality. Don’t be alarmed if you only find a schematic diagram for your car with symbolic images of the elements. Schematic diagram of external lighting for VAZ 2114, 2115:
- 3 – mounting block;
- 8 – lamps for side lights and brake lights;
- 11 – brake light limit switch;
- K4 – relay for monitoring the serviceability of brake light lamps and side lights.
LOCALIZING THE FAULT
Understanding the operating principle allows you to determine exactly why the brake lights may not light up:
- The fuse has blown. In the diagram, the fuses are marked with the letter F (from English - Fuse) and the serial number of the seat in the fuse block, for example, F3;
- poor contact at connectors;
- the light bulbs have burned out, but since the lights are connected in parallel, the likelihood that 2 lamps will burn out at once is extremely low;
- poor contact on the negative terminal of the lights. In this case, problems may begin not only with the feet, but also with the lighting of the remaining lamps in the lanterns;
- Damage to the negative track in the lamp board. From the total mass directly to the brake light lamp, the minus goes along a special path on the board. The path may collapse from water or mechanical impact;
- malfunction of the brake light switch, the so-called frog;
- broken wiring, oxidation of contacts.
FAULT FINDING ALGORITHM
To detect a fault in the electrical network, you will need a multimeter or a tester, which you can make yourself. Previously, we told you how to use a multimeter, so we won’t focus on that.
The sequence of searching for the cause of the breakdown:
- Check the fuse for the brake light circuit. The location diagram of the fuse links can be found in the repair and operating manual for your car;
- often the symbol of the protected circuits is located on the back of the cover covering the fuse mounting block. If the installed fuse of the required rating immediately blows, there is a short circuit (short circuit) in the circuit. Please note that the fuse can protect not only the feet, but also other circuits. Installing a fuse with an increased rating is fraught with the risk of a car fire;
- If oxidation is detected on the terminals, clean the contacts mechanically or use an aerosol contact cleaner.
- Having turned on the ignition first and holding the brake pedal depressed, check whether there is power on the positive wire that goes from the limit switch to the rear light connector. If there is power, there is a malfunction in the lights themselves;
- check whether the positive signal is coming from the mounting block to the limit switch. If + comes, but when you press the brake pedal it does not appear on the second terminal of the limit switch, then the problem is in the “frog”;
- If there is no + at the limit switch terminal, examine the circuit up to the mounting block. If the wire is intact and securely fastened in the connectors, then the problem is in the mounting block.
If, for example, there is a + on both terminals of the limit switch when you press the brake pedal, but it does not come to the headlamp connector, then you need to look for the location of the wiring break. You can check the existing “frog” with a multimeter. Simulate the state of the brake pedal being pressed, attach probes to the terminals, turning the multimeter into resistance measurement mode. If there is no resistance between the terminals, the limit switch is faulty. If you removed the brake pedal limit switch for diagnostics, adjust its position correctly during installation. The brake lights should light up at the slightest touch of the brake pedal.
The search principle we considered is suitable for most cars. But, for example, in some cars, a relay is also involved in the operation of the brake lights, due to which the brake lights may also not light up. That is why it is always necessary to start by reading the electrical diagram.
If you find an error, please select a piece of text and press Ctrl+Enter.
Main reasons
Almost all problems related to automotive electrical systems can be solved in approximately the same way. You need to look for a potential or probable cause of malfunctions in the problematic object itself, or understand the system responsible for supplying power.
The situation is exactly the same with devices called brake lights. If they stop working, then you should look for the reason in one of the following points:
- There were problems with the fuse. It has oxidized or completely failed;
- There are faults in the lamps themselves or in one lamp, depending on how many stops are not working;
- The reason lies in the mechanism responsible for turning on the warning signal when the brake is applied;
- In the socket where the stop light is installed, the contacts have oxidized;
- More serious problems appeared related to damage to the wiring.
Based on the stated reasons why the feet may stop working, we can draw a completely objective conclusion. A truly serious malfunction concerns only wear or damage to the electrical wiring. Solving such a problem with your own hands is not always correct.
When the rear brake lights (left and right) or the additional central brake light repeater fail, do not rush to look for an auto electrician and offer him money to fix the problem.
There is a high probability that you will be able to do everything on your own. You will only need a standard set of tools for a motorist, as well as an understanding of how the lighting equipment in general works in your vehicle. Start with the most likely and fairly simple to solve possible malfunctions. Only if it turns out that the problem is bad or damaged electrical wiring, then it makes sense to visit a good car service center. It is better to entrust such tasks to experienced craftsmen. The main components for restoring the operation of brake lights on your own, you will need a spare working lamp, a control unit or a multimeter, as well as suitable tools.
It would be a good idea to study the owner's manual and understand how to get to the stops on your car.
Fuse
The first place to start is by searching for the mounting block in which the fuse responsible for the brake light is located.
Moreover, each machine has its own electrical circuit and specific location of fuses.
These can vary significantly depending on the vehicle, such as:
- VAZ 2110;
- VAZ 2107;
- Toyota Rav 4;
- Ford Fusion;
- VAZ 2114;
- VAZ 2115;
- Ford Focus;
- Chevrolet Lacetti;
- Lada Granta;
- Hyundai Accent;
- Renault Logan;
- Hyundai Solaris, etc.
A blown fuse quite often causes the failure of a number of equipment, including lighting devices. Check fuses visually and using a multimeter.
But there is a simple and effective way to check that takes a minimum of time. To do this, start the engine and hold down the horn button. This is not suitable for all car models, but on many vehicles the same fuse is often responsible for the sound signal and brake lights.
If this is not the case, we continue our search further.
Brake lamps and their sockets
Next, you should switch to the brake lights themselves. In most cars, to gain access to the feet, the luggage compartment is opened, the rear light bulb is removed, after which you can get to the feet themselves.
But the dismantling process may differ on different brands and models. Here, start from your car specifically; if necessary, look for hints in the operating manual. There are examples of cars where you can get to the brake light without removing the rear optics at all. You still have one main task ahead of you. It consists of gaining physical access to the faulty device, the lamp and the socket in which it is located. Not everyone can try to determine the problem by eye. Here it is better to take a different route.
The optimal solution would be to use new, similar lamps instead of potentially faulty ones. Therefore, you will have to buy a light bulb in advance and screw it in. If you can't find a lamp of a similar size, use a marker or turn signal repeater. Make sure these conditional controls work first.
When everything worked after installing the new lamps, you found the reason. You can confidently buy new matching stop lamps, replace old ones and reassemble the unit in reverse order.
It is extremely important to take into account one feature. Some modern cars have such a principle of operation of brake lights, in which when one car brake light fails for one reason or another, the second one automatically stops functioning. That is, sometimes checking one lamp does not give a result, since in fact the chances are 50/50 of replacing the burnt lamp, and not the one that simply turned off in tandem.
If replacing the light bulbs did not give anything, check the sockets themselves. It happens that they oxidize, this breaks contact, and the device does not turn on, although power is supplied to it. Also make sure that the socket is connected to the vehicle wiring. If necessary, the contacts are disconnected, cleaned with fine-grained sandpaper, and then returned to their place. Even during this procedure, it is recommended to apply a special lubricant to the contacts after cleaning.
One more thing. When checking the sockets, it is also worth taking new light bulbs. It happens that due to oxidation of the cartridge, the lighting device itself fails. That is, in fact, 2 malfunctions occur simultaneously.
Problems with the switch
The brake light on a car lights up the moment the driver presses the brake pedal with his foot while sitting behind the wheel. When pressed in this way, the force is transferred to a special mechanism. It is popularly called a frog. It is also a limit switch and it is also a classic brake light switch.
There are 3 main reasons why a frog or limit switch may not work:
- contacts have oxidized;
- carbon deposits appeared;
- corrosion has formed.
Despite the slightly different processes, the essence of the problem is the same. It can be eliminated by stripping the frog, or by replacing the stop switch.
If none of the options are suitable, there is a high probability that the problem lies in damage to the vehicle's electrical wiring. Here it’s up to you to decide whether to try to resolve the issue on your own, or seek help from qualified specialists.
Considering the complexity of the electrical circuits of modern cars, a better solution would be to visit a trusted auto electrician. But the final choice is yours.
Thanks everyone for your attention! Be sure to subscribe, leave comments, ask questions and invite your friends to join us!
(No ratings yet)
The brake light does not light up on a VAZ 2110
Posts: 308 From: Our ChuVaSha
Do it normally, it will be fine!
If you drive more quietly, you will be further away from where you are going.
Posts: 14,628
SaNeK ReSpEcT
, Replace the brake light switch
Post edited by Aleks_N
— Apr 15 2009, 19:49
Posts: 308 From: Our ChuVaSha
Do it normally, it will be fine!
If you drive more quietly, you will be further away from where you are going.
Posts: 688 From: cbx, YuZR
Posts: 308 From: Our ChuVaSha
Is there a separate fuse for the brake light? the dimensions are on fire. everything is on, only the sonic signal is not on, and not a single one
Post edited by SaNeK ReSpEcT
— Apr 15 2009, 20:25
Do it normally, it will be fine!
If you drive more quietly, you will be further away from where you are going.
1) There is a wide harness running from the fuse block along the left side of the body along the car, check the harness connector under the trunk trim on the right side near the rear arch (if you look at the car from the rear), there is a common connector for all rear lights and other devices - maybe a banal “non-contact” ", either oxidation, or simply not making contact, or due to the fact that something is shorting out and heating up. 2) Using a voltmeter, measure the voltage that goes to the rear lights - connect directly to the connector that fits the light. 3) Simply close the two contacts on the frog - if you close them together, the brake lights should light up, this way you can identify the shortcomings of the frog, but you cannot short the wires for the frog to ground!
On the tenth family, glitches are frequent due to additional signals on the spoiler; when the spoiler is installed, the wires are pressed against the body and they short out; glitches also occur when installing the wheel arch liners; they touch the wires.
The VAZ 2110 has fuse F17 (7.5 A), which is responsible for the brake light
, interior lighting bulbs, individual lighting, ignition switch lighting, trip computer - all in one “bottle” here is the diagram of the VAZ 2110 https://cxem.net/avto/electronics/4-68-2.jpg Good luck with the repair.
Post edited by Julien
— Apr 15 2009, 21:07
Wiring test for non-working brake lights (ground test)
Let's look at the basic diagram: the brake lights and the reversing lamps have a common ground pin. If contact with this pin is broken, the reverse lamps will not turn on. Well, brake lights too.
Connector for connecting “internal” lights
On the left side there is a connector through which the wiring goes to the fifth door. The connector has black and red wires. Check the voltages on them. Most often the ground on the black wire does not ring. But maybe the connector itself needs to be cleaned.
Rear brake lights of VAZ 2110 do not light up
Let's consider the causes and possible ways to eliminate problems with brake lights in a VAZ-2110 car. It is worth noting that solving this problem will only require knowledge, time and a little experience, so before contacting a service station, you can try to solve everything on your own.
Advantages of brake lights VAZ-2110
Unlike old VAZ models, where the sensor that turned on the brakes was closed from pressure, liquid or gas directly when the brake pads were activated, on the 2110 model the sensor is located on the brake pedal, and thus the lights come on at the slightest press on the pedal even before braking, giving road users a little advance warning.