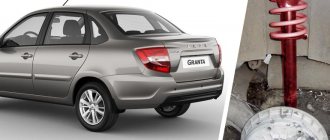
Replacing shock absorbers VAZ 2108, 2109, 21099: car enthusiasts should take note of the shock absorber
As a result of long-term use of the vehicle or premature breakdown, the vehicle owner may need to replace the front and rear struts. On VAZ 2108, 2109 and 21099 models, the service life of shock absorbers varies between 50-100 thousand kilometers and depends on driving conditions. It is prohibited to drive a car with faulty shock absorber struts, as failure can lead to an accident. Therefore, it is important to at least imagine in theory how the replacement is made.
Rear suspension
The rear suspension system is designed in such a way that repairing it sometimes requires replacing the entire central beam for the VAZ 21099 model. Fortunately, the need for such repairs is extremely rare. The central beam can be severely damaged in case of an accident.
If during the repair process you need to remove the wheels, then you need to loosen the bolts on the floor in advance. It is better to carry out work related to the removal of the rear axle with people who can hold and smoothly lower the beam.
How to disassemble the rear suspension on a VAZ 21099
Purpose of shock absorbers
The main function of shock absorbers is to keep the vehicle on the road no matter the condition of the road surface. Due to the struts, control is not lost when hitting bumps, which ensures a comfortable ride. Also, the front and rear struts do not allow the car to roll too much when entering a sharp turn.
Both the rear and front shock absorber struts of the VAZ 2108, 2109, 21099 consist of two elements - the shock absorber itself and the softening spring. The shock absorber is a cylindrical pipe with smooth inner walls, filled with working fluid. While the car is moving, the spring prevents the shock absorber from falling too low.
Reasons and signs of the need to replace racks
Failure of shock absorber struts in VAZ 2108, 2109, 21099 cars can be determined by a number of signs. Including:
- a characteristic knocking sound from under the car's bottom, which occurs due to wear of the fastening;
- the presence of black streaks on the shock absorber body, which can be easily
- detect during visual inspection;
- ineffective vibration damping, leading to excessive sway of the car body on uneven roads;
- strong shaking when hitting bumps.
To obtain reliable information about the technical condition of VAZ 2108, 2109 or 21099 shock absorbers, test the car on a vibration stand. The computerized stand takes into account the design features of the struts of a specific car model and performs testing by simulating various road conditions. The test results allow you to find out about the serviceability and remaining life of shock absorbers.
How to check a shock absorber
To make sure it works, you will need to do the following:
- it is clamped in a vertical position;
- raise to the maximum;
- quickly lowered.
This procedure must be repeated several times.
The following signs indicate failure of this part:
- presence of sounds during the above procedure;
- jamming;
- failure.
This shock absorber is replaced with a new one. However, before doing this, it is better to make sure that any individual element is not damaged. If this is the case, then only what is broken is replaced.
The procedure is as follows:
- the rod is pulled out to the maximum;
- the nut is unscrewed;
- take out the fixing elements and the rod itself;
- remove the working cylinder;
- every detail is inspected.
If defects are found, they are replaced. Assembly is carried out in reverse order.
After installing the compression valve, you need to make sure that its discs move smoothly. Jamming is not acceptable.
Finally, it’s worth telling that on average in Russia a new rack will cost approximately 3 thousand rubles. As you can see, the price is quite serious, and therefore it makes sense to treat the car more carefully and regularly care for it.
To fully familiarize yourself with the process, we recommend watching the video below:
On a VAZ-2109 car, replacing the rear struts is necessary in case of excessive wear or damage. If we compare the suspension of the “nine” with the “classic”, then it is more advanced, higher efficiency, and the design is a little simpler. Although there are still common features - the design has springs and shock absorbers.
Required Tools
You can remove faulty racks and install new ones in their place yourself. To do this you will need the following set of tools and accessories:
- Socket head for 17 and 19.
- Mount.
- Socket wrench.
- Jack.
- Pliers.
- Ratchet handle.
- Collar.
- Wrenches for 17 and 19.
- Penetrating lubricant.
- A key to keep the shock absorber rod from accidentally turning.
Replacing rear struts and springs with your own hands
The rear shock absorber struts on VAZ 2109-2108 models have to be changed less frequently than the front ones, since the load on the rear of the car is somewhat less. And as for the replacement process, it is also much simpler, and you can cope with this work without any problems. To get started, here is a list of the tools you will need for this repair:
- keys for 17 and 19
- mount
- penetrating lubricant
- knob
- ratchet
- head for 17 and 19
- a special key for unscrewing the support (to keep the strut rod from turning)
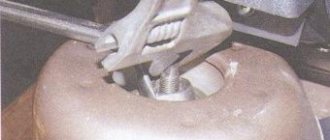
First, you need to slightly loosen the nut securing the upper support of the rear drain, which is located in the body glass - you can get there from the trunk:
At this time, you need to keep the rod from turning with a special key. Although I did all this with ordinary wrenches, it is possible to get to the nut with open-end wrenches, although it is problematic.
How to change the rear ones on a VAZ 2109 with your own hands
Replacing the rear shock absorber strut on VAZ 2108, 2109, 21099 models involves sequentially performing a number of stages. To ensure proper operation of the shock absorber, the following instructions should be followed.
- Open the trunk of the car and remove the protective cap from the side where the rack is located. After this, hold the shock absorber rod firmly to prevent rotation, and use a spanner to unscrew the fastening nut.
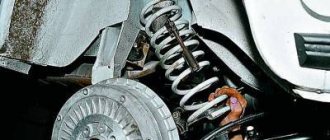
- Use a jack to raise the vehicle to gain access to the rack.
- Using wrenches, unscrew the bottom bolt that secures the shock absorber. To do this, hold the fastening nut of the bolt with one key, and with the second, unscrew the lower rack clamp and remove it.
- Pull out the bottom of the strut and lower the shock absorber down. After this, remove the protective rubber pad and iron washer from the rod.
- Remove the faulty rack and install a new one in its place in the reverse order. When installing the iron cover onto the protective cover, it is important to check that the flange is tucked into the lip on the cover.
- After completing the installation of the strut, check whether the shock absorber rod is inserted into the specially designated glass, then put the rubber cushion back on and secure the metal washer.
Video: how to replace it with a VAZ 21099
Causes of rear strut failure
Replacing rear struts on a VAZ 2109
There may be several reasons why the rear shock absorber strut is not functioning properly:
- It is possible that the rear wheel wears out the plastic locker that protects the strut while driving. This leads to the fact that over time the wheel “makes its way” to the rack.
- If the strut breaks off along the lower silent block, then most likely the bolt that holds it was not tightened under load.
Note: therefore, when replacing the rack, you need to pay attention to this bolt if you do not want to carry out repair work again soon.
How to understand that the rear pillar needs repair
VAZ 2109 rear strut extension
Signals that repairs need to be done can be different:
- The silent block has changed slightly. Perhaps there are cracks or other types of flaws on it.
- The boot and rubber gasket have become limp and less elastic.
Note: if they haven't broken yet, they definitely will soon. Therefore, it is advisable to replace them in a timely manner.
- The compression buffer is deformed or damaged. Because everything in the system works under high pressure, and the rubber gasket does not work normally, but all this pressure “presses” on the compression buffer. Ultimately, this leads to its breakdown.
- Small cracks appeared on the spring (see Replacing the springs of a VAZ 2110 on our own).
Note: if the spring is somehow deformed, it should be replaced immediately. At the same time, some drivers, wanting to “lower” their car, deliberately cut off several coils of the spring.
How to remove and install the front ones on the “nine”
It is somewhat more difficult to remove the front strut from the car and change it, so when performing work it is important not to deviate from the prescribed instructions. To replace the front shock absorber, you must perform the following steps.
- Remove the protective cap of the desired pillar under the hood of the car. The cap, which prevents dirt from penetrating the rack, can be removed without additional tools - just grab it and apply a little force.
- After removing the cap, loosen the nut located inside the shock absorber rod. To do this, put the small part of the removable key on the rod and install the larger part on top.
- Raise the car with a jack and remove the wheel from the side where the faulty shock absorber strut is located. Then use pliers to remove the cotter pin.
- Unscrew the nut that secures the ball joint, and then remove it from the hole.
- Move the brake hose away from the bracket to avoid damaging it.
- Remove the front steering knuckle and all the components located on it. Next, unscrew the mounting nut on the top of the shock absorber and remove the strut.
- Following the reverse procedure, install the new shock absorber strut in place. Once the process is complete, perform a wheel alignment and camber check.
After replacing shock absorber struts, it is important to check the secure fit of all fasteners. In this case, even if all parts are secured, the check should be repeated after 100 kilometers of the vehicle.
Operating a vehicle with faulty shock absorber struts can significantly reduce the level of driving comfort and negatively affect vehicle control. Timely replacement of struts will ensure safety on the road and prevent breakdowns of other components. As practice shows, the financial costs of installing new shock absorbers VAZ 2108, 2109, 21099 are disproportionately small in comparison with the possible consequences of ignoring the malfunction.
If you find an error, please select a piece of text and press Ctrl+Enter.
Installing a new part
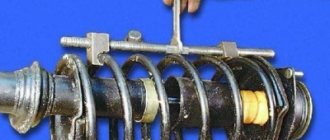
- A compression buffer is placed on the rod.
- The part is installed on the lower seat.
- A bolt lubricated with lithol is inserted.
- The nut is tightened too much.
- By slightly extending the rod, install the thrust washer, together with the lower cushion. To make it easier to remove the rod, you need to screw the nut on top.
- An insulating gasket is inserted above the spring. She is tied with a thin rope.
- The spring is installed on the rack. Its coil must fit into the groove of the cup.
- To fix the rod, you need to compress the spring. To do this, you need to raise the rear beam. The rod should fit into the hole.
- All removed parts are put on it.
- The nut is tightened.
- The jack is lowered.
- The top nut is tightened tightly.
After installation, the functionality of the new part is checked.
Important! Replacement of the shock absorber must be carried out simultaneously on each side. After 100 km it is necessary to re-stretch the connections.
Signs of malfunctioning rear struts
The shock absorber performs a very important function in the suspension of a car. It holds the car during turns, helping to avoid large rolls. Softens any collisions of the car with unevenness on the road.
If the car's handling has become worse, knocking noises are heard when driving over bumps, or the car has strong rolls when turning, then you need to check the struts. Malfunctioning rack operation is indicated by:
- Shock absorber deformation.
- Cracks in the spring.
- Oil leaks on the shock absorber.
You can also do the following experiment: go to the car, place your palms on the end of the wing and rock the car. If, after rocking, the car moves up, then down, and then stops rocking, then, based on the experiment, the strut is in good condition. If the car begins to rock continuously for a long time, then it is time to replace the struts.
Replacing racks
You can correctly replace the racks by sequentially performing the steps in the list:
- Place wheel chocks or ordinary bricks under the front wheels of the car.
- Hang the wheel whose stand needs to be changed using a jack.
- Remove the wheel from the car.
- Remove the protective cap from the glass on which the faulty rack is located.
- Clamp the shock absorber rod with pliers or an adjustable wrench and unscrew the nut that secures the car's shock absorber.
- Remove the metal washer and rubber pad that are located under the nut.
- Using two wrenches, unscrew the nuts at the bottom of the shock absorber.
- To do this, hold one nut and unscrew the other.
- Remove the bolt to which the two nuts were attached.
- Lower the shock absorber down.
- Manually remove the compression buffer from the shock absorber, as well as the protective cover.
- Remove the gasket from the shock absorber. It may also remain on the bottom of the glass.
Checking Rack Parts
Inspect all components of the rack:
- Shock absorber. If it has oil leaks or deformation, replace it with a new one.
- Compression buffer. If it is deformed or torn, it needs to be replaced.
- Protective case. Since it protects the shock absorber from contamination, a torn cover will significantly reduce its service life. Therefore, the cover must be intact, otherwise, replace it.
- Gaskets. If they are torn, they need to be replaced.
- Spring. Check if there are any cracks on it. Also check the settlement of the removed spring using a special device if you have one.
Installing racks on a car
Installation should be done in reverse order, but there are a few things to consider:
- when you install the steel cover on the protective cover, the flange must be tucked into the edge of the protective cover;
- the protrusion of the insulating gasket should rest against the last coil of the spring. To keep them together, you can wrap them with something.
Suspension is a very important part of any car, regardless of its purpose, so great attention must be paid to suspension maintenance. Suspension maintenance, in particular on the VAZ 21099, is very simple, which a car owner with any experience can handle, just using the instructions in our article.
Replacing the rear pillar on a VAZ 2108, VAZ 2109, VAZ 21099
Welcome! Rear strut - it performs the function of holding the car on the road, does not allow it to roll too much in corners, and also keeps the car on the road when hitting a bump and thus it does not lose control from this, in addition, the struts cause either discomfort (If not high-quality rack), or, on the contrary, it gives pleasure from driving and makes the car smoother and more confident on the road.
Note! In order to change the rack, you will need to take with you: A set of wrenches, in which you will have large wrenches of approximately “17” and “19”, in addition to this you will also need a screwdriver, and you can also stock up on a wrench and to it with cap heads! (Also take an adjustable wrench or some healthy pliers with you)
Summary:
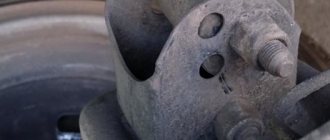
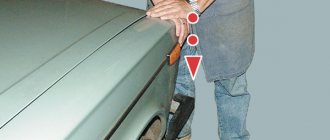
Where is the rear pillar? From the title you can already assume that since it is the rear, then it is located in the rear of the car, but not everyone knows where exactly, so just below you can see a photo in which the wheel has been removed from the car and you can almost completely see the rack itself.
Note! Any car strut, no matter the front or rear, consists of two important things, namely the shock absorber itself (Indicated in the photo above by a red arrow) and, accordingly, a spring (Indicated by a blue arrow) that holds the car and does not allow it to drop to too low a height, Well, in some ways, the spring softens the blow when hitting a bump, but still the most basic unit thanks to which the shock is absorbed when hitting a bump is the shock absorber itself!
When do you need to change the rear strut? To find out when it has become unusable, you need to go to a specialized car service center and have them undergo a technical inspection of the car (They have a special device for this) which will tell you whether the struts need to be replaced or not, but you can always manage to go to a car service station (For example you live in a village where there is no service that specializes specifically in suspension), so in this case you need to check the racks for serviceability yourself, namely look at them, you already know where they are, and if you suddenly find traces of oil on them then it is necessary to replace it quickly (Applies only to shock absorbers), and there should be no deformation on all parts, including the spring itself, namely, the spring should not have cracks, and in conclusion, let’s note a couple of facts, if when hitting a bump recently you start to experience knocking noises, and also if the car behaves loosely in corners and easily tips over to its side, then this all indicates a malfunction of the struts, which in this case you will need to replace.
Note! Carry out a small experiment that will help identify the malfunction of the struts, to do this, put your hands on the outer part of the rear wing of the car and rock the car, and then when the wing is at the lowest point, immediately remove your hands from it and if the car then swings first up, then down and stop, then everything is fine with the racks, but if it floats without stopping or sways more than once, then you will have to replace the racks! (Do this operation on each side, that is, if, for example, the car floats on the rear left side, and sits rigidly in place on the right side, then only the left strut is faulty and needs to be replaced)
Replacement
To replace or partially repair you have to go through a rather labor-intensive path.
You will need the following set of tools and materials:
- Screwdriver Set;
- Set of wrenches;
- Jack;
- Partner.
Decide in advance whether you are going to change the entire assembly, or whether you want to change only the damaged elements of the rear pillar. The volume of your purchases depends on this.
You can start working. Based on our instructions and the video lessons provided, you will be able to replace the rear struts yourself.
- Turn the gearbox into first gear mode.
- Raise the rear wheels using a jack.
- Install supports, strengthening the reliability of fixing your car in a given position.
- Remove the racks. To do this, first go to the trunk, remove the decorative rubber plug, which is located on top of the rack mount. It is better to remove all unnecessary things from the trunk.
- Take a 17-size spanner and a 6-size open-end wrench. With their help, you can unscrew the nut with a spanner, and the open-end wrench will be useful for holding the shock-absorbing strut rod.
Removal process
- That's it, this allows you to remove the mounting nut, support washer, spring washer and top pad without any problems.
- Now we go under the car to finish what we started.
- Take a 19 mm wrench and remove the shock absorber mounting bolt to the rear beam. Remove it.
- In some cases, problems may arise with dismantling this bolt, since it simply sticks. To do this, pre-treat the bolt with the almighty WD40 and give it time to react.
- If even this method did not help, then you will have to take the guide and simply knock out the fastening element.
- Next, remove our shock absorber along with the spring.
- Do not forget that during such manipulations most often the spring gasket remains on the body. It sticks to the metal. Many people forget to take it out, which causes difficulties during reinstallation. Don't make this mistake.
- Clean all the seats to make it more convenient for you and make it all look more aesthetically pleasing. Plus, neatness never hurts to extend the service life of new spare parts.
- To make it more convenient for you, wrap the gasket on the new spring with electrical tape, or secure it with thin wire. This will prevent it from slipping when you begin installation.
- When putting the assembly back together with the new rear strut, be sure to make sure that the raised portion of the spring cup faces the direction of the wheel.
- Secure the lower end of the rack with a nut and bolt, but there is no need to tighten the fasteners just yet.
- Using the lever of your jack, raise and lower the rear of the car. This is necessary in order to eventually insert the shock absorber rod into the hole in the body of your nine.
- With the spring in place, pull the shock absorber rod out to its full length.
- Insert the rod into the lower ear and secure with a bolt.
- Place a jack under the beam and begin manipulating the lifting mechanism.
- At the same time, the spring will begin to compress, and the rod will move towards the glass.
- You or your assistant must be alert in the car in order to have time to pry the rod with a screwdriver and ensure it is directed in the right direction.
- Once the rod is in place, the work can be considered almost complete.
- Fix the rod, not forgetting to insert the cushion, washer and engraver. All this is securely fixed.
- Now you can lower the car onto its own wheels and fully tighten the bolt of the lower shock absorber mounting.
Re-assembly stage
Changing rear rack assemblies is easier and faster than dismantling, disassembling the old rack, looking for defects in it and replacing individual damaged components. But this requires less financial costs.
Changing racks is not that difficult, even if you have little experience in such matters. But if there are none, be sure to contact trusted car services. Do not risk your own car, otherwise subsequent repairs will be even more difficult and expensive.