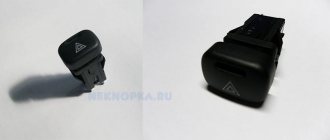
Button for turning on the heated rear window of VAZ 2110
In fact, there are few reasons for the heated rear window not working.
Most often, it is enough to simply change the fuse that controls the heated rear window. Just find a fuse diagram for your car (this is not difficult to do, since everything can be found quickly and easily on the Internet) and change this fuse, even if it looks intact. Now, if replacing the fuse did not produce any results, then the reason lies in the wiring, most likely there was a break somewhere or the wires were burned, you can try to inspect the wires coming from the button for turning on the heated rear window. But a complete failure of the rear window heating is a rare case, much more often it works, but not completely, or rather, not all heating threads work, but why does this happen? The answer lies in the principle of operation of the rear window heating, which is very simple, probably everyone knows that when current flows through a conductor, it begins to heat up, this is where this physical principle is applied, and if there is no contact between the threads, then no current flows through them , so they don’t heat up, and all we have to do is restore this contact so that the current begins to flow through all the threads. Moreover, the reasons for thread breakage are very simple; most often this occurs due to the fact that the car owner, while cleaning the rear window from snow and ice, breaks these same threads with a scraper. In this case, you first need to determine which threads are not working. This is done very simply, we turn on the heated rear window when the glass is foggy or covered with ice and see which threads do not warm the glass. After this, you need to clean the glass and visually determine where the thread broke; you can use a magnifying glass and walk along the entire length of the thread, since sometimes the gap is very small and is not visible to the eye. So, we have decided on the location of the damage, what to do next? And then you need to go to a car store and buy a tube with a special conductive paste to restore the rear window heating filaments.
Before you begin restoring the damaged area, you must thoroughly clean it of varnish and wipe it with alcohol or something else degreasing. Next, clean the ends of the threads a little, as they may oxidize and will not conduct current. Now we seal it with tape or tape above and below the damaged area, leaving a small gap between them, where we will pour the paste. The gap should be no wider than the thread itself. After this, carefully apply the paste to the cleaned area and leave to harden. You can usually turn on the rear window heating after a day has passed after applying the paste, but you can definitely read about this on the paste box itself, since they are different. In this way, you can restore all damaged areas of the rear window heating threads, spending a minimum of effort, time and money.
The next way to restore broken rear window heating threads is using metal filings. First you need to prepare ordinary metal filings; this can be done, for example, using a metal file, i.e. Just grind off some part of the metal with a file and here you have ready-made sawdust. Also, to restore threads in this way, you will need a magnet and good glue, preferably transparent. We take a magnet and attach it to the back of the rear window, because from the interior, in the place where the damaged area will be restored, and then pour metal filings into the place where the thread broke. Thanks to the magnet, the sawdust will be located in this very place, but you can play it safe and stick tape underneath the thread so that it doesn’t slide off. After this, we take transparent glue and pour it on top of the sawdust, the main thing before doing this is to make sure that the sawdust lies tightly and creates a connection between the threads. Next, let the glue dry, usually 1-2 hours, and check the functionality of the rear window heating.
Sources of the problem
Since many drivers prefer to restore the heated rear window with their own hands, you need to know about repair options taking into account the source of the problem. There will be no obstacles to independently checking the functional components of the car if you have minimal skills in repairing automotive equipment.
System fuse
The safety element is the first thing that should attract your attention when a breakdown is detected, since the system will not work if it is burned out. The location of this element varies depending on the car model, so at this stage you will have to turn to the vehicle service book for help.
Next, remove the fuse and make sure it is working. Repair of the rear window heating will be limited to replacing the burnt out element.
A breakdown of the system relay can also lead to the heating stopping. In such a situation, installing a fresh element will also be sufficient.
Wiring
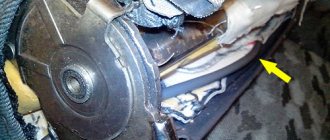
If replacing the fuse does not correct the situation, proceed to diagnosing the power supply wires. Burnout, broken fastening or fracture help stop the flow of current to the heating poles. To detect this circumstance, turn on the heating button and measure the terminal voltage with a tester. The terminals can be found at the bottom of the glass or on its sides. The lack of voltage on the wires should alert you.
Examine the entire wiring path for integrity, clean the contacts of the terminals and connections. Oxidation in these areas often leads to blocking the voltage supply. If you were unable to cope with this task yourself, an auto electrician will help you.
Threads
If the heating tapes are damaged, it may also be necessary to restore the heated rear window. To know how to do this, you must first study the peculiarities of the work process in this zone. The heating element receives voltage and then the energy follows the threads. In relation to the base, they are connected in parallel and act as current conductors. Their heating is due to a certain amount of resistance; despite the insignificant heating temperature, this is sufficient for its purpose. If one or more threads are damaged, no current flows through them, therefore, these areas do not heat up. The features of repair work in such a situation are described below.
Controls
If all the elements that you checked earlier are working properly, you should pay attention to the power button. You can determine the operation of the system by the light indicator that lights up, which makes itself known after pressing the button
If everything is activated and the corresponding indicators make themselves felt, but the glass is not heated, the working contacts of the toggle switch are likely to wear out or burn, so energy is not supplied. Repairing a heated rear window of a car only requires replacing the button.
Imported cars
In the case of imported cars, do-it-yourself rear window heating repair will not be limited to diagnosing the standard heating system, since the rear view mirrors are also equipped with heating. Activation of the heated glass of the stern leads to parallel activation of the heated mirrors. If the system does not work on both zones, it is most likely that you are dealing with the cause discussed in the first paragraph - a fuse or relay.
It is important to determine which fuses are associated with the glass, because there are several of them. It would be a good idea to diagnose the electronic board, which often wears out due to soldered contacts and broken tracks.
Rear window heating diagram for VAZ 2110, 2111 and 2112
A function such as heated rear window is by no means new on domestic VAZs. This option is available on all modern Volga-made cars, including “tens” and “nines”. Heated rear window is useful not only in winter, but also in summer (in particular, when it rains heavily).
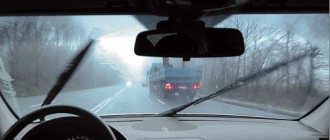
Clean glass is the key to your safety. After all, the visibility of the car thanks to the interior mirror increases by a third. Sometimes this system fails. The VAZ-2110 is no exception. Rear window heating not working? What to do and what are the reasons? You will find out the answers to these questions in our article today.
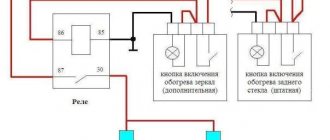
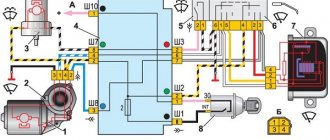
1 – mounting block; 2 – ignition switch; 3 – rear window heating switch; 4 – control lamp for turning on the heating; 5 – rear window heating element; K6 – additional relay; K7 – relay for turning on the heated rear window; A – to power supplies
The rear window heating is activated using the auxiliary relay K7 (type 904.3747-10). When the heating is turned on, the orange lamp 4, which is located next to the button, lights up. The heated rear window only works when the ignition is on, since voltage is supplied to the button through an additional relay K6, which is activated when the ignition is turned on. Power is supplied to the heating threads through the contacts of relay K7 from fuse F7, which is directly connected to the power sources.
It doesn’t matter how the relays and fuses are located, the connections are the same (except for relay K8)
Thirdly, there are both those without generator excitation resistors (and the legs at the rear Ш4/9) which are needed if you have an old device (otherwise the generator will not give a charge until you rev it up).
How to fix the heated rear window of a VAZ2107 with your own hands
To eliminate the causes of malfunctions, you will need the following devices:
- multimeter or voltmeter;
- foil.
Identifying the cause throughout the entire circuit
The most common failure of a defroster is a blown fuse. Until some kind of breakdown occurs, for example, failure due to a blown cigarette lighter fuse, the location of the unit and the fuses themselves are not known.
- Step No. 1 - in VAZ 2107 cars, the fuse that is responsible for heating the rear window is located in the fuse block under the designation F5.
- Step No. 2 - if the fuse is working, then the next step is to check the heater terminals on the glass and for ground.
- Step No. 3 - check the control unit connector (relay and toggle switch (on/off button)).
- Step No. 4 - checking the heating filaments with a tester.
- If the above steps do not reveal the cause, then Step #5 is to check the ignition switch contacts or fuse block board.
Step-by-step guide to diagnosing defroster filaments:
- To ensure that the heating filaments are not damaged by the sharp tips of the probes, it is necessary to wrap pieces of foil around the probes of the measuring device (voltmeter or multimeter in position “B”).
- Turn the ignition key and turn on the heated rear window switch.
- One probe of the measuring device must be connected to the positive wire, the second - to the middle of the wire (see figure).
- The value in volts should be 6. If it shows 6 V, then the heater filaments are working.
- If the value on the device displays 12 V, then the thread is broken between these two points.
- If 10 V is visible on the screen, then the thread is broken from the midpoint to the negative point.
- Next, you need to move the probes to the right, from the middle point to the right vertical stripe (minus), from the “plus” to the middle. If in this section the meter shows from 0 to 5 V, then this section of the circuit has a break.
Diagnostics of heater filaments with a voltmeter
Before repairing threads, you need to buy a repair kit in advance, and then do the repairs in this order:
- Clean the torn section of thread with alcohol.
- Along the length of the thread, above and below it, we evenly glue electrical tape (you can use adhesive tape, but electrical tape is more convenient). The width between the two strips of electrical tape is equal to the width of the heater filament.
- We apply a special solution with a brush (called a kit for repairing rear window defroster filaments) along the entire length between the electrical tapes. It would be more effective to trim the brush, remove the side sticking hairs, so as not to smudge the electrical tape and avoid overspending.
- We wait until the solution dries naturally, that is, we do not turn on the heater. Natural drying time is about 1 day.
Which car lamps are the most popular? Lamps H8 and H11 have some differences, but are interchangeable.
Recommendation for choosing a special regenerating agent for the glass heater:
- the color of the solution should be red-cinnamon (in practice, gray color did not work);
- the cost of a good working special tool is about 350-400 rubles (bought for 150 rubles, I could not restore the thread).
How does a wiring diagram benefit you?
Although domestic cars will be simpler than foreign cars, they all consist of a huge variety of different components, power and fuel units and, of course, sophisticated electrical equipment. The dear VAZ-2112 could not do without a modern electrical part. The right turn has stopped working, there is no low beam headlights, the horn is silent and does not buzz, a light bulb in the trunk has burned out or the radiator fan has stopped turning on. What to do, where to run and who to ask?
Every car owner should at least get to know the electrical part of his car in general terms. Where to begin? Rummage through the glove compartment, and if your wife has not yet put things in order, you can find there the “Operating Manual for the VAZ-2112.” Among other things, this necessary book contains a lot of important information on the electrical part. Having at least a little insight, in the future you will not only save on repairs at a service station, but also avoid ordering a tow truck when suddenly your “beloved” becomes rooted to the spot in the middle of a field.
Shendys › Blog › Mounting block 2110
Diagram of the main mounting block of fuses and relays Identification of fuses and relays of the mounting block Open cover of the mounting block Location of the mounting block in the car
| Relay no. | vendor code | Purpose |
| K1 | lamp health monitoring relay | |
| K2 | windshield wiper relay | |
| K3 | relay-interrupter for direction indicators and hazard warning lights | |
| K4 | low beam headlight relay | |
| K5 | headlight high beam relay | |
| K6 | additional relay | |
| K7 | rear window heating relay | |
| K8 | backup relay (not installed on VAZ-2110 family vehicles) |
Circuit breakers
| No. prev. | Ampere | Purpose |
| F1 | 5 A | Lighting lamps: license plates, instruments, dimensions on the dashboard, left dimensions, trunk lighting |
| F2 | 7.5 A | Low beam in the left headlight |
| F3 | 10 A | High beam in the left headlight |
| F4 | 10 A | Right front fog lamp |
| F5 | 30 A | Door windows |
| F6 | 15 A | Portable lamp, cigarette lighter |
| F7 | 20 A | Radiator fan, horn |
| F8 | 20 A | Heated rear window |
| F9 | 20 A | Windshield washer and cleaner |
| F10 | 20 A | Reserve |
| F11 | 5 A | Dimension on the right side |
| F12 | 7.5 A | Low beam in the right headlight |
| F13 | 10 A | High beam in the right headlight |
| F14 | 10 A | Fog lamp, left |
| F15 | 20 A | Seat heating |
| F16 | 10 A | Hazard signal, turn signals |
| F17 | 7.5 A | Brake light, ignition switch illumination, interior lighting |
| F18 | 25 A | Cigarette lighter, glove compartment light, interior heater |
| F19 | 10 A | Reversing lamp, brake light monitoring |
| F20 | 7.5 A | Rear fog lights |
Additional fuse diagram
Location of additional fuse in the mounting block
Comments and reviews
I'm looking for what role Mitsumi 41-v715 plays on the VAZ-21099
What is the question, what exactly are you interested in?
How to call the heated rear window on a VAZ 21099
Hello, please tell me how you can check the heated rear window when removed from the car. There is a charger and a light bulb. There is no tester, etc.
Opel Vectra b, how does the rear window heating work? Because it works for me, and it doesn’t work for me. The button is not latching, I checked the button and the relay, everything is fine too.
The night was dark and stormy. Snow completely covered the car to a height of several centimeters. It took several minutes to clear the snow, and by then the engine had warmed up enough for the remaining frost clinging to the inside of the windshield to melt, leaving tracks on the side windows. But the rear window defroster only thawed a thin strip at the top and bottom of the window, leaving a wide swath of glass frosted over and absolutely no visibility to the rear.
The worst that could happen is that the rear window defroster grille is completely non-functional, requiring you to either drive blind with no rear view (bad idea) or scrape snow and frost off the rear window with a trusty plastic scraper.
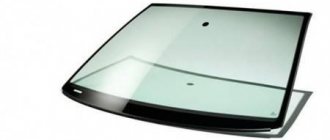
Improved windshield
As you know, in VAZ 2107 cars the manufacturer did not provide such a function as heating
windshield. There is only its air flow, which allows you to remove the “foggy glass” effect. If you want to improve your car, you can become the owner of a heated windshield. This athermal glass is easily delivered on its own as all the necessary components are attached to it.
This type of glass is ideal for the VAZ 2107, so a snowy, frosty morning can no longer ruin your mood. Of course, heated glass is quite expensive compared to its simple counterpart. But you probably won't regret this windshield upgrade.
Device
First, let's get acquainted with the structure of this system. It includes the following elements:
- The thread that provides heating.
- Wiring (positive and negative).
- System switch. Equipped with a warning light inside.
- Heating relay.
- Fuse.
- Control buttons.
This system works very simply. There is a conductive thread on the rear window. It warms up when power is applied. This way the glass is heated and condensation is removed from the inside.
Why does the rear window heating not work on a VAZ-2110 car? The reasons may be trivial. After all, the device has no mechanical parts. Therefore, all you need for diagnostics is a multimeter and a test lamp. This is the only way to find out why the heated rear window of the VAZ-2110 does not work. There is a photo of the diagram in our article. Below we will look at the main elements to check.
The most common reason why the rear window heating does not work on a VAZ-2110 car is the relay. Over time, it burns out and stops passing current normally. How to check this element for serviceability? You will need a multimeter. But first we check whether the relay is emitting signs of life. We turn on the heating button and listen to its operation.
A working relay should make a characteristic click. If it is not there, we continue to search for the problem deeper. We pull the relay out of the mounting location and apply the probe of the device to one of the contacts. The second wire goes to ground (that is, to a bare area of the body). If the device shows “zero”, most likely the element needs to be replaced.
It is because of the relay that the rear window heating does not work well. The VAZ-2110 is equipped with an element of the “K6” brand. It can be bought at any car store for a price of no more than two hundred rubles. If you don't have a multimeter, you can use a test lamp. It is important that it is 12 volts. We connect one wire to the “plus” of the relay.
How the system works
There is nothing supernatural in the very principle of operation of such a system. It is most often used to heat the rear window, but some car models implement heating of the front window, side glass and wiper locations when turned off.
The task of such a system is to create conditions on the surface of the glass that prevent frostbite or fogging. As you know, at temperatures below zero degrees Celsius, moisture freezes and ice forms. Therefore, to eliminate this phenomenon, it is enough to ensure the surface temperature is above zero degrees, and icing will not occur.
This is done quite simply - conductive strips are created on the glass, one end of which is connected to the vehicle’s on-board network, and the other through an appropriate control circuit to ground. When the heating is turned on, current begins to flow through such conductors; thanks to the generated heat, the glass is heated, which causes it to be freed from the formed ice.
Unbreakable connection
The machine and its electrical circuit cannot exist separately; this union is indestructible, like the foundations of the Chinese wall.
Almost all systems, in one way or another, depend on electricity and, in its absence, not only refuse to work correctly, but do not function at all.
Here are just a few of these interactions:
- ignition of the combustible mixture in the fuel system of both carburetor and injection type engines;
- supplying electricity to the starter when starting the engine;
- instrument panel illumination at night;
- informing other road users about the desire to carry out a maneuver using a light indicator “right” or “left”;
- playing a sound signal to prevent an accident;
- turning on the side lights to identify the vehicle at night.
Let's move on to the electrical circuit itself.
Among other things, the presence in the “Manual” of printed electrical diagrams with detailed descriptions makes it an indispensable assistant in not only accurately identifying symptoms, but also “prescribing treatment”, finding out the most important question of why it hurts, and not just where.
It is important to understand from our diagram what the following auxiliary equipment is connected to:
- sound signal;
- wipers;
- cassette player or radio;
- interior lighting;
- heated rear and front windows;
- power windows (if equipped).
The task is important for the reason that in a car there is a certain interdependence of some (main) systems from others (auxiliary). Some work in pairs, while others work in threes or even fours. If you know exactly this connection, you will immediately find your bearings. If there is no current supply to the glow plugs, then, most likely, other subsystems that work together are not functioning.
Relay and fuse box in the center console
Diagram of the relay and fuse box in the central instrument panel
Designation and numbering in the block Location of the relay and fuse block in the console
Circuit breakers
| No. prev. | Ampere | Purpose |
| 1 | 15 A | ignition module, controller |
| 2 | 15 A | canister purge valve, vehicle speed sensor, oxygen sensor (heating) and air flow sensor |
| 3 | 15 A | fuel pump, injectors |
| Relay no. | vendor code | Purpose |
| 4 | electric fan | |
| 5 | electric fuel pump | |
| 6 | ignition |
Diagram of an additional relay block on the left side of the center console
Designation and numbering of relays and control units in the center console Location of the relay unit in the car
Designations
| Element no. | vendor code | Purpose |
| 1 | Central locking control unit | |
| 2 | Immobilizer block | |
| 3 | Rear fog lamp relay |
Wire damage
This is exactly the case when the fuse did not save the situation and a short circuit still occurred. Melted contacts are very difficult to find. After all, the wiring to the glass stretches across the entire interior. To determine where the open circuit occurs, use a multimeter. It should show whether there is voltage in the network or not. Call all areas in this way. After all, a break can happen both before and after the fuse mounting block.
For what other reasons does the rear window heating not work? VAZ-2110 is equipped with special threads. A break can happen here too. The threads are a small layer of conductive substance. It is easily damaged by the slightest mechanical impact (even with such harmless actions as removing tint).
You can do this yourself. To do this, you do not need to dismantle the glass. All you need is to purchase a special conductive paste (available in auto stores or on the market) and apply it to the damaged area. It is important to prepare it carefully. To do this, carefully clean the varnish from the surface and degrease the area with alcohol (use a piece of soft rag).
Next, we clean the ends of the damaged threads. We apply adhesive tape or electrical tape to its upper and lower parts so that there is a small gap (no wider than the thread itself). We apply a special adhesive into it. After a day, the composition will completely dry out. Next, you can remove the remaining tape and check the system for functionality.
Possible malfunctions and their symptoms
If the heated rear window does not work, then car enthusiasts usually find out about it when it starts to sweat or a coating forms on it. When you turn on the heater function, you can wait for a very long time, in the end there will be no results or the glass will be partially heated. You don’t need to be a great specialist here to understand that the device requires repair.
Depending on the connection diagram, the car's windshield or rear window defroster may turn on either with or without the ignition on, but usually still works when it is on. Depending on the vehicle, the windshield or threads installed on the adhesive on the rear window may only operate after the engine is started. This allows you to prevent accelerated battery discharge (the author of the video is BortJournal Renault Megan).
It should also be noted that the device can operate at a current of 10 to 25 amperes, it all depends on the specific car.
So, if the rear window heating does not work, then there may be several types of faults:
- The system does not turn on. If the lamp located on the button does not light up when the system is turned on, most likely the problem lies either in the button or in the fuse. If the lamp is on, but the threads attached to the glue do not heat up, you need to check the relay. In some cases, the problem lies in the connectors connecting the device to the vehicle's electrical circuit, so you need to check these elements as well. Diagnostics are carried out in accordance with the service documentation for the car.
- If the rear or windshield fogs up slowly, especially during the winter cold, then the essence of the problem may lie in poor contact of one of the connectors; this needs to be checked. As a result, the resistance of the contacts will increase, and the voltage will be less powerful, accordingly, the threads attached to the glue , will take longer to warm up. In order to check this, you need to use a multimeter and measure the voltage at the terminals of the device. If there are differences in the readings obtained, they should be no more than one volt. Otherwise, the heated rear window of the car will need to be restored.
- Horizontal traces of fogging remain on the car glass - another type of malfunction. One of the most common problems in this case is the breakage of filaments in certain places. Usually, such a breakdown can be checked and identified without special instruments, just by eye, since at the point of the break the auto glass will not be thawed or fogged up. It should be noted that even with a slight mechanical impact, the tracks are destroyed, so when cleaning auto glass you must carefully use a scraper. If you carry large cargo, make sure that it does not rest against the rear window.
Method number 2
This method involves the use of non-ferrous metal shavings as a conductive element. Also, to repair the thread, we will need a transparent varnish (it is advisable to use a thick one, like for nails). Mix the shavings with a brush and apply to a strip previously sealed with tape, as in the previous case.
After an hour, the varnish will completely dry. The method is quite old. It is not always possible to connect damaged contacts as needed. Therefore, if it is possible to buy conductive glue, it is better to use the first method. It will be much faster, easier and more reliable. The cost of a 10-gram tube with this composition is 78 rubles. This volume is more than enough to repair several damaged heating threads.
The car does not start - there is no charge in the battery
This problem occurs because the battery charge is going somewhere. It does not disappear by chance, but always for some reason.
Here are some of them:
- you leave the car outside at an ambient temperature of -20 degrees or below;
- the battery life is ending;
- The radio was left on in your car for some time, which led to a loss of charging power.
In all these cases, two types of treatment are usually used: firstly, urgently recharge, and secondly, buy a new battery. If you keep pulling and driving on a dead battery, soon you won't even be able to disarm your car. You will have to manually remove the terminals, trying to make it “silence”. The situation will immediately improve as soon as the battery is charged again.
Troubleshooting procedure
- Check fuses F8 (20A) and F8 (20A) (mounting block).
- We check the serviceability of the rear window heating button. Is there a “plus” on pin No. 10 of the switch button and after turning on the button on pin No. 9 (a test lamp or multimeter will be useful).
- We check 12V at the output Ш5-2 and at the connector near the rear window.
- We check the wires and their connections.
- We check the rear window heating relay - K7.
- We check the integrity of the glass heating filaments.
The algorithm for determining the cause of a malfunction is similar for most cars, the only differences are in the names of fuses, relays and connectors.
By the way, do you know that to extend the service life of the heating elements, they use a Glass Heating Regulator (DOC), and you can also install a Fresnel lens on the rear window?
Source
Installation and repair of heated rear window
Having examined the design and components of the heating system, it is quite possible to do it yourself. To do this, you need a mesh of heating threads, wires, a switch, pads and a 4-pin 30 A relay, heat shrink, terminals, as well as round plug contacts for a hairpin. You also need to have electrical tape, pliers, pliers and screwdrivers.
Taking into account the fact that the filaments are very thin, you need to be extremely careful during the work, as there is a high risk of breaking these filaments both at the installation stage and after installation on the glass.
- Now you need to decide how to assemble and connect the heated rear window. To do this, first take the pads (if they have wires, they need to be removed).
Next, after crimping the wire with female contacts, you can fold a new block and connect the relay by crimping the ring-shaped connector. All that remains is to run the wire through which the heating is connected.
- The next stage is the installation of heating in the car. First you need to remove part of the dashboard and connect the pads. All work must be performed with the battery disconnected. Then you should decide on the installation location of the rear window heating button, as well as the relay.
Having selected the installation location, you can connect the power and route the wires to the fuses under the instrument panel. Then you need to locate the 16A fuse by connecting the plus wire coming from the relay to it.
We also recommend reading the article on how to polish your car headlights yourself. From this article you will learn how to properly polish headlights made of plastic and glass, how to polish car headlights, and also what you need to pay attention to when polishing car headlights with your own hands.
Next, the wire from the “+” switch should be connected to an 8A fuse. These wires must be secured, the switch removed from the dashboard, connected to the block and installed in place. The last step is to lay the wires to the glass. It is optimal to run the positive wire together with the general wiring harness of the car.
- The next step is to assemble the female contact, the wire is insulated. Next, you will need to connect the heating negative wire to the strut housing and the body. Upon completion of all work, you can put back all previously removed elements, lay down rugs, and snap panels. Then you should connect the battery.
- Let us also add that often during installation the difficulty is in deciding how to glue the heated rear window terminal. Ideally, it can be soldered. If soldering is not possible for one reason or another, you can glue the terminal using conductive glue.
This adhesive is based on silver shavings, a hardener and epoxy glue. By the way, conductive glue can be made at home. To do this, you will need to mix a one percent solution of formaldehyde and the same amount of silver nitrate.
Then take ammonia 5%, which is added to the mixture in a volume of 4-5 drops. After addition, a dark precipitate of silver precipitates, which is removed with distilled water and passed through a filter. The final stage is drying the mixture (heating about 120-150 degrees Celsius). Next, the previously filtered powder is added to the mixture.
By the way, rear window heating adhesive can be used for both installation and repair. For example, if the heating threads are torn or broken, then by applying glue it is sometimes possible to restore contact and the thread begins to work. As for repairs, you first need to identify the problematic element, then fix the breakdown. You can check the integrity of the threads both visually and using a multimeter. If the threads are severely damaged, it is better to immediately install a new heating system.
- The completion of the glass heating installation process is the need to glue the terminal to the foil strip. The strip needs to be prepared, then solder the terminal. The other side should be coated with glue, after which the strip is pressed against the glass. You need to press so that excess glue is squeezed out. Contact in this case will be better. Next, you need to wait about 24 hours for the glue to dry. It is not recommended to turn on the heating until the glue has completely dried.