Parking brake system (hand brake): device and adjustment
Adjusting the hand brake
We install the car on an inspection ditch or a lift.
We hang the rear axle of the car and lower the parking brake lever to the lower position.
Lubricate the threads of the cable end with WD type lubricant.
Holding the adjusting nut with a 13mm wrench, use the same wrench to loosen the locknut. |
Holding the end of the cable with pliers, use a 13 key to tighten the adjusting nut (while achieving the required number of clicks for the full stroke of the lever in the cabin) |
You can also hold the tip of the cable at the point where it connects with the spring by clamping its end with pliers.
In this case, the full stroke of the parking brake drive lever should be 4–5 teeth of the ratchet sector. When the lever is fully lowered, the wheels should rotate freely without binding. In this position, tighten the locknut.
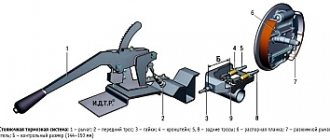
Parking brake adjustment unit:
1 – front parking brake cable; 2 – adjusting nut; 3 – lock nut; 4 – rear parking brake cable; 5 – piece of tube
Increased parking brake adjustability
If a spare thread is used on the tip of the front parking brake cable (as shown in Fig. a), you can select a piece of a suitable tube (Fig. b) and put it on the tip under the adjusting nut. Now the possibility of adjustment will increase.
Washer for securing the parking brake cable
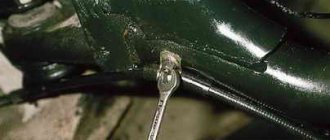
If the parking brake stops holding, the cause may be loose legs of the bracket holding the rear cable sheath. In this case, to fix the cable sheath in the bracket, you can use a washer with a slot, which should be inserted between the bracket and the sheath bushing. The slot of the washer should be directed “against” the slot in the bracket.
Cable attachment: 1 – bushing; 2 – shell; 3 – bracket; 4 – additional washer |
Video
Source
Home Cars - VAZ VAZ-21213 (Niva all-terrain vehicle) - maintenance and repair manual
search on the site copyright holders
1 - front cable; 2 – rear cable guide; 3 – front cable tension spring; 4 – rear cable;
content .. 81 82 87 ..VAZ-21213 (Niva). Adjusting the parking brakeParking brake drive |
| 5 – lock nut; 6 – adjusting nut; 7 – spacer sleeve |
Warning
At the end of 1995, the design of the gear sector of the parking brake lever changed - the initial tooth of the sector became double and the adjustment order, marked below in the text with the sign “*”, changed.
If the parking brake does not hold the vehicle on a slope of up to 25% when moving the lever 4–7 (2–8)* sector teeth, adjust it in the following order: – move the parking brake lever to the lowest position and then lift it up 1–2 sector tooth (this operation is performed only for the “old” design gear sector); – loosen the lock nut 5 and, by rotating the adjusting nut 6, tighten the cable 1; – check the full stroke of the parking brake lever, which should be 4–5 (2–4)* teeth along the sector, then tighten locknut 5. After performing several braking, make sure that the stroke of the lever has not changed and the wheels rotate freely, without sticking when fully the parking brake lever is lowered. Warning
If the cables are replaced with new ones, then it is necessary to brake two or three times, applying a force of approximately 392 N (40 kgf) to the parking brake drive lever. In this case, the cables will be pulled out.
VAZ-21213 (Niva). Brake pressure regulator
Installation diagram of the rear brake pressure regulator and its adjustment
| 1, 7 – regulator fastening bolts; 2 – piston; 3 – support sleeve bracket; 4 – pressure regulator drive lever; | 5 – axis; 6 – protective cap; 8 – traction; 9 – pressure regulator; X = 150±5 mm |
Installation of device 67.7820.9519 for adjusting the position of the rear brake pressure regulator
| 1 – device 67.7820.9519; 2 – pressure regulator drive lever |
If the bolts securing the pressure regulator are loose, adjust its position by first hanging the rear axle of the car. Then disconnect lever 4 from rod 8 and attach fixture 67.7820.9519 to its end. Direct the rod of the device upward until it stops at the floor of the body (see Fig. Installing device 67.7820.9519 for adjusting the position of the rear brake pressure regulator). This sets the distance “X” from the end of the lever to the body side member (see Fig. Installation diagram of the rear brake pressure regulator and its adjustment) equal to (150±5) mm. Lift the protective rubber cap 6 (see Fig. Diagram of installation of the rear brake pressure regulator and its adjustment) and, turning the pressure regulator on the bolts, achieve light contact of the lever with the piston 2. Holding the regulator in this position, tighten bolts 1 and 7 until full, then coat axle 5 and the protruding part of the piston 2 with a thin layer of DT-1 lubricant. Place 5–6 g of the same lubricant in the rubber cap 6 and install it in place. Remove the device marked 67.7820.9519 and connect the end of the lever to rod 8.
VAZ-21213 (Niva). Removing air from the hydraulic brake drive
Removing air from the hydraulic brake drive
Air that gets into the hydraulic brake drive when replacing pipelines, hoses, o-rings or when the system is leaking causes an increase in the free play of the brake pedal, its “softness” and significantly reduces the effectiveness of the brakes. Before removing air from the brake system, make sure that all brake drive units and their connections are tight, check and, if necessary, fill the reservoir to the normal level with brake fluid. Then thoroughly clean the air bleeder fittings from dirt and dust and remove the protective caps from them. Place a rubber hose onto the head of the fitting to drain the liquid, and lower its free end into a transparent container partially filled with liquid. Pressing the brake pedal sharply 3–5 times, with intervals between presses of 2–3 s, unscrew the fitting 1/2–3/4 turn while the pedal is pressed. Continuing to press the pedal, force the liquid along with the air through the hose into the container. After the brake pedal reaches its full forward position and the flow of fluid through the hose stops, tighten the air bleeder fitting as far as it will go. Repeat these operations until all air bubbles come out of the hose. Then, while holding the brake pedal depressed, tighten the air bleeder fitting as far as it will go and remove the hose. Wipe the fitting dry and put on the protective cap. Carry out all the above operations through the upper fittings, first on the right rear wheel farthest from the master cylinder, then clockwise: the left rear wheel, the left and right front wheels. This will remove air from one circuit. To bleed another circuit, use the lower fittings on the cylinder block of the left and right front brakes. In this case, air removal can be started from the right or left wheel. When removing air, maintain a normal fluid level in the brake hydraulic reservoir. If there is no air in the drive, the brake pedal should not travel more than 1/2–3/4 of its full travel. To eliminate the influence of the vacuum booster and pressure regulator on bleeding the hydraulic brakes, remove air with the engine off and the rear wheels loaded (the rear of the car is not allowed to hang out). If the brake fluid has been completely drained from the system, then before bleeding: – unscrew the air bleeding fittings on the cylinders of all wheels by 1.5–2 turns; – pressing the brake pedal sharply and releasing it smoothly, tighten the fittings as liquid flows out of them. Then bleed the hydraulic brakes as indicated above. If, even after prolonged removal, air continues to escape from the hose into the vessel in the form of bubbles, it means that it enters the system through damage in the pipelines, due to insufficient tightness of the connections, or due to a malfunction of the main or wheel cylinders. When bleeding air on a car whose brake system has been in use for a long time, replace the fluid in the system with new one. Liquid suitable for further use must be carefully filtered and then stored in a hermetically sealed container.
content .. 81 82 87 ..
Why do you need a handbrake on a Chevrolet Niva?
The parking brake is necessary to reliably hold the car in place during a short stop or long-term parking, which is especially important on uneven ground or roads. For inexperienced drivers, the handbrake will become an indispensable assistant when starting uphill; it helps not to roll back, but to immediately start moving forward.
If you need to leave the car for a short time, but don’t want to turn it off (for example, in the morning, when warming up), then using the parking brake is mandatory so that the started car does not roll (an unstarted car can stand “at speed”).
also prohibited to leave a car on a slope without a parking brake , in order to avoid creating an emergency situation. The parking brake must be in working order, adjusted and keep the vehicle on the slope, according to the recommendations described in the Operator's Manual.
Another extremely important property is that it will help stop the car if the main brake system fails . In the event of a failure of the main brake system (usually hydraulic or pneumatic), it is necessary to smoothly tighten the cable of the mechanical handbrake by pulling its lever up, the main thing is not to overtighten and not let the car skid. With a mechanical handbrake this is not difficult, but with modern electronic ones it is impossible. Fortunately, the Chevrolet Niva has a mechanical parking brake and its setting and adjustment is done manually.
Parking brake adjustment
How to tighten the handbrake on a Chevrolet Niva, given that loosening its cable can lead to serious trouble? First of all, let's understand the basic parts of the parking brake.
Its structure (main details):
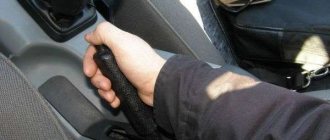
The release of the handbrake in a Chevrolet Niva is checked as follows : you need to drive up a slope and pull the handbrake lever towards you until it stops. If the lever makes 5-7 clicks and securely locks the car, then there is no need to adjust it. And if there were more clicks, but the car is still not fixed, it means that the second cable needs to be tightened.
It's done like this:
Attention! The setting and operation of the parking brake is considered normal if the lever is tightened by 5-7 clicks and at the same time securely fixes the wheel (you can check this by driving onto a slope). After the handbrake lever is lowered to its lowest position, there is no extraneous sound when turning the rear wheel.
Soft brake pedal: reasons
So, the most common problem is poor, low-quality fluid, due to the fact that it may not be suitable for a certain car model, and corrosion of the hoses may gradually appear. Rubber elements are not able to withstand such liquid; they delaminate and increase in diameter, which leads to loss of tightness. If the brake pedal has become soft, it is best to undergo diagnostics of the entire brake system, replace the fluid and defective elements.
The second reason is rust in the rods. There is only one way out - replacing them completely. You can determine such a malfunction by holding down the brake pedal; if it remains down and you have to “lift” it with improvised tools, there is definitely a problem in the rods.
The incorrect gap between the pedal and the cylinder is also determined by the pedal being clamped. If pressing immediately occurs easily and smoothly, and at the end the applied force has to be doubled, most likely the gap is incorrectly adjusted; the pressure present does not allow the pedal to be lowered and raised normally. You will have to adjust and bleed the brakes.
Air locks also cause a lot of trouble, appearing due to wear and tear of the hoses; they lead to breakdowns in the vacuum pump. The brake cylinders lose some of the pressure, the pads do not move apart, and therefore cannot press against the disc. The pads should be checked for any wear.
Having figured out why the brake pedal can be hard, you should pay attention to an equally common problem when the brake pedal has become soft. In such a situation, the brakes may be weak and perform poorly, which is no less dangerous than a hard pedal.
In extreme cases, the brake pedal may not rise after being pressed or may sink to the floor when braking. Naturally, in the case of a “cotton” pedal, owners are interested in what is the cause of the malfunction, why the pedal is soft after bleeding the brakes, and also how to make the brake pedal harder.
If bleeding has already been carried out, there is a high probability that mistakes were made, undetected breakdowns, brake fluid leaks, etc. occurred. For example, drivers often encounter a problem when, after replacing the brake pads, the pedal is soft, the brake pedal falls off after replacing the brake fluid, after bleeding the brake pedal fails, but the fluid does not drain, etc.
- One way or another, the main reason is depressurization of the brake system. Pipes fray and crack, problems with brake cylinders are possible, dirty brake fluid damages the cylinder mirror. Jamming of the TC pistons should not be ruled out.
At the same time, it is necessary to inspect the locations of all connections, fittings and other elements, since even a few drops of brake fluid leakage have no effect on the level in the reservoir, but air still enters the system, which is the cause of the soft pedal.
It should also be taken into account that if certain elements of the brake system have been changed (discs, pads, drums, working cylinders, etc.), in this case the braking efficiency will be slightly reduced until the parts are broken in. In this case, over several tens of km. The pedal may also feel softer than usual, or the brake pedal may alternate between being soft and stiff.
If the brake fluid is dirty, old and has lost its properties, it may boil due to heat. This leads to the brake pedal sinking or becoming too soft (“cotton”). This situation is dangerous because the problem may have a so-called “floating” nature. If such symptoms appear, you need to start with a complete replacement of the brake fluid.
Also interesting: How to adjust the sorcerer Niva Chevrolet
Stages of dismantling the hand brake and replacing it
The Niva-Chevrolet handbrake mechanism is relatively simple ; you can not only adjust it yourself, but also replace it. The parking brake is replaced when it is stretched excessively, when tightening it no longer has a positive effect, that is, tightening the cable is useless.
To dismantle the parking brake you will need: a 8, 13 wrench, pliers, cobra pliers:
Reassemble in reverse order . It is mainly the second cable that is changed; it is more susceptible to external influences and stretching, so the first cable is removed extremely rarely.
Replacing pads
The parking brake on a Chevrolet Niva may not work well not only due to cable stretching , but also as a result of wear on the rear brake pads of the system. If this is the reason for poor performance, change the pads yourself.
Before removing the pads, disconnect the parking brake cable. To do this, use pliers to disconnect the return spring from its mounting under the bottom of the car. Release the lock nut, unscrew it and the tension nut, and remove the guide. Remove the cable end from the bracket located on the bottom, then use a 8mm wrench to unscrew the bolts that hold the cable sheath to the brake shield and remove it. A similar sequence is performed on the other side.
Remove the tension springs from the pads, the earring, which is designed to adjust the gaps, and then replace the old pads with new ones.
Brake problems: hard or soft pedal - diagnosis and repair
In my article today I want to talk about the brake pedal, namely what it should ideally be, tight or, on the contrary, soft, how to find this golden mean?
By and large, the brake pedal can have several positions and states.
The first state is the one provided by the manufacturer, when when you press the brake pedal there are no dips or jerks, and no special effort is required. There are also two other unpleasant pedal conditions that can cause driver anxiety.
This refers to the state of the pedal when it is excessively tight or, on the contrary, very soft. Both one and the second phenomenon are equally unacceptable and indicate malfunctions and the need for urgent repairs of the brake system.
A stiff brake pedal can become stiff for several reasons, and they may not necessarily be associated with the traditional “sores” that are typical for all brake models. However, I still propose to consider the most common of them, and I will also try to give practical advice on how to eliminate them.
Most problems that cause the brake pedal to become soft are related to either the vacuum booster or the brake master cylinder.
1. Clogged air filter of the vacuum booster. Treated by replacing the air filter;
2. Sticking of the valve body in the vacuum booster. The vacuum booster needs to be replaced;
3. The vacuum booster diaphragm is damaged. Solved by replacing the vacuum booster;
4. Faulty vacuum booster tip. The tip should be replaced;
5. Sticking or failure of the check valve in the vacuum booster. To eliminate, it is necessary to replace the check valve;
6. The check valve of the vacuum booster is faulty or the seal is broken, resulting in fuel entering the chamber of the vacuum booster. The vacuum booster with check valve should be replaced;
7. Damage to the hose that connects the vacuum booster and the intake manifold, or the hose fastening on the fitting is loose. It can be treated by replacing the hose, or, if possible, by tightening the fastening clamp. The condition of the hose should be regularly monitored, this is especially true in the cold season.
As long as the hose is cold, it retains the necessary rigidity - the brakes function normally. However, after several tens of minutes of motor operation, the hose heats up and becomes more elastic. If, for example, during inspection you do not find delamination, the capacity of the hose will decrease, which in turn can cause problems with the brake pedal.
8. The sealing rings in the working wheel cylinders are swollen; this often occurs as a result of fuel and lubricants getting on their surface, or as a result of using low-quality brake fluid. To correct this situation, it is necessary to repair the working brake cylinders and replace the brake fluid
Here are several ways to independently check the performance of the vacuum booster.
First of all, start the engine to allow a vacuum to occur in the system. After this, press the brake pedal; if the pedal is hard, this is a clear sign of a faulty hose or amplifier. Then turn off the engine and wait 5-7 minutes, do not press the brakes.
It is necessary to specify the malfunction; to do this, press the pedal. If it is still hard, most likely the fault lies in the vacuum booster valve.
There is also another test. When the engine is not running, it is necessary to depress the brake pedal several times in order to remove the vacuum in the brake system. After this, without releasing the pedal, you need to start the engine; if the pedal begins to move down a little, the amplifier is in order.
Also interesting: Niva Chevrolet gasoline consumption per 100 km
Cause of soft brakes
A soft brake pedal, as a rule, simultaneously indicates several breakdowns in the brake system. More precisely, there are many reasons why the brake pedal can become soft. Sometimes this phenomenon is also called brake pedal failure.
https://www.youtube.com/watch?v=06Jj1Cy_KxQ
Air brake system. Troubleshooting occurs by bleeding the brakes and removing air from the brake system.
1. Low level of brake fluid in the expansion tank, depressurization of the brake system;
2. The main brake cylinder is faulty. A malfunction of the working cylinder occurs as a result of boiling brake fluid or when the piston jams. This malfunction can be eliminated by repairing the brake cylinders, or replacing the brake fluid.
I wish you success in carrying out independent diagnostics and repairs of the brake system. Don’t delay this, no matter how you twist it, working brakes are the key to your safety, as well as other road users.
How to improve the operation of the handbrake Niva 21213
Parking brake drive parts
Removal and installation
1. Carefully check the condition of the parking brake parts. 2. If a break or fraying of the wires is detected, replace the cable with a new one. 3. Make sure that the sector teeth and handle latches are not damaged; Replace worn parts. 4. Check the serviceability of the spring. It should ensure that the lever returns to the non-working position. 5. Check the condition of the rear cable sheath and the fastening of the lugs on the sheath, and also make sure that the cable moves freely inside the sheath. If the sheath is damaged and the ends are loose, replace the cable.
We will show you how to adjust the handbrake (handbrake) on a NIV car. Or let’s say it differently, how to tighten the handbrake cable. What to do if the handbrake does not work.
When we start to tighten the handbrake cable, the brake pads move apart; as the pads wear out, we have to tighten the handbrake cable all the time. There comes a moment when no matter how we pull the cable, the handbrake stops holding us. Why is this happening? The pads have worn out and the brake drum has worn out.
In order to tighten the handbrake cable, we need in this place:
Unfasten 2 nuts to 13, this is done using two keys. Very often two keys do not fit there (one should be slightly smaller), so one of the keys can be replaced with pliers.
The ideal tension of the handbrake in NIV is 4-5 clicks.
Very often in this place:
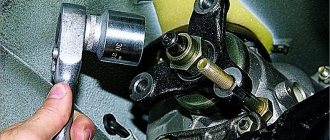
Where the handbrake cable is attached, the bolts break when unscrewed. This is a NIV disease due to the ingress of water and rust. To prevent this from happening again, unscrew these bolts (if this is still possible) and lubricate them with lithol. Otherwise, you will have to drill them out and cut a new thread. It's very troublesome.
Another trouble that can happen with the handbrake cable. In this place:
It wears out over time.
Video on how to tighten the handbrake cable on a NIV:
Before placing the car on the handbrake, press the brake pedal. Do not put the handbrake on the Niva in winter; the video explains in detail why this should not be done.
If the handbrake cable is very stretched or jammed, it is better to replace the cable.
If the parking brake system does not hold the vehicle on a grade of up to 25% when the drive lever is moved 4-5 ratchet teeth, the parking brake must be adjusted.
We install the car on an inspection ditch or a lift.
We hang the rear axle of the car and lower the parking brake lever to the lower position.
1. Holding the adjusting nut with a 13mm wrench, use the same wrench to loosen the locknut
2. Hold the end of the cable with pliers and tighten the adjusting nut using a 13mm wrench.
You can also hold the tip of the cable at the point where it connects with the spring by clamping its end with pliers.
In this case, the full stroke of the parking brake drive lever should be 4–5 teeth of the ratchet sector.
When the lever is fully lowered, the wheels should rotate freely without binding.
In this position, tighten the locknut.
To remove the front cable and the parking brake system drive lever, lower the lever to the lower position.
3. Remove the tension spring.
4. Use two 13mm wrenches to unlock the nuts.
5. Holding the tip of the front cable with pliers, use a high “13” head to simultaneously unscrew the adjusting nut and locknut.
6. Remove the spacer sleeve from the tip of the front cable
7. Remove the rear cable guide.
8. Use pliers to remove the cotter pin
9. Remove the thrust washer
10. Disconnect the front cable from the parking brake lever.
11. In the cabin, use a Phillips screwdriver to unscrew the screw for the side fastening of the lever casing
12. Unscrew the rear mounting screw.
13. Remove the lever cover.
14. Remove the sealing gasket.
15. Using a 10mm socket, unscrew the four bolts securing the lever bracket to the floor.
16. Remove the parking brake lever
To remove the rear parking brake system drive cable, disconnect its ends from the rear brake pad manual drive levers (see Replacing the rear brake pads).
Source
Adjusting the hand brake on Lada 4x4: photo
The car's parking brake is responsible for holding the car on an inclined surface. In Niva, this is done using rear drum brakes.
The principle of operation of this mechanism is as follows: at the moment the handbrake is tightened, the cable, mechanically connected to the handle, on one side (and on the other, to the rear right brake lever) is tensioned.
Next, the lever moves inside the brake device, thus forcing both shoes to diverge to the left and right, pressing their friction layer against the inside of the brake drum.
As a result, the drum is rigidly fixed and, in turn, blocks the rear wheels.
However, as the vehicle is used, there comes a point when the vehicle can no longer be held on an inclined surface (or the parking brake must be applied a significant amount of force). The fact is that the rear pads wear out and the cable needs tightening.
Let us note, by the way, that using the handbrake after driving through winter puddles is not recommended - in this case, water may get into the pads; The water will subsequently turn to ice and cause the shoes to freeze to the drum, causing the rear wheels to become locked.
To adjust the parking brake cable, the only tools we need are two 13mm open-end wrenches and pliers (round nose pliers).
- The first thing to do is put the car on a lift or drive it into a pit. In the second case, it is better to jack up both rear wheels.
- Next, you will need to make sure that the parking brake handle is fully released (the rear wheels can be turned without effort).
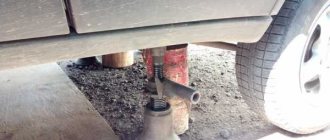
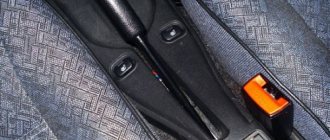
Next, locate the metal cable running under the bottom of the car. More precisely, we are interested in the place where there are 2 nuts on the cable next to the spring - one of them is an adjusting nut, the second is a lock nut. The first is located further from the spring, the second is closer to it.
Hold the adjusting nut (on the left in the photo) with one wrench and begin to unscrew the lock nut (on the right in the photo).
For some, it will be more convenient to use pliers or round nose pliers instead of the first key.
After this, you need to grab the cable with pliers, and then start turning the adjusting nut with a wrench. This should be done clockwise - it is in this direction that the cable tension is ensured (counterclockwise - weakening). After several rotations, you will need to get out from under the bottom and tighten the parking brake handle: the tightening force should correspond to four to five clicks. If these numbers are different, adjust the position of the adjusting nut to the required number of clicks.
If our settings correspond to the required ones, we check whether the wheels rotate freely when the handbrake is lowered. If this is okay, don’t touch the locknut for now, but drive to the nearest hillock, stop there, turn off the car and check the operation of the parking brake. It happens that the rear pads do not hold the car enough.
In this case, we go back, park the car as before and tighten the cable to 3 clicks. We go again to where it is possible to check the handbrake. The case when the forces of the rear pads are again not enough to hold the car on a hill serves as a signal to replace the rear brake pads. Old pads will need to be replaced with new ones, checking the condition of the drum at the same time.
Thanks for subscribing!
Do not forget to tighten the lock nut with a 13mm wrench. In this case, the adjusting nut should be held with pliers.
Fix the locknut completely to prevent it from turning arbitrarily.
If during the work the parking brake cable was replaced, then after a certain period of time it should be adjusted again. As mentioned above, optimal tightening is achieved with 4-5 clicks of the parking brake handle ratchet mechanism.
Design and repair of the Niva Chevrolet parking brake
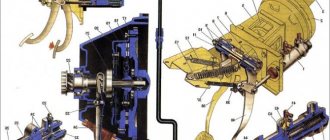
The parking brake is mechanically driven from lever 1 (Fig. 1).
The middle part of the rear cable passes through the groove of guide 7, the tension of which is adjusted with a nut screwed onto the threaded end of the front cable.
A spacer sleeve 8 is installed between the guide 7 and the adjusting nut.
At the rear ends of the cable there are tips, each of which is connected to the hook of the lever 11 for the manual drive of the shoes.
This lever is pivotally attached to the brake shoe with a finger and its upper part rests against the groove of the spacer bar 10.
The rib of the brake pad is installed in the opposite groove of the bar.
Replacing the rear parking brake cable
Replace the rear cable if it is excessively stretched (impossibility of adjusting the parking brake), mechanical damage and loss of mobility in the sheath.
You will need: keys “8”, “13” (two), cobra pliers, pliers.
2. Loosen the locknut on the front cable end.
3. While holding the tip from turning with pliers, unscrew the locknut and adjusting nut to the end of the tip.
4. Remove the spring.
5. While holding the tip from turning, remove the lock nut, adjusting nut and spacer from the tip
6. Remove the guide from the end and disconnect it from the cable
7. Take the cable out of the rear axle beam bracket and...
8. . from the body bracket hole.
9. Remove the two bolts securing the cable sheath holder to the brake shield.
10. Disconnect the end of the parking brake cable from the drive lever
11. Pull the cable out of the hole in the brake shield.
12. Similarly, remove the right branch of the cable and remove the rear cable from the car.
13. Install the new cable on the vehicle in the reverse order of removal.
14. Adjust the parking brake system.
Why do you need a handbrake on a Chevrolet Niva?
The parking brake is necessary to reliably hold the car in place during a short stop or long-term parking, which is especially important on uneven ground or roads. For inexperienced drivers, the handbrake will become an indispensable assistant when starting uphill; it helps not to roll back, but to immediately start moving forward.
If you need to leave the car for a short time, but don’t want to turn it off (for example, in the morning, when warming up), then using the parking brake is mandatory so that the started car does not roll (an unstarted car can stand “at speed”).
also prohibited to leave a car on a slope without a parking brake , in order to avoid creating an emergency situation. The parking brake must be in working order, adjusted and keep the vehicle on the slope, according to the recommendations described in the Operator's Manual.
Another extremely important property is that it will help stop the car if the main brake system fails . In the event of a failure of the main brake system (usually hydraulic or pneumatic), it is necessary to smoothly tighten the cable of the mechanical handbrake by pulling its lever up, the main thing is not to overtighten and not let the car skid. With a mechanical handbrake this is not difficult, but with modern electronic ones it is impossible. Fortunately, the Chevrolet Niva has a mechanical parking brake and its setting and adjustment is done manually.
Replacing a short handbrake cable on a Chevrolet Niva
I didn’t think that you might not find spare parts in stock for a Russian-made car, but ShNG is a different story. I drove around all the shops in the city, and everywhere I say that I have one cable like on 2106 or 2121, they stare at me and either snub 2 cables, or try to sell me from 21 Niva.
A week ago, I poured motor oil into the cable jacket and hung it so that it spread along the entire length. On the third day, it started dripping from the second end of the shirts, which means everything was lubricated as it should. Now the cable will not freeze if water gets inside, and it will not rot either. I also cut the springs on the cables, an old technique worked on the nine and six, why not do it on the field.
When replacing everything is standard, we hang up the axle, take off the wheels, take off the drums, but here’s the problem. The old owner left a gift, where there should be a threaded hole for removing the drum, a piece of a bolt sticks out, and it was not possible to tighten it with one bolt until I heated it with a gas burner. Upon further inspection of the drum, I find a second jamb.
The cable served 120 thousand kilometers in 2 years 8 months, which is not bad in principle) For the last 2 weeks I drove without a handbrake - it’s somehow unusual, so today I replaced the old tired cable. Since the BBC did not have a cable for the shniva in stock at that time, I bought it The officials sold it for 400 rubles; in the store it would have been 70 rubles cheaper. Special thanks to Ivanokk, who kept up the conversation in the garage and poured fresh kvass into the mug)
First, remove the spring and unscrew the locknut and nut that tension the cable. Remove the washer and guide plate. If the tension nut does not unscrew, but turns together with the front cable, use WD 40 to help and hold the front cable with pliers.
We counter, install the spring, rejoice at the working handbrake))
The mechanically actuated parking brake system acts on the brake mechanisms of the rear wheels.
The parking brake is mechanically driven from lever 1 (Fig. 1).
The middle part of the rear cable passes through the groove of guide 7, the tension of which is adjusted with a nut screwed onto the threaded end of the front cable.
A spacer sleeve 8 is installed between the guide 7 and the adjusting nut.
Rice. 1. Parking brake drive parts
At the rear ends of the cable there are tips, each of which is connected to the hook of the lever 11 for the manual drive of the shoes.
This lever is pivotally attached to the brake shoe with a finger and its upper part rests against the groove of the spacer bar 10.
The rib of the brake pad is installed in the opposite groove of the bar.
Parking brake adjustment
How to tighten the handbrake on a Chevrolet Niva, given that loosening its cable can lead to serious trouble? First of all, let's understand the basic parts of the parking brake.
Its structure (main details):
The release of the handbrake in a Chevrolet Niva is checked as follows : you need to drive up a slope and pull the handbrake lever towards you until it stops. If the lever makes 5-7 clicks and securely locks the car, then there is no need to adjust it. And if there were more clicks, but the car is still not fixed, it means that the second cable needs to be tightened.
It's done like this:
Attention! The setting and operation of the parking brake is considered normal if the lever is tightened by 5-7 clicks and at the same time securely fixes the wheel (you can check this by driving onto a slope). After the handbrake lever is lowered to its lowest position, there is no extraneous sound when turning the rear wheel.
How to replace the handbrake cable
Sometimes adjusting the handbrake does not bring the desired result due to the fact that the rear cable is overstretched. In this case, the only way out of the situation is to replace the Chevrolet Niva hand brake cable. In addition, the cable will have to be replaced if it regularly jams in the protective sheath or breaks due to wear. If during an external inspection you notice that the cable is damaged, replace it immediately - do not risk your own safety. You will find out how to replace the cable below:
After dismantling, install a new Niva rear hand brake cable. To do this, also use these instructions, but perform all the steps in reverse order. And with this, the replacement of the Chevrolet Niva handbrake cable is completed, and finally, do not forget to adjust the degree of its tension. It is also important to lubricate the adjusting threads on the rod upon completion of the repair work to avoid problems with unscrewing the nuts during the next adjustment or replacement.
How to check and adjust the tension of the handbrake cable
If the parking brake is able to hold the car stationary on a 25% slope, then it is doing its job as expected. If you pull the handbrake lever seven ratchet clicks or more, but the car still rolls, the conclusion is the following: the handbrake system is not working effectively.
In such a situation, adjustment of the Chevrolet Niva hand brake is required. This type of repair is simple, performed relatively quickly and does not require the use of special equipment. All you need for work are two keys “12”, pliers and a jack if it is not possible to put the car on the inspection hole.
To work, you need to put the Chevrolet Niva on the inspection hole
- First, check whether the handbrake really does not hold the car on the road at a slope of 25%. To do this, place the vehicle on an overpass or find a suitable section of road. If the problem occurs, then we proceed to adjustment.
- Setting the optimal parking brake cable tension is done under the car, so it is better to place it above the inspection hole. If this is not possible, use a lift or jack. In any case, the rear of the car must be raised.
- When the vehicle is ready for use, secure it and release the handbrake lever.
- Next, using a wrench, loosen the lock nut on the handbrake adjusting rod, then use a second identical wrench to tighten the adjusting nut until the cable is properly tensioned. By the way, pliers are needed to keep the rod from turning during the adjustment process.
- Now tighten the locknut and make a full stroke first to the working position, and then lower it. After this, spin each rear wheel by hand. The rotation must be uniform, jerking is not allowed. If any are felt, adjusting the Chevrolet Niva handbrake requires repeating.
It’s also interesting: Where is the fuel pump fuse for the Niva Chevrolet
And the last stage is testing the handbrake in road conditions. That is, you need to carry out a standard check of the parking brake's effectiveness, as described in the first paragraph of the manual.
After assembly, the handbrake must be tested in road conditions.
Replacing the hand brake cable Niva Chevrolet video
Replacing hand brake cables on a Chevrolet 410. Part 1.
Chevrolet Niva replacing rear brake pads
Adjusting the NIVA hand brake. We tighten the Niva hand brake cable ourselves
How to change a short parking brake cable on a Shnivy?
I tighten the handbrake of Chevrolet Niva 4x4 Chevrolet Niva 2016
AUTO repair. How to lubricate the parking brake cable
Chevrolet Niva heater damper repair
How to lubricate the handbrake cable yourself
Changing the handbrake cable and straightening the bumper on the Niva #AutoFormula 4x4
Home » Choice » Replacing the hand brake cable Niva Chevrolet video
Chevrolet Niva | handbrake adjustment | Chevrolet Niva
Category: Niva 06.27.2018 · : to the entry Chevrolet niva | handbrake adjustment | Chevrolet Niva disabled · Reading time: 4 min
How to tighten the handbrake on a Chevrolet AVEO
If you belong to the second category of car enthusiasts and would like to know how to tighten or replace the handbrake on a Chevrolet Niva, then the material in this article will be useful for you. You will learn how to replace the cable below: Brake pads - they are an arched backing with a special layer of friction plate that is pressed against the wheel rim, thereby blocking the wheel.
Please try again later. : May 19 Adjusting the parking brake (handbrake) on a Chevrolet Niva...
Handbrake lever - serves to transmit the force of the human hand to the actuator, which, in turn, acts on the brake pads to lock the rear wheels. Why do you need a handbrake on a Chevrolet Niva? The parking brake is used for:
Otherwise, repeat the adjustment. Automotive products Advertising Website design and development After the expiration of copyright, in Russia this period is equal to three years, the work becomes public domain.
After this, we lower ourselves into the inspection hole and begin adjusting the cable tension.
It is necessary to first unscrew the lock nut with a thirteen wrench, and then begin to tighten the main adjusting nut, while counting the number of turns made.
Tighten the cable three to four turns of the nut, after which you need to squeeze the lever and check at what click the handbrake keeps the wheels stationary.
The handbrake is considered normal when the wheels lock at the fifth click. Wheel locking is checked by trying to move the car.
After the cable is adjusted, it is necessary to tighten the lock nut all the way to the main nut, and after this the hand parking brake can be considered working. To be completely convincing, you need to drive up a 25-degree slope and put the car on the handbrake.
On the fifth click, the handbrake performs its function - it keeps the car stationary. The rear wheels must be removed to get to the brake pads. Having reached the pads, it is necessary to disconnect both cables that are connected to the brake pad drive levers. Figure 1 shows the main components of the Chevrolet Niva parking brake.
Chevrolet Niva parking brake parts.
The handbrake or lever that operates the brake system. A button on the end of the handbrake that helps release the car from the brake. Its purpose is to prevent spontaneous movement of the vehicle during parking or temporary parking with the engine running.
But the handbrake can also replace the main brake system in the event of its failure, which allows you to safely get to the repair site. You have to use the handbrake quite often, so its cable and brake pads are subject to intense wear.
As a result, car owners over time have to take measures to adjust the system or replace its individual parts. While some people turn to a car repair shop for this, others prefer to carry out repair work themselves.
Niva. Here's the handbrake!
If you belong to the second category of car enthusiasts and would like to know how to tighten or replace the handbrake on a Chevrolet Niva, then the material in this article will be useful for you.
The design of the Chevrolet Niva parking brake differs little from similar systems in other passenger cars. The design of the Chevrolet Niva parking brake is quite simple and is not much different from similar systems in other passenger vehicles.
The brake pedal has gone to the floor - what to do?
If the brake pedal becomes soft, that is, it begins to sink significantly, you should immediately check the entire brake system of the car. Most likely, diagnostics will be required at a service center and further repairs.
The main thing is to contact the service center in time
It is important to remember that all malfunctions of this kind are fraught with consequences. Brakes with a defect can fail while driving; this can probably happen on a busy avenue; such a car can only be stopped even at an average speed by colliding with some other vehicle or structure. If the brake pedal is easy to press, there may be several reasons:
- the brake cylinder is not able to hold fluid and the corresponding pressure; there may be significant wear on the cuffs and rubber gaskets;
- the wrong fluid has been filled into the brake tank;
- there are problems with the pads or discs;
- there are defects in the operation of the vacuum pump;
- The traction pedals may exhibit rust.
Problems with the brake system are clearly indicated by the presence of vibration, hissing and tapping in the pedal when it is pressed.
There may be several reasons why the brake pedal has become hard. It is worth noting that there are traditional faults that are typical for most cars, and specific ones that can only occur in some models of the brake system.
A hard brake pedal may occur due to the following reasons:
- blockage formed in the air filter. The malfunction disappears after replacing the filter;
- valve jamming. You can fix everything by replacing the amplifier;
- damage to the diaphragm. The hard brake pedal will disappear after replacing the booster;
- Malfunction of the tip in the vacuum booster. The tip will need to be replaced;
- poor functioning of the check valve, the valve will have to be replaced;
- leakage, which causes the flow of fuel;
- defects in the hose going from the amplifier to the manifold. It's best to replace the hose. The condition of the hose should be checked regularly, especially in winter. It functions normally only in a cold state; any overheating makes it flexible and elastic, which is why delamination may appear in the future. They reduce throughput and cause brake problems.
- loosening the rubber hose on the fitting. It is treated by tightening the fastening clamp.
A stiff brake pedal can be the result of swollen o-rings located in the cylinders. Such a defect occurs after fuels and lubricants begin to leak onto the surface. In this case, you will have to repair the brake cylinders and change the fluid.
Equally worrying is the malfunctioning of the vacuum booster. It should be checked regularly; to do this, before starting the power unit, you should press the pedal; if the brake pedal is pressed tightly, there is a malfunction in the amplifier or hose.
In order to more specifically identify the location of the malfunction, you should press the pedal again 5 minutes after turning off the engine. If the brake pedal becomes stiff a second time, the booster valve is faulty.
As you know, the safe operation of any vehicle directly depends on the proper operation of the braking system. At the same time, the driver may notice that at some point the car brakes worse, extraneous noise appears during braking, the brake pedal sinks, the brake pedal becomes hard or soft, etc.
In any case, if the brake pedal is hard to press or the brake pedal is soft and does not brake the car well, you must immediately stop using the car, determine the cause and eliminate the problem. Next, we will look at why the brake pedal is hard to press, the brakes are too soft, or the brake pedal is either soft or hard.
Also interesting: How to change the handbrake cable on a Chevrolet Niva
Read in this article