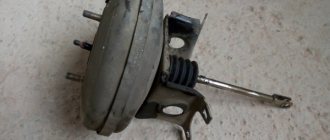
Install the top cup and support. If you keep the old support, it is advisable to lubricate the bearing before installation. To lubricate the bearing, remove the upper oil seal, then remove the old grease and apply new one. It is best to remove the oil seal with a knife.
Install the support mounting nut and tighten as much as possible without a special wrench. Fully tighten this nut when the shock absorber is on the body.
Next, reinstall the shock absorber on the body; no problems should arise.
The process of replacing the front struts of VAZ 2113, 2114, 2115 is clearly shown in this video:
VAZ 2114: replacing the front pillar with your own hands
On a VAZ 2114 car, the front strut is replaced if it fails. The resource of the suspension element is quite long, but do not forget that the fourteenth has been produced since 2001, and the youngest car is currently three years old. And the service life of a shock absorber depends on many factors, including the conditions in which the car is operated. And, unfortunately, they are not always ideal - the quality of the roads leaves much to be desired. Let's look at the entire process of replacing the front pillar on a VAZ 2114.
Necessary tools and spare parts
The process of replacing leaking racks is not fraught with great difficulties, but it does require preparation. The list of necessary tools and spare parts looks like this:
- Jack for raising the car and gaining access to the suspension;
- Wheelbase wrench for wheel removal;
- Hammer and set of spanners;
- Flat and Phillips screwdrivers;
- Rags for cleaning dirt.
It is noteworthy that the removal of the rear pillar on the VAZ 2114 is possible without the presence of a pit or a lift. All you need to do is have a jack and a set of keys on hand. When you decide to change the rear pillars on a VAZ 2114, prepare all the tools listed above, and also do not forget about the safety rules. In addition to the jack, use hemp or bricks.
Tools for work and materials
When replacing the front strut on a VAZ 2114, it is necessary to have all the following tools at hand:
- Jack (ideally, of course, a hydraulic or pneumatic one would be suitable, since they are convenient to work with).
- A set of keys.
- Pliers, duckbills, forceps.
- Hammer and chisel (just in case).
- Puller for the ball joint of the steering tip.
- Spring tensioner.
- Steel wire.
- Lubricant like WD-40.
Replacing the front struts of a VAZ 2114 with your own hands is impossible without a new set of spare parts. What is better - to take all the elements separately or together? Depends on how “killed” the shock absorbers installed on the car are. If all the elements of the rack have become unusable, then you can purchase it assembled, then the repair procedure becomes much easier - it will be enough to unscrew a few bolts and install all the suspension components.
But this is true for cases when you purchase branded spare parts, for example, Kayaba (KYB, Kayaba). But if the renovation is “budget”, then you can collect all the elements separately:
- Shock absorber strut VAZ 2114. Standard SS20.10P/L.00.000-01 will cost you about 5,000 rubles, but you can find it cheaper. The price directly depends on the manufacturer. But we must not forget that quality can also be judged by price. On the VAZ 2114, the front strut is not replaced so often, so you need to be responsible when choosing components.
- Support bearing number 348702 (or included 8115). Bearing dimensions 14.5x52x1475x100x19 (according to specification).
- Chipper (silicone is preferable, but rubber is also possible). The ideal copy is number SS74101 - a complete analogue of the stock one.
- Anther. The cheapest option is plastic, with the number 2108-2902814, but it deteriorates quite quickly and is not worth buying. The similar 2110-2905681-R, from the front pillars of a VAZ 2110, performs much better in operation.
- Bolts securing the hub to the shock absorber.
- A spring is needed if the old one has sagged too much.
- “Little things” such as washers and metal spacers for springs can be borrowed from an old rack.
But we must not forget that the replacement must be carried out simultaneously on both sides! Therefore, all of the above spare parts will have to be purchased in double quantities.
Selection of new
Look at different photos to see what the assembled rear pillar for a VAZ 2114 looks like. This will allow you to understand what you generally need to look for for this car.
The fourteenth model of the domestic automaker AvtoVAZ provides for the use of a telescopic rear pillar.
Kayaba kit
We will not rant about which ones to buy, with what characteristics, from what materials, and so on. We will simply offer you objectively the three best options.
| Name | Advantages | Flaws |
| SS20 | A high quality device that will provide excellent performance characteristics to the car. | When replacing, you need to additionally purchase a support from the same company. |
| Plaza | Available in three types - Sport, Comfort and Supersport, they have excellent performance characteristics. | Not frost-resistant, therefore problems may arise when used in winter |
| KYB | Available in several types of execution, depending on the driver’s style, they are distinguished by the best characteristics | High cost and widespread counterfeits due to the popularity of racks. |
Replacing the front struts of a VAZ 2114
And now more about how to replace the front strut supports of a VAZ 2114 with your own hands. First, you should prepare the car for work - disconnect the battery, install stops under the rear wheels so that the car cannot be moved. And we begin:
- Raise the side to be repaired using a jack.
- We remove the wheel. Need I say that you need to loosen the bolts in advance?
- Place the brake pipe to the side so as not to damage it.
- Using keys “17” and “19”, unscrew the bolts securing the strut to the hub. These bolts and nuts can be thrown away immediately - reuse is unacceptable. Firstly, there is a plastic lock on the thread, and it is designed for a small number of tightenings. Secondly, metal fatigue affects and the bolt can become deformed when tightened.
- On a VAZ 2114, the front strut can be replaced without removing the spring. But you still have to unscrew the nut and remove the tie rod end.
- Using a key set to “13” you need to unscrew all three nuts that secure the support bearing housing to the car body.
After this, the entire rack assembly can be removed and a new one installed in its place. As you can see, replacing the front struts of a VAZ 2114 is not that difficult. But if you install an old spring, you will have to tinker with disassembling the old unit - this can be problematic, since long-term use takes its toll on it. Rust appears, the metal “sticks”, sometimes even penetrating lubricant cannot help.
The repair procedure is the same on both sides. Installation of a new rack is carried out in the reverse order. It is important to observe the tightening torque of threaded connections, since your safety depends on it. Use a torque wrench for convenience. At this point, the replacement of the front struts of the VAZ 2114 is completed, you can continue to use the car.
Replacement
Having decided on the choice of new racks, you can begin the procedure for replacing them. We recommend that you study training videos on replacing rear struts on a VAZ 2114, which allow you to carry out repairs competently and effectively even without experience in such a matter.
Don't try to repair old racks and look on the Internet for some advice on this matter. Even if something is found, resuscitation of failed suspension components will not give the desired effect. Moreover, you risk making the problem even worse.
Remember - these elements cannot be repaired. The only correct solution is replacement. This procedure is performed as follows:
- Place the car on some flat surface. It could just be the floor in your garage;
- Raise the rear axle and be sure to put some kind of stoppers under the wheels so that the car does not suddenly jump off the jack;
- Remove those wheels where you plan to change the struts. The order of replacement does not play a big role, that is, you can start with either the left rear or the right rear wheel;
- The protection is removed from the top mount;
- Armed with a 13 mm wrench, slightly loosen your grip on the rod nut;
- Loosen the other nuts as well. This time the ones that hold the body;
- Take regular pliers and straighten the cotter pins. This will allow you to remove the old stand without any problems;
- There is also a nut on the steering rod, which should be removed without serious effort. Here you will need a 19 mm key;
- Remove the brake hose by unscrewing the nuts securing it;
- When unscrewing the steering knuckle elements, carefully remove your old strut through the arch;
- When installing a new element, simply proceed in the reverse order. There shouldn't be any problems when assembling the unit.
At this point, the procedure for replacing the rear struts can be considered complete. Now check the car in action, make sure that all previous problems are gone and the car behaves as you expected. Obviously, figuring out how to change the rear struts on a VAZ 2114 is not at all difficult. That’s why car owners often resolve such issues in their own garage. This fact does not force you to do everything yourself, since not everyone is given the opportunity to be an experienced auto mechanic. Don't be afraid to contact auto repair shops.
Signs of malfunction of VAZ 2114/2115 racks
The following signs indicate the need to replace the struts on the VAZ 2114/2115:
- When a strut fails, the first thing to start leaking is the shock absorber.
- Steering wheel wobble appears.
- Vehicle vibration increases when driving on poor-quality road surfaces.
- The car begins to drive around.
- The skidding trajectory on a winding road becomes larger.
- The braking distance of a car changes upward.
- The suspension periodically makes extraneous sounds and squeaks.
How to check the struts of a VAZ 2114, VAZ 2115
Self-diagnosis methods are, to put it mildly, ineffective, so it is recommended to carry out diagnostic work exclusively on specialized equipment. There is one way, but it only works when the rack has already worn out. You will need to stand near the corner of the car (near the right pillar, for example).
Stand near the edge of the right headlight and place your hands on the hood or fender, then rock the car two or three times, and when it is at the bottom, sharply remove your hands. If the car then goes up and a little down and immediately stops without unnecessary vibrations, then the strut is most likely normal. We carry out similar actions on the left wing. Most often, one rack fails, so the difference in its “behavior” is obvious.
Another reason for the malfunction of the front shock absorber strut of the VAZ 2114/2115 is the failure of the upper support. The reason for replacing the upper supports is usually one of two reasons:
- ruptures and cracks in the rubber part of the support. As a rule, this occurs due to aging of the rubber. This is fraught with the fact that a support that is in this state will suppress noise and shocks while the car is moving much worse;
- failure of the upper support bearing. It occurs much more often than the breakage of a rubber element, and more anxiety is added, since the support with a broken bearing knocks loudly, even on small irregularities.
How to change the front struts of a VAZ 2114, VAZ 2115
There are two options for dismantling the shock absorber strut: one allows you to avoid subsequent adjustment of the steering wheel alignment angles, the second allows you to quickly complete the work with more compact units, but after that it is necessary to adjust the steering wheel alignment angles. The difference is that in the first version we remove the strut together with the steering knuckle, without loosening the nuts of the lower and upper (adjusting) bolts securing the strut to the steering knuckle. In this case, the amount of work is greater: we additionally disconnect the brake caliper and ball joint.
We proceed according to the first option, disconnect the steering rod, remove the brake pad guide with the caliper and the brake disc, and remove the outer CV joint from the hub.
How to change rear struts on a VAZ 2114/2115
For the rear wheels, telescopic racks are used, on which there is a rod and a place for a spring behind the bowl. The lower shock absorber eye is bolted to the suspension arm bracket, and its rod is secured to the upper suspension spring support through two rubber pads (one at the bottom of the support, the other at the top) and a support washer (under the nut). The hub has a double-row angular contact ball bearing, similar to the front wheel hub bearing, but smaller.
To replace the rear struts on a VAZ 2114/2115:
- We hang the rear wheels, remove the back of the rear seat and remove the rear wheel arch trim.
- Unscrew the nut with a 17 spanner, holding the shock absorber rod with a 6 spanner.
- Remove the nut, spring and support washers, and the top cushion.
- Using two 19mm wrenches, unscrew the nut of the bolt securing the shock absorber to the beam.
- We take out the bolt and take out the shock absorber along with the spring.
- We remove the spring gasket and check for deformation and damage.
- For ease of assembly, attach the gasket to the spring with wire or electrical tape. This will make it easier to install it in the body.
- We install the shock absorber so that the rising part of the spring cup is directed towards the wheel.
- We secure the lower end of the shock absorber, but do not tighten the nut.
- We insert the end of the shock absorber rod into the hole in the body and smoothly lower the car.
- We fix the rod.
- Then tighten the bolt of the lower shock absorber mounting.
For work we will need:
- spanners sizes 17,19, 22;
- socket head sizes 13, 17, 19;
- open-end wrench 9;
- hammer;
- pliers;
- mount;
- spring tie;
- jack;
- ratchet handles and cranks;
- new oil shock absorber KYB 665059 or its analogues VAZ 21082905002, 21082905003, SACHS 100831.
The price of the shock absorber KYB 665059 was 1200 rubles. Relevance of prices in Moscow and the region for spring 2021.
We remove the rubber plug of the upper support and, using a special key that allows you to hold the rod while unscrewing the nut, loosen the connection.
Repair
To repair the lock and replace parts, you will need the following tools:
- open-end wrench for 17 and 19;
- liquid oil for lubrication;
- Screwdriver Set;
- pliers or pliers.
Repairing a lock yourself requires some skill and slowness, so you need to count on at least 2 hours. First you need to determine which mechanism in the lock has failed; most often it requires repair:
- springs (zam, hook, latch);
- replacement of traction.
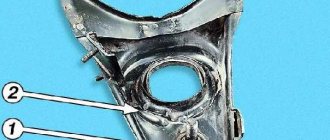
Replacing the lock spring
The lock spring is located on the car frame. Wear of the metal part, deformation and cracks cause the hood to not close tightly. Using the VAZ 2114 as an example, you can install the lock spring in several stages:
- Disconnection from the spring of the traction mechanism. A screwdriver is used.
- Removing the spring.
- Installing a new lock spring.
Replacing the latch spring
If you need to change the latch lock spring, for example, on a VAZ 2114, you will need a flat-head screwdriver and a 19mm wrench. You can change the spring in three stages:
- Kickback (loosening) of the locknut.
- Unscrewing the pin.
- When the locking mechanism is removed, the spring is replaced with a new one and a similar assembly is performed in the reverse order.
Replacing the hook spring
Unlike the previous two spring replacements, replacing the lock spring will require either pliers or fine tweezers. Repair is more painstaking and requires a certain skill. The work is carried out according to the following principle:
- Use a screwdriver to pry off the lock washer that holds the hook axis.
- The washer is removed from the grooves with tweezers (or pliers).
- The hook axis is removed.
- The spring is removed.
Replacing traction
It is necessary to change the lock drive when the locks are in working condition, and when the hood is opened using the handle from the passenger compartment, the lid does not open.
Replacement of traction is carried out according to the following principle:
- The cable is released from the hook (the hook itself does not need to be removed).
- A 13 key is used to secure the handle axis.
- The handle is removable.
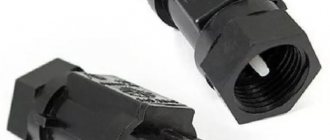
- Use pliers to straighten the bent part of the cable.
- The locking sleeve extends and the end of the cable is released.
- The loop is removed from the draft lever.
- The rod is pulled out from the motor side.
- The shell is released from the holders and the part is replaced.
We change the rear and front struts, springs and shock absorbers on a VAZ 2114
Suspensions are affected by driving style and the condition of the roads on which the car travels. It is better to skip the story about the state of affairs in the CIS countries. Racks are the most vulnerable elements of the chassis. To find out what condition these parts are in, the car should be taken to a service center. The replacement can be done independently, but the driver must know exactly what to change. There are main signs by which you can determine that the chassis elements have become unusable:
- While driving the VAZ 2114, the driver hears knocking and noise even when driving on a flat road. The shock absorbers are worn out - this diagnosis is usually made by car specialists.
- Difficulty maintaining a smooth driving pattern. In 95% of cases, the cause of such a malfunction is the spring.
- Regular suspension breakdowns. The culprit could be the rear undercarriage components or the entire rack stopping normal operation due to a malfunction.
Elements of the front suspension of the VAZ 2114 are less likely to fail, but the process of replacing springs and shock absorbers is no different from working with the rear suspension. Usually the driver feels where the breakdown has occurred. Repairs should begin only after receiving a “diagnosis” from the workshop.
Replacing springs and struts should be done in pairs on one suspension. When changing only one shock absorber, at first most of the load will fall on the old parts, and this will significantly shorten their life.
Installing new springs and shock absorbers
Replacing springs and struts for a VAZ 2114 is carried out according to the same principle, regardless of whether the rear or front suspension is being repaired. For repair you will need:
- Jack;
- Hammer;
- Heads and keys with sizes 13′ and 19′;
- Breakdown;
- Spring ties;
- Puller for ball joints;
- Ratchet handle and knob for it;
- Pliers;
- New details.
Warning: when installing new struts (shock absorbers) or springs, the owner of the VAZ 2114 must raise the rear or front part of the car. To avoid injury, you need to put chocks under the front wheels. During operation, first gear must be engaged. You shouldn’t rely only on a jack; it’s better to play it safe and add strong supports. The chassis must be in an unloaded state, so the supports should not overlap the beam.
- You need to lift the front or rear of the car with a jack, depending on which suspension will be serviced.
- The wheels must be removed.
- To get to the rack, you need to remove the steering tip. It is held in place by a bolt and a cotter pin.
- When the strut is freed from the steering tip, it is necessary to unscrew the nuts securing the strut to the lever. This is done as follows:
You can evaluate the result of shock absorber repair as follows: the car is placed on a flat surface, and the driver pumps it several times. If the car is firmly on its wheels, then the process was completed correctly. After 100-200 km, you will need to re-tighten the nuts. This is done to consolidate the new elements that have already been “adjusted”. Regular inspection and lubrication will help keep your undercarriage in good condition.
Detailed video on replacing rear struts:
- Let's figure out what wheels can be installed on a VAZ 2114
- Spacers VAZ 2114: what are they for and how to install
- Racks for VAZ 2114: selection, breakdowns and replacement
Runout of the steering wheel and gearshift knob VAZ2114
Order of Operations
Removing old shock absorbers and installing rear struts of the VAZ 2114 and other models can be done without an inspection hole or overpass - just jack up the car. But before you lift the car, you need to remove the assembly plugs located in the trunk. So:
- You need to remove the trunk shelf, bend back the upholstery and use a screwdriver to pull out the plug. The rod nuts are located under them; they need to be unscrewed and the washer and plate removed.
Now you need to jack up the car. This is necessary so that the lower rack lock is accessible. This bolt is most often tight, so it is better to pre-coat it with a special lubricant. If after this you cannot unscrew the fastener, you need to knock it out with a smaller bolt.
Now you can remove the stand, be sure to support it - it may fall. It's easier to do this if you move the end towards the rear of the car
Note! After dismantling the stand, a rubber gasket remains in the glass. It needs to be removed because the material has lost its elasticity
A new spacer must be installed, which is purchased separately from the assembly.
Now you need to remove the spacer sleeve, shock absorber cushion and bushing, remove the cover from the casing, and remove the bump stop from the rod.
You can begin installing the new unit. The rod element must be fully extended. We install the bushing, cover, its cover, and bump stop on the rack. The spacer and spring are assembled after all other parts. On a note! It is advisable to bleed the shock absorbers before assembly. This will increase their functionality and service life. The procedure is performed by turning the device over. This will allow the oil to spread evenly throughout the entire assembly.
Installation is performed in reverse order.
Then all the above operations are repeated on the other side of the machine. Difficulties may arise during assembly:
- if the unit does not want to be placed in its normal place, you can use the jack beam;
- if the old parts have lost their integrity, they need to be replaced, if they are in order, wipe them with kerosene;
- if the support bearing comes out separately during dismantling, this is normal;
- to install the spacer without any problems, you need to glue it to the spring with masking tape;
- Some experts believe that when final tightening the fasteners, you first need to remove the car from the jack.
The sequential replacement of the rear struts of the VAZ 2114 can be seen in this video:
Replacing front struts, springs and supports on a VAZ 2114-2115
The front struts on VAZ 2114-2115 cars wear out much faster than the rear ones, and this is due to the fact that the front part of the car bears a large load, since the main units are located there. If the shock absorbers are leaking, or are starting to leak heavily in potholes, then it would be best to completely replace them. Many people are used to dealing with such problems at a service station, although if you try a little, you can do it all on your own. The main thing is to have all the necessary tools and equipment at hand. Below is a detailed list of everything:
- spring ties
- ball joint or steering wheel remover
- pliers
- hammer
- keys for 13 and 19 as well as similar heads
- crank and ratchet handle
- breakdown
I recommend that you first familiarize yourself with the video, which will be presented below, and then read my photo report on the work done.
Types of shock absorbers
There are 3 types of shock absorbers:
- Oil (hydraulic).
- Gas-oil.
- Gas.
In addition, there are devices with a built-in chip and electronic control.
Types 1 and 2 of shock absorbers are double-tube (matryoshka). They contain oil and pistons with valves in the inner tube (cylinder). In the outer pipe (cylinder), which is also the body, the hydraulic devices contain ordinary atmospheric air, and the gas-oil devices contain nitrogen pumped under a pressure of 2-3 bar. Malfunctions begin when the oil in the inner pipe foams heavily due to heavy loads and splashes out into the outer cylinder. The less liquid remains in the inner cylinder, the worse the device performs. Actually, that’s why nitrogen is pumped under pressure into the external loop. The gas presses on the liquid, and it foams less, which means it does not splash out and remains where it should be.
Type 3 shock absorbers are monotubes. In one cylinder they contain oil, a free-floating piston with valves, and nitrogen pumped under a pressure of 15-25 bar. These shock absorbers are quiet and precise at high speeds. People call them gas, although, as we see, in them the bulk of the work is performed by liquid.
If you want to install new imported shock absorbers, then it is best to buy ready-made kits designed specifically for the VAZ 21099 car.
The cost of imported shock absorbers ranges from 6,000 to 12,000 rubles. According to tests carried out by the Autoreview magazine, the following kits were recognized as the highest quality:
- Koni Special - oil, Netherlands.
- Sachs Super - gas-oil on the front suspension and gas on the rear, Germany.
- Monroe Gas-Matic - gas-oil, Belgium.
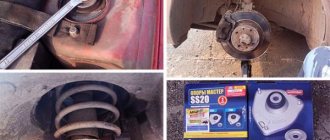
Guide to self-replacement of front suspension struts on VAZ 2114 - 2115
The first step is to put the car on the handbrake, remove the front wheel bolts and jack up the car. Then finally remove the wheel and you can begin this repair of the chassis on the VAZ 2114-2115.
First, you need to release the rack from the mount with the steering tip. Read about this in more detail in the article on Replacing tie rod ends. After we have completed this task, unscrew the two nuts securing the strut to the lever from below, as is clearly shown in the photo below:
And we try to pull out the bolts from the back side with our hands. If this cannot be done due to rusted connections, then you can use a punch or a wooden block to knock out the bolts with a hammer:
When the bolts pop out, the stand can be moved to the side, thereby disconnecting it from the lever:
Now open the hood and unscrew the three nuts securing the front support to the body glass of the VAZ 2114-2115. This is clearly shown in the picture below:
When you unscrew the last nut, hold the stand from below so that it does not fall. Then you can remove it without any problems:
So the entire front suspension module has been removed. To disassemble it, we will need spring ties and a special wrench to unscrew the central nut on top of the support. The first step is to loosen the top nut, holding the rod from turning:
Never let go completely, otherwise you might get a spring on your forehead or something else. Tighten the springs using special tools
And only then unscrew the nut completely and remove the upper support cup:
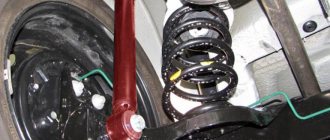
Then you can start removing the support itself:
And then the springs:
Now all that remains is to remove the rubber boot and compression buffers and you can begin replacing all the necessary parts of the front suspension: support bearings, supports, struts or springs. The entire assembly process is carried out in strictly reverse order and does not take much time. When installing the module on a car, it is possible that you will have to tinker a little so that the holes in the strut body itself and the lever line up at the bottom. But if you have a mount, you can do it yourself!
The prices of components are approximately the following (for example, I will name from the manufacturer SS20):
- The supports are sold at a price of 2,000 rubles per pair
- Front struts can be purchased for around 4500 for two pieces
- Springs can be purchased at a price of 2000 rubles
As for the remaining parts, such as compression buffers and anthers, in total you will spend about 1 thousand more rubles. Of course, the effect after installing a non-factory suspension is simply pleasing. In general, I’ll write about this in future articles.
Sequence of work when replacing shock absorbers
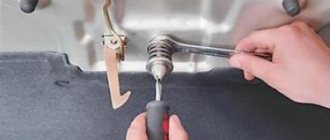
Before dismantling the rear shock absorber of the VAZ-2115, it is necessary to remove the plastic plug from the rear strut cup and unscrew the nut securing the rod. To do this, a special key is used, which simultaneously fixes the rod and unscrews the nut.
After removing the nut and washer with a rubber cushion, jack up the car and remove the rear wheel to access the lower part of the mount
Using a 19mm open end wrench we secure the nut, and with a 19mm socket we unscrew the bolt, lubricating it with the previously penetrating lubricant, unscrewing and removing the bolt from the hole, and remove the rear shock absorber from its seating location. To do this, it is better to use a flat screwdriver, carefully prying the lower part. The strut body is moved to the side, moves down and the shock absorber is removed.
We take out the remaining rubber gasket inside the glass with the same screwdriver. We disassemble the old shock absorber, removing the spring, rubber bushing, cup, casing, bump stop, and then install these parts in the reverse order on the new strut.
When installing the spring in place, the last coil should take a position in the lower cup of the rear shock absorber such that the end of the spring does not extend beyond the boundaries of the cup. And after installing the rack, it should be oriented towards the wheel. Before installing the shock absorber, it is recommended to immediately put on the upper elastic band and, so that it does not change its location, attach it to the coils of the spring using insulating tape.
Upon completion of complete assembly, the rear strut is installed in the reverse order, the upper nut and the lower bolt securing it are tightened.
There is a special offer on our website. You can get a free consultation with our corporate lawyer by simply asking your own question in the form below.
VAZ 2115: features of replacing springs
Replacement of VAZ 2115 springs, old and new springs
Replacing the springs on the VAZ 2115 is necessary in cases where their integrity is compromised, in the event of mechanical damage or cracks, or in case of significant subsidence. All car owners should know that replacing a spring on a VAZ 2115 requires a pair replacement, that is, the springs of both the front and rear suspensions are replaced as a set (pair), regardless of the condition of the second spring, the same applies to shock absorbers.
Replacing the front spring
This work is best done on an overpass or inspection hole, although it can also be done simply on a flat area without a slope:
- First we need to stop the car with the handbrake, then remove the bolts that secure the front wheel, then lift the car with a jack
- Finally removing the wheel
- To replace the spring and shock absorber of the front suspension, you need to remove and disassemble the spring strut
- After removing the wheel, turn the steering wheel in the direction opposite to the removed wheel until it stops
- Now it is convenient to remove the cotter pin
- Then, using the “19” key, unscrew the nut that secures the pin of the tip of our tie rod to the strut arm
- We take a puller and press the finger out of the lever
Use a puller to press the finger out of the lever.
- If suddenly there is no puller, then unscrew the nut not completely, then insert the mounting blade (pry bar) into the spacer between the strut arm and our steering rod, then apply sharp blows to the end of the strut lever with a hammer
- Be sure to remove the brake hose coupling from the strut holder
- To unscrew the shock absorber rod nuts, you need a special wrench that allows you to keep the rod from turning
- We go into the engine compartment and remove the plug from the upper strut support
- Then loosen the clamp on the shock absorber rod nut
- Then, from below, before unscrewing the upper bolt securing the strut to the steering knuckle, paint the installation marks on the bolt and strut bracket
Preparing for replacement
Before you begin repairs, you need to prepare the car. To do this you will need:
- Park the car on an overpass or inspection hole. Only in this case will you get maximum visibility of all suspension elements.
- Wheel chocks must be placed under the front wheels.
- Next, you need to hang the entire rear part of the car; to do this, loosen the wheel bolts.
- Lift the left and right sides alternately and remove the wheels. Install reliable supports on both sides.
This completes the preparation. Please note that the jack cannot be installed under the rear beam. Supports cannot be placed under it either. In this case, the spring on the strut will be compressed, which will lead to inconvenience during repairs.